Funny and Embarrassing Stories
Tim Carter
Founder - AsktheBuilder.com
Tim Carter
Founder - AsktheBuilder.com
DEAR TIM: I love your newsletter, but why are there ads in it for your products? You also send additional emails during a promotion to remind subscribers a promotion is about to end. I find these ads and extra emails bothersome. - Dan Rybicki
DEAR DAN: Thanks so much for writing to me. I can understand your frustration about extra emails in your Inbox, as all of us seem to be getting overloaded with messages. However, I'm hoping that you'll give me a hall pass because of the give and take of the situation. Let's look at the dynamic of my newsletter and what really happens.
Each time a newsletter goes out, you get hundreds, or possibly thousands, of dollars of tips for free. You get information about the best products for your home. You get suggestions on the best tools to buy. You get announcements about product problems and recalls. The most amazing thing of all, you pay nothing for my newsletter that contains all of this.
But look at it from my side of the fence. I have to spend a tremendous amount of money to actually send the newsletter. The service I use to host the list and send the emails does not do it for free.
My list is over 100,000 subscribers, so project what you think I spend each month to host and send the newsletter. I'll give you a clue: it could make a mortgage payment on a sizable home!
Add to that the lost opportunity cost. Instead of investing all the time testing and reviewing tools and products, writing the newsletter, etc., I could be writing columns and doing videos that make money. I'm like you; I have to support my family and pay my bills. If I didn't want to work on the newsletter, I could spend that time with my family, doing a recreational activity, reading a book or just relaxing.
With this in mind, I would think that you could tolerate promotions within newsletters for my products and reminder emails for those who want to buy them at a reduced price, but procrastinate and put off the transaction until the last moment. The money made for doing this is my reward for spending time producing the newsletter.
Add to this, I would think that you would welcome the opportunity to save money from time to time, instead of having to pay full price for my products. But perhaps I'm mistaken and you prefer to pay full retail all of the time.
You could always subscribe to an ad-free version. Would you prefer that?
You may not believe this, but I add about 150 new subscribers per day.
That means since I sent out the unusual Sunday announcement yesterday, there are now about 225 new members of the AsktheBuilder family. Welcome!
If you're one of the new subscribers, this is a very abbreviated newsletter.
Each year I have a massive sale on my Stain Solver oxygen bleach.
The sale ends in a few hours - at 8 a.m. ET April 13th, 2010. That's tomorrow morning for me.
You'll NOT see a sale of this many sizes at the same time for another year. When I say LAST CHANCE, you'll discover quickly I mean it. I don't mince words in my newsletters.
You can save up to 25 percent off the jumbo 50-pounder size. If you order the smaller sizes, the discount is less, but substantial:
But you only get the discount if you act now. I guarantee you a few will miss this sale and be upset. That's why I'm sending out this reminder. The prices go up tomorrow morning at 8:01 a.m. ET sharp. The only way they won't is if Roger, my assistant, calls in sick or the Internet is shut down.
But don't count on that happening. The last time Roger missed a work day for sickness, I believe, was back in 1982.
Tim Carter
Founder - AsktheBuilder.com
P.S. I forgot to add, if you're a new subscriber, that Stain Solver is one of the most powerful oxygen bleaches out there. It cleans anything water washable. Go watch the video at the home page of the site.
P.P.S. Oh, it's also an incredible deodorizer. When you're at the Stain Solver website, read just a few of the reviews or testimonials. They're real. Some will blow you away for sure. But here's one I got from Sarah H., who lives in Hollis, Maine. She sent it last night to me: "My son was lucky enough to get hand-me-down hockey equipment. The unlucky part was the odor. I soaked the equipment, gloves and all, in the washing machine with hot water and Stain Solver for a few hours. I was amazed at the dirt and grime that got "lifted" from the equipment. I also use Stain Solver regularly on my husband's work clothes. Wonderful product and I just ordered another 50 pounds. Thanks!"
AsktheBuilder.com
Stain Solver Sale Almost Over
Chinese Drywall Update
Regular Newsletter
I do product reviews frequently. Please read my Disclosure Policy to understand the relationship between me and the companies that make the products or offer the services I review.
If you have a question for me, don't hit the Reply button just yet. Go immediately to my web site and type in the keywords about your problem into my Search engine. The search box is at the top of every page of my web site. You could have your answer in seconds if you do this! Please pay attention to all links you see at my web site. The exact products and services you often need are right in front of you, and you might be ignoring them.
If you're a new subscriber, this is an unusual Sunday broadcast. If you've been around the block or two with me, then you know that it's Spring and that means decks, docks, patios, tile floors, etc. all have to be cleaned.
I have many columns and videos, too many to list, at the website showing you how to safely do all these tasks.
In each of these, you'll see me using oxygen bleach. Every Spring, I have an annual sale on my brand of this magical product, Stain Solver. Oxygen bleach is a green and organic cleaner that's been in my store for over ten years BEFORE this current fad of Green Products hit the market. Mine happens to be one of the most powerful made in the USA.
I did something different this year with my sale, and sure enough, it's working.
Last year, we sold more of the four-pound size than any other. But this year, because the discount increases the more you buy, the 16 and 50-pound sizes are flying off the shelves. In fact, a few days ago we set a new record for the number of 50-pound sizes shipped in one day. I can tell you the UPS truck's bumper was much closer to the ground when it left the shipping dock than when it arrived.
I announced this sale five days ago. There are only two days left before the prices go back up. If you're a long-time subscriber, you know I don't do these sales frequently. In these tough times, now's the time to react and save some real money.
The sale ends on Tuesday morning, April 13, 2010 at 8 a.m. ET sharp. If you arrive at the cart late, you'll miss the sale price. When the sale's over it's over. You can save up to 25 percent on the 50-pound size if you order before the sale ends.
Please go to the Stain Solver home page and watch the video there. You'll love the ending. It was totally unscripted.
Last issue, I talked about the Chinese Drywall problems. I tried to create a link from the newsletter to a USA Today story, but the link would not work. Boy, did I hear about that!
You were probably one who wanted to know how to identify if you have this very bad product.
Within hours of the newsletter arriving in your email box, I had Roger create a Chinese Drywall page at my website for you. Go there and see all the outbound links to things that will help you.
If you want to see if you have Chinese drywall in your home, the only way I know how is to find a factory butt edge along the 4-foot side of a sheet of the product. See if the remaining part of the label shows it to be of Chinese origin.
These labels on drywall are shown at the page of my website, but understand that only part of the label remains after the drywall is installed. This remnant label is up against the studs, so you have to do destructive work to find one.
I suggest taking off the baseboard on a long wall. Remember, sheets of drywall are usually 8, 10 and 12-feet long. Look down at the bottom of the wall for a butt seam where two piece of drywall meet on the wall. If you don't have a long wall, then there's a great chance you'll find the label edge in a corner.
Make a small cut with a hand-held drywall saw to be able to get at a small piece of drywall. The piece needs to be at least 6-inches tall. Look at the back of the drywall for the label. See if it's a Chinese product or one made by a US Company.
Good luck!
A regular newsletter will be out on Tuesday. In that one, I talk about my recent test of a Campbell Hausfeld pressure washer. You don't want to miss that review. Speaking of things NOT to miss, be sure you get your Stain Solver.
I'll also share some photos I've taken while on my trip out West. I'm sending this newsletter from the South Rim of the Grand Canyon.
AsktheBuilder.com
Latest News
Chinese Drywall
Plastic Shims
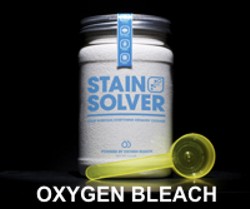
Annual Spring Stain Solver Sale
Faux Painting Kitchen Cabinets
Gutter Guards
Latest Columns
I do product reviews frequently. Please read my Disclosure Policy to understand the relationship between me and the companies that make the products or offer the services I review.
If you have a question for me, don't hit the Reply button just yet. Go immediately to my web site and type in the keywords about your problem into my Search engine. The search box is at the top of every page of my web site. You could have your answer in seconds if you do this! Please pay attention to all links you see at my web site. The exact products and services you often need are right in front of you, and you might be ignoring them.
I'll be on a plane headed West in a few hours for two weeks of R&R mixed with some high-powered business. A week from today, I'll be attending the spring conference with many of my close Internet entrepreneur friends. This next week will be spent visiting some National Parks and other scenic spots in the Southwest that I've not been to in over 40 years.
At the end of the trip, I'll be visiting one of my original subscribers. I've communicated on the phone and via email with Patricia for over 13 years, but never seen her. For years, I've promised to stop and see her. She's given me permission to do a video together, so I can't wait for that. I'll upload that video and share it once I'm back.
If you're a new subscriber, I try to always carve out time when I travel to meet you. I'm doing it again in Albuquerque, NM next week. I had planned for next Monday at a Starbucks, but that was before I looked at my itinerary.
It's impossible for me to be at that location that early in the day. I'll not yet have arrived in town. Sorry for the oversight! If you do want to get together next week in ABQ, email me and we'll figure out a time and place.
This past week, Dave, a subscriber who lives in Florida, gave me a second heads up about the severe issue with Chinese drywall. Dave first brought this to my attention many months ago, and I broke that story here in the newsletter.
The latest news is that houses with this material need to be gutted according to the most recent directive from the Consumer Products Safety Commission.
This drywall contains fly ash from Chinese power plants. The trouble is some of these plants burn high-sulfur coal and the ash has way too much sulfur in it. It then off-gases hydrogen sulfide which corrodes copper wiring, and just about any other metal found in homes like air-conditioning coils, gas piping, etc.
This drywall streamed into the USA a few years back when there was a huge demand to rebuild from back-to-back natural disasters. The Southeast part of the USA seems to be the hardest hit.
What a mess. I sincerely hope you don't have this product in your home.
Last month I was in Cincinnati, OH, getting my house ready to sell. While I was gone, a manufacturer sent me a sample packet of plastic shims to my office in New Hampshire. They're called Handi-Shim.
While pretty pricey compared to a bundle of traditional cedar shims you'd pick up a lumber yard, these can come in handy if you need to space things evenly. A traditional shim is a long wedge that gives you infinite adjusting capability. These plastic shims don't have that. They are flat and come in different thicknesses. You can make adjustments to the 1/32nd of an inch.
They're great in places where you can't afford a shim to compress or rot over time. I'm sure I'll use them in any number of places.
I've talked about this for weeks, and it's now time! Each spring, I have the biggest sale of the year on my Stain Solver. Last year you nearly crushed us with orders. Every person who was associated with AsktheBuilder and could fog a mirror was in the warehouse mixing, pouring and packing. You and us together made a sizeable contribution to the UPS Pension Fund!
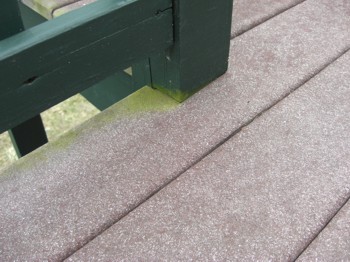
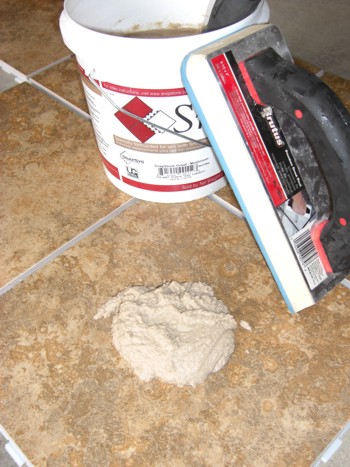
If you're about to clean a wood deck, a composite-wood deck, a dock, etc., this is the product you need. Maybe you're hosting a graduation party or a wedding event at your home and need to make that grout in your tile floors look like new. Stain Solver is the magic product to do that. In fact, a close friend of mine calls the product Uncle Tim's Magic Crystals. It cleans anything water washable.
Carpet stains, red-wine stains, chocolate stains, etc. are easily removed. A woman two weeks ago told me it saved a special embroidered shirt. Her husband had tried every other stain remover with no luck. My Stain Solver made it look like new in a few minutes. I have thousands of success stories, many are at the Stain Solver website.
This sale only lasts a week, and it only happens once a year. If you're a seasoned subscriber, you know I'm not yanking your chain. You'll regret not buying it now.
This sale is a little different than last year's. This time you get rewarded the more you buy. Here's the details:
The sale ends Tuesday, April 13, 2010 at 8 a.m. Eastern Time. I'll be sending reminders in case you don't open this email.
Dixie Glover from Cowarts, AL emailed me a day ago. She asked:
I have some light-colored cabinets that are not real wood. I want to paint them to look like they are cherry wood. Someone has told me to use a rose/mauve/pink paint with a dark plum glaze over it. Do you think this will work or do you have any suggestions?
Dixie, faux painting like this can be done. I was lucky enough a few years ago to watch a master do this. His name is Gary Lord. There are many artists and master painters that can do what Gary does. Gary has several books you may want to read to help you.
The bottom line is you absolutely can produce this effect. How hard will it be? Well, it's absolutely going to take some practice. But that's the neat thing. You can practice on a cabinet door until you get the technique down, or choose to practice on a smooth piece of plywood. Once you get the colors and graining you want, then do all the cabinets. Take before and after photos so we can all see how it comes out. Good luck!
Several weeks ago, I mentioned that I'd be talking about spring tasks. You may think cleaning gutters is something for the Fall. In my experience of testing gutter guard products over the past 12 years or so, Spring is when most of them fail.
You see, deciduous trees produce flowers each spring that in turn, create the seeds. These flower blossoms rain down on roofs and end up in gutters. It created a huge issue at my Cincinnati house, and I was not alone. Over the years, I've tested MANY gutter guards, and I've never been paid to do a test. You can read all the columns about this at my website if you just type:
gutter guard
into my search engine.
For years, I tried to discover the gutter guard that wouldn't fail in this situation. I found it about three years ago. You can watch two videos that document this test. I apologize in advance about the tie-dye shirt in the one video. I happen to like bright colors and tie-dye.
You want your interior steps to be the most unique? Look how you can paint them.
Cork Flooring Planks work well. I have had cork flooring for years.
Pedestal Sink Pluses and Minuses
Did you ever think of having drawers in EVERY kitchen cabinet? See my cabinet drawers.
AsktheBuilder.com

This asphalt driveway is eight years old and has survived punishing frost heaves with little cracking. PHOTO CREDIT: Tim Carter
DEAR TIM: I grew up with an asphalt driveway, but my husband had a concrete drive. We’re debating what type to install as our current drive is in horrible shape. My contention is the asphalt driveway cost will be less than concrete. But my husband doesn’t want to mess with asphalt driveway sealer every year or so. What would you install at your home? What are the pros and cons of a new asphalt driveway? Lisa G., Burbank, CA
DEAR LISA: Let’s start by saying I’ve had both types of driveways at homes I’ve owned as well as a third possibility that you didn’t mention. I’ve had great success with all the driveways with respect to their ability to withstand heavy trucks, wear and tear, and virtually no maintenance. Yes, I said little maintenance with an asphalt driveway.
Asphalt driveway paving is a huge business, and you’ll probably discover many different contractors in your area that specialize in this trade. Asphalt is fairly easy to install if you have the right machinery and a good crew that understands the material.
Asphalt is not too much different than concrete with respect to how it’s made. Both asphalt and concrete are made with stones and sand. But the binder that locks them together is completely different. Concrete uses Portland cement, while asphalt or blacktop uses asphalt cement. Asphalt is a very unique compound because at normal temperature ranges it can be flexible. This can be an advantage with paving.
When crude oil is low in price, the cost of an asphalt driveway is usually less than concrete. This is not always true as there are so many variables associated with each job. You simply have to get an asphalt driveway estimate along with one for concrete to make your decision, if it’s purely a cost issue.
But there are other things you should consider. Asphalt drives can contribute to staining of floors in your home if you’re not religious about taking off your shoes at the door. You can track in the oils from asphalt drives, as well as asphalt driveway sealer, if you leave your shoes on and walk around the house. My in-laws home had gorgeous white vinyl flooring in their kitchen that had yellow pathways created by the oils tracked in from the asphalt.
Sealing an asphalt driveway doesn’t have to happen as frequently as you might think. The current home I’m in has an asphalt driveway that’s eight-years old. It’s in nearly perfect condition, and has never been sealed. It’s absolutely true that sealers will help prevent water from seeping into tiny cracks in the surface, but I see none of those on my driveway.
Large asphalt roadways are not sealed, but they are sometimes coated with a rejuvenation product that helps extend the life of the asphalt cement that holds together the rocks and sand in your driveway. Ask your local asphalt contractors what they know about the rejuvenation coatings.
If you decide to go with an asphalt driveway, you need to understand where they derive their strength. Because the asphalt can actually move when it gets hot, the crushed gravel beneath the drive must be deep and well compacted. The soil under the gravel should be very strong, well drained and compacted. It’ not a bad idea to install a geo-textile fabric between the soil and the crushed gravel.
Asphalt driveway construction is a true science. I would install no less than 8 inches of crushed gravel under any asphalt drive I was installing. It should be installed 4 inches at a time and each layer well compacted. The gravel should extend at least 6 inches beyond the final edge of the finished asphalt if you want the edged of your drive to withstand heavy loads with no cracks.
If you’re considering asphalt driveway resurfacing, understand that you have several things that need to be thought out. Cracks in existing paving can telegraph through the new surface. If you want a perfectly smooth driveway for years, you may want to start over putting the new asphalt on freshly compacted gravel.
Adding one layer of asphalt on top of another can be problematic at sidewalks, garages, etc. The existing driveway may have great drainage away from these abutting surfaces, but the new driveway may create ponding issues. Be sure to discuss this possibility with your contractor. You want great drainage and no miniature ponds on your new drive.
Do NOT seal a new asphalt driveway for at least a year. You don’t need to seal it until it starts to turn gray or you see that the asphalt cement has worn off many of the small rocks.
You want a driveway that puts heads on a swivel? Go with a tar and chip driveway. It’s a hybrid asphalt driveway where liquid asphalt cement is squirted onto gravel and small colored stone chips are broadcast into the hot tar. Once it cools, you have a magnificent surface that wears like iron.
Column 827
DEAR TIM: I’m confused about which decking boards to use on my new deck. There are different wood species and types as well as the entire family of composite decking boards. What type have you had experience with and which ones are the best? Is there really a maintenance-free decking board made? What’s the safest way to clean a dirty deck? Should I use a pressure washer or elbow grease? Frank W., Bennington, VT
DEAR FRANK: If you want to get confused about deck boards, I suggest you attend one of the huge national shows I routinely attend. In one giant hall, there seems to be every flavor of deck board you could imagine. Each representative tries to cast a spell on you as you listen to their pitch about why their product is better than the rest. I’ve heard many claims over the years that don’t seem to stand the test of time.

These are composite decking boards that have been exposed to harsh sun for eight years. PHOTO CREDIT: Tim Carter
Let’s talk about the claims I distinctly remember about treated decking from 40 years ago. When the salesman told me about this material, he clearly said maintenance-free. Well, that was wrong. Granted, he may have not been trained properly, but anyone who’s ever had a treated-lumber deck knows they require periodic cleaning and sealing.
If you neglect a wood deck, small checking cracks eventually become giant fissures as the wood rips itself apart as it soaks up water and then liberates it when the sun comes out. Add to that the highly destructive effects of ultraviolet light from the sun and you can see why traditional wood is the heartache of many a homeowner. Just about everyone loves the look and feel of real wood deck boards, but I don’t know of anyone who looks forward to caring for it.
If you do start to lean towards real wood, pay attention to the different species that may be available near you. Cedar and redwood have natural rot-resistant chemicals in them. Different grades of these species sometimes are often affordable and look great. Clear boards that have no or tiny knots are almost always the most expensive.
Plastic deck boards are commonly called composite decking, so watch for that when you shop. You can get pure plastic or vinyl decking if you like. Be sure to view that on a sunny day at an outdoor exhibit where it’s been installed. The first time I saw white plastic decking, I got an intense headache because I didn’t have sunglasses with me. The glare was blinding.
Real composite deck boards are typically a mix of wood fibers and some type of plastic resin. Some of the plastic is recycled and some can be virgin resin. There are blends as well.
If you do research, you’ll quickly discover there have been recalls, failures and rot problems with some of the composite decking. That’s not to say it’s a total failure. It’s an industry that’s still finding its way in many respects. The home I just bought has a composite decking that’s eight years old, and it has a very splotchy appearance. When you look closely it appears that the blend of wood fibers and plastic is not consistent through the product.
I’ve installed countless different decking boards and have to say at this point that real wood is still my favorite. Redwood, a species that is grown like corn or wheat, is a drop-dead gorgeous wood decking.
All decks have to be cleaned periodically. Airborne dirt, algae, mold and mildew can collect on these massive horizontal surfaces. I’ve seen many decks ruined by pressure washers that blasted away much of the lighter-colored spring wood that’s found between the darker bands of summer wood grain. You may be able to use one of these powerful machines without damaging the wood, but pay very close attention as you work. Do the same if you hire a professional.
I prefer to use elbow grease and oxygen bleach. Do not use chlorine bleach and water as is recommended by many others. Chlorine is toxic to all vegetation around the deck, it takes the natural color out of the wood, and it can accelerate the corrosion of any nails, screws, and framing connectors used to construct the deck. Oxygen bleach will not cause any of these problems.
Oxygen bleach can be safely used on all decking boards except redwood. In certain instances, it can make redwood darker. All composite decks and vinyl decking can be cleaned safely with any oxygen bleach.
Some homeowners confuse decking defects with deep mold or mildew in their decks. Recently a homeowner sent me photos of his deck that he had just cleaned with oxygen bleach. He felt the product was inferior as the deck was not an even color when dry. The photos clearly showed that the decking suffered from the same defect as mine - there were uneven splotches of dark plastic resin and then areas of wood fibers. I pointed this out and the homeowner said I was the first expert to have noticed this.
Column 826
DEAR TIM: A bucket of premixed urethane grout got my attention at a tile store. The salesman was chanting all the benefits of this new product, but I’m a little skeptical. What’s the difference between urethane tile grout and traditional tile grout? Is this grout in a bucket just a fad? Do you think it’s as durable as traditional cement-based grout? Would you use it in your own home? Saundra P., Lexington, KY
DEAR SAUNDRA: A little over a month ago, I discovered this fascinating new urethane grout. I’m getting ready to test it on a small project so I don’t have any real testing data to give you. However, I can tell you that based upon my research so far, it appears to be a top-line product that I’ll use in my new home project that’s starting soon.

Yes, the urethane grout is premixed and comes in a bucket ready to go! PHOTO CREDIT: Tim Carter
I can understand being a skeptic with respect to home-improvement products. Failures can be expensive and time consuming as most things we install in our homes are meant to last. The last thing you want to be doing is chiseling out defective experimental grout from a tile floor.
The good news is that there have been hundreds, if not thousands, of innovative products over time that have quickly proven they have the mettle to withstand Mother Nature and the abuse we humans generate. I feel this urethane grout will be another one to add to the list.
Let’s talk about the differences between the urethane grout and cement-based grout. Because urethane grout is only available in a sanded version, we’ll limit the comparison to those two products.
Both products have a fine aggregate, usually fine silica (quartz) sand, as the foundation of the product. This sand is what really produces the strength and durability of grout. Silica has a hardness of seven on the Mohs scale, and not too many naturally occurring things are harder than quartz. When sanded grout is dry and you rub your finger across it, you can readily feel this sand.
Urethane grout is premixed. You open a bucket, stir it to fold in any of the urethane polymer that’s separated during shipment and immediately get to work. Cement grout is a powder you mix with water. If you add too much water, you can significantly reduce the final strength of the grout. Unequal amounts of water in different batches can lead to mottled coloration of the dried grout. Cement-based grouts are dusty when you pour and mix them.
The urethane grouts use polyurethane resins and polymers as the binder to hold together the sand particles. Traditional grout uses Portland Cement. Urethane is very sticky and bonds exceedingly well to just about anything.
The pigments in the urethane grout are a special coating that’s permanently bonded to each of the fine sand particles. The finished colors of the grout are solid, colors that are ultraviolet stable. They will not yellow nor fade when exposed to harsh sunlight that might stream through a patio door. Pigments in traditional grouts are powder additives that colorize the cement which then coats the silica sand. It can wear off over time. You’ll see this on older grout floors as the sand particles look white or a light color.
Because urethane grouts air dry, you have to wipe off any excess grout film quickly from the tile surface. It’s best to just work a small area of probably 10 square feet at a time. Always squeeze all the water from a sponge as you gently wipe and film from the surface of the tile. Excess water can weaken urethane grout.
The drying or curing time for these urethane grouts is about the same as cement-based grouts, however in very humid locations the curing time will be longer. They’ll not achieve a great hardness until the water in the emulsion has a chance to evaporate. Simply follow the instructions on the product label and you should be fine.
You’ll discover that the urethane grouts are more expensive than the cement-based products. However, factor in that the urethane grouts are more flexible than traditional grout. If there is slight future movement, a cement-based grout will usually develop a hair-line crack. The urethane grout may be able to withstand that stress without cracking.
If you’re a rookie and don’t know how to mix grout, the urethane grout takes away all that worry. You simply open up the bucket, mix and spread. If you have any leftover, you can save it if you follow the directions on the label. Once traditional cement-based grout is mixed with water, it will harden. You can save leftover dry cement-based grout, but you must tightly seal it so that humid air will not react with the cement powder.
Column 825
Latest News
Selling My Home
Home Inspectors
Pearl from Trinidad
Albuquerque Meetup
Stain Solver Sale Postponed
Construction Details
Tim’s Tools
I do product reviews frequently. Please read my Disclosure Policy to understand the relationship between me and the companies that make the products or offer the services I review.
If you have a question for me, don't hit the Reply button just yet. Go immediately to my web site and type in the keywords about your problem into my Search engine. The search box is at the top of every page of my web site. You could have your answer in seconds if you do this! Please pay attention to all links you see at my web site. The exact products and services you often need are right in front of you, and you might be ignoring them.
Since the last newsletter, I've been busy. We did the final push here at my Cincinnati house getting it ready for the first Open House, which was this past Sunday. My good friend Roger worked here for three days helping pack up my office and do any number of other tasks. Without his help, I was doomed. Kathy and I are both beat as you might expect. I know Roger was tired too!
If you've been a subscriber for the past year, you know I've been getting the house ready for sale as I've been in New Hampshire while Kathy was here in Cincinnati with Kelly. Both come to NH in August. Be sure to look at the photos and videos.
The Cincinnati Enquirer did a feature article on the house two weeks ago. The reporter, Amy Howell, did a magnificent job capturing the back story.
Here's the bottom line: You can buy the house. As you can imagine, it's truly one-of-a-kind. Or, if you know someone who wants it and they buy it, I'll pay you a finder's fee. All they have to do is identify you as a subscriber to my newsletter. I'll pay you a one percent finders fee. Do the math. That's a big number. The house is in excellent condition, as you might expect, and shows really well. Be sure to look at all the pages at the website.
While on the subject of my house, I'm confident the buyer will order a house inspection. No worries, as there are no major defects in my home.
But what if the wrong inspector shows up? Overnight I got a very troubling email from a home inspector named George that lives / works in New York. I'd prefer not to tell you his last name or the city for the obvious reasons. Here's what he sent to me:
"Mine is not a question but a comment. The present day fiber cement siding was started to be made in the mid 60 when asbestos fell apart. You are misleading people when you tell them it has been around for 90 years. The product we see today is a blend of cement, cellulose, and silicate. It does and will wick water if not sealed at cuts. It will fall apart and turn into mush if exposed to prolonged or constant moisture contact I worry as a Home Inspector when I see information like this. Please rethink these statements. I teach home inspectors, one of my classes is on Fiber Cement siding products."
So what's the error here? He went to my website where I have at least four or five columns about fiber-cement siding. The first few were written about ten years ago and document the history of the product. Here's the first column I wrote about fiber-cement siding.
You'll note in the column I clearly state that the original fiber cement used asbestos. Then at a later time, asbestos was removed and wood fibers substituted in its place.
Within the past two years, I wrote the latest column on fiber-cement siding talking about how it's having problems. This is what the inspector talked about in his email to me.
So what's the problem? In my opinion, this inspector - and he says he teaches other inspectors - isn't very thorough or he misinterprets things he sees. I never said in my columns that the original siding had wood fibers. I clearly state in the other one there are moisture issues.
What if your inspector makes mistakes like this while looking at a home you're buying? George gave me his phone number and said I can call. You bet I will today.
The first thing I'll be asking him is if he carries any certification. I'll wager you one pint of mocha chip ice cream from Aglamesis that George is *not* ASHI certified. If you want to take this bet, then email me immediately.
I just got an email from Pearl Bhagan who lives in Trinidad, West Indies. Here's what she wrote:
"We have made a tub enclosure from cement board. Other than using tiles over the cement board, what can I use that would look spectacular? Thank you so much."
Pearl sent a photo of a dramatic layered platform with steps leading up to the tub. She's mixing two different tiles and granite. So there's lots going on.
I suggested that she might consider accent tile in the field tile above the tub area. There are colored tile you can use for this as well as textured tile with unique patterns. You can also create your own design like my daughter did for her tub/shower area. Go to my past column about Granite Tile.
Last week, I announced I'll be in sunny Albuquerque, NM, April 16-20th. You and I can get together! I'll be in town for a secret Internet conference. My initial invitation may not have been enticing because I talked about golfing or lounging around the pool with you at the resort. That offer is still open. However, maybe you don't golf or soak, and instead you want to drink some bean juice. I'm doing that too!
Two of my very close Internet buddies will also be in town for the event. Randy Cassingham of This is True and Leo Notenboom of Ask Leo.
http://ask-leo.com/
Both of these wise men have newsletters similar to mine and are inviting their subscribers. We're all going to meet at Starbucks on Monday April 16th, between 5 and 6 p.m. Be at the Starbucks at 901 Rio Grande Blvd, Suite A-190 about 1/2 a mile north of old town. I'll be tweeting the event. See my Twitter address above.
Because it's Easter week, I'll not do the Stain Solver sale. Look for that huge announcement next Tuesday.
I get requests every week from visitors to the website about how things should be built or connected when you are doing building or remodeling. For example, you may want to know how a deck post should be anchored to a concrete pier. You may want to know the best pier design. A pier is a vertical column that transfers the weight of a structure to solid rock or good bearing soil.
You may want to know how to frame a wall. What does a door header look like? How many studs do you have under a header at a door or window? Maybe you want to know how to pour a footer or build a block wall and need a simple drawing of its cross section. Does this make sense?
Anyway, I've decided to build a collection of these construction details and sell them for next to nothing to help you build things the right way.
Here's where I need your help. What do you want to see? What are you having trouble visualizing? Email me back and *please* change the Subject Line to: Construction Details. I'll get started on this project immediately.
I want to announce another new feature at AsktheBuilder.com. Frequently, I get emails from people asking me what tools do I use and what products can be found in my home. It makes sense. If they work for me and I feel they are great quality, you'll feel comfortable about buying the same thing.
Here's a new page we just built and it will grow for sure. All the things you'll see here I own and use on a regular basis. I'll never put anything on this page that I haven't tested and like. So you can purchase them with confidence.
The links are affiliate links to Amazon.com. This means if you buy the item via that link, I do make a small commission. It's only fair that you know that. These are tools I'd have my Mom use if she was still here.
AsktheBuilder.com
DEAR TIM: Window coverings are part of building or remodeling, so I felt you’d know a little bit about them. Is it hard to install blinds and window coverings? What things do you have to think about when you’re working with them? I just saw an ad for solar window coverings that says I’ll save all kinds of money. Is that true? Should I even consider discount window coverings, or will they fall apart? I don’t want to waste money. Krista B., Sammamish, WA
DEAR KRISTA: I know enough about drapes, curtains, valances and window coverings to be highly dangerous. All you have to do is ask my wife. Just this past weekend she walked away from me in complete frustration after I hung a window covering at the wrong height. I made a bonehead mistake that had me using my pry bar to take out the carefully placed brackets so they could be lowered to the correct height.

These simple window coverings were made by my wife in an afternoon. PHOTO CREDIT: Tim Carter
Installing window coverings can be somewhat problematic. There are all sorts of things you have to take into consideration when working with the hardware and the surfaces in and around the windows. Years ago, I remember my Dad swearing at the plaster walls as he blasted craters next to the casement windows while trying to install simple rolling blinds. The tiny nails and screws shattered the plaster and didn’t hold well at all.
There are other things that can go wrong, some of which you might not discover until you’ve already spent hundreds or thousands of dollars. For example, you may love a heavy curtain rod that mounts on the wall beyond the outer edges of woodwork trim. Imagine what happens in a bay window situation where the window trim is somewhat close to the intersecting corners of the angled walls? Yes, the curtain rods can interfere with one another.
You may have an installation emergency working with wide windows. The metal rods can easily droop once the window covering fabric is attached. You’ll need to ensure there is a way to support the hardware so the coverings are straight and not sagging. Not only will you need a small hook, bracket or other piece of hardware, but you’ll also need a place to insert it that won’t interfere with the operation of the window. As you can see, there’s lots to think about.
I had to deal with this sagging issue recently. It can really be an issue with windows that are found in thicker exterior walls like mine. My one home has walls framed with 2x6s instead of the more common 2x4s. This means the windows are two inches farther away from the inside surface of the wall.
In my case, the window coverings and valances were hung in the same plane as the interior wall. These were suspended by a thin round tube that could only span 26 inches without drooping. My window was nearly 5-feet wide so I had to install a vertical wood trim piece that projected from the center of the two windows back towards the room about one and one-half inches. This piece of wood was the perfect solution allowing me to screw in a simple L-hook that held up the small round drape rod.
We may have seen the same marketing push for the solar window coverings. These products are very intriguing, as I like everything solar. The ones I saw contain a fluid that heats up and stores this heat only to release it later after the sun goes down. You only install these coverings on south-facing windows.
My mantra with products like this always focuses on the real payback savings. Remember, you never ever save money on any home-improvement energy-related purchase until such time as you get back the money you spent, plus interest, in fuel savings. Simply put, if you spend $1,000 on these window shades, you don’t save a penny until you actually experience fuel savings in excess of $1,000. Then, after that time, you do start to save. Be aware that some payback periods can easily exceed ten or more years. These payback periods can be reduced by rebates, tax credits and other incentives.
Be very careful with discount products. They may be made with inferior materials that quickly degrade once exposed to harsh ultraviolet light from the sun. Any hardware that comes with these products may also be of marginal quality.
Measuring for window coverings can also be a challenge. Mistakes can be expensive, especially for window treatments that fit within an opening. Window coverings that extend sideways and below a window can be much more forgiving.
If you’re building a new home or doing an extensive remodel job, consider installing solid-wood blocking in places where you’ll be installing hardware. This requires the preselection of your window coverings early in the job so that you can tell the carpenters where to place the wood blocks. You’ll never regret installing these simple scraps of lumber.
Column 824
Subscribe to the FREE Ask the Builder newsletter to receive professional advice for your home. Complete the form below and each week you'll get:
Unsubscribe at any time. We respect your email privacy.