DEAR TIM: Pavers are top on my mind. I'm planning a paver patio and want to be ready to go when the weather is favorable. Because of the harsh economy, I can't afford to hire a contractor. Will brick pavers make a durable patio, or should I lean towards concrete pavers? What's the difference? Patio pavers look great because of the seams and texture, are they difficult to install? Shelly V., Lebanon, NH
DEAR SHELLY: My wife and I have had a paver patio at the last two homes we have owned, and I have one at the home I just purchased in New Hampshire. Our brick-paver patio in our old home has been in place for over 20 years and it looks as good as the day I installed it. Mother Nature has coated it with thick ice, the sun bakes it in the summer and the brick and mortar are wearing like iron.
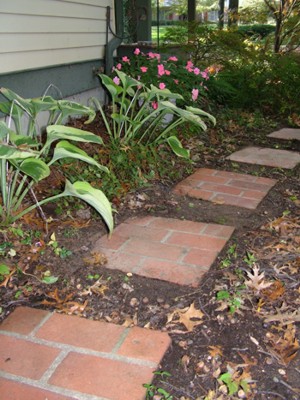
If you want to work with pavers, pick a small project like brick paver stepping stones. PHOTO CREDIT: Tim Carter
A concrete paver is not too much different than a brick paver. The common concrete pavers that have been used to construct walkways, steps and patios are made from smaller stones, coarse sand, Portland cement and colored pigments. The colored pigments are what create the earth tones you see in these products. However, the color eventually dulls over a period of a few years. Over time, the colored cement paste wears off the top surface of the concrete pavers, and they usually develop a faded look when you start to see the actual color of the small stones and coarse sand.
You don't have this color issue when you use brick pavers. The clay that's mined and formed to make the pavers is the same color all the way through. So as the brick wear, the color always remains uniform. You just have to be very careful to purchase the correct pavers as some are not rated or certified to be used in a horizontal manner in climates like yours where you get frigid weather. Purchase the pavers from a real brick yard, and make sure they carry the severe-weathering rating.
The pavers that resist ice and snow for decades are fired longer in the kilns and sometimes at a hotter temperature. This heating process actually transforms the soft clay into an artificial stone. If you fire brick long enough, you can make them so hard and strong they'll resist heavy truck and car traffic when used in roadways. Visit downtown Athens, Ohio and you can see brick streets that have been in use and exposed to the weather for over 100 years.
When you go to install the pavers, you need to make a choice. You can set them in sand, a sand and Portland cement mix or you can mortar them directly to a concrete slab. My paver walkways and patios are all mortared to steel-reinforced concrete slabs. This is by far the hardest and most labor-intensive method, but I did so for a reason.
My first experience with pavers was a patio I built for my future mother-in-law. She had some instructions where you set the uniform pavers in a checkerboard pattern on top of compacted damp sand that was blended with Portland cement. The sand bed was 4-inches thick and it was easy to get it level after compacting it. I did that by dragging a straight 2x4 across the sand/cement mixture. The brick were set directly on the sand and then fine sand was swept into the cracks between the brick.
Those patio pavers have been down for 37 years, and they look fantastic. Over time, a few high and low spots have developed, but they add character to the patio.
A few years after this job, I tried to set thin pavers just on sand. It was a disaster. The brick drifted around on the sand, ants brought the sand to the surface, weeds grew in between the brick and we constantly tracked sand into the house.
To get pavers to stay put, have no humps and look good, I decided to mortar them to a concrete slab. As you can imagine, this requires more excavation depth, expensive concrete, lots of help to place the concrete and then countless hours of mixing mortar and carefully laying the brick pavers so they are in the same plane and shed water. If you have the desire and the time, it makes for a stunning look. I strongly advise you to experiment perhaps with a garden-pavers project so you can see how much work is involved.
Paver installation is going to be hard work no matter which method you choose. I can tell you how to install pavers, but the truth is you just need to start and see how much work you can accomplish in a weekend. Excavating earth is going to be your first hard task, and mechanical tools may be your best bet. You can rent miniature excavators or backhoes that allow you to scrape the earth, and they have a front bucket that you use to transport the dirt to a truck or low spot in your yard.
Paver patios are a popular project because they are do-it-yourself friendly and look positively stunning when the job is done. Your challenges are many, but they all can be overcome if you're determined to get this job done. The best way to get a taste of laying pavers is to just do a small area in another part of your yard. Get a feel for how much work and skill it requires to get the results you'll be proud of.
Column 763