Suggested Thermostat Settings

Suggested Thermostat Settings

When you purchase a programmable thermostat, it will come with instructions and possibly a booklet of suggested settings for the four different periods of time. Most of the thermostats come from the factory with pre-programmed settings. Beware, these may not suit your needs! If you have a strange schedule or jump out of bed and rush out the door, you can save money and be more comfortable if you take the time to customize the settings. What's more, the factory settings assume you work Monday through Friday and have the weekends off. It seems today that is the exception rather than the rule. So many of us have weird schedules. The point is, take the time and set up your thermostat. Be sure to see if your new thermostat is equipped with the Adaptive Intelligent Recovery feature. If it has this money saving intelligence, use it!


Stop - Check this out!  Want to save money on your winter heating bills, click here to watch my Heating Costs Video.

Or click here to read about another way to spend less on your heating bill. Save on Heating Bills

The first table contains suggested settings for the days you leave the house and go to work. The second table has settings for your off days you run errands and are home for most of the day. The temperatures I picked work for me. You may want them to be much hotter or cooler.

Workday Settings

Period Start Time Heat Setting Cool Setting Fan Mode
Wake 5:45 am 67F /  19C 78F / 25C Auto
Leave 7:30 am 61F / 16C 84F / 29C Auto
Return 5:30 pm 67F / 19C 78F / 25C Auto
Sleep 9:30 pm 61F / 16C 81F / 27C Auto

Offday Settings

Period Start Time Heat Setting Cool Setting Fan Mode
Wake 7:30 am 67F / 19C 78F / 25C Auto
Leave 9:00 am 61F / 16C 84F / 29C Auto
Return 1:30 pm 67F / 19C 78F / 25C Auto
Sleep 10:30 pm 61F / 16C 81F / 27C Auto

Column B367

Wine Storage Solutions

Wine Storage Solutions

Here are some examples of some wine storage kits and systems. I guarantee you that you will find one that will work for you. The images were taken directly from the Wine Cellar Innovations literature. Contact them to get color copies and see their full line of accessories.

Wine Cellar Innovations
800-229-9813

winecellarinnovations.com


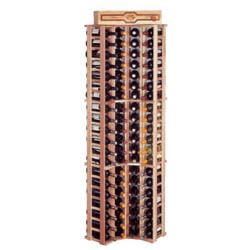
Curved Corners form a smooth 90 degree transition between walls. Made of individual bottle racks 4 columns wide x 21 rows high, this rack holds 84 bottles.


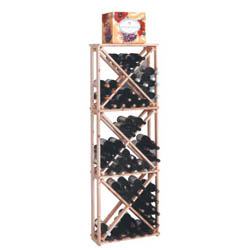
Diamond Cubes are 1 column wide x 3 cubes high. Each cube has 4 quadrants holding 10 bottles for a total of 40 bottles. With a case stored on top, this rack holds 132 bottles.


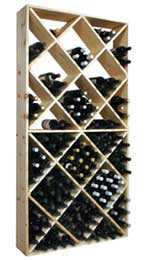
The Solid Bin Rack is constructed of sturdy 1x10 pine and holds up to 208 bottles.


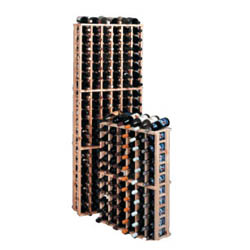
Individual Bottle Racks are available in 2 different heights. The 21 row rack is 72" high and the 11 row rack is 36-3/16" high. Each rack is 6 columns wide and holds 126 or 66 bottles respectively.


Our Custom Moldings provide a built-in cabinetry appearance to our racking that distinguishes them from the rest.

Toe Kick base wine shelving is also available.

Related Column: A Custom Wine Cellar

Column B356

Wine Storage System Manufacturers

Wine Storage Systems

Who would have ever thought that the largest wine storage system manufacturer would be in my backyard? Well, it is true. I was very lucky and met the owner of the company at the International Builders Show in January of 2001 in Atlanta, GA. He invited me on a plant tour and I was amazed at the size of his operation and the attention to detail. They are very innovative and the quality control is of the highest. This company happens to be:

Wine Cellar Innovation
4575 Eastern Ave.
Cincinnati, OH 45226
800-229-9813
winecellarinnovations.com

The variety of storage systems and accessories blew me away. They have storage systems for the beginner that just hold 10 to 12 bottles to systems that will hold thousands of bottles of wine. The cool thing is their ability to custom design a system for you. Wait till you see the accessories they offer, like custom murals, custom ceramic tile, lighting, wood cravings, inlay flooring, etc. If wine is your hobby, you will begin a very fruitful relationship with this company to be sure!

The other players in the wine storage are:

  • Apex Saunas & Wine Cellars
    Bellevue, WA
    800-462-2714
    www.apexwinecellars.com

  • Baltic Leisure
    Oxford, PA
    800-441-7147
    www.balticsaunas.net
  • Fine Wine Rack & Cellar Co.
    San Francisco, CA
    415-626-9463
  • The Wine Rack Co.
    High Falls, NY
    888-687-2517
    www.wineracks.com
  • Vigilant Inc.
    Candia, NH
    888-812-4427
    http://company.vigilantinc.com

Column B356

Wine Storage Systems

Wine Storage Systems
Tips on Wine Storage & Vapor Barriers

Wine consumption is growing. As the baby boomers age like a fine wine, they are recognizing that this time honored beverage deserves some serious attention. Consumed in moderation, it has proven health benefits and it can make one feel good at the same time. As for me, if I haven't eaten for 4 or 5 hours and have a glass or two of wine, I start to get very happy!

The Next Step

If you start to really get into wine tasting and collecting, then you need to treat the wines with the respect they deserve. Wine can spoil and degrade in quality if it is not pampered. The rules for wine storage are fairly simple: 55 - 58 degrees F and 55 -75% relative humidity, and darkness.

I think you can see why the old wine storage rooms were in the basements of castles or large European homes. These spaces create ideal wine storage conditions.

The trouble is, modern homes are built so that most basements are not cool and damp. You need to build an artificial room that simulates this atmosphere. This task is not hard if you are a serious do-it-yourselfer. If your skill level is beneath this, then you might want to have your wine storage room built professionally.

Humidity

Older wine and even many new ones use traditional cork stoppers. It is important for the cork to stay swollen to lock in the flavor and other fine qualities of the wine. Low humidity levels can shrink corks ever so slightly and cause a degradation of the wine. You can solve this problem by elevating the humidity within the wine storage room. This is accomplished any number of ways, but to do it right, you need humidification equipment that is sized properly and has excellent controls to maintain a constant level of humidity. Wine Cellar Innovations sells such equipment.

Vapor Barriers

The humidity created within the wine storage room wants to migrate to other parts of your house. Moisture levels this high can cause all sorts of problems and condensation if you are not careful.

You can stop the movement of this water vapor by installing a high performance vapor barrier on the warm side of the wine storage room. This means that the vapor barrier goes on the outside of the wall construction.

You can purchase these great vapor barriers at businesses that sell supplies to commercial concrete contractors. You will rarely find them at home centers or regular hardware stores. Two products that work well are:

Super Sampson
800-635-3456

Tu-Tuf
800-435-2621

Call these numbers to find a distributor near you.

Redwood

Consider using redwood for your wine storage system. Leave the redwood unfinished. Chemicals in urethane, stain and paint can travel through corks and ruin the flavor of wine!

Redwood will withstand the humid conditions within the wine storage room. It has natural wood preservatives within it.

Accessories

If you want a grand wine storage room, you can have it. Murals, custom tile, custom cabinetry, tables, wood carvings, etc. are all available. You can easily personalize your wine storage room and make it something you can really be proud of. Remember, drink in moderation!

Column B356

Copper Tubing Flaring Tool Video

Most people are familiar with hard copper tubing. You know the type that has to be soldered at the joints. But, there is another type of copper tubing that does not require soldering. Soft copper tubing is available in a variety of sizes. It can be bent without kinking. In addition, it uses compression fittings or flare fittings to create leakproof connections.

A special copper pipe flaring tool is required. This tool consists of two components. One piece is a clamp with holes for the various diameter tubing. Clamp this on the end of the copper pipe. The other piece has a conical point, holding arms and a screw.

But, wait! Before flaring the end of the tubing, be sure you slide the compression nut onto the tubing first. If not, you will not get it on the tubing. Once the nut is on the pipe, attach the second part on to the clamped piece with the conical point in the tubing. Tighten the screw to create the flared end on the copper tube.

Done this way, the connection will not leak. Working with soft copper tubing is very simple.

Framing Square Video

A simple tool like a framing square can help with laying out cuts for building a swing set or play house. The framing square is good for making sure things are cut square. But it can do much more. If you have to make a plumb cut or a seat cut, the framing square will assist you.

There are a lot of numbers on a framing square. The numbers that go from 1 to 16 on the smaller arm relate to the pitch or slope of the roof. As the roof gets steeper, the numbers get higher. To get from the framing square to the piece of wood your are cutting, work with the numbers on just one side of the square. Either the outside numbers or the inside numbers. Don't confuse them.

For example, if you want a 7/12 pitch roof, hold the 7 on the outside edge of the framing square on the piece of lumber. On the other leg of the square, align the 12 with the other side of the lumber. Mark the lumber and make your cuts. It is that simple to get the proper cuts for your roof.

Underground Wire Tunnel Video

If your project calls for running a small cable or wire under an existing patio, sidewalk or driveway, there is an easy way to do it, without laying on your stomach with a shovel. Use a piece of PVC pipe with a chisel cut. This will serve as your drill bit.

First, create a small trench perpendicular to the sidewalk to create some working room for the pipe. Once the trench has been cut, use a sledge hammer to drive the PVC pipe a few inches into the ground. Twist the pipe to break off the dirt and remove the pipe. The end will have dirt in it from under the sidewalk. Take another small diameter pipe or rod and drive the dirt out of the chiseled pipe. Continue driving it in a very inches at a time until you have reached the other side.

You now have your tunnel to run the cable or wire under the sidewalk. If you leave the PVC pipe under the sidewalk, it will serve as a nice conduit if you need to run another wire at a later date.

Tim received an email from a reader about a water line under a foundation. Read about the solution in the September 6, 2011 AsktheBuilder Newsletter.

Crown Molding Cutting Tips

Crown Molding - Traditional Cutting Methods

Cutting crown molding has driven many a person nuts! Years ago, I was one of them. In fact, I just received a wonderful note from Milton Grant in Clinton Township, Michigan. Milton wrote, "...I have tried your system of cutting the moldings in a miter box while it is sitting as it hangs on a wall. I have also used a Delta Sidekick compound saw. Results - My greatest product is sawdust, for which I have no market."

Well Milton, your days of producing vast quantities of useless sawdust are over! Once you have finished reading this article, it is my hope that you will completely understand the process!

Test Pieces

I think one quick way to success is to cut some small test pieces of crown molding so that you can see how the joints actually work. With these test pieces in hand, you can use them to check the corners you are about to work in. The test pieces tell you whether or not the corner is square. If a corner is out of square - and most are - you can see how much you need to adjust your saw cut to make the joints perfect or nearly so.

Get Some Junk Trim

Go to a lumber yard and buy the least expensive crown molding you can find. You are going to use this to experiment with.

I would get possibly two 8 or 10 foot long pieces. I would cut 16 inch long pieces until you get very good at the process. This tutorial material will really come in handy as you teach yourself how to adjust the saw angle to compensate for corners that are not 90 degrees.

Odd Angles

Okay, so you mastered cutting inside and outside corners that are 90 degrees or nearly so. Now you ask, "Tim, I have a 45 degree and a 30 degree bay window area in a room. How do I make the angles work there?" No problem! If you know the intersection angle of the walls, then you simply divide that by 2 to get the saw cut angle.

Let me prove it to you. Your 45 degree angled bay is actually just part of an octagon, or eight sided object. To install crown molding at any of these 45 degree corners you just set the miter box saw at 22.5 degrees. The cut on the molding will look similar to your other cuts, it will just not be as long. Go ahead, cut two test pieces as I have shown on the other pages of this bulletin. They will look a little odd, but I bet you they will meet very closely or perfectly up in that bay corner.


Would you like step-by-step photos and instructions that show you how I install crown molding anywhere in a home? If so, you might want my Instant Download Crown Molding eBook.

But, if you want to actually see me install crown molding in all the same places while watching an action-packed interactive DVD that was filmed in High Definition, then you may want my Crown Molding DVD.


Positioning is Critical

When you hold the crown molding upside down in the miter box saw, you must position it very carefully. If you do not hold each piece you cut the same way in the saw, the angled face will get longer and shorter and this will make for an imperfect joint. Use your scrap inexpensive crown molding trim and test this. Twist a piece ever so slightly and see what happens. You may have only rotated the trim one sixteenth of an inch in the saw but the angled cut grows by an eighth of an inch or more!


Click here to watch a video on cutting crown molding the easy way.


The Hidden Triangle

Cutting crown is bad enough, but nailing it can be even worse. If your nerves are on edge from cutting frustration you will TILT when you go to nail it if you have not installed the simple triangular piece of rough lumber in the void space behind the trim. If you are using the standard 3 and 1/4 or 3 and 5/8 crown, a 2 x 2 cut diagonally on a table saw yields two perfect pieces. I like to leave a 1/8 inch gap between the back of the molding and the block for adjustment purposes.


Remember, my Crown Molding eBook has complete step-by-step instructions with tons of color photographs that show you exactly how to cut crown molding. 100% Satisfaction Guarantee!

Column B354

Crown Molding Installation On A Sloped Ceiling

"Steeper sloped ceilings are problematic because the horizontal pieces of crown molding may not fit well against the wall or the sloped ceiling."

Crown Molding Sloped Ceiling - It's Not Easy

You may need to install crown molding on a slanted, sloped, or vaulted ceiling. I want to tell you right not it's not easy.

The slope of the ceiling can create all sorts of challenges for you.

Related Links

Cutting Crown Molding - Standard Basic Cuts

Crown Molding DVD - Tim Carter Shows You How!

Are There Different Methods?

Yes, you have multiple methods to chose from. The slope of your ceiling will determine which method works best for you.

Steeper sloped ceilings are problematic because the horizontal pieces of crown molding may not fit well against the wall or the sloped ceiling.

Free & Fast Bids

CLICK HERE to get FREE & FAST BIDS from local trim carpenters who can install your crown molding.

Is the Triangular Transition Piece Necessary?

No, it's not necessary to cut and use the complicated triangular piece. Standard 45-degree cuts can be used on a sloped ceiling.

It's best to cut a standard inside corner template as you see in the video above. Use that to determine the exact low point of where the two pieces of crown will touch in the corner on the wall.

How Do You Cut the Triangular Transition Piece of Crown?

Watch the video below to get your head around how to cut the triangular piece of crown molding. You may like the look and choose to do the job this way.

The best way to do it is to make a small transition piece of crown molding that acts like the crown is being installed on a flat ceiling on one side of the piece, but on the other edge, it is making a transition as if the crown molding is climbing a stairway making the bend that happens as you transition from the sloped ceiling along the stairs to the flat ceiling below or at a flat landing.

What About Adding Flat Stock to the Slope?

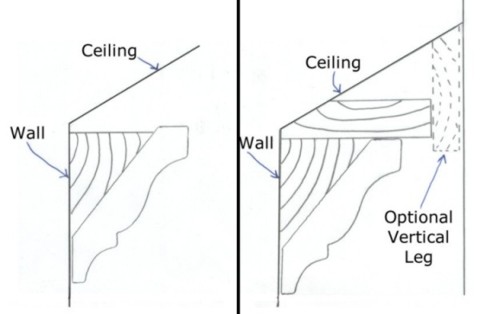
Yet another option - and it is much harder - is to make a flat area that simulates a traditional flat ceiling. This flat surface is created using regular lumber. The regular lumber can just extend out and above the crown molding or it can do that and actually return vertically to intersect the vaulted ceiling.

Either way, you better have some moderate to expert carpentry skills. These illustrations should help you visualize what you need to do to accomplish the task.

crown molding vaulted ceiling

CLICK HERE to get FREE & FAST BIDS from local trim carpenters who can install your crown molding.


Would you like step-by-step photos and instructions that show you how I install crown molding anywhere in a home?  If so, you might want my Instant Download Crown Molding eBook.

But, if you want to actually see me install crown molding in all the same places while watching an action-packed interactive DVD that was filmed in High Definition, then you may want my Crown Molding DVD.


Click here to watch a video on cutting crown molding the easy way.

This popular column was mentioned in the December 8, 2010 Newsletter.

Column B354

Dream Home Tips

Building the Perfect Home

I believe the old saying goes, "Every now and then even a blind pig finds an acorn." Well, this particular Builder Bulletin appears to be one of those rare acorns or as I call them grand slams. The response for this bulletin has been nearly overwhelming. I would have bet money that the response would have been just slightly above normal. Every time I go out on a limb and predict that a particular Bulletin will indeed be popular, it generates a humdrum response. I have decided to give up predicting after this bulletin!

Perfection - It Can be Costly

Some people look at perfection in two different ways. Some want perfect workmanship that is flawless. This is almost always impossible but it can be achieved. If you want perfect workmanship then communicate this from the get go and be prepared to open your wallet. The status quo, unfortunately, is that many people want great results for low cost. This is the same as mixing oil with water. It can't be done!

But some people want the perfect home with respect to function. Imagine a house that fits you like a glove. I have gotten very close on several occasions, but have yet to achieve it even with my own home.

To get perfection in this way you almost always need to build the same home twice. Once you have moved in, you will start to uncover pesky flaws. Often they are minor. Perhaps it is just a matter of inches. Maybe it is an electrical outlet that is in the wrong place. Maybe there is an outlet missing. Perhaps you had trouble moving furniture into or out of a particular room. Maybe there aren't enough hose bibs around your home or the ones that are in place are in poor locations. You get the idea.

A Little Trick

Very few people have the required discipline to do what it takes to achieve the perfect house. You need to maintain a list of the flaws in your current home. It is hard to take a moment out and write something down, but if you do it, it will pay huge dividends. Every time a pesky flaw causes you a problem write it down. When you go to buy an existing home or plan for a new one, use the list to make sure these mistakes do not happen again.

Be sure to write down even the craziest things. For example, do you like the location of the soap dish in your shower? Would you like a tall shelf in one or more corners to store shampoo and other body care products? Who says they have to be down low on the back corners of the tub? It is simple to install triangular marble shelves in tile showers!

When you travel write down things you like in hotel rooms. Do you like that coffee machine in the bathroom? Do you want coffee as soon as you jump out of the shower? It is possible. Just plan for enough counter space to comfortably place the coffee machine!

Outdoors is Important

Don't forget the outside of your home. Do you need more space for cars? Do you like to shoot hoops? If so, you need to plan for a nice level basketball area. Do you like to sit outdoors at night? What about bugs? Will your screened in porch be big enough?

Is your grill going to be in the right location? Can you cover it somehow so you can grill when it rains? Is your patio going to be in the blazing sun? Is there a way to orient it or plant a tree to provide some shade? What about screening neighbors? What about stopping outdoor noise from getting inside? There are all sorts of things you need to think about. Keep writing things down on your list!!!!! Check out my list in 50 Dream Home Design Tips column.

Column B349