Septic Systems Video

Do you have a septic tank, how do you keep it working at the optimum condition? One way is to be sure you keep things like lacquer thinner, latex paint, chlorine bleach and antibacterial soaps out of the septic system. Why? Because all of these items kill the beneficial bacteria that works to dissolve food particles and bodily waste in the septic tank.

Garage disposers and septic systems can work together. The disposal will grind up the food into smaller pieces, increasing the surface area of the food. This allows the septic system to break down the food quicker. There is a garage disposer designed specifically for use with septic systems. It features an enzyme tank that injects the beneficial bacteria into the food as it is being ground.

Remember if you have a septic tank system, keep those bad chemicals out of the system. Get your system pumped out on a regular basis.

Read in the May 13, 2016 AsktheBuilder Newsletter why pumping out a septic tank is important.

Wood Glues Video

Are you a hobbyist or wood worker? If so, you have probably used wood glues. The old standard is the yellow carpenter's glue. But there are more choices now. The yellow glue is still available but it is affected by water. It should not be used outside.

There is a dark wood glues. When the glue dries, it turns dark so the glue line is not as noticeable. Eliminates that white glue line.

The new woodworkers glue is designed for finish and trim carpentry inside work. It features a very quick setup time. Great when working with small trim pieces. The typical setup time is 5 to 10 seconds.

Polyurethane glue is waterproof. It sticks wood to wood, glass to wood. A very multi-purpose glue, almost like an epoxy. This glue actually uses the water in the wood and air to chemically cure. Be sure to clamp the wood pieces after glueing. As the glue dries, it turns to a foam and expands to fill in the area. Clamping the pieces will keep everything in the correct position.

Clamping the work pieces is a good idea when using any glue. This positions the joint until the glue is dry. Select the right glue for your next woodworking project.

Air Filters Video

Air Filters Video Transcript

You know this time of year the air outside it's crisp it's clean it's free of pollutants. It's really really wonderful. Now wouldn't you like to have that same quality of air inside your home? Well, you can if you use the right furnace filter. You know a lot of people are familiar with the standard furnace filter that's fiberglass.

You know they're replaceable and I call these things rock catchers and the reason why is because the space between the fibers is so huge that just about everything can get through it.

What these filters are primarily for and a lot of people don't know this these are just to protect the equipment inside your furnace. They protect the heat exchanger. They protect the electric blower and the electric motor from dust and pollutants. They do nothing to really control the air quality inside your home.

If you want to get good air quality inside your home or improve it, you have to step up to another type of filter. There are disposable filters that cost about four dollars apiece. You can get them at a lot of local hardware stores and these are pleated paper filters. These catch a lot of dust particles a lot of pollen. Just about many of the things that are inside your home.

But there's a problem with them as well they are disposable you have to throw them away and they last about three months at a time. My

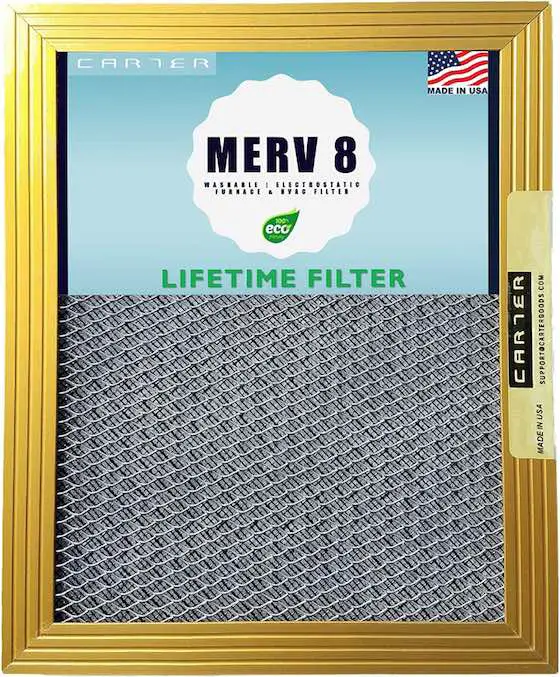
favorite filter is one that's built specifically for your furnace. These are polyester electrostatic filters and these are lifetime filters. And what happens is when these get dirty, you just rinse them out with a hose and you just put them right back in your furnace. They cost about 35 to 40 dollars apiece but they can pay for themselves in as little as 18 months.

Remember, if you want to have really good clean air inside your home consider getting one of these lifetime filters. They're available at most heating air conditioning contractors or some of your local hardware stores. If you want to discover more home improvement tips go to AsktheBuilder.com.

Related Links

Electrostatic Air Filters - These Are The Ones You Want

Carbon Monoxide Filter

CLICK or TAP HERE to get FREE QUOTES from local heating and cooling contractors who sell great filters.

Buy This Great Washable Air Filter

washable furnace air filter

This is a lifetime washable furnace air filter. CLICK HERE or the photo above to purchase it.

Electrical Outlet Box Video

Most home projects with include the addition of an electrical outlet box. Having the proper tools will make the job go great.

First, there are the linesman pliers. They have a large cutting area and the leverage to cut wires and cables. Also useful for twisting wires together.

Next, is the wire stripper. This tool has various size openings that match the different wire diameters. Just select the proper size opening for the wire, squeeze down around the wire and pull. It strips the insulation off the wire. Neat and clean.

Needle nosed pliers are also a valuable tool for working with wiring. You use the needle nose to form a loop in the end of the wire to fit around the screw on the outlet or switch.

Do not forget the razor knife. It is used to cut down the length of the wire insulation. Be careful to cut right down the middle of the insulation. If you cut off to one side, you run the risk of nicking the insulation of the wires inside the cable.

One final tip, be sure to turn off the electric for the circuit on which you are working. This will prevent any electrical shock or worse.

Road Salt Video

Shoveling snow can be hard work, especially when the snow is wet. There are some products that can help. Deicing salts will help clear the snow. Will these salts harm the concrete? Not if the concrete was properly installed.

There are three types of rock salts. Regular rock salt, anhydrous calcium chloride salt and magnesium chloride. The magnesium chloride, or mag, is newer and works better at lower temperatures. It is also less corrosive to metals, such as railings. Mag is also easier on the trees and shrubs as compared to the other two salt types.

Most stores will carry the first two types of salt, but you might have to go to a specialty store to obtain the magnesium chloride product. Check the yellow pages under salts.

Put down a layer of the salt before the snow starts accumulating. It will be easier to clear your sidewalks and driveway if you do. Save your back and try some of these road salt deicing products.

Stop - Purchase Deicing Salt eGuide NowGet a 24-page guide right now that answers all your questions about Deicing Salts. Will it RUIN your concrete? Did you know that salt can SERIOUSLY harm you? What about your expensive landscaping? You can have all these answers and more in less than a minute. Buy it NOW.

Gas Fireplaces Video

Do you have to carry in firewood for your fireplace? What a pain! Wood burning fireplaces require a lot of work and they are dirty. Plus, you have to constantly tend the fire. There is an easier way.

A gas fireplace is a better alternative. There are gas logs that look very realistic. Some much so that some actually glow and have glowing embers. Gas fireplaces provide instant warmth. No waiting for the logs to catch fire. Just turn on the switch and the fireplace comes to life.

Another advantage is once you turn off the fire, you can close the damper right away. No warming for the logs to go out completely and leaving the damper open allowing cold air to flow down the chimney. Or the warmer air inside the house escaping up the chimney.

If your fireplace does not have a gas connection, one can normally be added, especially if your fireplace has one of those ash dumps. Connect a contractor or plumber to run your gas line to the fireplace. Then just flip the switch and sit back and enjoy the warmth.

Energy Savings Video

Here are two tips to help you save money with your energy costs. First at the end of the summer and fall watering seasons, remove any garden hoses you have attached to the outside faucets. If you do not and you have a frost proof hose bib, the water line could burst behind the faucet. You may not notice that until you turn the water back on in the spring.

To save money in the basement, check the area between the foundation and the floor joists. If there is no insulation in those spots, add it. Just cut some regular fiberglass batt insulation to fit and stuff it into the openings.

If you already have insulation in those spaces, pull one out and look at the back side. If there is a black spot at the top or bottom of the insulation, you have an air leak. The black spot is dirt that has been filters by the insulation. Get some caulk and caulk the joint where the air is leaking in.

The savings can add up if you block out the air leaking into your basement or crawl space.

Tile Backsplash

DEAR TIM: I think a tile backsplash would be a great way to make my bathroom look better. Do you have to buy special backsplash tile? I'm open to any backsplash tile ideas including a glass tile backsplash. If you were installing a ceramic tile backsplash, how would you do it, and what are the pitfalls you would avoid? Do I need any special tools or skills to complete this job? Amber C., Newark, OH

DEAR AMBER: Tile backsplashes in bathrooms or kitchens are a great idea. I like them for all sorts of reasons. First, they are almost entirely waterproof. Furthermore, because tiles come in all sorts of textures, colors, patterns, etc. the tile backsplash can become a dramatic accent focal point. This is especially true when the countertop is natural stone like granite or marble or a man-made stone composite.

Special tile is not required for this job, but you may want to consider it. Regular flat tile that is common in many bathrooms will work, but you have to make sure you purchase a tile with a finished edge, or one that comes with special trim tile. Because ceramic tile is often one-quarter-inch thick, and sometimes thicker, the transition from tile to the wall surface must be made with trim tile or tiles that have a finished edge on at least one side of the tile. These special tile are frequently referred to as bullnose tiles. They have a soft rounded edge that is the same color as the tile.
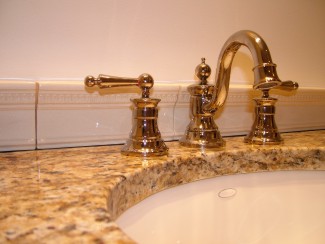
This tile backsplash was made with ornate cornice tiles, but installed in less than an hour. PHOTO CREDIT: Tim Carter

This tile backsplash was made with ornate cornice tiles, but installed in less than an hour. PHOTO CREDIT: Tim Carter

For a drop-dead gorgeous look, visit a specialty tile store that sells only tile and tile products. There you will probably discover special cornice tiles that resemble woodwork trim. The profile of the tile is nearly identical to woodwork where one edge of the tile is thicker. These tiles are often rectangles and sometimes come with special profiled outside corners in case you have an outside corner as part of your backsplash.

Before you choose the tile for your backsplash, slow down and think about the look you want to have for years. Ceramic tile, in my opinion, is not a short-term decorating product. Tile is often expensive, and requires a significant amount of work to install. If you purchase a high-quality tile, it can last for 50 or even 100 years. For this reason, you may want to pick a ceramic tile that will age gracefully. Some modern tile styles are transitional in my opinion. They may become dated in as few as 10 or 20 years.

There are all sorts of different installation tips depending upon what type of tile you select and the type of countertop it rests on. Recently I installed a stunning decorative tile backsplash on a granite top. Before I started, I caulked the joint where the granite met the wall. After the caulk was dry, I then sealed the granite well, especially the small area where the tile would overlap the granite.

You want a small one-sixteenth-inch space between the bottom of the tile and the countertop. This gap should be caulked with a caulk that matches the color of the grout. You can frequently find these specialty caulks at the stores that sell only ceramic tile. Some caulks are made to exactly match specific tile grout colors.

I prefer to grout the backsplash tile first. If any grout gets into the gap between the tile and countertop, remove it immediately with a toothpick. If you wait until the grout hardens, removing it is risky. One slip with the tool and you could scratch the tile or the countertop.

Most tile backsplashes can be installed with a minimum of tools. Regular tile can be scored and cut with a tile snapper. Fancy tiles must be cut with a wet diamond-blade saw. Miter joints for inside corners are best cut with this same saw. These special saws can be rented if a friend doesn't own one you can borrow.

As for skill, installing tile requires attention to detail and precise measuring ability. Tile grout joints for backsplashes vary from 1/16th inch up to and including 1/4 inch. When a cut tile is too short, the resulting fatter grout line is more visible than a lighthouse beacon on a clear night. Take your time both measuring, marking tile and cutting.

If the tile backsplash is for a vanity that is freestanding and neither side of the countertop touches a side wall, make sure the tile is centered on the countertop. There are two ways to center a tile backsplash. Once you mark the exact centerline of the countertop, lay the end of one tile on the centerline mark and place other tiles next to it with the proper spacing for the grout lines as you work just one direction towards the edge.

If the last piece of tile needs to be cut and it is less than one-half-inch wide, then adjust where the first tile starts. Instead of placing the end of the tile on the centerline, place the center the first tile directly over the centerline of the countertop. This will allow you to have a much larger piece of tile when you get to the edge of the countertop.

Column 679
Nail Guns

Nail Guns

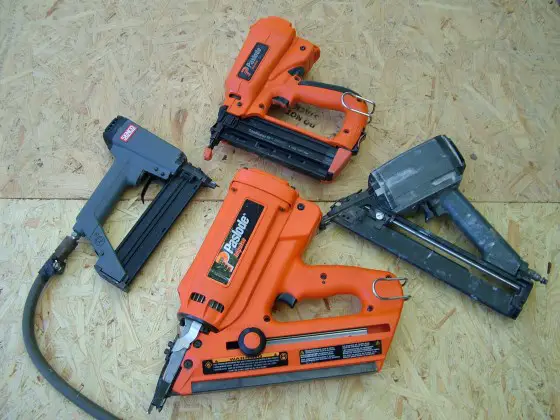
These are four different nail guns. Two use compressed air, while the other two are powered by miniature combustion engines. PHOTO CREDIT: Tim Carter

DEAR TIM: I have seen nail guns used by construction workers, and wonder if they might not be a great investment. I have not used a nail gun before, and wonder if it is too much tool for me. Cordless nail guns are very appealing, but I wonder if I should consider a pneumatic nail gun or an electric nail gun. Surely you have used nail guns in your work. What are the pros and cons about these tools and can you offer any guidance before I pull the trigger and buy one? Jenni M., Tampa, FL

DEAR JENNI: I can't say enough great things about nail guns. I have used them for over 30 years, but not without incident. These powerful and productive tools have saved me weeks of labor over time, but they have also caused me some personal pain. Nail guns are indeed guns, and as the name implies, they can be dangerous if you do not follow all safety rules combined with a generous helping of common sense.

Nail guns are inherently dangerous because they drive both long and short nails into wood, even dense oak, in a fraction of a second with a single blow. Driving a regular nail with a hammer is also dangerous. On more than one occasion, I have been hit in the face with a regular nail that ricocheted off a wood surface when it was struck unevenly by a regular hammer. Several times the nail drew blood.

If you can grasp and pour a glass of milk from a full one-gallon container, then you have the strength to handle nail guns. The nail guns that fire long framing nails are heavier than smaller nail guns that drive thin finish nails into trim lumber. My guess is that you are thinking of using trim nail guns more frequently than framing nail guns.

You mentioned cordless nail guns, but I think you mean combustion or impulse nail guns. I own several of these, and they are the nail gun of choice for me. This type of nail gun is a self-contained tool. It does not require a pesky air hose or electric cord to power it. These gas nail guns use a fuel cell often filled with liquified petroleum gas and a spark plug powered by an internal battery. An internal piston, very similar to the ones in your car engine, pushes the nail into the wood when the nail gun safety and trigger are depressed simultaneously.

Nail guns save work because they can drive nails quickly and efficiently. You can adjust these tools so they drive the nails to different depths. When used to install asphalt roofing shingles, you want the nail head to be snug against the shingle but not driven too far to where it tears through the shingle. When driving nails into framing lumber or applying wood sheathing, you often want the top of the nail head flush with the wood surface. Different building codes dictate how far a nail should be driven.

When using a finish nail gun, you often want the nail countersunk, so you can fill and disguise the nail. All finish nail guns I have used do this instantly as the nail is driven by the tool. Ugly beauty marks created by hammer heads that strike the wood surface are things of the past when you switch to nail guns.

When pricing nail guns, think of the entire system. Add up the costs of all of the components needed. If you decide to by a pneumatic nail gun or multiple nail guns, be aware of the capacity of the air compressor. If you are just going to use smaller nail guns for projects and trim, a small air compressor will often work. But if you think you will be doing framing work with a larger nailer, a large compressor may be necessary, and one fueled with gasoline instead of electric. The nail-gun manufacturer often has great guidelines that help you select the proper-sized air compressor.

I used pneumatic nail guns for many years. The air compressors and hoses that supplied the air to the guns were a necessary evil. But 13 years ago, I switched to combustion nail guns. I love these tools and have never missed the pesky air hoses or the noise of the compressor as it recharged itself with more high-pressure air.

Construction workers and serious do-it-yourselfers are injured daily by nail guns. I was injured by a pneumatic nail gun one day working in my own basement while building a frame wall. The nail gun I was using kicked back after driving a nail. The top of the nail gun hit me above the my right eye. The impact knocked me off the step ladder, broke my glasses, stunned me and produced a deep cut that required four stitches to close. Suffice it to say I earned a new level of respect of how a person can be injured by the recoil power of this tool.

A co-worker once drove a nail through the center of a bone of his big toe one day at one of my projects. He was guilty of not wearing steel-toed boots and working too fast. We had to cut out a section of the floor and take it with him to the hospital as he had nailed his foot to the flooring.

But set all of this horror aside and buy yourself some nail guns. When used properly, they are real time savers and the work they do is superb. Most nails are coated with an adhesive that actually holds better than a traditional nail. The heat caused by driving the nail melts the glue along the shaft and the glue sets inside the wood.

Column 678

Bathroom Vanity Cabinets

DEAR TIM: I thought the process of selecting and installing bathroom vanity cabinets for a remodeling project would be simple. It turns out bath vanities come in many different sizes with all sorts of different options. I cringe at having to install all of these things, and worry I will ruin any bath vanity cabinets I will buy. My wife wants all of the options, but I would prefer to buy one simple box I can nail to the wall. How do I solve this conundrum? Bob F., Norfolk, VA

DEAR BOB: The first thing you are going to do is tell your wife to pick out whatever vanities your budget will allow. The second thing is you are going to do some deep-breathing exercises and relax. Installing bathroom vanity cabinets is not as hard as it may seem. I feel you are suffering from a significant case of anxiety because you either lack the tools, skills or a combination of the two.

There are many different methods to properly install bath vanities, but I am going to share some of the tips that have served me well over the years. There is no doubt other carpenters may have techniques that will work faster and better. Perhaps you know a handy person in your neighborhood or at your place of work that can help you if you get into a bind.

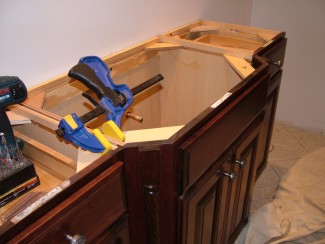
This bathroom vanity cabinet is really three separate cabinets and two accessory pieces of trim. It took less than an hour to completely install them. PHOTO CREDIT: Tim Carter

This bathroom vanity cabinet is really three separate cabinets and two accessory pieces of trim. It took less than an hour to completely install them. PHOTO CREDIT: Tim Carter

One of the reasons you want to consider bathroom vanities that are made from multiple cabinets and parts is the finished look. By combining cabinets that have different depths to them, you can create a stunning bump-out look where the center sink-base cabinet projects just 4 inches or so into the room. Adding trim accessories creates the look and feel of true custom cabinetry.

When the countertop is formed to follow an extended profile, it looks rich and elegant. These small features make your home really stand out if and when you decide to sell. Think about it, anyone can get a straight countertop out of a box from a home center.

One trick, when working with different cabinets that need to be screwed together, is to remove all drawers and cabinet doors. This can be done easily with a screwdriver. Some cabinets have quick-release levers that allow you to pop a door off its hinges with no tools. Removing the doors and drawers prevents scratches and allows you to work on the cabinets with nothing in your way. The cabinet boxes are also much lighter.

I prefer to use squeeze clamps that have rubber tips to hold cabinets together in the exact alignment as I screw them together. Sometimes you can screw through the sides of the cabinets to draw them together. Other times you have to carefully install screws through the finished frames. If you need to do this, take your time and be sure the length of the screw is not too long to where it passes through the finished side or front of a cabinet frame.

It is extremely important that the finished bathroom vanity cabinets are level side to side and front to back. This can be a significant challenge as floors are frequently out of level and walls are not plumb or square. Use tapered shims under the cabinets to get them level. You may have to install shims between the back of the cabinets and the finished wall to keep the cabinets level as you screw them to the wall. Yes, screws not nails.

Some bath vanity cabinets come with fancy trim that can be added on the face of the cabinet frames. This trim can sometimes be attached to the cabinets with screws from behind. Once again, be careful about the length of the screw. Always clamp the piece in position and slowly install the screw. You can rent nail guns to attach the trim, but be sure you use a pin nailer that shoots nails that are not much thicker than the shaft of a needle.

If the total width of the assembled bath vanity cabinets is 5 feet or less, I would screw them together and install the system as if it were one box as you originally wanted to do. The trick is to install no less than six screws through the sides of the cabinets where two cabinets touch one another. This way, when you start to move the cabinets around, they are very sturdy, and they should not pull apart.

If you have an accident and crack a cabinet frame, ruin the finish of a cabinet side, frame, door or drawer, do not panic. If you live in a mid-sized or large city, there are any number of wizards who can come to your home and repair this damage with little effort. These furniture repair masters come with a small box loaded with sticks of colored lacquer and an alcohol-fueled lamp that they use to match the color and wood grain of your cabinets.

They can repair holes, scratches, dings and splits making the cabinet appear as if it is in perfect condition. This safety net should give you the confidence to move ahead on this project.

Column 677