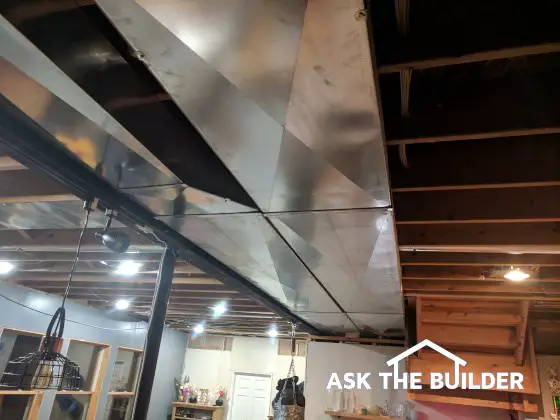
HVAC Static Pressure | See the long supply duct on the left next to the gray I-beam? Notice how it reduces down in width? That's what needs to be done in supply ductwork to maintain adequate static pressure as the main duct gets farther away from the furnace. The same-sized duct on the right is the main return air trunk line heading back to the furnace. This column has SO MUCH good information it's why I shared it with my 31,000 subscribers in my October 25, 2020 FREE newseltter. Copyright 2018 Tim Carter
HVAC static pressure is the measurement of the force the air inside your ductwork. The pressure reading at the furthest air register from the furnace or air handler must be equal to the pressure measured at the closest one.
HVAC Static Pressure Checklist
- Main supply duct must get smaller as branch lines take off
- Room farthest from the furnace can be just as warm/cool as the most comfortable room in the house
- HVAC ducts should mimic blood vessels in your body
- Install a damper control in each branch line
Related Links
Heating Ductwork - SECRET TIPS - Do NOT Share Please
Heat Loss Infrared Photos - MUST SEE Poor Workmanship!
HVAC Static Pressure Is Easy To Maintain
The first thing to remember is that each room in your home needs a certain amount of air flowing into it for you to be comfortable. I say this assuming your home has a forced-air heating system or an air-conditioning system for summer cooling.
It's important to realize that the air coming out of the supply registers in each room must be flowing at the same rate. This happens when the static pressure in the ducts is equal no matter where you measure it in the duct system.
Free & Fast Bids
CLICK HERE to get FREE & FAST BIDS from local HVAC duct contractors.
How Do You Balance Airflow In Ductwork?
The first step to balance airflow in ductwork is to calculate how many cubic feet of conditioned air must flow into each room to make the room comfortable.
Most people don't realize that residential heating and cooling systems are very complex. This is true for both forced air systems as well as hot water or steam heating systems.
There are many calculations that must be made to ensure that the properly sized equipment is selected. There are many controls on the equipment which must be properly adjusted to assure a well-balanced system. Ductwork must be properly designed and sized. It is by far the most technical aspect of residential construction.
How Do You Calculate the Correct Furnace Size?
When you decide to install a forced air furnace or air conditioning system, you need to make various calculations. Each room of your house, depending on its size, location, compass orientation, amount of glass, etc., requires a certain volume of air to enter it to properly maintain the desired temperature.
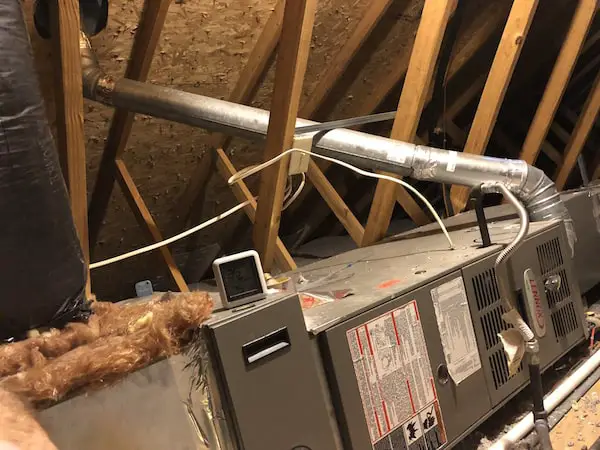
This is a furnace up in an attic. The photo was sent in by one of my newsletter subscribers. Several mistakes were made during its installation, not the least of which it's laying on its side instead of being a proper low-boy furnace. Copyright 2018 Tim Carter
As you can imagine, each room depending on the variables mentioned above will probably demand a different volume of air. A larger room will require more air than a smaller room.
A corner room may have two outside walls, while an interior room may have no exterior walls. You or your HVAC person must think and quantify all of these things to provide a comfortable interior climate.
What is the Primary Function of an HVAC System?
Interior climate control is the primary function of a heating and cooling system. A properly installed system will ensure that each room of the house is adequately heated or cooled.
An inferior system will result in widely different temperatures from room to room, hot and cold spots, excessive noise, etc. The trick is to make sure that the proper amount of air enters and leaves each room.
The calculations that are made to ensure the proper amount of air enters the room tell the HVAC person a very important number. It tells that person how many cubic feet per minute of air each room requires.
This, in turn, tells the HVAC person how powerful of a blower to install with the furnace. Common sense would tell you that if the calculations indicated that the entire house required 1,750 cubic feet per minute and the blower could only produce 1,200 feet per minute, there would be a problem. Let's assume that the HVAC person gets the right sized blower.
CLICK HERE to get FREE & FAST BIDS from local HVAC duct contractors.
How Do You Get the Right Amount of Air Into Each Room?
The challenge is to get the proper amount of air into each room at the same time. This is where things begin to get complicated.
Here's the problem. The furnace blower fan only creates a certain amount of energy at any given instant. This energy is constant. If one room gets too much air (energy), there won't be enough for the remaining rooms. Remember, different amounts of air (energy) are going to each room.
To achieve the goal of getting the proper amount of air (energy) into each room at the same time is to have equalized static pressure throughout the entire duct system. Static pressure in an HVAC system is the same thing as blood pressure in your body.
It's a time-tested principle that works. It is not that difficult to achieve in your HVAC system.
The principle is very easy to apply. Remember the initial calculation that indicates the total number of cubic feet per minute of air that your house requires?
How Important is it to Do the Airflow Calculations?
It's vitally important that you or your HVAC person correctly calculates this number. If you decide to do this calculation, you must obtain heating and air conditioning books which tell you how to do it. It is not that difficult, it just takes time.
Your local library probably has the books that you need. Once you have this number, and you have the separate number for each room, you are ready to design your ductwork.
HVAC Static Pressure & Ductwork Installation
Ductwork is like any other piping device. You can only get so much air through a duct at a given pressure. It makes sense. You must not forget this concept.
We also know that the furnace blower fan can only produce so much energy. This energy translates to pressure because it is pushing the air out of the furnace. The pressure at the blower will not be equal to the pressure at the air supply register in each room.
This is because the total pressure of the blower becomes divided by the number of air supply registers. However, the pressure at each register must be the same regardless of the size of the room or register.
Here is how it works. Once the air (energy) leaves the furnace blower it begins to travel down the main supply duct. This duct has a certain cross-sectional area.
An example would be a duct 8" high by 22" wide. Before the blower turns on, this duct, as well as all of the other ducts, are full of air. The blower is going to have to push this air out of the way in order to get the hot or cold air into the rooms.
It takes energy to push things. Remember, the furnace blower only creates a constant amount of energy at any given moment. When the furnace blower turns on, it begins to push all of the air down the ducts.
Every time a branch duct turns off the main duct there is less energy to push the remainder of the air. If the main duct does not reduce in size after several branches are taken off, the remaining air (energy) begins pushing extra air that it shouldn't have to push.
If this happens, this wasted energy results in lower energy (air) at the remaining supply air registers. The pressure of the air coming out of these registers will be lower than the pressure at the registers closer to the furnace.
As you can see, the main air duct must continue to get smaller and smaller as more branches go off to each room. This is exactly how your blood supply system is designed. The arteries close to your heart are much larger than the arteries in your hands or feet.
The downsizing of the main duct depends upon the amount of energy which is left after each branch duct leaves the main duct. Many factors come into play as to when this duct begins its downsizing.
However, if for some reason your main duct does not get smaller as branch runs are taken off, ask your HVAC person why. I hope they have a good explanation.
What are Other Static Pressure Air Balancing Tips?
There are some other important points you should consider when installing a new furnace or replacing an existing one. Try to locate the furnace in the center of the structure.
Did you ever stop to wonder why your heart isn't in your head or your feet? By placing the furnace in the middle of the structure, you minimize the distance to the farthest room.
This means less air has to be pushed. Make sure that the HVAC person installs a damper control in each branch duct going to each room.
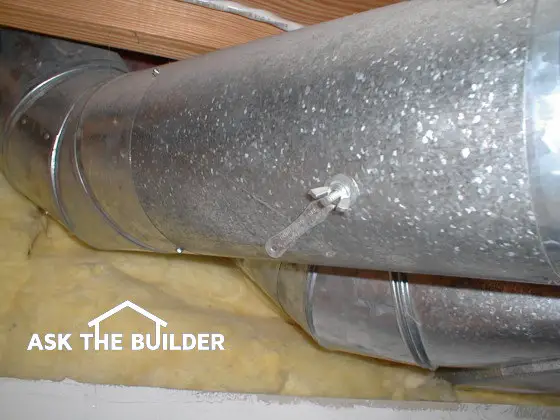
The lever you see on the side of the round metal duct is a damper control. It is connected to a round metal disk inside the duct pipe. If I rotated the lever so that it was straight up and down, the disk would block 90 percent of the air flow in the duct. Copyright 2018 Tim Carter
This damper control is very similar to a water faucet. You can limit the amount of air going to each room by adjusting this damper. This extra control will also help you to balance the system.
Ask to see the calculations that your HVAC person used to enable him or her to properly balance your system. These calculations will show each room and the amount of air each room needs. The air volume will be expressed in cubic feet per minute (CFM). Ask questions so that you fully understand the calculations. Spend a few minutes at the library or local bookstore. Believe me, you can't know enough about your heating and cooling system.
CLICK HERE to get FREE & FAST BIDS from local HVAC duct contractors.
Column B12