He's coming. Is that why you're huddled with Pashi, Kandee, Rob, Paula, Mary Lee, Bruce and about 80 other new subscribers who've signed on in the past seven days? Yes, Old Man Winter is about to plop his arse down in the great Northeast Kingdom for at least four months!
I do like the four seasons, but there's a big difference in the length of winter between Cincinnati, Ohio and New Hampshire.
Winters in central New Hampshire can be longer by a good six weeks. Back in Cincinnati, while rare, there were warm t-shirt days in December. You could also have some very nice warmth in mid-March.
Here in New Hampshire, we often have our cover snow the first week of December. This means you don't see the lawn or grass again until April! It's not uncommon to have cold weather until the middle of April! Oh well, at least the snow away from the roads stays nearly pure white all winter long.
CLICK or TAP HERE to see how cold it was a few years back in mid April! You need to watch the BOTTOM video on that page. Hang in there as the wind dies down after about 15 seconds.
Kathy and DaVinci Reviews
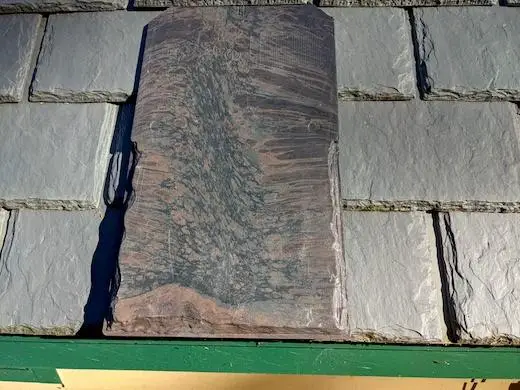
Early last Sunday morning Kathy was intrigued by the photo of the Brava faux slate and the video I shared about my Davinci Roofscapes faux slate roof. She decided to do some digging. After completing her research, I received this note from Kathy: "I think you should read the reviews of customers who bought the Davinci Roofscape shingles. You might not want to recommend it."
I immediately sent back, "Where are these reviews? I've had my DaVinci roof for six years now and there are zero defects. They actually look better now than the day they were installed because they look even more like real dusty slate."
Kathy sent me a screenshot of the website and I immediately went there to do my due diligence. I'm not sharing the website because I think it's got a hidden agenda and I don't want to promote it.
I feel this is an excellent teaching moment. You need to engage your critical-thinking skills and separate the wheat from the chaff when reading online reviews.
Once at the website, I discovered some negative reviews that talked about leaks. Roof leaks are almost never a product issue, especially with DaVinci virgin-polymer shingles for goodness sake! Leaks in new roof installations are almost always traced to a workmanship flaw.
Since I have a DaVinci Roofscapes roof, I decided to leave a truthful review. The invisible website owner - that was a huge FLASHING WARNING LIGHT TO ME BY THE WAY - did have wording that said it could take up to two days for a review to be published.
It's now been a week and my review is not visible. Does that mean the website owner has a hidden agenda and wants to make DaVinci look bad???? Maybe, and maybe not...
When you stumble onto a website and you can't see a photo, a name, or a physical address of the owner, you should immediately be suspect of ALL you see at that website.
I share this because if you stumble across a site that's not publishing all the reviews, and you have no way other than to test this yourself by writing one, you might not be getting all the data you need to make the right choice. Getting just one side of the story is never good.
Never forget in reviews you're hearing one half of the story. You know this to be true if you've raised children. Be careful of reviews filled with vitriol. Pay attention to reviews that are objective and filled with facts, not opinions.
Don't ever forget, a half-truth is a WHOLE lie.
If you were about to invest in a top-of-the-line product like DaVinci or Brava, it's best to reach out to the manufacturer and see about obtaining addresses near you where you can view the product and walk up and talk to the owners.
In the case of DaVinci, they are forthright with this information. All you have to do is read any number of their blog posts.
Put on your Peter Falk Columbo trench coat and do a little digging to find out where the roofs are. It's not hard, for goodness sake, because in most of the blog posts they identify the owner of the building and give you the city and state too. How hard is it to reach out to the owner?
Live Streaming Video
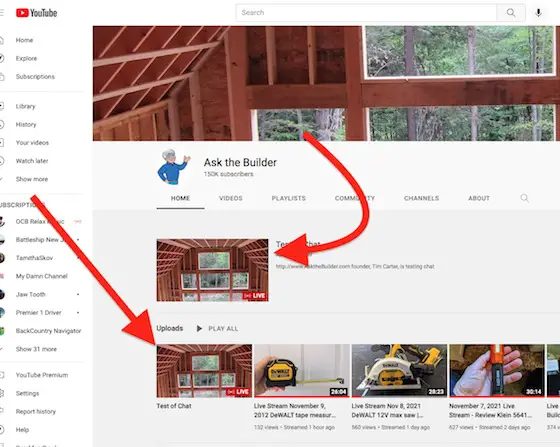
My son convinced me to get back into live streaming video. I did a test yesterday afternoon:
The live stream test from high atop my perch in my man cave was a huge success. I did it completely unannounced and within minutes quite a few YouTubers were watching live, one from Thailand!
CLICK or TAP HERE to watch it. The live stream is recorded just as all live TV is so it can be played back at your convenience.
Those viewing could ask me questions in the chat box to the right in real time. You'll see me in the replay read the chat questions. It was a boatload of fun.
I'm happy to answer your question on LIVE video. CLICK or TAP HERE to ask the question. BE SURE you say that you want me to answer it on the live video feed.
I'll send out an email blast to you here when I intend to go LIVE again. It will be this coming week. It's all up to you and you submitting great questions.
Electrical Fires in Your Home!
Each day houses catch on fire because of electrical issues. The causes are many and it's why the National Electrical Code was developed years ago by the insurance industry. The insurance companies were looking for a way to stem the tide of their losses and exposure.
Look at this infrared photo taken in my own basement:
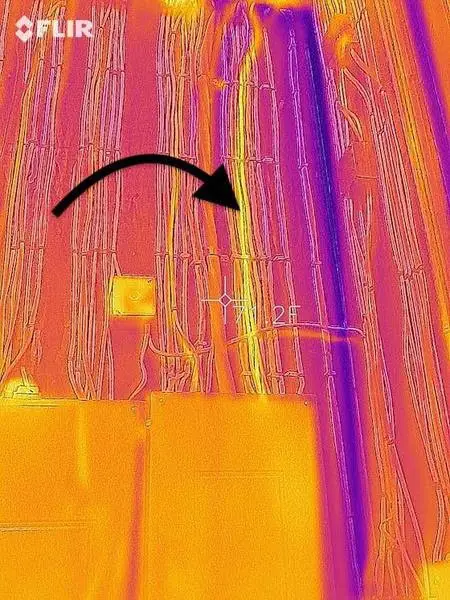
The black arrow is pointing to two cables stapled one on top of another that are significantly warmer than the others nearby.
Do you know what's causing this to happen? The heat is caused by friction. The alternating current flowing back and forth through the wires inside the cable create heat just as when you rub your hands together. It's okay for a cable like mine or yours to get warm. It's not okay for one to get so hot the insulation melts!
This friction is not an issue if you've matched the wire size to the load. Circuit breakers and fuses are designed to prevent wires from overheating. They stop the flow of the current if too much is happening at once. CLICK or TAP HERE to discover so much more about circuit breakers and old-time fuses. Investing this time could SAVE YOUR LIFE or that of your loved ones.
Fancy Lock
My good friend Mike, who's been a subscriber for many years, sent me a video about a lock that's almost 350 years old.

CLICK or TAP HERE to watch a short video that demonstrates all of the clever features of this lock.
Then ask yourself: How many people are left on the planet that can make a lock like this using 1680s technology?
How To Do Less
Each week, I receive lots of emails from people who want me to share news about what they're doing. Believe me, I've had my share of unusual pitches. But I got one mid-week that had me shaking my head. Here's what Peter sent me:
"On Nov 5th at 8/7c, I will be airing on Shark Tank with a product I built in my college dorm room to help other students skip their Zoom classes.
Would you want the story? Let me know and I can send over a press release."
Great - just what we need. A product that helps young future workers LEARN LESS. What am I missing?
That Time of Year - Leaves
I stopped having to deal with leaves, pine needles, tiny twigs, pieces of bark, etc. in my gutters years ago. Lookie lookie:
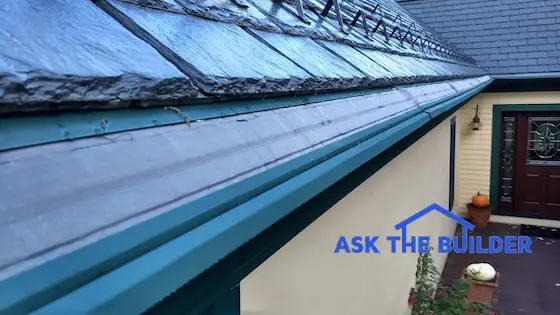
CLICK or TAP HERE to discover how you can have the same peace of mind I enjoy each autumn. No ER visits for me after falling off a ladder! Get the BEST gutter guard!
That's quite enough for a Sunday.
Tim Carter
Founder - www.AsktheBuilder.com
BEST DARN Cleaner - www.StainSolver.com
Winter Field Day Approaching - www.W3ATB.com
Do It Right, Not Over!
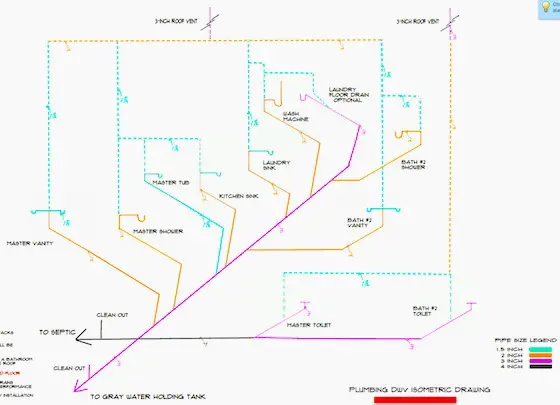
P.S. Do you know all you need to know about plumbing drain pipes? CLICK or TAP HERE and let me know if you discovered something new. Come on, tell the truth for goodness sake! I know you didn't know about sweep 90s!!!! Come clean!