Recessed Lighting – Hidden Lighting

kitchen with 3 levels of lights

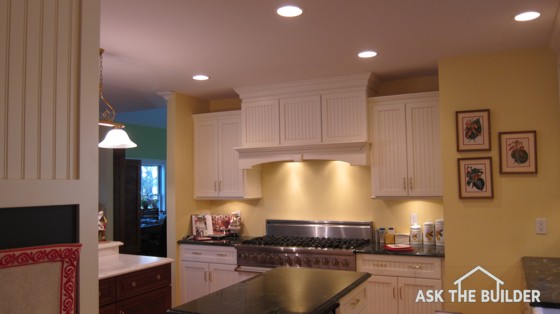
There are three levels of light in this kitchen, four if you count the bright lights under the stove hood! Photo credit: Tim Carter

My wife designed the light layout in our kitchen. It was my job to install the lights. As I nailed up the 12 or so recessed light housings that she selected, I whined the whole time, saying that there would be too much light. After all, we had a decorative hanging fixture that would illuminate our island. Furthermore, there was a paddle fan over the kitchen sink that also had a light fixture.

Well, I was wrong. The recessed light fixtures created a ring of brilliant light over all the counterspaces. They compliment the softer light from the hanging fixtures. Kathy was right once again!

Hidden Light

The widespread use of recessed lights occurred in the 1950's. The contemporary housing trends of the 50's and 60's dictated that all aspects of a house were sleek. This meant that surface mounted fixtures were out and hidden, recessed lights that were smooth with the ceilings were in.

The advantages of recessed lights have stayed with us. The types of fixtures and the trims, however, have come a long way. The original recessed fixtures were very simplistic. There were very few trims available.

CLICK or TAP HERE to get FREE QUOTES from local companies that can help with your lighting needs.

Recessed Light Parts

Recessed lights are somewhat different than an ordinary light fixture. A recessed light has three primary components: the housing, the bulb and the trim. The housing is the main part of the light. It is installed early in a job, before the plaster or drywall is installed.

Bulbs for recessed lights are very specific. They do not resemble ordinary light bulbs, except for the treads. They are cone shaped and often come as spot or flood lights. Very often the inside of the glass surface is coated with a reflective material so that the light created by the filament is directed down, not sideways.

The trim is the part of the light that you actually see. There are a multitude of designs, shapes, finishes, etc. that are now available. Some of the most popular trims used today are those designated as spectacular. These trims have a highly polished interior surface which helps to reflect as much light as possible down into the room.

Column B91

Fluorescent Light Bulbs & Manufacturers

The following is a listing of some very standard 4 foot fluorescent bulbs, their manufacturers, the lumens per watt (This is a measurement of how efficient they are. The higher the number the more light the bulb produces per unit of energy.), the CRI, and the color temperature.

All the manufacturers have all this information about all of their bulbs and it is sometimes published on the packaging. But sometimes you have to ask for it, as it is not always printed on the label or container. At the end of the table each manufacturer is listed with their 800# in case you run into difficulty at a store.

Remember to do a little price comparison shopping. Compare the average life of the bulb to the price and keep in mind the efficiency rating. A lower efficiency bulb may cost less at the store, but may cost more to operate in the fixture.

Bulb Comparisons and Manufacturers


MANUFACTURER
 BULB/MODEL#
 LUMENS/WATTS
 CRI
 COLOR TEMPERATURE
 
SYLVANIA D830 FLUOR. 83 80 3,000K
 
GE SPX-30 83 82 3,000K
 
PHILIPS 30-U 76 85 3,000K
 
SYLVANIA D835 FLUOR. 83 80 3,500K
GE SPX-35 83 82 3,500K
 
PHILIPS 35-U 76 85 3,500K
 
SYLVANIA D841 FLUOR 83 80 4,100K
 
GE SPX-41 83 82 4,100K
 
PHILIPS 41-U 76 85 4,100K

MANUFACTURERS & LITERATURE

  • SYLVANIA
    800-LIGHTBULB (800-544-4828)
  • GE
    800-327-2080
  • PHILIPS
    800-555-0050

Sylvania has two excellent booklets on Color Temperature and Color Rendition. These books have excellent color photographs illustrating the effects of color temperature on objects. These booklets are Color is How you Light It and Understanding Lighting. I suggest you ask for them. Also, maybe your town has a lighting center like mine. Here in Cincinnati, Becker's has a light lab setup that will show you numerous fluorescent bulbs and how they change the color of pictures, fabrics, etc. The demonstration is dramatic! Hopefully, your town has a retailer like Becker's.

Column B101

Light Bulbs Alter True Colors

Kelvin and Color Rendition Scales

Kelvin Scale Comparative Values

The following list gives you a feel of where certain light sources are relative to one another on the Kelvin scale.

  • Candlelight
    1,850K
  • High Pressure Sodium
    2,000K
  • Regular Incandescent Bulb
    2,750K
  • Warm Fluorescent Bulb
    3,000K
  • Some Halogen Bulbs
    3,000K
  • Mid Range Fluorescent Bulbs
    3,500K
  • Cool Fluorescent Bulb
    4,100K
  • Some Metal (Mercury)Halide Bulbs
    4,500K
  • Special Fluorescent Bulbs
    5,000-6,300K
  • North Blue Sky light in low pollution area, low humidity, ideal weather conditions, high noon
    7,000-8,500K

Color Rendering Index

The color rendering index is an arbitrary scale of 0 to 100. It was developed in the 1930's, before fluorescent lights. True color samples (8) picked by the international lighting community are used to test the manner in which a particular bulb affects the color of the samples. Since the color of the sample is known, the amount that its color changes because of the bulb illumination determines the bulb's scale rating.A 0 rating would be the absolute worst, with a score of 100 being perfect.

Ratings can be all over the scale. For example, certain mercury vapor lamps have a CRI rating of 20! That is why your car looks weird in some parking lots at night. Some fluorescent bulbs have a CRI rating as high as 90.

For comparative shopping, any bulb with a CRI rating of 70 or higher will produce excellent color rendition. Values between 60 and 70 would be considered good. Below 60, and you run the risk of poor color rendition. Be careful!

Column B101

Light Bulb Comparisons

Advantages & Disadvantages of
Different Bulb Types


BULB TYPE ADVANTAGES DISADVANTAGES
INCANDESCENT low initial cost-numerous sizes-great color-various shapes-easy to wire-easy dimming capability poor efficiency-produces high heat-short life span-costly to operate-can cause glaring


FLUORESCENT long useful life-medium to high efficiency-various color range-low temperature & brightness-diffuses light somewhat higher initial cost-minimal decorative fixtures-some are sensitive to low air temperatures


METAL HALIDE very efficient-very long life-good to moderate color range-low operating cost high bulb cost-potential for glare-limited fixture selection-primarily an outdoor bulb


HIGH PRESSURE SODIUM very efficient-very long life-low operating costs high cost-poor color rendition-strong glare-primarily an outdoor bulb

Column B101

Light Bulb Color Temperature

Light Bulb Color Temperature

Many people are familiar with "cool" white or "warm" white fluorescent light bulbs. These bulbs have vastly different color temperatures. A "cool" white bulb commonly has a color temperature of 4,100K. This is in the low range of blue color, similar to ice. Hence, the "cool" adjective.

The "warm" fluorescent bulb often has a color temperature of 3,000K. It imparts a more orange / red light on objects. Because you normally associate warmth with red or orange objects, this accounts for the "warm" descriptive name, even though it is a cooler temperature on the Kelvin scale.

As we discussed in photography, color temperature can affect the way things look in your house. If you decorate with reds, browns, and oranges, you want to illuminate these rooms with bulbs that have a color temperature in the 2,750 - 3,000K range. Conversely, if you happen to like green carpets, or blue colors, light these rooms with bulbs that produce color temperatures of 4,000K or above.

What happens if you have both colors in a room? No problem! Use a mid range bulb. You can purchase bulbs that produce light in the 3,500K range.

Color Rendition

This color thing gets even more confusing. Don't blame me! I'm trying my best to make sense out of it.

Two different bulbs that have the same color temperature can produce vastly different looks on colored objects. In other words, an inferior or poor quality bulb can make a red object actually appear green! I'm not kidding! As such, light scientists developed a way to measure the ability of a bulb to render true coloration. They use a color rendering index. It is simply a scale of 0 to 100. The closer a bulb is to 100, the better job it does at rendering true colors.

When you purchase bulbs from a lighting store, they normally have this information in their catalogues. I doubt that you can easily obtain this information from a giant home center store that has hundreds of light bulbs on their shelves.

It is really worth it to visit a full blown lighting center. Ask the sales people what they know about color temperature. Ask for literature. The major bulb manufacturers have GREAT booklets on this subject with dramatic photography showing just what can go wrong.

Column B101

Color Temperature and Kelvin Scale

fall color new hampshire

These are trees on a 90-acre tract of land I own in central NH. As you can tell, it was peak color. The photo was taken about 1 PM and not even close to the golden hour around 5 PM!

Color Temperature - It's all About Kelvin - No, Not Kevin

I remember that autumn afternoon vividly in my mind. It was a brilliantly sunny afternoon. The fall colors were at their peak. I had driven past this particular maple tree every day. However, the depth of color was so dramatic, I raced home to get Kathy, my wife. The orange and red leaves, when brushed by the breeze, made the tree look as if it was being consumed by fire.

We got back to the tree within 15 minutes. Although the tree was still beautiful, it didn't seem to possess the same brilliance. The sky was still cloud-free. The difference, although I didn't know it at that time, was that the color temperature of the sun had probably dropped several hundred degrees. Kathy said, "What's so great about the tree? It looks just like any other tree around here." No matter how I tried to describe it, it didn't seem to make any difference. She mumbled about me seeing an eye doctor as we walked back home.

You should read my other two columns. Here's the original color temperature column that appeared in over 100 newspapers across the USA. I then produce an extra document people could buy for $2. This document was split into two parts. This page is one. Here's the other half of the color temperature document.

Color Temperature in Geology Photography Class

I first learned about color temperature back in college. At that time, I was deeply involved in photography. I was taking an advanced course in color photography when the topic was first introduced to me. It was very confusing at the time. I don't think the professor did a great job of showing us examples of the color temperature scale. All I remember was that different lights had the ability to render different colors. I also remember that the final exam was a killer.

The Kelvin Scale and Color Temperature

Light (from the sun, a flashlight, light bulb, etc.) is simply visible electromagnetic energy. Visible light contains different colors of light. You see these colors whenever you witness a rainbow, or an artificial rainbow created by a prism or cut glass.

The science community uses three temperature scales: Fahrenheit, Celsius, and Kelvin. Most of us in the USA are familiar with the Fahrenheit scale. This is the scale we use to measure our weather and cooking temperatures.

The Kelvin scale is used primarily by scientists. It does not have any negative values. In other words, the absolute coldest anything in the universe could get on the Kelvin scale would be 0 degrees.

Heating an object can produce the rainbow of colors. That is where the Kelvin temperature scale comes in. If you begin to heat an object, it eventually begins to radiate color. Just like a rainbow, the color at lower relative temperatures is in the red/orange range. As the temperature increases, the color begins to pass through yellow, green, and finally ends with blue/violet. You can demonstrate this to a limited degree if you turn on an electric stove element or a toaster. The glowing metal (usually orange) is radiating that color. This is also why embers glow in a fire.

Fall in NH October 2020

This is a shot looking towards tee box number 2 across that pond and to the right at Pheasant Ridge golf course in Gilford, NH. I took this photo in October of 2020 on a glorious morning just after the golden hour. The colors were still vibrant.

Kelvin and My Tree Story

Remember the tree I thought was so beautiful? It just so happened that I drove past the tree when the sunlight was producing the best orange/red light. On the Kelvin scale the color temperature would be around 2850, maybe a little higher. This happens in the morning and afternoon.

At noontime, the color range is closer to the blue/violet range. The Kelvin temperature on a cloud-free day at solar noon would be at 5,600 or better.

World-class photographers use this to their advantage. Take National Geographic for example. Those awesome photos in that magazine may take days to shoot. The photographer will wait for just the right light temperature to get the effect he or she is looking for. For this same reason, if you visit the Grand Canyon on a vacation, DON'T take pictures at high noon. The colors in the canyon will appear washed out in your photos. Take them just a little after sunrise, or a little before sunset to get the best orange and red coloration.

Column B101

Low Voltage Landscape Lighting Problems

Plan the Cables

Many homeowners who have low voltage landscape lighting have problems with cut power cables. It is easy to forget over time where shallow buried cables lie. To avoid this, try to plan your cable runs so they might not fall where you will possibly landscape in the future. After you install the cables, consider making a detailed map of your light layout and where the cables are. Take measurements off permanent outdoor points like corners of your house, edges of patios, any feature that is not likely to move. Take this drawing once completed and put it in a zip-lock plastic bag and nail it to the wood panel where your main electric circuit box is. You should remember that it is there as you think about buried cables when you start to dig in the future.

Bad Bulbs

I have received complaints from people who feel low voltage light bulbs burn out too soon. This can happen for two primary reasons. If you buy cheap bulbs, don't expect them to last. There are imported low voltage bulbs that are flooding our markets. They look great, but they usually don't perform as well as a domestic name-brand bulb.

Also, you really need to wear cotton gloves when you install them. NEVER touch a low voltage bulb with bare hands. The oils from your hand cause the high quartz content glass around the bulb to actually become brittle. This can cause the high pressure gas inside to leak out!

Companion Articles:  Outdoor Lighting, Landscape LightingLow Voltage Landscape Lighting ResourcesLow Voltage Outdoor Lighting Manufacturers

Column B285

Low Voltage Outdoor Lighting Manufacturers

low voltage deck lighting

Low Voltage Outdoor Lighting Manufacturers

Following is a very interesting list of manufacturers. A very good friend of mine, Dave Butler compiled it. He used to write a column about home technology topics and he was kind enough to share this wonderful list with me so that I could share it with you!

Keep in mind to use price as a guideline when comparing fixtures. High quality comes with a price. Good fixtures usually have better components that cost more to make. Also be sure to watch out for inferior light bulbs. There are some import bulbs that are very poor quality and they burn out in a short time. Buy name brand bulbs from a name you recognize!

  • Brinkman
    800-527-0717
    low voltage fixtures, solar powered designs, border and accent lighting, power consoles with and without timers
  • Hadco
    717-359-7131
    everything you could imagine plus harsh environment fixtures - for those sea coast gardens!
  • Hubbell
    864-678-1000
    a full line of products and bulbs
  • Hydrel
    800-750-9773
    complete line of products, transformers and consoles
  • Intermatic
    815-675-7000
    full line plus some solar powered lights
  • Kichler
    866-558-5706
    full line of lights for every need plus their catalogue has a wonderful two page crash course on how to design an outdoor system
  • Kim Lighting
    626-968-5666
    full line of lights in different metallic finishes
  • Loran/Nightscaping
    800-544-4840
    absolutely one of the leaders in low voltage exterior lighting. The founder of this company is an expert in the field.
  • OWI
    310-515-1900
    low voltage fixtures built into fake rocks!
  • Pioneer Electronics
    800-421-1404
    once you light up your patio, you will need outdoor speakers from these guys!
  • Prescolite / USI
    800-272-9901
    their fixtures are somewhat commercial
  • Stereo Stone
    800-350-7866
    rock lights - seriously! seven designs with speakers too!

Other Solar Stuff

Two other companies sell a wide variety of solar lights including an inexpensive line. Call these two companies and see what they have:

  • Northern Hydraulics
    800-221-0516
  • Real Goods Trading
    800-347-0070

Companion Articles:  Outdoor Lighting, Landscape LightingLow Voltage Landscape Lighting ResourcesLow Voltage Landscape Lighting Problems

07/08

Column B285

Low Voltage Landscape Lighting Resources

trex low voltage lighting

These are the post cap lights on my Trex Transcend deck. It's magical to be on the deck at dusk. Copyright 2018 Tim Carter

I'm So Confused....!

Does planning and installing low voltage landscape lighting sound confusing? If so, you need to get the awesome planning guides that are available.

Perhaps one of the best is produced by Nightscaping. They have a series of booklets, guides, slide cards, etc. that will take you through the planning process.

The Nightscaping Technical Manual is a work of art, available on their website via a PDF download. It is a wonderful collection of photos of fixtures, tables, power center descriptions, etc. If you use this guide in conjunction with others mentioned in this Bulletin, you will really get a good grasp of how to properly install a first class exterior low voltage lighting system!

Low Voltage Planning Guides

It requires some thought to install low voltage lighting. You need to make sure you have enough fixtures and the correct sized power console to supply the required electricity. Not only that, the loads need to be balanced and the correct wire size has to be used. It can be complicating. Certain manufacturers have splendid guides that take you through the planning process step by step. Do whatever it takes to get the following booklets, pamphlets and books. You will not regret it in the least, trust me on this one!

A Simple Pamphlet

Intermatic publishes a very simplistic pamphlet that folds out. You can draw your deck or patio on it and then use the plan to calculate the number of lights, the size of the required power console and then the size of the wire that is used to feed the fixtures. The name of the pamphlet is: A Planning Guide to Building Your Own Professional Grade System. It is a bare bones guide. Keep reading for Intermatic's phone number.

A Must Have Guide!

Intermatic also publishes an awesome 51 page booklet that you must get at any expense. It is a small booklet - about 4.5 inches wide by 6 inches high. It is item # LV-92K and titled Light up Your Life. This booklet takes you through the entire process and has excellent color images, illustrations, etc. You are quickly educated on how to size fixtures, power centers and best of all, choose the right lights for the right purpose! Call Intermatic at 815-675-2321 and do whatever it takes to get this booklet!

CLICK or TAP HERE to get FREE QUOTES from local companies that can add dramatic outdoor lighting to your deck or patio.

Books

If you are online, visit www.amazon.com and use their powerful search engine. Look under Low Voltage Exterior Lights. When you do this, I'll bet an older Ortho book comes up: How to Design and Install Outdoor Lighting by William Wilson. It is a great book.

Visit your library as well. See if they happen to have any recent titles on Exterior Low Voltage Lighting.

Companion Articles:  Outdoor Lighting, Landscape LightingLow Voltage Landscape Lighting ProblemsLow Voltage Outdoor Lighting Manufacturers

Column B285

Landscape Lighting

trex low voltage lighting

These are the post cap lights on my Trex Transcend deck. It's magical to be on the deck at dusk. Copyright 2018 Tim Carter

Landscape lighting is very cool. It can make your deck, patio, backyard, etc. look like a fairyland. It can allow you to enjoy outdoor parts of your home that you might otherwise abandon when the sun goes down. I am sold on the concept and am getting ready to install some at my own home next spring. They can really make your house, plants and landscape features glow with a mystical illumination!

Need To Know

Installing low voltage landscape lighting is simple. Installing it right is the challenge. You need to carefully select the lights, the wire that feeds them and the power center that supplies electricity. If you don't do it right, you can have all sorts of problems. For example, some people think they will just go ahead and buy the largest power center to plan ahead for future lights. This can actually cause problems! You need to typically load the power center to a minimum of 50 percent of its capacity. If you don't do this, it can send too much voltage downstream that will burn out bulbs prematurely.

trex low voltage lighting

CLICK or TAP HERE to get FREE QUOTES from local companies that can add dramatic outdoor lighting to your deck or patio.

Light Layout

There are different ways to plan and install a series of lights. You can do a simple straight run installation where fixtures run in a sequence away from the transformer power console.

A loop installation looks like a circle. This helps reduce voltage drop. If you do this method, you need to pay attention so that wires are not crossed.

A split load installation has several feed wires that lead from the transformer that power individual strands of lights.

A T installation consists of a heavy cable that helps to evenly distribute the power. This cable branches and feeds separate sections of your outdoor lighting system.

Column B285