Settlement Cracks or Shrinkage

cracked concrete slab

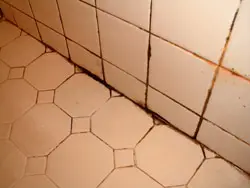
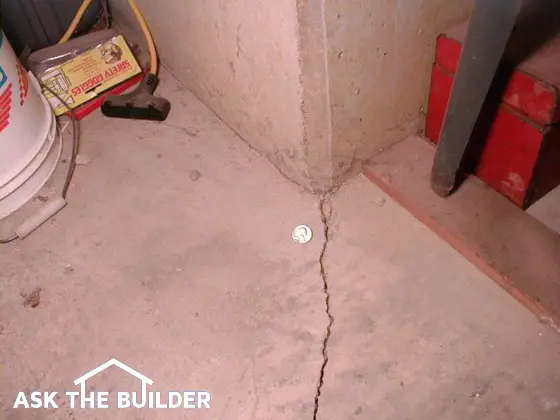
Settlement Cracks or Not? | This nasty wide crack in a basement concrete slab is not a settlement crack. It's a shrinkage crack.

Settlement Cracks - Very Rarely is it Settlement

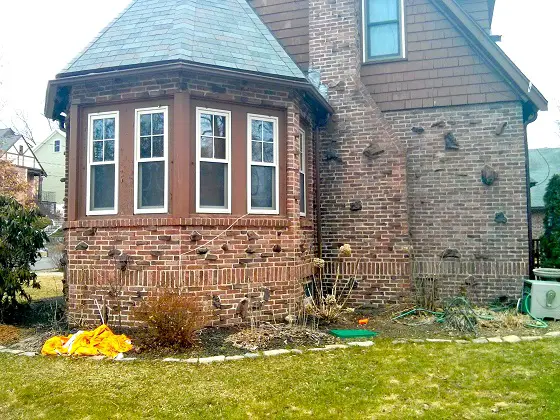
I can't tell you how many thousands of times I have heard a new homeowner complain about settlement cracks. They seem to think the cracks that often develop early in the life of a new home occur because the entire house is sinking into the ground.

In certain cases, this absolutely can happen. Several years ago, I testified as an expert witness in a legal proceeding where a house had been built over uncompacted fill dirt that was placed over trees and other organic debris. The cracks that were tearing the house into several parts were indeed settlement cracks.

What is a shrinkage crack?

But 99 times out of 100, the cracks that you might see in a foundation wall, a concrete slab or in floors, walls, ceilings, ceramic tile grout, etc. are shrinkage cracks. Water is an ingredient of many building materials. It can be a natural ingredient as in the case of wood, or it can be added in the manufacturing process much like milk is added to a powder when making pancake batter. When this water evaporates from the material, the loss in volume can create a tension or tearing force within the building material.

CLICK or TAP HERE to get FREE BIDS from local handymen that can patch concrete shrinkage cracks.

How do you prevent settlement cracks?

To prevent real settlement cracks in your new home, you need to be somewhat proactive. In almost all areas of the nation, building inspectors are responsible for doing a visual inspection of the soil just before the foundation footer is poured. A trained inspector can often see or smell soil that may not be strong enough to support the weight of the new home.

But in the case I testified in, the fill soil brought into the building site looked fine. It appeared to be compacted sufficiently. But underneath the thin layer of good-looking soil trouble was lurking. Building inspectors are not expected to do extensive laboratory soil testing. They, as well as you, can request it if the soil seems suspect.

How Do You Repair Concrete Cracks?

CLICK or TAP HERE to discover the best product to use to repair concrete cracks. I use it all the time.

What can a topographic map tell me?

Before you buy a lot, ask to see the before and after topographic maps of the subdivision. If you study these maps you can see if the lot you are thinking of buying is one that contains fill dirt or one where dirt was removed to fill in an adjacent lot or two. Buying a lot that contains no fill dirt is the first step to prevent settlement cracks. It is no guarantee, but at least you remove poorly compacted fill dirt from the equation.

geology topo map

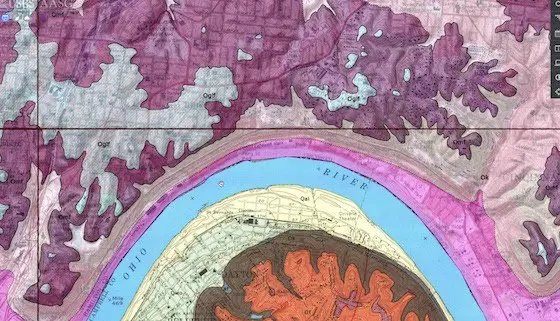
This is a topographic map and a geology map all in one. You can also get soil maps. Watch that video just below. Each color on the map represents a different rock formation.

Your local county agricultural agent may also have a free soil map for the asking. These invaluable tools often classify countless soil characteristics. One of them happens to be average strength. The soil map legend will help you identify weak soils and ones that are well suited to build upon. You do not have to have a degree in geology to understand these maps. They are frequently very user-friendly.

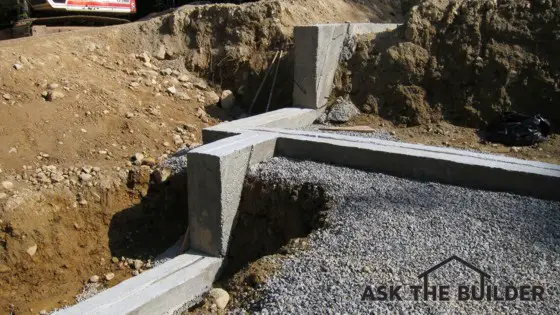
What is a foundation footing?

Once you are sure you are building upon a satisfactory soil, you need to make sure the footing and foundation will not budge under the weight of the home. The footing is perhaps the most fundamental aspect of a home foundation. It's a structural element not much different than a beam or a column. The footing is that part of a house or building that contacts the ground. Everything is built up from a footing.

What Does a Footing Do?

A footing's job is disperse the weight of the entire structure over a wide area. It's no different than the hard rubber pads you place under sofa or piano legs to minimize the imprint they might otherwise make on a hardwood or carpeted floor. If you simply poured a narrow foundation wall on most soils without the support of a footing, the foundation wall would sink into the soil like a jungle explorer in quicksand.

Is Footing Design Critical?

Footing design is critical. Local building codes may state a minimum width and thickness, but more is obviously better. A ten-inch-thick footer that is 24 or 28 inches wide is superb in most cases.

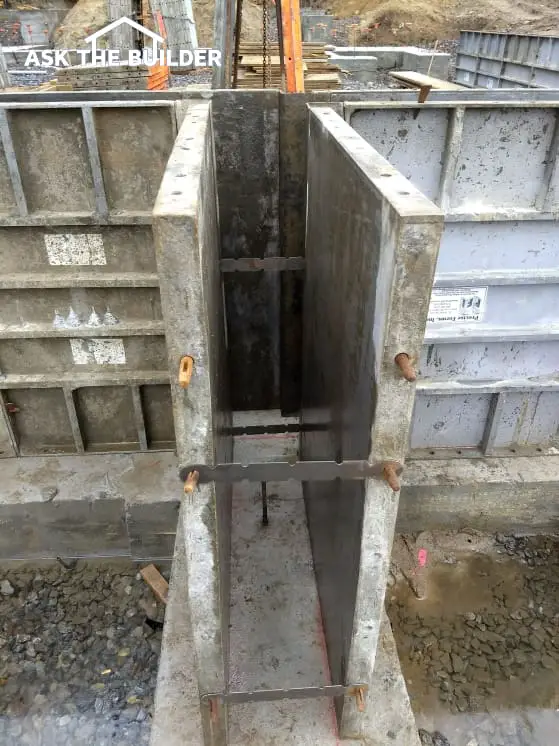
Should Reinforcing Steel Be in Footings?

The footing must contain a minimum of two continuous steel rods that are surrounded by the wet concrete.

Reinforcing Steel in Footings

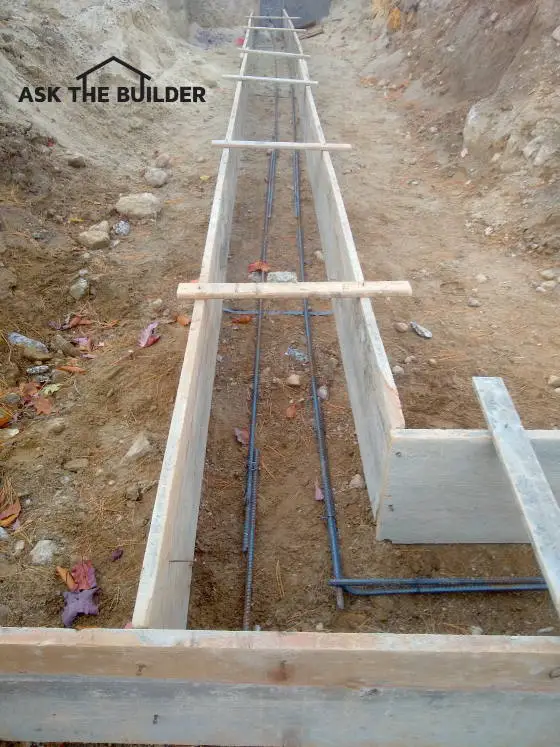
This is typical reinforcing steel in a footing. It will be raised up before the concrete truck arrives.

I prefer to use bars that are at least 5/8 inch in diameter, although 1/2-inch rods suffice. The steel should be placed in the lower third of the footing. If the footing is 10-inches thick, then be sure there are 3 inches of concrete UNDER the steel rods.

Keep in mind that the concrete used to pour the footing is available in different strengths. It costs just a little bit more money to add strength. Specify 3,000 pounds per square inch(psi) at a bare minimum. If you can afford 3,500 psi concrete for the footing, order or specify it.

How thick should the foundation walls be?

Poured or cast-concrete foundation walls should be at least 8-inches thick and some taller longer walls should be no less than 10-inches thick.

Your foundation walls act as giant beams when they are placed on the footer. If you are planning for a full basement, they also do double duty as retaining walls. To prevent cracks, be sure you use similar strength concrete as in the footers. The foundation walls must also get thicker as the walls get taller. Eight inch thick walls are fine where they may only have 5 or 6 feet of fill dirt up against them, but if you have more, I would specify a ten inch thick wall.

Is Steel Reinforcing Important in Foundation Walls?

Steel reinforcing is also important in foundation walls. Typically, a builder might place two rows of steel in the lower and upper portion of the wall. If you want bulletproof concrete walls that will stand the test of time, give serious consideration to extra horizontal steel as well as vertical steel bars that lock into the footer and continue up into the top of the foundation wall. Vertical steel bars help prevent horizontal cracks in the foundation walls.

Is it possible to help prevent foundation cracks once the house is built?

Yes. You can prevent foundation cracks by keeping the clay soil damp all year. You can install simple vertical watering holes to deep water the soil using a hand auger and filling the holes with rounded pea gravel.

Watch this video.

Column NH017

Solid Masonry Construction – Standard in Old Homes

brick and rock house

Solid Masonry Construction | Here’s a very unique and tasteful use of brick and rock on the exterior of a house. The tips below are SO GOOD that I shared this column with the 31,000 subscribers who got my December 2, 2020 FREE newsletter. Photo Credit: Tim Carter

Solid Masonry Construction - The Way It Was Done in 1900

Solid masonry construction was the standard way to build in the late 1800s and early 1900s. Brick homes were more substantial and frame homes were considered maintenance nightmares because they had to be painted.

Just today, I was asked a question by John and Terry from Chicago. They're building a unique new home that blends old building methods with modern techniques.

Although the exterior of the home is brick, what is behind the brick facade in different places might surprise you. Their new home is a blend of solid masonry construction and brick veneer. John and Terry, though, wanted to know if they are making a mistake with respect to the solid masonry aspect of the construction.

What is solid masonry construction?

Solid masonry construction in the residential marketplace is, in many regions, a disappearing building technique. Fifty years ago, it was a very common practice to have exterior walls that were either solid concrete block or a combination of four inch thick concrete block that had an exterior face of split stone, brick or even stucco. This method of construction was a holdover from 80 to 100 years ago when many brick buildings were built two or three wythes or thicknesses of brick.

Was Plaster Applied Directly to the Brick?

The interior plaster was often applied directly to the masonry walls in old homes and buildings. Fifty years ago, it was common for carpenters to nail furring strips to the masonry. Drywall or plaster was then attached to the wood strips.

The 8-inch, or greater, thickness of the walls was necessary to support the structure and roof above. Carpenters were part of the building team and often worked side by side with the masons so floor joists could be fit into the structure as it was being built.

Is solid masonry a good insulator against winter cold?

Solid masonry is a bad insulator against cold. Modern building methods allow contractors to insert thick closed-cell foam inside solid masonry to help conserve energy.

But solid masonry was popular when heating fuels were cheap and before air conditioning was in widespread use. Solid masonry is a poor insulator and anyone who lives in an older solid masonry building will readily tell you how cold the exterior walls can get in the dead of winter.

Is Masonry More Expensive Than Wood Frame?

Building a traditional masonry wall is often more costly than building a wood framed wall system. It often takes more time to build a masonry wall than to do the same thing with wood studs. If you compare traditional wood framed walls to traditional solid masonry walls both of the same finished thickness, you will readily discover a wood framed wall offers more insulation.

As construction practices begin to shift, so do the products used in the systems. Brick and concrete block have remained fairly consistent over time, but other building materials have changed radically. For example, standardized windows and doors have, for the most part, transitioned to a wood framed wall standard. The common extension jambs for both windows and doors favor a wall framed with 2x4s or one with 2x6s. You can get windows and doors for solid masonry construction, but the jambs and installation details will be different than if your builder was working with wood walls.

How can solid masonry walls be insulated?

Solid masonry walls can indeed be insulated. There are any number of ways to achieve high insulating values. The outer layer of masonry can be separated from the inner layer by a 2.5 inch space where two-inch thick closed cell foam sheets can be installed.

This foam, when combined with additional insulation on the inside of the wall, can create a very energy-efficient structure. But keep in mind that the cost to achieve this system will undoubtedly be higher than stuffing a 2x4 or 2x6 wall stud cavity with fiberglass, cellulose or even spray-foam insulation. You can also rapidly nail one-half inch thick closed cell foam to the exterior wood frame walls to add even more insulation to this wall system.

The bottom line is simply that the widespread use of solid masonry construction had its day in the sun. It still works well in parts of the USA where weather is moderate and solid masonry is favored for all sorts of reasons. For example, wood-consuming termites are so ferocious in the South and Southeast that solid masonry is one of the only acceptable building materials. Unrelenting summer heat in the Southwest makes solid masonry a darling because it mimics the adobe structures native Americans lived in to stay cool. But for many of us, wood framing has become the standard.

Will Solid Masonry Stand the Test of Time?

Solid masonry will stand the test of time as evidenced by many buildings that are well over one hundred years old. But building a home this way may set you back more money than you care to spend to build this type of legacy. Unfortunately, as with many things, the decision is controlled by money. If you have the money for solid masonry and wish to spend it, then do so with my blessing!

Column NH016

Negligent and Arrogant Builders

What happens when a builder makes a mistake?

A frustrated homeowner from Indiana recently wrote to me asking for help. After reading his letter, I felt you might find yourself in a similar situation when building your new home. It turns out the Indiana man had a builder who didn't install the right vents in an exterior wall of the home. When the mistake was brought to the attention of the builder by the homeowner, the builder simply shrugged it off and said no one will notice and the substitute vents will work just as well as the ones that should have been installed.

Will suing a contractor work in all cases?

The trouble is the someone who did notice happened to be the same person who pays the bills. The story continued to unfold with the builder refusing to rectify the mistake. The homeowner proceeded to talk with his attorney to find out if legal pressure could be used to have the right vents installed. The legal advice was a bitter tasting pill: The cost of litigating the matter was ten to twenty times the cost of the repair. To make matters worse, there was no guarantee that a legal solution would be 100 percent favorable to the homeowner.

Watch some more of my videos on Finding the Best Contractor. Just click or tap here.

At first blush, this might scare the beejeebers out of you causing you to back out of the new home market. The thought of dealing with an autocratic builder who shrugs off mistakes is most disconcerting. In reality, it would be a nightmare to deal with. The good news is you don't have to deal with people like this and you can insert several provisions in your contract with your builder that give you an option or two in the event your builder makes a mistake he wishes to walk away from.

Should you get a detailed cost estimate of the project?

The first thing you must do is request a highly detailed cost estimate with your bid from each builder. This breakdown might easily contain 150 line items, perhaps more. It is vitally important that the detailed cost breakdown becomes an addendum to the contract between you and the builder. This detailed pricing allows you to attach costs to different aspects of your job and can help initiate discussions as to how much things might cost if they need to be redone. More importantly, the line items allow you to make sure you only pay a given amount for work that is complete and totally satisfactory.


How would you like me to build your new home? It's probably impossible for me to fit your job into my schedule, but I will gladly share hundreds of my tricks and building secrets with you and your builder. Check out my New House Specifications.


How do you protect yourself in the contract?

Your contract needs to contain language that allows you to withhold money for work that is not complete and/or work that does not pass inspection and/or work that simply is wrong or poorly done. The contract should contain language that also gives the builder a specific time to begin the repair work. If the contractor walks off the job or drags his feet with respect to initiating the repair, the contract should contain language that permits you to obtain quotes from other builders or tradespeople who will step in and take care of the problem. The cost of the repair is paid for by you but deducted from the amount you owe the original builder.

All of these clauses need to be written by a competent attorney who deals in contract law in the state where your home is being built. You must also talk with the building department before you sign the contract. The local building ordinances may create a sticky situation with respect to who is responsible for work being done on your new home. If your initial builder takes out the building permit and ignores you, find out if there is a way to transfer the building permit to you or a second builder who may have to take over the job. No doubt this will be unpleasant, but failure to look into this probability may cause an enormous headache and legal problem if your initial builder holds hostage the building permit and your final Certificate of Occupancy.

Perhaps the best advice is to find a builder who doesn't treat you like a castoff. I can't emphasize how important it is to actually talk with three or more of the builder's past customers. Ask about disputes. Drill down and find out why they happened and how they were resolved. Ask if the builder ran towards the problem or ran away. You want to hire a builder that sprints to the solution of each and every problem.

Column NH015

Foundation Tricks for Waterproof Homes

stepped foundation wall

Here's a foundation footing that's making a transition from one level to another. It's poured continuously for extra strength. Photo Credit: Tim Carter

If you are a curious sort of person, you might explore construction sites from time to time. I used to do this as often as possible, when I first jumped into the building trade. I loved to see how things were being built. It usually didn't take long to see trends or methods from one jobsite to another that were similar. The same is true today. The only problem is what you see is not necessarily always the best way to proceed with a given task.

Should the top of a poured foundation wall be flat?

Let's talk about a simple detail of new home construction that your builder may do on your new home. I am talking about the mundane top of your poured concrete foundation. Inspect an average residential concrete foundation that is either eight or ten inches thick and the top of that foundation will almost always be totally flat. You may think this is a good thing as who would want one that might be sloped or some other odd shape?

If your new home is one covered with vinyl, wood or some other siding product, I would agree with you. Flat foundations are a good thing. The reason for this is fairly straightforward if you stop back at the jobsite a day or two after the rough carpenters have started to frame your home.

Should the first floor exterior wall be flush with the outside face of the foundation?

Look at how the wood subfloor system connects to the poured concrete foundation. You should quickly notice that the wood subfloor and/or the first floor exterior wall surfaces are flush with the outside face of the concrete foundation. This construction detail is done on purpose so the finished exterior siding that is nailed to the wood walls can lap over the poured concrete one and one half inches or more.

This overlap creates an excellent watertight barrier as rainwater streams down the exterior siding. Without the overlap, capillary attraction can cause the streaming water to cling to the underside of the siding and subsequently find its way to the top of the foundation. If this happens, the water can find its way into your home.

Is a flat foundation a good choice for a brick or stone wall?

But if you are building a home that has a brick, stone or some other facade that needs the support of the foundation, a perfectly flat foundation may not be a wise choice. Masonry materials such as brick, and stone can and do allow water into the wall system. This has been a known fact by the construction industry for years. High quality builders use a series of flashings and water barriers to collect this water and redirect it to the exterior of the structure. But since Mother Nature's gravity force pulls water down, a simple and clever foundation design can be implemented that makes it very difficult for this water to penetrate inside your home.

concrete foundation forms

Note the metal cross straps that hold the vertical forms in place against the pressure of the wet concrete. Copyright 2018 Tim Carter


Prevent a wet basements by using this Basement Waterproofing Checklist to hire a great professional. I offer a 100% Money Back Guarantee.


The subcontractor that pours the concrete foundation can insert a simple box inside the forms before the concrete is poured. This box can be six, eight or even ten inches high and just four inches deep. The top of the box is set so it is level with the top of the foundation. The box is attached to the concrete form that faces the outside of your home.

After the concrete pour is complete and the subcontractor strips off the forms, you discover that the box created a step or ledge in the top of the foundation. Instead of the first course of brick or stone starting at the same level as the wood floor and wall system, it actually starts below the top of the foundation. The top of this ledge is lower than the rest of the foundation.

It should be obvious why this ledge helps your brick or stone home. Any water that flows behind the brick flows down to the top of this ledge. For water to back up and run over the top of the foundation into your home, it will have to rise to the full height of the ledge. This is very unlikely if the builder and masonry subcontractor have inserted all of the necessary flashings, water membranes and water weep holes.

The foundation subcontractor will charge a little more money to produce this ledge, but it provides years of peace of mind. Be sure to ask your potential builder all about brick and stone ledges. If he says, "Huhhhh?", it might be time to continue your hunt for a more knowledgeable builder.

Column NH014

Ceramic Tile Tips


subway tile in tub shower

Ceramic tile tips are like candy at Halloween. Your job is to only consume good ones as you'll discover below.

Ceramic Tile Tips - Be Sure You Get Expert Ones

You're here because you either haven't installed tile before or you tried and it didn't go so well. Hah! I remember my first ceramic tile experiment. That's what I called it!

Ceramic wall tile seems to find its way into many new homes. There are many reasons why this building product maintains its popularity. It's beautiful, it's durable and it often becomes the centerpiece of a room with respect to interior decor. Choose wisely and the ceramic surfaces will garner countless compliments from all who visit your home.

What is Ceramic Tile?

Ceramic tile is clay that's been chemically transformed by high temperatures in a kiln. Before firing, the clay is soft and pliable. The high temperatures of the kiln change the mineralogy of the clay transforming the soft putty material to hard stone. It's very similar to what happens with concrete, although concrete doesn't need to be put into a kiln no get hard.

Ceramic tile is simply pottery. It is a clay product that is fired in a kiln. The extreme heat in the kiln changes the crystal structure of the clay making it very hard and brittle.

CLICK or TAP HERE to get FREE BIDS from local tile installers. I'm talking really good ones.

How Does Tile Get the Shiny Finish?

Prior to entering the kiln, the clay surfaces are painted with a glaze. The heat of the kiln transforms the glaze into an ultra-thin layer of glass.

Most glazes are harder than steel which is why you can't scratch the surface of most ceramic tile with an ordinary knife and fork.

How Can I Avoid Cracked Tile?

You avoid cracked tile by making sure there are never any hollow spots under a tile. You also need to make sure the floor under the tile is rigid and will not flex. You can install tile on wood floors, but the wood must be very thick.

The hard tiles have tremendous strength when you squeeze them between your fingers. But if you bend the tiles subjecting them to tension or stretching forces, the tiles crack readily. Tension forces within a new house are commonplace. The lumber used to build new homes is usually fairly dry and stable when it is delivered to the jobsite. But rain, humidity and water liberated from other building materials such as drywall compound, paint, etc. can cause lumber to swell.

Will Tile Shrink If Installed on Wet Lumber?

If your tile subcontractor installs ceramic tile on lumber that has gorged itself on this diet of water vapor, the tile can start to crack as the lumber shrinks. This shrinking happens over time after you move in to your new home. In fact, these cracks that appear in walls, ceilings, tile and tile grout are often called settlement cracks when in fact they are almost always shrinkage cracks.


If you're putting ceramic tile in your new home, check out my Ceramic Tile Installation Checklist to learn exactly what you should know about the process. Avoid making costly mistakes with the help of this document. I offer a 100% Money Back Guarantee.


Can You Prevent Cracks in Tile?

You can prevent some cracking but it is very difficult to stop all cracks. In a perfect world, a builder could stop construction after the house was framed and had a roof on it. The lumber could then dry out. But this is not realistic. The cost of money and the ever-present deadlines put pressure on builders to build faster not slower.

How Can I Make a Wall Flat For Tile?

You can make a wall flat by using light-gauge steel studs. You can also use normal wood framing, but be sure the 2x material is cut from the center of the tree. Look at this photo for an example:

straight stud old lumber - new lumber growth rings

The piece of lumber on the top was harvested from the forest in 2013. Note how you can see it was cut from the center of the tree. You can see the sapling center ring. The one on the bottom was taken from the slopes of the Rocky Mountains just after the end of the Civil War or War of Northern Aggression. Photo Credit: Tim Carter

In critical areas, it's possible to take wood framing out of the equation. A builder can frame wall with steel studs or special engineered lumber that resists swelling and the wicked twisting and warping that can happen when ordinary lumber dries out. Using these special materials also helps to produce perfectly flat wall surfaces that tile subcontractors crave. Perfectly smooth wall surfaces make for ideal finished walls. The reason is simple: Highly glazed tiles reflect all light. If one tile is bent a slightly different angle than the one next to it, it stands out like a sore thumb.

What is the Best Wall Material Under Tile?

The best material to install tile over is one that's strong and waterproof. Cement board or other waterproof smooth products are excellent.

It's also vitally important that the tile be installed on a substrate that will indeed stand the test of time. Many years ago tile subcontractors installed their tile directly on concrete mortar. This labor-intensive process has been simplified as your builder and tile subcontractor can readily buy sheets of one-half-inch thick concrete. Using special galvanized screws, they attach this flat substrate to the wall studs. The thin sheets of concrete board are strong, durable, and waterproof.

How Do You Avoid Cracked Grout?

To avoid cracks in grout it is very important that the tile subcontractor mix the grout properly. It should not be too wet. The grout, when mixed, should resemble thick but creamy icing. Watch this informative series of videos showing how to install floor grout.

Once the grout is troweled over the tile, the excess needs to be removed. If the contractor uses a sponge that has too much water, this excess water can soak into the wet grout and weaken it. Within a short amount of time, the grout can crack and sometimes fall out.

Want more Ceramic Wall Tile Tips - click here.

Column NH013

Custom Woodwork – It’s Affordable

custom woodwork for base boards

How to Make Custom Baseboard |This is all custom baseboard and woodwork. Look at the fancy inside and outside corner pieces.

How to Make Custom Baseboard - You Just Need a Knife

Have you ever walked through a distinctive older home? Perhaps you grew up in one. Undoubtedly it had hardwood floors, smooth plaster walls, larger windows and a smooth plaster ceiling. It's my guess you have walked through new model homes that have all of these same amenities but something just isn't quite right. The new house just doesn't look like the old home. The difference is just skin deep. In almost all cases, the new home builder failed to mimic the woodwork that you see in those fine older homes.

Is custom woodwork affordable?

Custom woodwork is affordable if you run hundreds of feet of it. You have to spread out the setup fee and the cost of grinding the custom knife over lots of trim  for it to make sense.

Were you told by your builder or architect that you could get custom woodwork for your home? Or, as in many cases, were you told it is prohibitively expensive? In either case, you were quite possibly shortchanged. Not only can you copy the style and profiles found in older homes, but it can also be done with little or no pain to your pocketbook. Perhaps the most surprising thing is that you can actually draw your own pattern for any door or window casing, baseboard or toestripping.

How is custom woodwork made?

Door and window casings, baseboards and other wood moldings are created very easily. They start off as regular rectangular pieces of wood not much different than a stock 1 x 4 or 1 x 6. This wood is fed into a machine that has a high-speed rotating knife that cuts the profile into the stock piece of lumber. The knife has a special shape that is a mirror image of the finished profile you see on the finished wood trim. Creating a custom knife takes very little time and this tool can be used to cut thousands of linear feet of wood without being re-sharpened.

Why is the Woodwork at the Home Centers Cheap?

The woodwork at home centers is usually cheap because it's finger-jointed crap.

hardwood floor inlay farmcrest fireplace

How to Make Custom Baseboard | That green stripe on the wall is custom baseboard. This hardwood floor, with decorative inlay, is also customer work.  It was in my own home I built. The installer I hired used a straightedge and shingles to make the hardwood perfect. © 2020 Tim Carter

The cost issue is a moot point for the most part. Don't be fooled by many of the moldings you see at lumberyards or home centers. They may be imposters. Often these moldings are made from scrap lumber that has been joined together to make long pieces of trim. Some of these are even cover with a paper-thin layer of wood veneer to simulate a solid piece of wood. These moldings are often cheaper than custom solid-wood molding, but always keep in mind you are not comparing apples with apples.

Is the extra cost for custom woodwork worth it?

The cost per linear foot to create custom solid-wood trim is often just a little bit more than what you might pay for humdrum molding you see in all of the other houses in the sub-division. Keep in mind that the custom woodwork in a home makes an enormous statement. Think of it as the gleaming necklace or bracelet or earrings a woman wears. Women are beautiful without jewelry, but the accent jewelry produces simply enhances their beauty.

Why is Scale Important?

The scale of woodwork is also very important. If your new home will have 9 or even 10-foot ceilings, the trim must be larger than normal so that it looks good to the eye. A smaller trim with a dashing profile will appear skimpy in a room with tall ceilings.

If you or your architect is in doubt about how to achieve the proper size, don't experiment. The easy thing to do is to visit older homes and find one that has woodwork that looks and feels right. Get out your measuring tape and mark down the sizes. To visit older homes, pay attention to open houses hosted by Realtors in the older sections of your city.

Where Do You Find Custom Baseboard or Trim?

The wonderful custom woodwork in my own home was readily available. Just about every major city has several discreet woodworking mills and businesses that take rough lumber and turn it into things of beauty. Within moments of doing a search on the Internet using Woodwork or Custom Woodwork followed by your city. You should discover any number of local companies that can make any trim you need from just about any lumber species you desire.

How Can I Save Money Making Custom Baseboard and Trim?

If you intend to paint the woodwork in your new home, you can save substantial money by ordering your new woodwork as paint grade material. This type of lumber is very affordable as it often has slightly irregular grain coloration that detracts from the wood when stained. But since paint can mask these defects, it makes sense to use this lower grade for your home.

Should I Order Extra Baseboard and Casing?

Be sure you order extra trim for your home. Accidents can happen and you do not want to be 8 or 10 feet short when trimming out the last room of your home. Once you or your builder calculates the total linear footage required, be sure to take the time to see how the custom trim compares in pricing with the stock trims your might have chosen. You'll probably be shocked to learn it only costs several hundred dollars to get a personalized and unique look for your fabulous new home!

Column NH012

Storm Water Drainage

downspout splash block

Storm Water Drainage | Splash blocks don't do much to channel water away from the foundation, but they can slow soil erosion. © 2017 Roger Henthorn

Just last night, I was watching the British Broadcasting Show Ground Force. The stars of the show had come to Atlanta, Georgia to renew the backyard of a home. As dawn broke on the second day of the two-day shoot, the stars of the show and the homeowner discovered that an overnight rainstorm had flooded the side yard and part of the back yard where the new pond, garden and deck were being installed. I know, you are wondering what in the world this has to do with your new home in Chicago. In one word: Everything!

Do splash blocks help with storm water?

For two brief seconds, the videographer showed the cause of the flooding. The downspouts from the roof terminated at the bottom of the exterior walls and the rushing water simply hit a two-foot long concrete or plastic splash block. The only purpose the diverter served was to absorb and spread out the energy of the falling water. Without the splash block, the soil around the house would quickly erode. The roof water was not being piped away from the home.

Do building codes require rain water be piped away from the foundation?

Many building codes do not mandate that rain water from a roof be piped away from the foundation. Keep in mind that building codes are different in many parts of the nation. We are getting very close to having one national building code, but even when we do, local building officials can tweak the code to match local practices and such.

Add to this the storm-water management problem many have just started to realize in the past 15 years. Do some research and you will discover that urban and suburban flooding has become a reality during the past 20 years. Part of this is because storm water systems designed many years ago simply underestimated the volume of water that is generated by hard surface house roofs, driveways, patios, parking lots, etc. I don't think that engineers 50 or 75 years ago ever dreamed a shopping mall or a subdivision with hundreds of homes might ever exist.

Where do you redirect downspout water?

Modern planners and engineers deal with this storm water using sophisticated water retention systems. Roof downspout water can be piped directly to underground storm water retention basins. In some instances it can flow into open retention or detention features. The bottom line is that your new home should become a responsible member of the community. The water from your roof should be captured and redirected to a place where it does not cause a problem on your lot or the lot of a neighbor. At the very least, it should be released slowly so it does not overwhelm the natural waterways near your home.

If you are lucky enough to build in a community that requires storm water to be piped to a central location, be sure the piping on your lot is the right type and it is installed the correct way. Even if you are not required to discharge your storm water to a central location, it is still a great idea to divert it as far away from your home as possible.

What size should sewer line pipe be used for downspouts?

I prefer to use four inch diameter plastic sewer line pipe for down spout drain lines. This piping is very durable and the joints between sections of pipe and the fittings are very tight. You can often buy fittings that have rubber seals or ones that are glued with a regular solvent glue. Using either type insures that water will not leak from the pipe and that tree roots will not enter the piping system.

dvd french drain outside cover

Do your own DIY install of a Linear French Drain with Tim Carter's time-tested methods and materials! CLICK THE IMAGE TO ORDER NOW!

The installer of the piping should avoid the use of 90-degree fittings except where the pipe terminates against the foundation wall and turns up to capture the roof downspout pipe. These tight bends when placed downstream in the piping are enormous obstacles for plumbers or drain cleaning companies. If your piping gets clogged in the future, 90-degree bends may prevent a company from extending a metal drain cleaning wire down the piping system. You can easily create a 90-degree turn by gluing two 45-degree fittings together. Two 45-degree bends create a gentle turn that the drain cleaning equipment can navigate.

What slope should the drain pipe have?

The piping should not be buried in the un-compacted fill dirt alongside a foundation. This dirt settles over time and the piping can fracture or develop a negative pitch where water actually flows the wrong direction. It is better to put the pipe in the undisturbed soil that usually can be found about 4 or 5 feet away from the foundation. The buried pipe can cross this uncompacted soil to get to the virgin soil, but make sure it has plenty of pitch. I recommend one inch of fall for every two feet of run as it crosses this danger zone. Once the pipe is in good soil, it can have a pitch of 1/8 to 1/4 inch of fall per linear foot of run.

If at all possible, take photos of the installation of this system. These photos will prove invaluable years from now as they will help you locate the piping should you need to dig a hole or excavate for any reason on your property. Place the photos and negatives in a safe place such as near your electrical circuit board panel. Put the photos in a sturdy labeled envelope and nail it to an open spot next to the electric panel. The circuit breaker panel board is rarely disturbed and makes a great spot to store facts about your home.

Column NH011

Garage Plans 2 Car Planning Tips

2 car attached garage

Garage Plans 2 Car | This looks like a great 2-car garage. It's NOT. It SUCKS. It's too small. You'll never be able to store anything along the walls.

"Over the years, I've discovered a two-car garage needs to be 32 feet wide by 26 feet deep."

Garage Plans 2 Car - 99 Percent are Too Small

Almost all 2-car garages are too small. You can't open your car or truck door without hitting something along the wall. The overhead door might not be wide enough or tall enough for a modern full-sized pickup truck. The list of flaws of garages is endless.

Before you get too attached to your new home plan, you better step back and take a look at your existing garage. If you are like most people, you probably have accumulated too much stuff. Well, maybe that isn't the problem. Maybe your existing garage is simply too small and/or the storage system is simply undersized or antiquated. If you want to avoid garage storage nightmares, now is the time to exorcise that demon from the blueprints.

Are Most Garages Undersized?

It is a sad but true fact that many garage spaces are simply undersized for the average homeowner. By the time you park cars, place garbage cans, lawn mowers, garden tools, bicycles, workbenches, etc., you rarely have any space to spare. What's more annoying are the delicate maneuvers you must make to get in and out of cars without scratching or bumping doors. All of this can be avoided if you speak up during the design process.

How Can You Create the Perfect Garage?

One method of creating a floor plan for your new garage is to simply look at your existing garage. Use a measuring tape and see how much extra space you need around the fixed objects in your garage. For example, with your car(s) parked within the garage, note how much space would be needed to comfortably move around the front, rear and sides of the car(s). Do the same around any workbenches, floor and wall cabinets, etc. If you walk around with everything in the garage and feel cramped, not that on a piece of paper.

How Big Should a Garage Be?

A garage should be big. It should have plenty of space in front of your car and plenty of space next to it. Over the years, I've discovered a two-car garage needs to be 32 feet wide by 26 feet deep. These are interior floor space dimensions, not exterior foundation dimensions. As for the height, a garage with a 12 or even 13-foot-high ceiling is ideal. This height allows you to construct a loft that runs over the hoods of the cars you park in the garage. All sorts of things can be stored on this loft.

Should I Use Storage Trusses for the Roof?

If that kind of interior height does not work with the style of your plans, you may be able to gain extra storage space by asking your architect or builder to install storage trusses over the garage. These unique trusses are made to support both the garage ceiling as well as a variety of boxes and possessions one might find in the average attic. If your overall house plan has steep roofs, inquire about attic trusses over the garage. Using these affordable trusses, you get a bonus room on top of the garage!

What Size Should the Garage Doors Be?

Don't make the mistake many do with respect to the actual garage doors. If you are going to have two separate doors, be sure they are nine feet wide and eight feet tall. This will allow you to easily park with ease a vehicle that might have protruding side mirrors. The extra height allows you to park an SUV that might have pairs of skis, a ham radio antenna, or a lower profile carrier on the roof. These things rarely make it if the door is the standard height of just seven feet.

How Many Electric Outlets Should Be in a Garage?

Electric receptacles are a must. Be sure you plan for an exterior receptacle near the garage doors that allows you to power tools as you do projects in fair weather. Be sure you have several dedicated 20 amp electrical circuits near your workbench. If you plan to become a more serious do-it-yourselfer, be absolutely certain several larger empty conduits are installed between your main electrical panel and the garage. These will allow an electrician to install more circuits to the garage with ease in the future.

Is Ventilation Important?

Ventilation is an important consideration. I highly recommend a through-the-wall ventilation fan that exhausts fumes or hot air from the garage to the exterior. If you work with paints, stains, and other solvent-based products in your garage, a fan such as this will give you plenty of replacement air. They also work well to keep garages cooler in hot climates.

What About Floor Drains?

You should install floor drains. These capture dripping rain water and snow meltwater. Don't slope the floor to the doors. The water collects against the door seal creating a puddle. In cold climates, the door can freeze to the floor.

Column NH010

New Construction Change Orders – Costly

house blueprints with marker and scissors

Construction change orders | Avoid change orders with fantastic plans like this. CLICK or TAP HERE to order a PDF set of EXCELLENT PLANS that you should copy.

Construction Change Orders - Death on a Stick

Construction change orders can cause you great financial harm. Some contractors use change orders to dramatically increase their PROFIT.

How Can I Avoid Construction Change Orders?

You avoid change orders by making sure your plans are accurate and thought out. CLICK or TAP HERE to download a set of excellent plans so you can see how yours should look.

You need to make sure you can visualize your new home in 3D from a set of plans. If not, use computer-aided design to render your plans in 3D.

CLICK or TAP HERE to get FREE BIDS from local architects that can give you 3D plans!

Change orders can be eliminated by you selecting all fixtures, materials, etc. BEFORE the drawings are made. This way the builder can't come back at you saying it will take more time to do a task. He had the chance to add that to his bid when he was reviewing your drawings.

How Big is the Home Building Process?

The new home building process is titanic in nature. You will be asked hundreds, perhaps thousands, of questions by your architect and builder. The thought of this alone scares some people to the extent they avoid building a new home.

Those that do decide to stroll down the new home building path may twist an ankle or even dislocate a hip if they begin to modify decisions that were made months earlier in the process. If you want to avoid the pain associated with injury, then by all means do whatever is necessary to avoid change orders.

Change orders in new construction are like flies at a picnic. Change orders aggravate just about everyone invited to the party. Most builders detest them, sub-contractors become frustrated and homeowners feel they are being taken advantage of. Rarely is there a winner in the change order game.

How Do I Locate a Great Builder?

It's not too hard to locate a great builder. CLICK or TAP HERE for tips.

Why are Change Orders Bad?

Construction change orders are bad because:

  • they can slow down the project
  • they can often add extra cost
  • they can create distrust between you and your builder

Imagine you're a builder. Your project is running smoothly and you are on schedule. The finish carpenters are on the job and the painters are not far behind. You have several other customers who are anxiously awaiting you to start their jobs.

But one or more of your current customers calls you one morning to say they would love to have the family room window one foot wider. The customer says they understand there will be a cost to change it and are willing to pay for it.

How Complex is One Change Order?

One simple change order can be very complex. Consider the following situation where the customer wants a larger window. Here's what's involved in making it happen:

  • You're going to have to spend hours to calculate the cost of the change and then administer it through all of the stages
  • The window they want may take you six or more weeks to get to the job site
  • The exterior brick must be carefully cut so as not to reveal the surgical procedure required to enlarge the opening
  • The rough carpentry opening has to be enlarged
  • Your electrician may have to be called in to move a wire or outlet
  • Drywall repairs will be necessary

In other words, the finish date of the job will be delayed. You will be distracted taking care of this pesky change order when you should be focusing on your other jobs that this current customer knows nothing about. In other words, this change order becomes a pain in the you-know-what.

How Does A Homeowner View a Change Order?

Your view as a homeowner perspective is very different. After all, you're no expert.

You looked at the plan and saw a window opening and the view of the window on the plan elevation, but you had no idea that there would be so little glass area.

The builder tries to convince you - because he does not want to change the window - that you will get used to it. In fact, you heard him mumble, "Heck, I'll not be able to see that window from my house."

You think to yourself, "How hard can it be to change a silly window?"

After getting the written change order, you faint thinking, "What? It costs THAT much!"

What Happens With Multiple Change Orders?

Now, imagine this situation replayed 25 or even 50 times during the building process as you discover both little and big things you want to change. One of two things usually happens:

1. You break your personal bank or credit line with your self-imposed cost overruns.

2. Your builder blows one or more head gaskets and your relationship deteriorates to where neither of you speaks to one another.

Believe me, I've seen both happen. It's an ugly sight. The process of building your new home was supposed to be fun and filled with happiness. Instead, change orders turn it into a dark place full of animosity.

How Do You Avoid Change Orders?

You can avoid change orders fairly easily. Doing so will allow you to frequently stay on budget and complete the job on time. You need to open the lines of communication early in the process. Do not be embarrassed to say you do not understand how something will look. Do not hesitate to ask for a 3-dimensional printout of what each room will look like. Inexpensive computer software is readily available that will allow you to see your new home. In fact, it will even allow you to easily build a scale model of the home with all interior and exterior walls with the finishes on them!

Be sure to see actual samples of hardware, faucets, lighting fixtures, etc. Do not rely on a photograph in a catalog to make your final decision. Select all products and finishes in the planning stage, not the building phase of your job.


How would you like me to build your new home? It's probably impossible for me to fit your job into my schedule, but I will gladly share hundreds of my tricks and building secrets with you and your builder. Check out my New House Specifications.

Column NH009

Mold Prevention When Building a Home

tile mold

Mold Prevention is easy. This is gross mold growing on shower tile. It's pretty easy to stop this from happening.

Mold Prevention - You Must Keep Everything Dry

Mold is very akin to fire. To have a fire you need just three things:

  • fuel
  • heat
  • oxygen

Oxygen is always present all around you and your home so you can't do much about that. The fuel for a fire is also everywhere. I don't think you want to sleep on a piece of steel. Imagine the inside of your home if you removed ALL the things that can catch on fire. That leaves one thing you can control: heat.

Mold is so similar. Here are the three things you need for active mold growth:

  • mold spores
  • food
  • water

Mold spores are everywhere in your home. Forget about trying to clean them all up. Food is everywhere unless you're an extreme OCD person. I happen to know a few who take cleaning quite seriously. But think about water. You can control it to a large degree. Keep things dry, and your mold problems will disappear. Period.

Do Builders Know How to Keep Houses Dry?

Based on the email help requests I get, I would say many builders and subcontractors don't know how to keep a house dry.

If you have a skin in the new home building game right now, you must surely be acutely aware of the mold issues that are plaguing many new homes. There are many reasons why mold is growing where it should not be.

What is the Primary Reason For Mold Growth in New Homes?

In my opinion, the primary reason for mold growth is simply operator error. Many young builders, job superintendents, and sub-contractors do not have a crisp historical perspective of how homes used to be built. Many also do not treat their jobs as a vocation. Those craftsmen who have a true passion for building tend to avoid mold issues as well as other construction defects.

How Do Old Homes Help One Understand How to Keep a House Dry?

Before I started into the custom home building profession, I had the good fortune to work in the home remodeling field for nearly ten years. It was not apparent to me at the time, but I was getting educated each time I took apart a house to rehabilitate it or add a room addition. When you start to take the outside surface off a home, whether it be brick, stone, wood siding, stucco, etc., you soon discover how well the home was built. I have taken apart many 80 or 100-year-old homes that had no mold, mildew, or wood rot.

Are the Causes of Mold Obvious?

When I did discover mold, mildew, and wood rot in homes the cause of the problem was usually very obvious. Poor workmanship would allow water to saturate the wood used to build the structure of the home. Here are a few of the primary causes:

WATCH these two videos to see the right way brick should be flashed. Less than 0.1 percent of houses have this flashing.


Undoubtedly other builders before me had seen the same thing and figured out that if you keep wood dry, it simply does not promote the growth of fungi that we see as mold, mildew and wood rot.

Does Felt Paper Help Keep a House Dry?

Traditional asphalt-saturated felt paper is a wonderful product to help keep a house dry. It can be found on hundreds of thousands of older homes.

You may wonder what sets those homes apart from the mold-stricken ones you see in the news. One of the significant differences between many of today's new homes and those your parent's grew up in is simply tar paper.

Where Was the Felt Paper Placed To Stop Mold and Wood Rot?

Older homes that had exteriors made of wood siding, fiber cement, stucco, etc. had a weather-resistant layer of tar paper sandwiched between the wood framing and sheathing and the finished surface exposed to the weather. When water got behind the exterior surface, the waterproof tar paper would shield the wood from getting wet. By carefully overlapping the tar paper both vertically and horizontally, any water would be escorted back to the atmosphere.

Do Metal Flashings Help with Mold Prevention?

Yes, metal flashings do help with mold prevention. They capture water and redirect it back outside.

In addition to the tar paper, metal flashings were common on top of windows, doors and other distinct horizontal breaks in the outside building materials. These simplistic flashings served one purpose. They would capture water that got behind the exterior surface and then redirect it back to the exterior of the home where it could continue its journey into the soil around the home. Flashings are simple to install and made from inexpensive pieces of aluminum, tin or galvanized metal.

What is the Trick to Stop Wood Rot, Mold, and Mildew?

The real trick to stop wood rot, mold and mildew is to create an air gap between the exterior skin of your new home and the structure behind the skin. The structure must have a waterproof membrane such as traditional asphalt saturated felt paper or one of the newer air and water infiltration membranes.

WATCH THIS VIDEO TO SEE THE AIR GAP:

Once installed, vertical furring strips made from ACQ treated lumber can be nailed to the solid studs behind the felt or membrane. The thickness of the strips can be as little as one quarter inch and up to one half inch. The wood or vinyl siding, stucco lath, etc. are then nailed to these wood strips. Long nails must be used so that the fasteners eventually travel into the wood studs in the wall.

CLICK or TAP HERE to get FREE quotes from local companies that can treat your mold.

Should House Siding Extend Over the Top of the Foundation?

Be sure the strips extend down past the top of the foundation at least one and one half inches. Galvanized hardware cloth that has one eighth by one eighth inch spacing needs to be fastened to the bottom of the vertical strips so that insects can't get up into the void space behind the outer skin of your home. This heavy screening will last as long as your home and will be hidden by the outer finish material that you and all of your neighbors will look at each day. The hardware cloth must lap up behind the furring strips, then span the gap and finally lap over the top of the furring strips to make an effective barrier.

Does an Air Gap Allow a House to Breathe?

The air gap your builder creates will allow your house to breathe. There are other products that help create this same space and your builder may find them to be more cost effective. It is my hope that the building code officials will eventually mandate this to be a required item on each new home built. Doing this is smart, easy and is a great thing for the health and well being of everyone.

Column NH008