Y2K – A Real or Perceived Threat?

Y2K

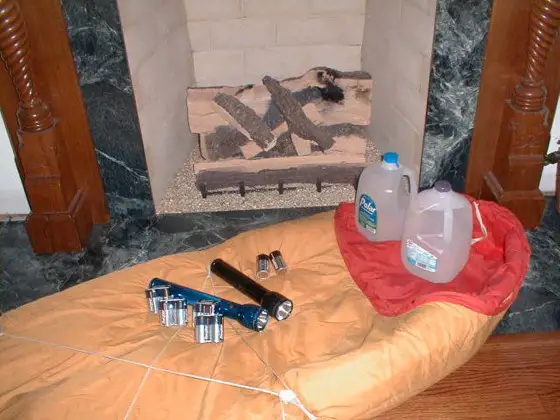
If you have a negative outlook on life, start gathering supplies such as these. Me, well I am not going to do anything to get ready. I have a feeling everything is going be just fine. I figure Superman will save the day if need be.

DEAR TIM: To tell you the truth, I am a little concerned about all this Y2K stuff. What if many computers malfunction on New Years Day? How can I protect the investment in my house and that of my mother who lives in Florida? What should we do to prepare for possible interruptions in utilities? Just what are you doing to get ready? Hollis B., Columbus, OH

DEAR HOLLIS: To be perfectly honest with you, I am just now starting to make some Y2K preparations. I actually planned for periodic disruptions in electric service when I built my home some years ago. At that time, I installed a wood burning fireplace that has a special firebox that allows heat from the fire to flow back into the rooms of the house. About 10 years ago, we lost power for 3 days during an early winter storm and the fire I built kept the family warm enough to survive. I also recently installed a set of gas logs in another fireplace that require no electricity to operate. If the utility company is still piping natural gas during a Y2K crisis, I will be in great shape.

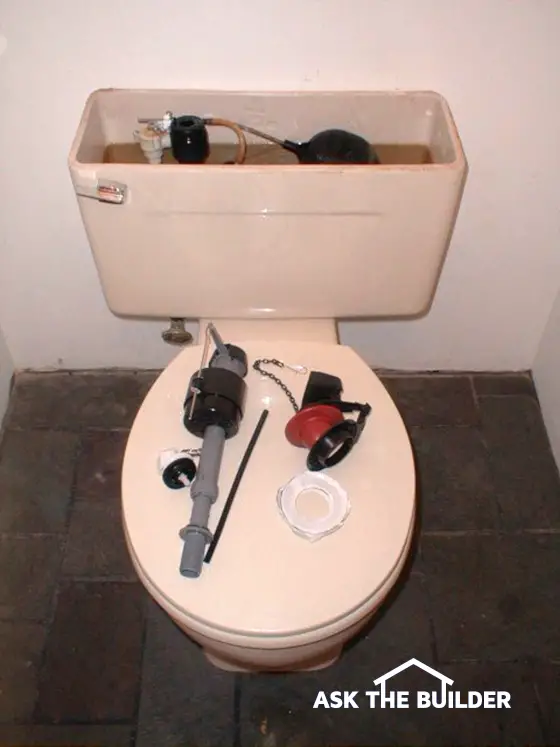
There are several things you should think about doing in the event there are Y2K problems. Since you live in a climate where it drops below freezing, you need to protect your water piping systems from the danger of freezing. The water supply lines represent the largest danger. You need to make sure that your main water shutoff valve operates with ease and that you have the ability to drain the water supply lines in the entire house.

To effectively drain water lines, you need a valve in a low spot of the water supply line system. A simple boiler drain valve that has hose threads on it will work just fine. This allows you to install a garden hose on the valve to allow water to drain to a floor drain or some other low spot. To drain down a water system without the aid of compressed air, get as many people to help as possible. Station a person at each plumbing fixture or group of fixtures. Turn off the main water supply valve. When a signal is given that all can hear, turn on all plumbing fixtures, flush all toilets and open the boiler drain valve. Gravity will pull virtually all of the water out of the water supply lines.

If the heat does go out in your home, and it begins to really get cold or you decide to abandon the home, you need to pour some potable or recreational vehicle antifreeze into the drain traps of all sinks, tubs, and showers. Avoid using automotive antifreeze as it is highly poisonous and can cause problems in public sewer and private septic systems. You need to pour the antifreeze into toilet bowls as well. This solution keeps the standing water in those fixtures from freezing and rupturing the drain lines. Your mother in Florida shouldn't have to worry one bit about freezing weather. She needs to stockpile sun screen lotion!

Air leaks around windows, doors and other exterior cracks will rob your house of the marginal heat that a fireplace will produce. It is a good idea to make sure that all weatherstripping and gaps around doors and windows are sealed tightly. If your attic has minimal insulation, now would be a great time to upgrade so that your house stays warmer for a longer period of time.

If you plan to burn wood or some other fuel, make sure your chimney is cleaned. If there is a chimney fire during a crisis and there is no water supply, you house will most likely burn to the ground. For this reason do not use candles for lighting purposes. Purchase high quality flashlights and lots of batteries.

Start to save plastic one gallon milk jugs. Rinse them out well and begin to stockpile water. Fill the bottles with 16 ounces of rinse water and shake vigorously. Do this at least 5 times before filling with water. You can also use 2 liter soda pop bottles to store water. Put 4 or 5 drops of chlorine bleach in each container to stifle bacteria growth. You can also fill them in the last few weeks of December if you desire to have the freshest water. If you need to drink the water, open the containers and pour it into a large bowl. Let it sit for 12 - 24 hours and the chlorine taste and odor will dissipate.

Those people who live in a moderate climate should make preparations to capture rainwater for sanitation purposes and possible drinking water. If it snows during the crisis, you can always melt snow to make liquid water.

Your mother needs to think about a potential interruption of air conditioning. Window shades or outdoor awnings might help minimize heat gain if this happens. She should also stockpile water. If the Y2K crisis turns out to be a dud, the water bottles will come in handy during a water main break. If you don't believe me, just ask my Mom!

Column 282

Outdoor Lighting

outdoor lighting

This house is only several miles from mine. The outdoor lighting is just splendid at twilight.

DEAR TIM: Some of my neighbors' houses and gardens have some unique and interesting outdoor lighting. I asked them about it, and they said it is low-voltage outdoor lighting. Is this possible? Are there limitations to what you can do with exterior lighting? What should I be concerned about? Is it difficult to install? Lisa N., West Warwick, RI

DEAR LISA: High-powered low-voltage outdoor lighting is nothing new at all. The next time you are out driving at night and some idiot turns on his bright headlights in your face temporarily ruining your night vision, keep in mind those headlight bulbs are powered with just 12 volts of electricity.

The outdoor lighting industry has been making hundreds of exquisite low-voltage outdoor light fixtures in a multitude of finishes for all sorts of uses for over 40 years. Its popularity has exploded during the past 10 years.

There are many, many advantages to using low voltage lighting in outdoor applications. Lower voltage means smaller, more compact, light bulbs and light fixtures. This allows you to hide fixtures within landscaping so that they are not visible during daylight hours. Installation costs are much less than if you were to use traditional high-voltage fixtures. High-voltage wiring often requires conduit, and lots of labor to install all wiring and fixtures to meet or exceed the National Electrical Code.

Outdoor lights can be used to do all sorts of things. You can use them to create small, soft puddles of light to illuminate a garden path. Outdoor waterscapes can contain underwater lights that let you enjoy small ponds and waterfalls on those dark evenings when you are relaxing on your patio or deck. More powerful beams of light can shoot straight up or down to draw attention to specimen trees, bushes, or magnificent features of your home. Lights can be activated by timers, motion detectors, photo-electric cells, or traditional switches if you prefer.

The central core of a low-voltage outdoor lighting system is the power center. This is a high-performance transformer that steps down regular 120 volt household current to the low voltage needed to power your lights. These centers are often installed outdoors. Because low voltage means less energy, the power centers should be centrally located within the lighting arrangement. This keeps voltage loss to any one fixture at a minimum.

You need to be concerned about over-lighting. Many homeowners make mistakes by installing far too many exterior lights. To further complicate things, good intentioned homeowners often select the wrong lights. The first thing you need to do before you purchase any products is to decide exactly what you are trying to accomplish. Do you want security lighting, landscape lighting for trees only, architectural lights to highlight features on your home, or a combination of these? Each of these applications requires specific light fixtures equipped with specialized high performance lamp bulbs.

Also, keep in mind a growing interest in the dark skies movement. Some parts of the nation limit the amount of outdoor lighting, as it interferes with star gazing. Be sure you check with your local government code officials or in private subdivision regulations or covenants for dark skies policies.

Once you have a general idea of how many lights you think you might use, draw up a simple plan. Compare the number of lights you think you need to the actual number of lights you see at many of your neighbors' houses and gardens. Stop by and visit them and do an actual fixture count. You might be surprised to find out that you have too many lights in your plan.

Keep in mind that you can always add more lights at a later date. The power centers that feed the safe low voltage electricity to each light come in different sizes so you should plan ahead. If your initial lighting plan causes you to reach the capacity of a certain power center, it might be wise to upgrade to the next size. You will not regret this in the event you need to add several more lights as you begin to fall in love with what outdoor lighting can do for you.

Low-voltage outdoor lighting can be a challenge to install if you have no electrical experience. Voltage-drop calculations often need to be considered, cables and fixtures need to be sized, total light wattage needs to be calculated, power centers need to be sized, etc.

Some manufacturers have excellent step-by-step guidelines and booklets, but even after reading these, you may feel overwhelmed. Don't hesitate to obtain quotes from several outdoor-lighting experts in your area. Be sure to visit projects they have completed, and view them at night. Ask the homeowners if they would hire the company again to do additional work.

Companion Articles:  Landscape LightingLow Voltage Landscape Lighting ResourcesLow Voltage Landscape Lighting ProblemsLow Voltage Outdoor Lighting Manufacturers

Column 285

Change Drill Bits in a Snap!

drill bits

Changing Drill Bits

DEAR TIM: I am really frustrated with the chore of exchanging different drill bits while doing projects. Using a drill chuck key can be a real pain. I have two drills that I can use, but this seems like a waste as well. What do you do to make switching drill bits and other accessories go smoothly? Surely there must be a better way! Steve D., Crown Point, IN

DEAR STEVE: I not only have experienced frustration, but also bloody knuckles on more than one occasion! Traditional drill chucks that require the use of a key are fine if you intend to use one bit for several hours or all day. But many jobs require switching of different bits or accessory tips within a matter of minutes. Enormous amounts of time and energy are wasted every time you have to use a drill chuck key.

Drill manufacturers thought they had solved this problem several years ago when they introduced the keyless drill chuck. I have several drills that use this very nice feature. Keyless drill chucks grasp drill bits tightly and are easy to use. However, they only solve part of the problem. If you need to change bits frequently, you still have to turn the chuck mechanism to release the bit and then adjust and re-tighten once you have the new bit or accessory tip in place.

The problem with drill chucks was solved not too long ago. Interestingly enough, the traditional drill chuck has been left unchanged. Someone had an ingenious idea to marry the simple, yet dependable, quick connect fittings commonly found on pneumatic tools, gas hoses, automotive tools, etc. to regular drill bits and other accessories.

The end result is so nifty you can't believe it. You can buy different tool kits that include a variety of different sized drill bits, drill extension rods, screwdriver bits, screwdriver guides, etc. that have a unique hexagonal shaft at one end rather than the traditional rounded end. Included with each kit is a special holder that you install into your drill chuck. After you tighten the drill chuck , you load and unload different bits into this holder with a simple quick motion. The holder grabs onto the bits or accessories and the hexagonal shaped shaft prevents slippage as the drill turns.

Some of the holders work differently than others. Certain ones have a sliding ring that clicks to an open position that allows you to load or unload a bit. When you have the bit in place, you then slide the outer ring backwards to lock the bit in place. Other designs have a spring loaded ring mechanism. You slide the outer holder collar down to load or unload a bit. Once you let go of the ring, it locks the bit into place. Another design allows you to simply push bits into the holder and they lock in place. To release the bit, you simply slide the outer ring and the bit falls into your hand.

These very handy tool kits come in different sizes. You can purchase smaller kits that have approximately 20 - 30 pieces including the bit holder, assorted wood and steel drill bits, flathead and Phillips head screwdriver tips, nut drivers, spade drill bits that cut larger diameter holes, and special screw countersink bits that have a small pilot bit included. As you might expect, you can also buy kits that have up to 85 pieces! All of the kits come with wonderful plastic or tough fabric cases that store the bits and accessory tips.

Many of the kits come with a very nice tool that has a sliding guide that surrounds a screw. When you slide the guide into place, it surrounds the entire screw. This makes it impossible for the screw to jump out of the bit that you have installed into the tool. As the screw is driven into the wood or metal, the guide retracts on its own allowing you to drive the screw without fear of making a mistake.

These new drill bit kits with the accessories are one of the best power tool ideas I have seen in a long time. It is now a joy to use a drill instead of a hassle. I can assure you that once you use this system, your old drill bits will soon be a garage sale item.

Companion Articles:  Where to Buy Quick Release ToolsQuick Release Drill Bit ManufacturersDrill Bits - Quick Release

Column 286

Settlement Cracks – Causes and Prevention

settlement crack

Settlement Cracks

DEAR TIM: I am beginning to notice cracks in the foundation, concrete slabs, and some of the interior walls and ceilings of my home. I am concerned that the house may be settling. Do all houses settle? What can cause this to happen? What can one do to minimize cracking in a home? Who is the best person to call for advice? Mandy S., Sulphur Springs, TX

DEAR MANDY: The word settlement, in my opinion, is one of the most misused words in the residential construction industry. There is no doubt that your house may be experiencing settlement. In addition, it may be suffering from upheaval, frost heave, slippage, lumber and concrete shrinkage, and compression stress caused by insect damage! Wow, I sure know how to ruin someone's day, don't I?

Settlement happens when parts of a house drop below the elevation or height where they were placed during the original construction. There are numerous reasons why this may happen. The soil beneath the foundation or beneath column supports may shrink due to moisture loss. The soil may not have been compacted properly before the foundation was installed. Large pieces of organic material may have been included in the soil under the house. When it decays, the soil above it collapses to fill the void. The list of possibilities is nearly endless. Not all houses settle, but many suffer cracking of one type or another.

My own home has hairline cracks in the foundation as well as numerous cracks in the basement floor. The cracks are normal concrete shrinkage cracks. Concrete shrinks as it dries and cures. It is not uncommon to see 1/16th inch of shrinkage for every 10 feet of concrete length. This shrinkage tends to pull or tear the concrete apart. Sharp 90 degree corners at windows, doors, and offsets in slabs and foundations are excellent locations for the cracks to begin.

If you get up on my roof and look at my chimney flashings, you would think my house has settled nearly an inch and a half. This relative movement could have been a combination of upheaval of the chimney and settlement of the house, but I am inclined to think it is due entirely to lumber shrinkage. Even kiln dried lumber will shrink as it acclimates with the atmosphere and dry conditions inside a home. A multi-story home, like mine, can easily see 3/4 inch or more shrinkage depending upon the moisture content of the wood when the house was built and the species of lumber that was used.

Some soils are very sensitive to moisture gain or loss. Certain clay soils can expand nearly 20 times their volume if they get saturated with water. If this happens because an under-slab plumbing pipe fails, a large hump can develop in an interior slab. Other expansive clay soils can shrink and take a structure with them as they dry out. If you build in areas that have these types of soils, you need to keep soil moisture as constant as possible. One way to accomplish this is to install perforated drain pipe around the foundation. As part of the piping layout , install a tee fitting and a riser pipe up to the surface. If a drought sets in, use a garden hose to inject water into the piping system. This will trick the soil around the foundation into thinking it is raining at the surface.

Structural cracking in houses can be minimized if you take precautions. If you are building on fill dirt, make sure it is properly compacted. Geotechnical and soils engineers can perform soil tests to make sure the soil can support the building. If you live in a cold climate, make sure that all footings are installed below the depth that frost normally penetrates the soil. Foundation walls need horizontal steel bars near the bottom and at the top of the wall to offset stress forces. A residential structural engineer can design steel reinforcing rod placements to help hold footings, foundations and slabs together.

To minimize lumber shrinkage, try to get your house under roof as soon as possible. If the lumber does get saturated by rain during the construction process, try to get it to dry out by keeping windows and doors open as construction continues. Consider installing fans to accelerate evaporation. If you can get the framing lumber to shrink before the drywall, finished flooring, cabinets and trim are installed, you will see minimal cracks.

Column 288

Lots and Drainage

! ! ! See Author's Notes at Bottom of Column ! ! !

topographic map

Learning to understand a topographic map that shows elevations will be worth the investment of time.

Drainage Problems

DEAR TIM: My husband and I are getting ready to purchase a lot for a new home. We are concerned about drainage and flooding issues. Our current home has a soggy lot and we would like to avoid that. What should you look for when selecting a lot for both a new and an existing home? Can you do anything to improve the drainage on a lot or to prevent house flooding? Can you look at a plan of the subdivision and tell a difference between lots? Jeeney A., Owensboro, KY

DEAR JEENEY: Drainage problems in and around homes can be a huge source of misery for a homeowner. Periodic flooding from storms, overland storm drainage and even subsurface water can cause damage to a home and its contents. If you choose wisely, you can sleep soundly every night a rain storm pops up. If you choose poorly, you may have many a sleepless night after your first flood.

Lot selection is just as important for people who live in flat coastal areas as it is for people who live in the plains and hilly areas. Each area has its own unique characteristics. The first thing you should be concerned with is the big picture. Take a look at the land around your lot. How much land is directly uphill from the lot? How much surface water is funneled onto or around your lot? You want to avoid lots that are in or adjacent to the bottom of natural drainage swales or shallow valleys. These are Mother Nature's gutters in a very heavy rainfall.

Pay attention to the regional location of your new lot. Is there a tremendous amount of land yet to be developed that may cause the streams around your home to carry more water in a future storm? Storm water retention basins are required in many new developments, however they end up discharging more water into streams and creeks than before the development was undertaken. Prior to development, undisturbed soil actually captures and soaks up a certain amount of rain water. After development, parking lots, driveways, streets, rooftops collect and disgorge this rainwater into the retention basins.

Build Your House Elevated

Consider picking a lot where the actual house location rises up above the surrounding land slightly. If your lot does not have this feature you can often create it artificially. The trick is to hold the top of the foundation or slab up out of the ground 18 to 24 inches and then use excavated foundation dirt to create a gentle grade away from the house in all directions. This slight rise in elevation in low lying areas may keep the inside of your house dry in a torrential rain storm while your neighbors are wading around in one or two inches of water in their slippers.

Try to look for a lot that has perhaps 3 or 4 feet of elevation difference over the entire lot. Lots that have this valuable asset allow you to install subsurface drainage pipes that can drain soggy lots or capture overland storm water that is aiming for your house. You can install a linear french drain or an inter-connect series of these simple drainage trenches to collect subsurface and overland water and then direct it to the low point on your lot.

How can a trench drain help?

These simple trench drains are often only 6 inches wide, 18 to 24 inches deep. You install a 4 inch perforated drainpipe at the bottom of the trench and then fill the trench with 1 inch diameter rounded washed gravel. Grass will eventually cover the top of the gravel to hide the trench. If you want to capture overland water, widen the trench as it nears the surface and create a walking path with flat stones that are surrounded by the washed gravel.

Many land developers sell lots using plans. These plans often contain lines that tell you what the lot topography will look like when all grading is complete. These lines connect points on the lot of equal elevation and are usually drawn in two foot increments. If the lot you are looking at has lots of lines on it that are closely spaced to one another, it means it is a hilly lot. Lines that are V shaped indicate a large or small valley that is present on the lot. If you don't understand the lines, take the plan to the actual lot and see how the actual land relates to the lines. It isn't really that hard to figure out once you see the land!


Author's Notes:

You may wonder if my advice is worth anything. Well, read what Jim Sanders wrote to me when he was at the end of his rope:

"Hi, I just wanted to write to give you the results of my "Trench Drain". I have had a wet crawlspace for 15 years. Water would fill the crawlspace at times, so we actually had to drill weep holes at the base so that it would enter the basement and eventually, the sump pump.

I have tried everything. Several contractors said that the only thing we could do was to bring the water into the house via drainage tile and let it enter the sump pump. That would work, but because I live on a 6' elevation, there is no reason that I should have water problems. It became like clockwork...when it rained, we would rush home from the lake or wherever we were vacationing so that we could be prepared to start the backup generator, in case the power failed. We even had our alarm company put a sump alarm on our system, so they could notify us if we had a power failure. Battery backup was not an option, because sometimes we lose power for days and during any rain, our sump would run every 7 minutes...just like clockwork.

I found your site and read the article on the trench or French drain. At first, it sounded a bit like "holistic healing" to me. I failed to understand why a 2 ft. deep trench, 4 ft. away from the house would do any good. How could this simple thing correct an extreme water problem that has plagued me for years, cracked my foundation, settled my garage floor and ruined almost every vacation?

The Linear French Drain trench running from the house. PHOTO CREDIT: Jim Sanders

The Linear French Drain trench running from the house. PHOTO CREDIT: Jim Sanders

I decided "what the heck". I had to dig by hand using a trenching spade and a pick-ax, because the builder back-filled our property with brick and blacktop. It took quite a bit of time. Because the ground level varies so much on that side of the house, I was not able to achieve exactly 2 ft. deep. It varied from 18" to 30" in spots, but the slope was downhill. The trench is about 80 ft. long. At times, I thought about filling it all in, because I just didn’t believe that it would work.

I stoned it, put tile in, and filled it with #1 round stone. I socked the pipe just for safety measure and I also used geotextile fabric on top, so I could cover with dirt and grass. I also ordered some clay and pitched from the house to the drain.

After a short rain, water is running away from the house. PHOTO CREDIT: Jim Sanders

After a short rain, water is running away from the house. PHOTO CREDIT: Jim Sanders

Result? For the last month, we have had 7 or 8 torrential rains, the worst of which was last night. It rained so hard, that our lawn washed out in spots because of the high clay content. Our sump pump, that normally ran every 7 minutes during and after rain, has not turned on for 4 weeks. The silt at the bottom of the sump well is now dry and cracking. Our crawlspace has not shown a trace of water or even moisture.

Since I couldn’t see correcting the foundation cracks or the garage floor settling and tilting until I corrected the problem's source, I waited to see if the trench drain worked first.

This week, I had a company come in and perform sort of a "mud-jacking" technique on the garage floor, which worked perfectly. Also, during the past few weeks, I parged the cracks in the foundation.

A dry sump pump. PHOTO CREDIT: Jim Sanders

A dry sump pump. PHOTO CREDIT: Jim Sanders

I just wanted you to know how this worked. I stressed for many years over this issue and the solution was nowhere near as difficult as I thought it would be.

As a side note, I went to the end of the drain tile during a hard rain to see what was happening. Water was running out of the drain tile in about the same exact volume that it previously ran out of the weep holes in my crawlspace. This winter will be interesting, because last year, the ground next to the house was so saturated that during a thaw, my sump would run constantly. I'm guessing that the ground between the trench and the house will probably be drier now going into this winter."

- Jim Sanders, Upstate area - New York

CLICK HERE to get FREE & FAST BIDS from local drainage expert contractors.

Column 289


Dust Free Central Vacuums

central vac system

Dust Free Central Vacuums

DEAR TIM: I am thinking of having a central vacuum system installed. Is it possible to install these in an existing house or just new homes only? Are there different systems and sizes? How do you know where to install the inlets? What about accessory tools? George W., Norwich, CT

DEAR GEORGE: Central vacuum systems are superb! I have one in my home and would never think of going back to a traditional upright system. I love the whisper quiet operation and the fact that all dust and dirt is directed to the collection canister and/or outdoors through the vacuum exhaust port. What really appeals to me is their cost. Often you can get a high quality system installed in an existing home for the same money you might spend for a top of the line upright vacuum cleaner.

You absolutely can install a central vacuum system in an existing home. The tubes that transport the dust and debris can be installed in attics, basements and crawl spaces. Even two story houses can be retrofitted. A professional worker can often install a system within one day with minimal mess and hassle. Installing a central vacuum system in a new house is extremely simple. The tubing can often be finished in just several hours.

Not all central vacuum systems are created equal. There are two basic types of systems - one type incorporates filters or filter bags and one system doesn't. Central vacuum systems that use filter bags operate at peak efficiency when the filter bags are brand new. As you vacuum, dust particles clog the filter paper and dirt fills the bag. These characteristics cause the system to suffer a reduction in suction power as dust and dirt build up within the filter bag.

The other type of central vacuum does not use a filter. Using advanced design, the dirt and dust enter the central vacuum canister and swirl around. Centrifugal force created by the cyclonic spinning of the air transports the dirt and dust to the sides of the canister. Here a series of cones and stand pipes stop all but the finest dust. This fine dust is transported to the exterior of your home where it belongs.

Sizing a central vacuum system is important. The smaller your house is the smaller your central vacuum system needs to be. The power of a vacuum system is often measured by how high a column of water it can support or pull. Most manufactures make models that can pull anywhere from a 90 inch to as high as 136 inch water column. An average home that contains 2,400 square feet of finished floor space might easily be serviced with a vacuum system that is rated at 95 inches of water column. Large homes above 6,500 square feet usually require motors that can create a column of water 120 inches or more. Extremely large homes often require two or more separate central vacuum systems.

The positioning of the inlets ports requires some planning. These ports are the locations where you plug in your vacuum hose. Vacuum hoses come in different lengths and some people like long ones and other people prefer to use short ones. Long hoses have greater reach from room to room. If you use one of these, you may only need two inlets per floor that are located in hallways. Short hoses obviously require more inlets per floor. Be sure that you place the inlets on walls where they will not be blocked by furniture. Often the best place is near a doorway.

Central vacuum system manufacturers offer a complete line of accessory cleaning tools. These are often matched to the system and can't always be interchanged between manufacturers. Consider purchasing ones that are electric powered instead of air powered. Air powered accessories might not work at peak efficiency if there is a loss of suction power.

Make sure that you can get at least one of the nifty dustpan inlet accessories. These special inlets are cut into baseboards at the floor level. They are ideal for mud rooms, kitchens, and bathrooms. You simply use a broom to quickly sweep large messes over to the sleek baseboard mounted door. As soon as you open the door with your toe, the motor starts up and your dirt offering is gladly accepted by the vacuum cleaner spirit!

Column 290

New Countertops with Paint

painted countertops

You can buy cool stencils at craft stores. Use the right paints and a little bit of clear water-based urethane, and you are set.

Painting Countertops

DEAR TIM: Our home is 20 years old and the kitchen countertops are plastic laminate, butcher block design, popular in the 70's and early 80's. We would like to redo the worn countertops to a more modern look. We absolutely can't afford to install new tops of any type. Is it possible to create a new, durable surface and not spend more than $75.00 on materials? Ken W., Plano, TX

DEAR KEN: This is your lucky day my friend! You are going to be able to radically change the appearance of those humdrum plastic laminate tops into magnificent works of art in just several days. I know this is going to sound absolutely crazy, but you are going to paint the countertops. This is a job that virtually anyone can do and if you take your time, the tops will be the talk of the town.

Not only are we going to paint the tops, but I suggest you incorporate the extensive use of stencils to create decorative multi-colored patterns that will make your kitchen counter surfaces one-of-a-kind. Stencils are available at many large scale craft stores. You can get ones that create a strand of ivy around the entire counter, fern and regular tree leaves, country kitchen scenes, different fruits, and floral patterns. If you use several colors with the stencils, the finished look will be stunning. Use the stencils on the front edges and vertical back splashes of the countertops if you want to maximize their effect.

If you don't like stenciled patterns then I highly recommend that you think about try a faux finish look. You can use multiple paint colors and different items such as newspaper, sponges, rags, sheet plastic to create textured and dimensional looks within the paint.


Author's Note: I have a wonderful step-by-step eBook that shows you how to get professional results when painting cabinets. It is easy to follow and affordable. Plus, you get the eBook instantly!


The paint in and of itself when applied to a horizontal surface will not be able to withstand the abuse of daily kitchen tasks. It will scuff and scratch easily. To overcome this problem, coat the painted tops with three or four coats of clear floor urethane. Floor urethanes can take enormous amounts of abuse and easily withstand puddles of standing water.

Oil based paints are great for a project like this. They usually cure and harden faster and they have superior adhesion qualities once dry. You can use water based 100 percent acrylic paints, but they would be my second choice. The amount of paint required when using stencils is very little. You might only need 10 or 16 ounces of each color depending upon the size of your counter tops. Craft stores often sell acrylic paints in affordable small squeeze bottles. Custom oil colors may be available at art supply stores.

I need to caution you before you start. This project is going to take you down a one way road. The painting process will be destructive to the plastic laminate surface. But based upon your description of the tops, it sounds like you have nothing to lose and everything to gain.

The plastic laminate tops are superb surfaces to paint. You begin the project by cleaning the tops with soap and water. Remove all traces of dirt, grease and cooking oil. Dry the tops and sand them with a medium grit aluminum oxide sandpaper. Vacuum the dust from the tops and apply your primer coat of paint. Apply the finish coat of paint after the oil primer has completely dried. Allow this second coat to dry. If you are stenciling, now is the time to be creative. Practice stenciling on a painted piece of scrap lumber until you feel comfortable and competent.

Once you have completed your decorative painting and all paints have dried for two days, apply the first coat of clear urethane. Follow the manufacturer's directions with respect to drying times. Sand lightly between coats. To avoid brush strokes in the urethane, thin it slightly. Never exceed the manufacturer's recommendations that are printed on the label.

After you finish this project, you will need to treat the tops with moderate care to preserve the new finish. A cutting board will be mandatory whenever you use a knife and avoid sliding metal cans and other heavy objects across the countertops. Every six months clean the tops, sand them lightly and apply a maintenance coat of clear urethane.

Column 292

Concrete Crack Prevention

concrete cracks

Concrete Crack Prevention

DEAR TIM: We are having a new concrete driveway installed. What can be done to prevent cracks in the new surface? Is it realistic to expect the surface to last for 25 to 30 years with no maintenance? How thick would you pour the drive? Would you install any steel reinforcing? Does the driveway need to be sealed once it is poured? Maria B., Janesville, WI

DEAR MARIA: Concrete is a wonderful driveway surface. If your driveway is installed by a seasoned professional, then your driveway should easily last 30 years. In fact, I have seen concrete driveways in my town that are nearly 50 years old that are still in good condition. Long lasting, crack free concrete does not happen by accident. It must be ordered correctly, installed with great care, finished properly, and cured carefully.

Cracks are to be expected in new concrete. Professional concrete masons realize this fact and take measures to minimize their appearance. Concrete is very strong if you try to squeeze or compress it. But if you try to stretch it or bend it, it usually only exhibits 1/10th the strength that it possesses when you compress it. If the new concrete in your drive is poured over soft, uncompacted soil, your car or a heavy delivery truck will bend and crack the concrete as it passes over the soft spot. This is why concrete needs to be poured on solid, compacted soils.

Concrete also shrinks as it dries and hardens. It can shrink about 1/16th of an inch for every ten feet of length. This shrinkage creates tension within the concrete that tries to tear it apart. Professionals who install concrete driveways install crisp tooled lines in the slabs. These are called control joints. The lines act as pre-weakened stress points that encourage the concrete to crack at these locations. The joints can also be installed as soon as the concrete hardens by using a diamond saw that cuts the line. The control joints must be deep enough to perform their job. The minimum depth of the joint should be 1/4 the thickness of the slab.

Spacing of control joints is critical. Make sure the joints on your driveway are spaced at intervals of 15 feet or less. It is a common practice to make the spacing equal to the width of the driveway. If your driveway slab will have sharp 90 degree corners, control joints should extend from these corners out into the slab. Concrete cracks often radiate from corners, so make sure you discuss the control joint layout with the contractor before the pour begins.

Thicker concrete is a good idea for driveways. I would like to see you install a minimum 5 inch thickness. Often contractors might try to tell you that a 4 inch thickness is sufficient. The cost to upgrade to a 5 inch thickness on an average driveway is chicken feed when you compare it to the total cost of the job. For example, if your driveway measures 720 square feet, a 4 inch thick pour will require 9 cubic yards of concrete. Increasing the thickness to 5 inches requires 11 cubic yards of concrete. The extra two yards of concrete will only cost about $130.00. (1999 pricing - adjust for inflation)

Reinforcing steel is a must in my opinion. Steel is very inexpensive and it helps to strengthen the concrete significantly. Steel will hold cracked slabs together. Without steel, cracks can grow in size and you can get offsets where one part of the slab is higher or lower than an adjacent piece. Steel needs to be placed no more than 2 inches down from the top of the slab for maximum performance.

Concrete that has been ordered with enough cement so that it is a 6 bag mix (564 lbs of cement) or a 4,000 pounds per square inch design strength, contains just enough mix water to give it a 4 inch slump consistency, is finished without the use water, and is moist cured with plastic or with a liquid curing compound should not have to be sealed.

If your concrete driveway is poured correctly, the surface will withstand cold weather, deicing salts, vehicle traffic, basketball games and tricycle road races for many years. Weak concrete that has been ordered and installed improperly needs to be sealed with high quality silane or siloxane water repellents. Do not use film-forming silicone sealers.


Want perfect concrete work? Find a pro by using my Concrete Work (Sidewalks, Driveways, Patios & Steps) Checklist. I offer a 100% Money Back Guarantee.


Author's Notes:

May, 2004

Keep in mind that the above strength rating of 4,000 psi concrete is a minimum standard. There is no reason why you can't order concrete that is 4,500 or even 5,000 psi. It will cost slightly more simply because they are adding more cement per cubic yard. But if you expect the concrete to be subjected to harsh conditions, this extra cement could extend the useful life 25 to even 50 more years!

Column 293

Window Seat

Window Seat

Window Seat

DEAR TIM: I'd really like to have a window seat in my home. I think they're cozy and attractive.

Are there different storage possibilities or configurations? What does it take to build a window seat?

Is it possible to build one on a standard flat wall? Erika N., Seattle, WA

DEAR ERIKA: Why only one?

Multiple Seats Make Cozy Retreats

I think that you should consider building several window seats in different parts of your house. They are excellent multi-purpose fixtures. Not only do they provide extra seating, but they also create lots of useful storage space. In fact, I just talked to my wife about building one in my son's room.

Free & Fast BIDS

CLICK HERE to get FREE & FAST BIDS from local carpenters who can build one or more window seats for you.

Window seats are one part of a home that can change with the seasons. Some people outfit the seat with vibrant upholstered cushions depicting the different seasons of the year or holiday periods.

Some achieve the same effect by using decorative pillows. Because the eye is usually drawn to a window when entering a room, the decorated window seat tends to get immediate attention.

Accessing the storage area beneath a window seat can be accomplished in a number of ways. The first house my wife and I owned had the traditional hinged seat. You flip up the seat and the entire storage area lies before you.

This storage method has some limitations in my opinion. If you need an item that is on the floor or in the lowest part of the storage area, you need to pull everything out to get to it.

The front vertical surface of the seat can be built with swinging cabinet doors or even bi-pass sliding doors. This method of access is not much different than any standard wall or base cabinet. Because window seats are already so low to the ground, you usually only have room for one shelf level. If you decide to place audio or video tapes, disks, or compact disks below a window seat, you can have special shelving dividers built that maximize this type of storage.

I have installed window seats that have drawers beneath them. This configuration offers the least amount of storage space as the drawer body and suspension system use up space that would otherwise be available had cabinet doors or a flip-up lid been used.

Window seat construction can be simple or complex. The simplest window seat is just a bench with no access to the storage space beneath it.

CLICK HERE to get FREE & FAST BIDS from local carpenters who can build one or more window seats for you.

One simply needs to build a simple wall that forms the front face of the seat and then place a piece of plywood on the top of the short wall and the window wall. Complex window seats can be built using specialty hardwood lumbers, exquisite detailing and moldings, and accessories such as built-in indirect lighting and hidden sound system speakers. The possibilities are endless.

Window seats are easy to build if the window is in a small alcove or between two nearby side walls. If you have a plain long flat wall, you can still build a window seat. One option is to install a set of built-in base cabinets with bookshelves above them on either side of the window. Many kitchen cabinet companies make cabinets for this exact purpose. The window seat spans between the two sets of cabinets. The look is stunning.

There are some basic guidelines you should follow with respect to window seat dimensions. Find the most comfortable chair in your home. Model the height and depth of the window seat after this chair. I have found that a finished height of 19 inches off the finished floor is ideal for most window seats. The window seat depth from front to back is also important. Make it too shallow or deep and it can be uncomfortable. The preferred depth should fall somewhere between 17 and 22 inches. If you intend to take an occasional catnap on your window seat, then I suggest you make it 24 inches deep.

If a heating or cooling duct is currently under a window, then simply hire a professional heating or cooling contractor to extend the duct so that it blows the air out the front of the new window seat. You can purchase decorative metal or wood grill covers that will compliment the window seat instead of detracting from it.

CLICK HERE to get FREE & FAST BIDS from local carpenters who can build one or more window seats for you.

Column 295

Toilet Troubles – Catching The Phantom Flusher

toilet repair

Installing the parts you see on the toilet seat will usually silence all but the most possessed of toilets.

DEAR TIM: I am having toilet troubles. Every toilet in my house seems to have a different problem. The second floor toilet fills with water every 4 hours or so without being flushed. The powder room toilet just doesn't flush well. Once flushed, water doesn't seem to leave the bowl area quickly like it did when it was new. The basement toilet moans, groans, and whistles as it fills with water after each flush. Is it time to apply for a loan and call in the plumber? Veronica D., Crown Point, IN

DEAR VERONICA: Don't go to the bank just yet. Believe it or not, each one of those toilet problems can be fixed by a determined homeowner. In fact, I once helped a woman fix a toilet by just giving her simple instructions over the telephone. She succeeded and saved herself some significant money by not calling in a plumber. Keep in mind that a few states have exceedingly restrictive plumbing codes. I know it sounds crazy, but if you live in one of these states, you may not be legally permitted to perform simple repairs on your own toilets. Check your local building department to see if you are permitted to make minor toilet repairs.

Let's start at the top and work down. Your second floor toilet is often referred to as a phantom flusher. You think it has flushed because you here the toilet tank filling with water. No ghosts or goblins flushed the toilet. The ball cock valve in the tank turned itself on because the water level in the tank dropped. This happens because the rubber flapper valve in the bottom of the tank wears out or deforms and doesn't seat properly.

You can test for this problem very easily. Remove any sanitizing products from your toilet that may color the water. Flush the toilet once or twice so the toilet bowl water and tank water are perfectly clear. After the toilet stops running completely, add 10 drops of green food coloring to the toilet tank water. Check the toilet in 30 minutes and see if the water in the toilet bowl has a green tint. If it has, it is time to install a simple flapper valve repair kit. They are sold at virtually every hardware store, plumbing supply house, and home center.

The powder room toilet may have one or more problems. The sluggish flushing could be caused by a partial blockage in the drain line, a blockage within the toilet, or a mineral deposit buildup within the toilet bowl. Take a few moments and thoroughly clean the toilet bowl. Pour a bucket of water rapidly into the bowl. This will evacuate most of the water in the bowl. Wearing rubber gloves, use a sponge to remove the last traces of water from the toilet bowl. Place a small mirror in the bottom of the toilet so that you can see up into the toilet drain pathway. Look for plastic army men, rubber ducks, hair rollers or anything else that may be lodged at the top of the drain passage.
Watch this video on the Flapper Valve.

If you can't see any obstructions, the toilet bowl rim and the syphon jet hole at the bottom of the toilet bowl may be partially clogged with hard water mineral deposits. Remove the toilet tank lid and lay it flat on the floor. Using a large funnel, pour a gallon of white vinegar into the vertical overflow tube in the center of the toilet tank.The vinegar will dissolve hard water deposits in the small holes that are in the underside of the toilet bowl rim and the larger syphon jet hole in the bowl. Use a toothpick and a Popsicle stick in these holes to help loosen hard water scale. In severe cases, you may need to treat the toilet with vinegar several times over a period of days to see an improvement. If not, it is time to call the plumber for this toilet.

The basement toilet complains as it fills because the ball cock valve is probably past its prime. Older valves have a float ball made from plastic or brass. As the water level in the tank rises, the valve starts to slowly close. When the valves get worn, they start to get noisy. Newer toilet fill valves keep the water running at full capacity until the tank is full. These valves are easy to install and are made to fit just about any toilet. Don't be intimidated by toilet repairs. The insides of a toilet tank look confusing, but in reality they are child's play.

Column 297