Well, hello! You might be a new subscriber and I’m so glad you’re here. I set aside this part of the newsletter each week to welcome you.
You, though, might have been here with me so long that you remember all too well when I got the tankless water heater manufacturers’ undies in a wad.
They were beating the drum about how much money you’d save using their magic tankless water heaters, but they didn’t really share how much extra you’d pay for one and then the extra cost to install it.
BWAHAHAHAHAHAHA <insert laughing emoticon with tears>
Answer me this: Just WHEN do you think you start to save money after buying something that says it's going to SAVE YOU MONEY on your utility bills?
I answer that question for you RIGHT HERE.
CLICK or TAP HERE and be sure to read the letters I received from homeowners just like you.
It’s important for you to realize I’ve been a master plumber since age 29 so I know a thing or two about water heaters.
Upcoming Review
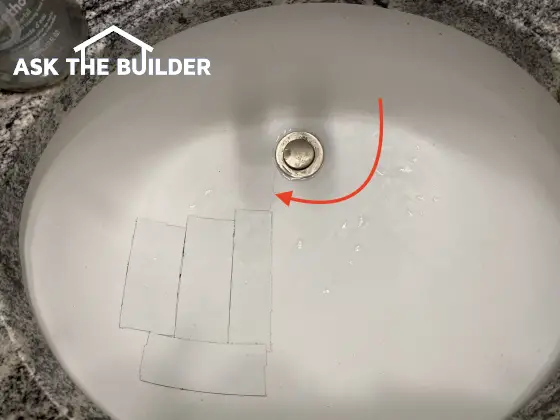
Please peer at this photo and then read just below it.

To understand what you see in this photo, you MUST go see what my favorite book of all time is. CLICK or TAP HERE, please.
Do you know how Mary Anne moved about?
My entire life I've always wanted a machine that's equipped with what you see in the photo above. Patience pays off!
Soon you'll see LOTS of photos and a video showing this magical machine in action.
Work-From-Home Survey
I’m wondering how life in your home has changed because of the dreadful and questionable lockdowns. Are you now working from home and having problems with distractions?
Do you need more privacy? Do you wish you had a way to separate spaces? I’m sure you understand what I’m asking for.
CLICK or TAP HERE and please take the FAST survey.
It would really help me understand your situation if you could also upload great hi-resolution photos of what challenge you’re trying to overcome.
When I see your room photos, I’ll have a much better chance of being able to help you.
Small Engine Sleepovers
Sleepovers can be fun. Remember when you were a child and you went to a friend’s house for the night? This past week I finished all my outdoor yard work for the season and had to put my lawnmower, my gas-powered string trimmer, and a larger walk-behind string trimmer to bed for the winter.
They're having a sleepover in my shed until next spring.
When I open the shed door and start to clean up the feathers from the pillow fights so I can tug the machines out of the shed, I’m not going to be suffering from a small-engine hangover when they don’t start. You don’t want that either.
You want all your small engines to start on the first pull, right?
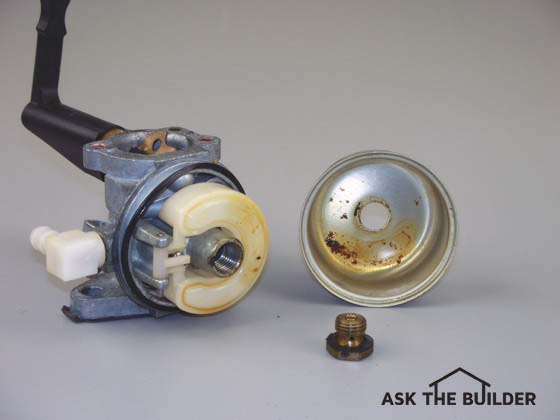
CLICK or TAP HERE to see how to make sure your small engines START FIRST PULL like mine do each spring.
Gail from Indiana
You may have reached out to me in the past few days thanking me for my missive this Veterans Day. Thank you for your kind words.
Gail, who lives in Indiana, sent me an email that really touched me. There’s much more to Veterans Day than I realized. So much more.
CLICK or TAP HERE and see if you thought about all what Gail shared with me.
Calendar Confusion
I don’t know what in the heck is going on, but according to the chocolate Advent calendar in my man cave, there are less than 12 days until Christmas!
Chocolate Advent Calendars? Are you SERIOUS, Tim?
You bet I am. CLICK or TAP HERE to see a few great ones.
HURRY before December 1st gets here. These make great fun gifts. You NEED TO ORDER NOW to get one in your hands or those of a friend or relative who needs Christmas to come FASTER.
Coal is King
Jim, my best friend here in New Hampshire, and I were having a Morse code conversation two days ago. He sent, “Fired up coal last evening.”
Here’s what anthracite coal looks like as it burns in a home coal stove. There’s virtually no smoke with this hard coal. This photo was taken by a good friend of mine, Lee Hillsgrove, Sr., who also heats his NH home with coal.
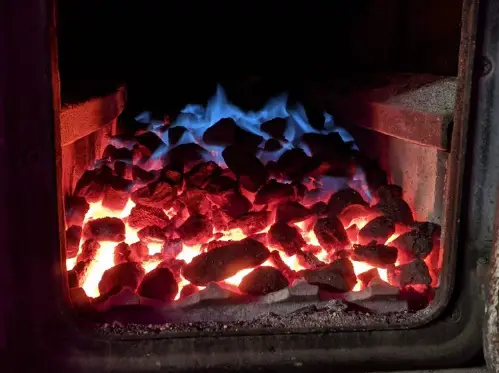
It’s important to realize when conversing in Morse you often shorten sentences and leave out nonessential words. You should also know that Morse telegraph operators over 160 years ago developed and used short word acronyms, Q codes, that you might feel you invented when you send them in a text.
Jim heats with coal and his coal stove in the center of his home does a magnificent job of keeping his entire house toasty warm.
Is your house as warm as Jim's? Are some rooms COLDER than others? I know why. Keep reading.
He also enjoys the peace of mind knowing he’ll never be cold. He once told me, “I love knowing all the heat I need is stored in my basement in 50-pound sacks. You can’t say that about your propane tank. You HOPE you’ll get deliveries all winter long.”
He’s right. I do get anxious some January days wondering if the propane truck will show up or drive away if I didn’t get a chance to clean the snow from my drive.
I’m sharing all this just as a prelude to helping you solve the dilemma of why your house is COLD in the winter. CLICK or TAP HERE and please read my past column and WATCH the video I made for you.
If your home is HOT in the summer, you should READ the column and WATCH the video too.
Standby Generators - How Much Do They Cost?
Joe, from Belfair, Washington, asked me this:
“What would be the average cost of installing an emergency standby generator running on LPG?”

I happen to run my standby generator on LPG (propane). I’ve had my generator for twelve years, and it’s saved my bacon quite a few times in ice storms, and recently this past summer in a windstorm. We were out of power for eight hours.
I immediately replied to Joe. I sent him this URL so he could get FREE QUOTES from local standby generator contractors.
You should DO THE SAME. CLICK HERE to get a FREE BID.
If you want to see my standby generator and watch a great video about it, CLICK or TAP HERE.
That’s enough for a Sunday, right?
Tim Carter
Founder - www.AsktheBuilder.com
BEST Organic Cleaner - www.StainSolver.com
Q-Code Man - www.W3ATB.com
Do It Right, Not Over!
P.S. Another ham radio friend, Clayton, reached out two days ago saying older plastic surge protectors are CAUSING HOUSE FIRES. The MOVs wear out and start arcing. CLICK or TAP HERE to discover MORE!!!