December 23, 2018 AsktheBuilder Newsletter

Are you a new subscriber? Thanks for your trust.  

Are you one of my friends, you know, you've been here long enough to start to get a handle on the situation? Thanks for maintaining our friendship.  

First and foremost, Merry Christmas!  

That's what I say. If you happen to celebrate a different holiday at this time of year, then please accept my best wishes for your tradition.  

But here at the Carter house, it's Christmas.  

I decided to share with you today a photo from a past Christmas day here in central New Hampshire where I live.  

The first image I came to brought a tear to my eye.  

It was a short video I shot last Christmas morning when no one was stirring but Lady the Dog and me.  

Lady, the Dog

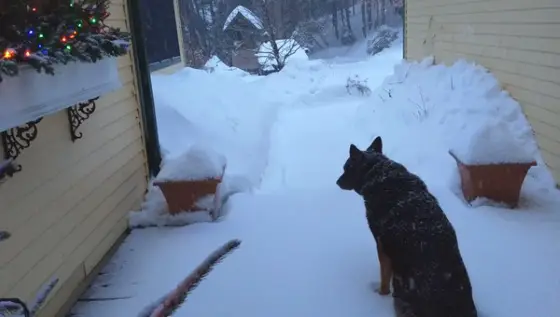
CLICK HERE to watch the short video. Lady HATED to have her photo taken or video shot.  

Many people are like that including my wife. As you can see in the video, it was a picture-perfect Christmas morning with a deep base cover of snow and more falling from the sky!  

Little did I know, but it was to be Lady's last Christmas. Less than three months later, we had to send her back to Heaven. CLICK HERE to read the tribute I created for this amazing gift God gave us for just a little under ten years.  

Lady was indeed a gift.  

If you've ever owned a dog, you may agree that they could be the most perfect creature next to your soulmate, of course.  

Dogs tend to love you more than you might love yourself. Dogs deliver a constant flow of dopamine to your brain. This is why it's so painful when they pass away. You go cold turkey without the dopamine surges.

RIP Lady. Thanks for all the great times we had together.  

More Thanks  

This time of year I disconnect. I focus on family and friends. I think about what's ahead and how I can be happier than the year before.  

This Christmas will go on record at the Carter house as one of the most interesting ones. Here's just a partial list of reasons:

  • our youngest daughter was able to come home for the first time from Puerto Rico where she's been working the past ten months
  • my son got a fantastic job a little over two weeks ago and moves into his new loft apartment the day after Christmas
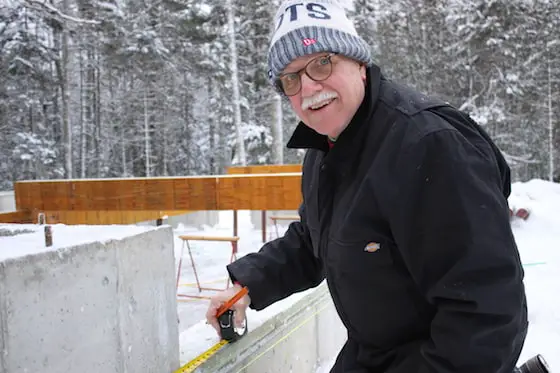
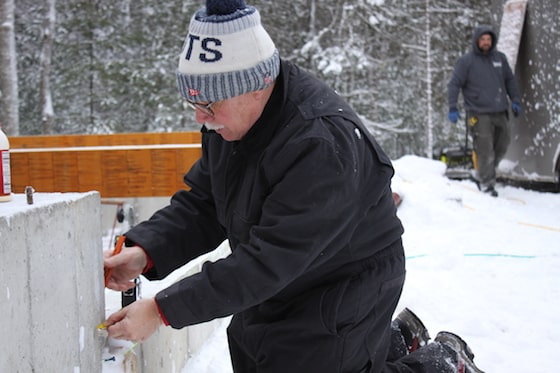
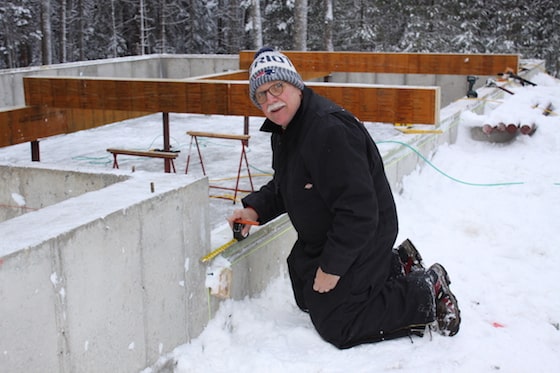
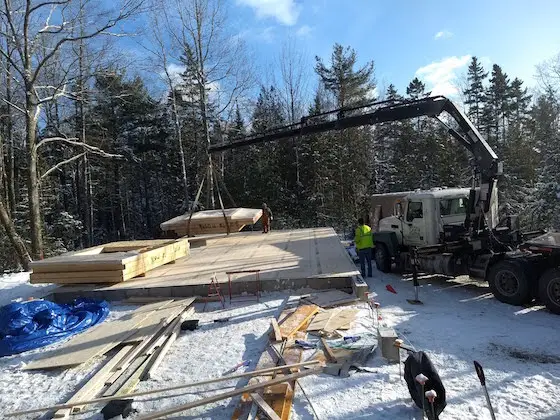
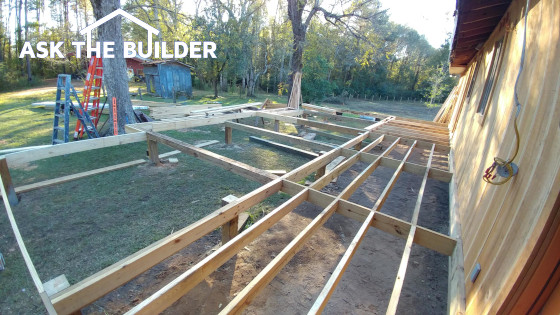
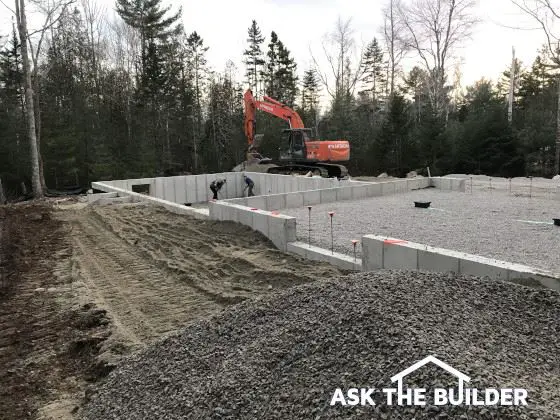
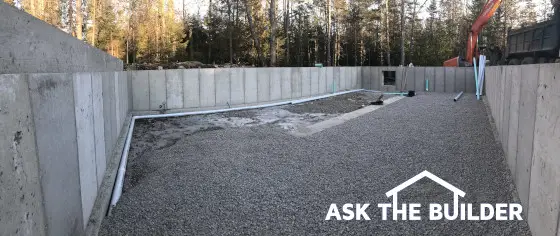
  • my oldest daughter moved to Bar Harbor, Maine, two months ago and I'm helping her and my son-in-law build their new home

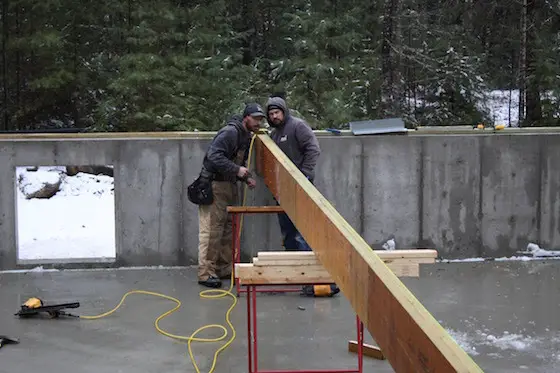
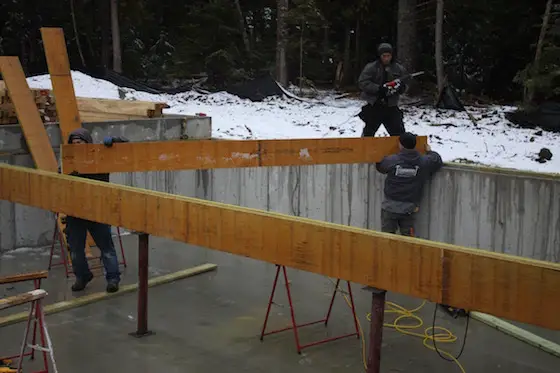
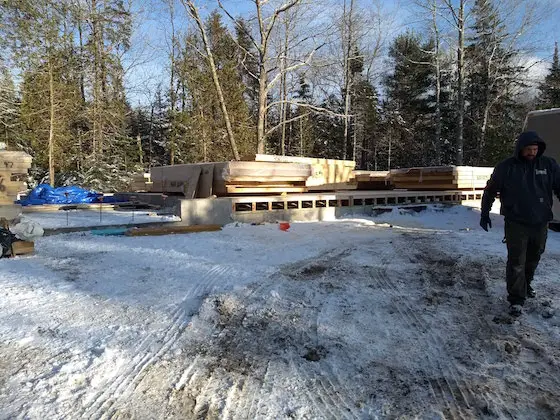
I just got back from Bar Harbor two days ago after spending all week up there taking hundreds of photos and shooting several hours of video of the building process.  

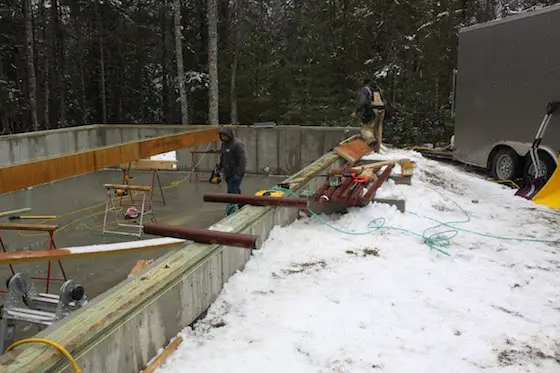
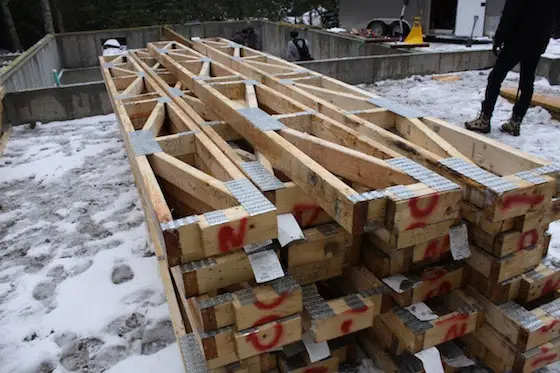
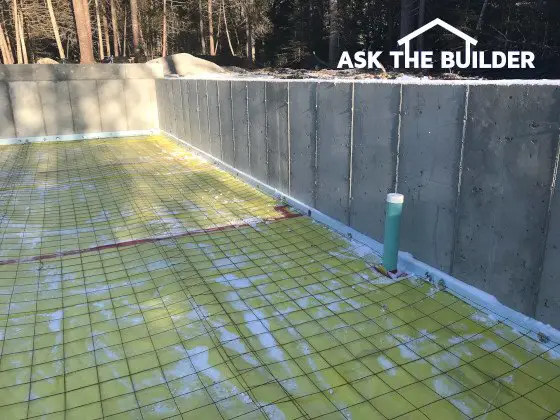
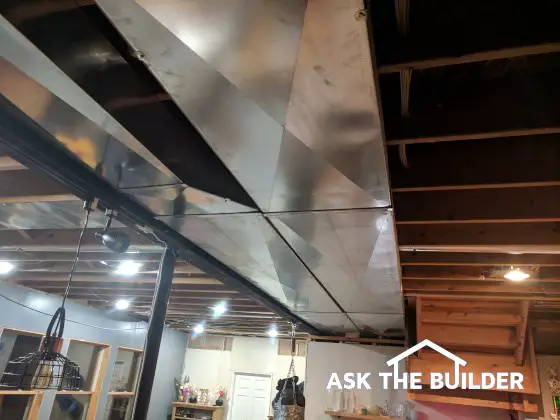
Prefabricated floor trusses, wall panels and special attic trusses were specified for the build. These are all built in climate-controlled factories. The precision is to the 1/16th of an inch or LESS.  

Miguel, the lead carpenter on the job, was heard to say multiple times this past week, "There ain't no sixteenths in framing!"   

That's why they call it rough framing in case you didn't know.  

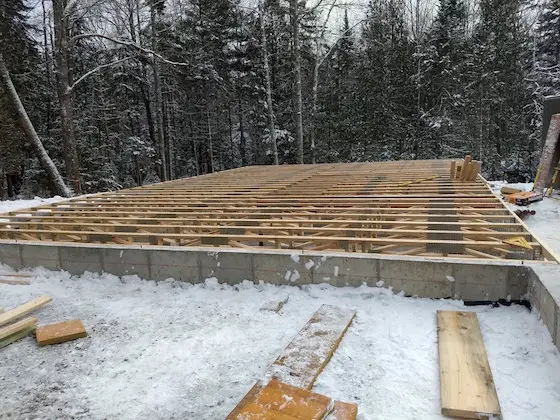
Here's a photo of the house on Thursday afternoon after Miguel and his crew completed the installation of the subfloor up on the second story.   It's important to realize that they didn't start setting first-floor floor trusses until about 8 am on Tuesday morning!

You'll be hearing lots more about prefabricated wall panels in the upcoming months. I was never able to use them when I was building as the industry was just gearing up for the most part.  

Jody Patterson, the builder working with my daughter had this to say about the prefabricated wall panels and floor trusses on Thursday morning, "The only other time I've used them is when I was a carpenter working for another builder. With it getting harder and harder to find qualified field carpenters, all I can say is these panels are so easy to work with that from now on it's ALL I'm going to use. I doubt we'll ever stick-frame a house in the field again. Can you believe how much progress we've made in just 72 hours?"    

What's Happening The Next Few Months  

I don't know if I've mentioned it before, but I'm doing all the plumbing, radiant heating and electric installation in my daughter's home.  

We start in earnest doing all this work on Friday, January 4th.  

Prepare your eyes and ears.  

Rest assured I'll be taking hundreds of photos of the process as well as shooting some run-and-gun videos of what we're doing. It's a RARE opportunity to capture things I wish I could have captured with electrons thirty years ago when I was still building each day.  

This newsletter is going to morph over the next few months to chronicle the entire process. I'll be so busy the next month that all I may do is send out photos to you and some ROUGH un-edited video clips for you to watch. Some may contain funny footage that would go on an outtake reel.  

I ask for your patience during this process as in the spring, I'll be creating countless new articles based on the HUNDREDS of photos and video clips. In other words, please hold any questions you may have until such time as you get to read what you're seeing in the photos. I just won't have time to answer you over the next few weeks and months.  

Here's some of what you'll see:  

Cast iron waste and vent piping - why? CLICK HERE

PEX domestic water & radiant floor heat - why? CLICK HERE

Wall-hung mini combination boiler - why? CLICK HERE

12-gauge circuit wiring instead of 14-gauge - why? CLICK HERE    

You and AsktheBuilder.com  

I want you to realize you're an important part of my life. Your positive feedback is a source of energy for me. I appreciate your comments, your emails, and all the stories you share about how I've been able to help you save time and money.  

I continue to wake up each day enjoying creating content to help you. I feel the path put in front of me the past twenty-five years was not just a chance happening.  

It's my belief I was selected to do a brain dump to help you and those who have yet to be born. It's so important to curate hard-earned knowledge that we know works.  

For example, how cool would it have been for the Egyptians to leave a few chiseled stone tablets showing EXACTLY how they built the Great Pyramids?   How marvelous would it have been for the Chinese to leave drawings of how they built the Great Wall on such steep terrain? Can you even lift a small boulder and place it on a hillside? Have you seen photos of the size of some of the stones the Chinese used to construct the Great Wall?

Think of all the tradespeople that take their secrets to the grave with them so others have to do trial and error to regain that knowledge.  

This is what Ask the Builder is all about. I'm trying to preserve forever all the things I know that have worked well for decades so you and others can save lots of sweet moola.  

That's what the next three months is all about. Capturing images and video footage that will help you and others.  

Wish me luck and pray I don't freeze to death up on Mt. Desert Island!  

I'll be wearing my new Dickies coveralls to help prevent that. CLICK HERE to see them and photos of my hat honoring my favorite football team.  

MERRY CHRISTMAS to you and yours!  

Tim Carter
Founder - www.AsktheBuilder.com
Certified Organic Cleaner Man - www.StainSolver.com
Morse of Course Man - www.W3ATB.com  

Do It Right, Not Over!

Dickies Sanded Flex Coveralls

dickies flex coveralls

My Dickies Flex Coveralls are keeping me warm and dry working in Downeast Maine on a frigid winter morning! Copyright 2018 Tim Carter

Dickies Sanded Flex Coveralls - Warm & Dry

I had the good fortune to have a pair of Dickies Sanded Flex Coveralls on while I was overseeing the construction of my daughter's home in Downeast Maine in late December, 2018. (This column was SO GOOD that I shared with the 31,000 subscribers who read both my December 23, 2018 and March 3, 2019 AsktheBuilder Newsletter.)

Coveralls are a great way to stay warm. Here are the other reasons why I prefer to wear them:

  • easy to put on or take off
  • easy to access pockets of normal pants under the coveralls
  • eliminate wind chill

You wear normal clothes under the coveralls. They cover all your clothes. Pretty clever name, right? Copyright 2018 Tim Carter

What are the Dickies zippers like?

There are three zippers for the Dickies Flex Coveralls. One at the bottom of each leg so the calf portion opens wide allowing you to put the coveralls on with boots on.

The third zipper is the main one on the front. It is extra long allowing you access to your belt buckle on your pants and anything below that. This main zipper is also long enough so you can take the coveralls off easily.

It's hard to see the detail since the coveralls are black, but there are two chest pockets with snaps and there are two rear pockets. You also have smaller side pockets on each side. My only suggestion would be to make these side pockets deeper.

How is the Sizing?

Overall you want to order a size bigger than what you'd normally wear. I wear large shirts so I ordered an XL set of coveralls.

The inseam is the tough part. They come in just a few lengths and I ordered the shortest one. I estimate the small length is actually an inseam of about 34 inches. My normal inseam on pants is 29 inches. I had to get giant pins and roll up the legs about 4 inches so they wouldn't drag.

Do They Have Stretch Cuffs?

Yes, the sleeves have an inner elastic cuff that keeps out wind. This is a nice feature.

Is the Collar Soft?

Yes, the collar is very soft and can be flipped up. If you want to keep your neck really warm, get the Dickies accessory hood that has a long felt neck cover that fits down inside the coveralls.

December 19, 2018 AsktheBuilder Newsletter

Are you a brand new subscriber? Welcome and thanks for your trust. Honorable subscriber of record? Thanks for remaining on the list. You're a blessing! 

This is going to be a pictorial newsletter as I'm up in Bar Harbor right now getting ready for my third day of taping hours of video footage of the framing of my daughter and son-in-law's new home. I'm also taking hundreds of high-resolution photos.

Over the next few months, you're going to be treated to some tasty construction eye candy, that's for sure. 

The last issue I shared a photo of the foundation and you may have been one who wondered why the house only sports a crawlspace instead of a full basement. 

There are two reasons:

  • ledge
  • not enough fall across the lot to support foundation drain tile that would daylight

If you blast a hole in solid granite for a full basement and you can't have a trench extend to daylight where ground water would flow on its way to the ocean, then in short order you end up with a covered swimming pool instead of a bone-dry basement that would be the pride of the Atacama Desert. 

If this describes your home - one that doesn't have its drain tile pop out of the ground allowing water to flow by gravity - then you must have a sump pump that does its best to keep your basement dry.

CLICK HERE NOW to get a feel for the best way to install drain tile in your home. I loath sump pumps for any number of reasons - primarily they fail when you most need them. Sump pumps with the most capacity need electricity to operate and electricity can be in short supply during horrible storms that produce vast quantities of rainwater that enter the sump.

Once your electricity goes out, your basement starts to fill with water. Too bad so sad. All that pain could be avoided by purchasing a lot that allows you to have a drain tile that extends to daylight. 

Rest assured that I'll be writing many new columns about what you see in the following photos. I've already started a MASSIVE audio series featuring SHORT six-to-seven minute episodes about each step of the process. CLICK  HERE to listen to these short episodes.

framing start

The above photo was taken about 90 minutes after the framing crew started to work on Monday morning. The first task was to shovel all the snow out of the crawlspace! Note the round steel columns, better known as lally columns, that will be used to support the massive LVL beam running the length of the house.

floor trusses

You're looking at floor trusses. These are being used instead of traditional solid floor joists. 

You'll discover quite soon why I specified these in the home. These are not too tall and the reason for that is because tall floor trusses on a first floor create problems at exterior doors. Once again, I'll be explaining all this in videos, future podcasts and in articles on my website. 

CLICK HERE to discover lots more about fantastic floor trusses.

lvl beam

Miguel is on the left. He's the foreman of the crew. John is on the right side of the giant LVL beam. Miguel is like the Energizer Bunny.

pipe cutter lally column

Miguel is using a special pipe cutter to cut a lally column that goes under the giant LVL beam. Pauley is helping to hold the column steady and John is pondering why he's working in the misting rain and cold. Once again, try to hold all your questions about what's going on. Believe me in upcoming newsletters, I'll explain EVERYTHING you're seeing in the photos.

end of cut lally column

This is the end of the lally column once it's cut. Do you know what that is inside the column and more importantly, WHY it's in there? No worries - I'm going to explain all of it to you quite soon!

smaller LVL beam is being placed on top of the main LVL

A smaller LVL beam is being placed on top of the main LVL and the foundation wall. This beam will transfer a concentrated load from the second floor floor-truss system down to the earth. It's all about continuous load pathways when it comes to structural support in your home.

This is what the house looked like yesterday about 10:45 in the morning. The Advantech subflooring was about to be installed. That was finished by 1:00 pm.

prefabricated walls delivery

At 1:25 pm yesterday, the delivery truck started dropping off the prefabricated walls for the first floor and the garage. Yes the walls were made in a factory about 150 miles away and trucked to the site. 

Factory-built wall panels allow for much greater precision. Building the walls under a giant factory roof keeps all the materials DRY. 

Prefabricated walls allow the crews to shave days, and in some instances weeks, off the schedule. That's very important when building in Downeast Maine in the winter.  

CLICK HERE to travel to the Structural Building Components Association Best Way to Frame website. You'll discover a treasure trove of things about floor trusses, prefabricated walls and any roof truss you might imagine.

wall panels stacked

All the wall panels are stacked on the floor in pre-determined piles so there is zero wasted motion standing them up and putting them around the subfloor exactly where they belong. 

I'll be leaving to go tape more video in about an hour. It's Wednesday morning about 7:09 am as I type these words. 

That's enough for now. I'll be wearing my Dickies Flex coveralls today as I did yesterday. They do a superb job of keeping me warm! 

Tim Carter
Founder - www.AsktheBuilder.com
Certified Organic Cleaner Man - www.StainSolver.com
Morse Mania - www.W3ATB.com 

Do It Right, Not Over!

Stop Water Vapor Now and Window Condensation Woes

yellow plastic vapor retarder

The yellow plastic vapor retarder you see is a very special product. It’s far better than the low-priced rolls of clear plastic you might see at a home center. (C) Copyright 2018 Tim Carter

Stop Water Vapor Now

QUESTION #1: Hey Tim, I’m flummoxed. I’ve seen videos and read online articles about needing a vapor barrier in the walls of my home and possibly under concrete slabs. My builder says these things are a waste of money. I need your vote of confidence and written words to give me the strength to demand they be used. What are these materials, do they work, and where would you use them in your home? Janet A., Long Island, NY

Have you ever been rolled over by a builder, remodeler or salesperson? In the past week, it happened to my son-in-law and my son! Knowledge is power and the person with the gold makes the rules. Those are two axioms I’m continuing to pound into my kids and their spouses.

It’s very important to realize that vapor is very hard to stop. That’s why it’s best to call the products vapor retarders, not vapor barriers. I can tell you unequivocally they’re fantastic products and I’d use them in my house in certain areas all the time and in other places sometimes.

I’ve got lots of past articles and videos at my own AsktheBuilder.com website about vapor retarders and barriers, but you should also go to an authoritative website - BuildingScience.com - for some amazing facts and figures.

Another key point is to realize like other products there are different levels of quality when it comes to vapor retarders. Some products are cheap and do a so-so job of blocking vapor. If you spend a few more dollars, you can get superior products. I only buy ones that pass the ASTM E1745 test. (Read more on the ASTM E1745 products in my New High Performance Vapor Retarders column.)

Water vapor lives in the soil unless your home is in the Atacama Desert where you may find trace amounts. But normal soil is damp and the water vapor is constantly trying to get up into the air. You want to keep this vapor in the soil under your basement slab and out of your crawlspace. High-performance vapor retarders like the one above do just that. Water vapor in basements and garages can rust equipment and tools and lead to mold growth on walls.

Water vapor can cause severe wood rot in walls of modern homes. This happens primarily in cold or hot climates. You’ve surely taken a cold beverage can outdoors on a humid summer day and seen the outside surface has water drops on it in a few minutes, right? The same thing can happen in your walls where water vapor can condense on the cool surface of exterior sheathing in a cold climate or the cool surface of drywall in a hot, humid climate when you have your AC on low.

A vapor retarder placed on the correct side of an exterior wall can stop wood rot, mold and mildew. Just do a little more research and you’ll discover exactly what to do in your climate. Gather the data and don’t get rolled by your builder or remodeler. After all, it’s your money and your castle. Protect it!

Window Condensation Woes

QUESTION #2: Tim, I’m really distressed. I spent over five figures on new efficient replacement windows. I invested in the new windows because my old windows had lots of condensation streaming down the glass. I still have some condensation forming on the new ones! What’s going on and did I get ripped off? Danny S., Springfield, MA

Condensation is the bane for many a homeowner. I clearly remember the water pouring off the single-pane steel casement windows of my childhood home each winter. My mom would routinely have me towel the window sills dry in my never-ending battle with the wretched water.

It’s possible you were ripped off depending on the quality of the replacement windows you purchased. My advice to all who message me on my AsktheBuilder.com website is to purchase replacement windows that carry the gold AAMA label. Windows that have this certification are the highest quality you can get.

But here’s the rub. I could install an AAMA gold-label window in your home perfectly using the latest expanding foam insulation and you still might have condensation. Here’s why:

Condensation forms when the temperature of a surface drops below the dew point of the air touching the surface. That might make your brain hurt so here’s an example. 

Imagine the outdoor temperature drops to minus 15 F one night. Even though your new windows have the best double-pane glass, the surface of the inner pane of glass in your home might drop down to 50 F while the outer pane of glass is at minus 15 F. If you have your humidifier set too high and the dew point of the air in your home is 51 F or higher, condensation is going to start to form on the glass.

The key to preventing window glass condensation is to lower the humidity in your home as the temperature drops outdoors. There are automatic controls that can do this for you.

Column 1281

Blasting Ledge

ledge bedrock wide

Blasting Ledge | See that mound in the center of the photo? That's a ledge or solid bedrock. There's solid bedrock just under the soil. Please watch this amusing short video with Cary Grant when he discovers ledge on his new-home site. Copyright 2018 Tim Carter


Blasting Ledge - Not DIY - No Way - No How

Blasting ledge was done years ago with hand-held star-bit drills and sledgehammers. Two men would drill down about 18 inches, pack the hole with black powder, light a fuse, and run for their lives. Black powder was very dangerous to use and many workers died or were maimed.

Alfred Nobel changed all this in 1867 with the introduction of the new safer dynamite. This invention made him a fabulously wealthy man. He used much of this wealth to foster scientific work creating the world-famous Nobel prizes.

CLICK or TAP HERE to get FREE BIDS from local foundation contractors who can get prices for blasting rock on your land.

Is Blasting Ledge Safe?

Yes, blasting ledge is safe when the blaster uses modern safer explosives like TNT and dynamite.

blasting tnt dynamite

These yellow tubes are the dynamite or TNT that will shatter rock and blow your body to bits. It requires the utmost respect. Copyright 2018 Tim Carter

How Do You Blast Ledge?

The first step in blasting ledge is to drill holes into the rock. Modern machinery can do this in just minutes. The spacing of the holes depends on the hardness of the rock that's being removed. The common spacing for holes in granite is about 6 to 8 feet on center.

How Deep are the Holes Drilled?

The normal depth for the drilled holes ranges from 6 to 8 feet. The holes are about 2 inches in diameter.

rock drill blasting machine

This is a machine that drills holes in rock like you'd drill a hole in soft wood. The machine can drill faster than you can ever imagine. Copyright 2018 Tim Carter

Is Anything Packed into the Holes on Top of the Dynamite?

Yes, small crushed gravel about the size of green peas or mid-sized green grapes is put into the holes on top of each dynamite charge. This material forces the energy of the blast sideways inside the hole. Without the gravel in the hole, most of the energy would shoot up out of the drilled hole into the air.

blasting ledge chip gravel

This is the crushed gravel that's used to fill the drilled holes after the dynamite is placed at the bottom of the hole.

What Prevents Rocks From Flying Through the Air?

Once the TNT or dynamite is packed into the holes, giant mats made with used rubber tires and steel mesh are placed over the rock. These absorb the impact of the exploding rocks so they don't go flying through the neighborhood.

Deck Beams and Posts and Your Door Woes

deck beams

This deck framing leaves lots to be desired. The wrong material is being used. (C) Copyright 2018 Tim Carter

Deck Beams and Posts

QUESTION #1: Tim, I really need your help. My husband is making a mess of a deck extension project. I’m concerned he’s using the wrong-sized lumber and the connections between pieces of lumber don’t appear to be secure to me. Are you able to share deck-construction basics so my kids and I don’t tumble to the ground below? Tricia P., Osceola, IA

All you need to do is spend a few minutes doing a search about deck collapse and you’ll discover local TV news station websites are littered with story after story of collapsed decks. You can even watch videos of decks collapsing with people on them. Deck construction is serious business and you need to make sure everything is done correctly.

Entire books have been written on the subject and it’s impossible for me to give you precise detailed advice. That said, you should start your education at the nadra.org website. The North American Deck and Railing Association owns this website and they have quite a few helpful documents and checklists that will get you up to speed as to some of the best practices to use when building a deck.

It’s important to realize that treated lumber must be used outdoors. The treated lumber sold now in the USA has a high copper content. When the lumber gets wet and the copper leaches from the lumber, this solution can become highly corrosive to any hardware, framing connectors, screws, nails, etc. that are not rated for this very destructive brew. One-half-inch diameter bolts can be reduced to withered rusted rods in just a few years in the right conditions.

Another key point is flashings. If the deck connects to your house, any board bolted to the side of the house needs to be flashed so water doesn’t rot out the side wall of the house. There are all sorts of methods and materials to employ, but you need to be skilled to succeed.

Deck railing posts are a major concern because many carpenters and DIY homeowner warriors get this aspect completely wrong. There are special metal connectors that should be used in conjunction with through bolts, not lag bolts.

Beams that are supported by columns need to be attached correctly. There are special pieces of approved hardware to do this or a large post can be notched to accept the beam. Through bolts then connect the beam to the post.

Special tape should be used on top of the joists before the decking is applied to prevent joist rot and to ensure the nails and screws holding down the decking don’t pull out.

I’ve got countless deck construction articles and videos at my AsktheBuilder.com website to help you understand what needs to be done to be safe. I urge you to go there and read all my past work about deck construction.

Your Door Woes

QUESTION #2: Tim, I’ve got a few interior doors at my home that are driving me crazy. One of the doors wants to slowly close on its own. I’m convinced it’s a ghost. Another door has started to rub up at the top of the door where it touches the door frame. Help this single mom who’s handy but has no money. Sara B., Corona, CA

My guess is you’ve had at least one of the problems facing Sara. I have the ghost door issue at my own home with my master bathroom door. She Who Must Be Obeyed has instructed me that it will be fixed this weekend.

The ghost is really gravity. The hinge pins are so well machined, fitted, and oiled that if the door is just slightly out of plumb, gravity will pull it closed. The fix for this is so easy you’ll wonder why you didn’t do it sooner.

All you have to do is grab a few shims or something to shove under the bottom tip of the door under the handle. Be sure the door is open so you can get outside once you do the next step.

Use a hammer and screwdriver to remove one of the hinge pins. Take the hinge pin outdoors and put it on a piece of lumber and strike the center of the pin with your hammer to put a slight bend in the pin. The bend will create enough friction in the hinge to stop the door from closing on its own.

The rubbing door problem is almost always traced to hinge screws on the upper hinge that have come loose. Tighten them and see if the problem disappears instantly. If the rubbing is less, but not gone, then you may have to use a wood chisel to deepen the upper hinge mortise on the door or the door frame.

Column 1280

Your Pesky Dryer Vent Pipe and Deicing Salts

Dryer vent pipe

Look at the convoluted mess of a dryer vent pipe. This mess can be avoided. (C) Copyright 2018 Tim Carter


Your Pesky Dryer Vent Pipe

QUESTION #1: I need your advice, Tim. My clothes dryer stopped getting my clothes dry. The problem was traced to the vent line being squished behind the dryer. I was also told the flexible plastic pipe was inferior. Can you share your magic way of connecting clothes dryers to vent pipes so they’re trouble free?  Valerie S., Mesquite, TX

Valerie’s problem very likely is your problem if your clothes dryer is taking longer and longer to dry clothes. There are several other causes too such as a clogged vent pipe, a clogged lint filter, and a lint-clogged vent flapper.

Several years ago, I helped a single mom install a new washer and dryer in a home she had rented. I had to modify the length of the dryer vent pipe and was stunned when I took it apart. The entire 25 feet of the vent pipe from the old dryer location to the exterior vent hood was choked with lint. I had never seen anything like it in all my years!

Years ago, I got upset one afternoon when trying to connect my own vent pipe to a new dryer my wife bought. I was trying to lean back over the dryer reaching down to tighten screws and lost it. I decided I was going to make it easy for myself and anyone else in the future to deal with disconnecting the vent pipe for cleaning, inspection, or installing the next new dryer.

It’s important to realize the first mistake I feel most builders make is installing the vent pipe in finished laundry rooms close to the floor. That’s the root cause of all the pain. I got out my tools and relocated the vent hood so it was exiting the house wall a few inches above the back of the dryer.

Doing this allowed me to connect solid 4-inch metal 90-degree angle pipe to the male outlet at the base of the dryer using sheet-metal screws. I then extended a piece of solid pipe straight up the back of the dryer from this fitting.

I attached a second 90-degree fitting to this vertical pipe above the back of the dryer using more screws. This fitting would connect to a short stub of pipe that exited my exterior wall. I was able to slide the dryer closer to the wall and had no trouble mating the fitting to the short stub of the pipe. Installing the final screws was easy.

At first blush, you may not like this solution because you’d see the ugly metal pipe above the dryer. As you might suspect, I knew my wife would be unhappy too. I solved that problem by making a box shelf that attached to the wall with a french cleat.

This open-bottomed box slid over the vent pipe hiding everything. The shelf was a perfect place for the box of dryer sheets and other bric-a-brac that seems to gravitate to laundry rooms. I even put in small writing on the front bottom corner: Slide Up for Vent Pipe Access


Deicing Salts

QUESTION #2: Tim, what’s the truth about deicing salts and concrete? I recently saw some magic liquid that I can use instead of salt. Does salt harm concrete? Is there anything I can apply to my concrete to prevent damage? If the concrete surface is spalled, what can be done? Danny V., Traverse City, MI

You may have the same concerns about deicing salt and concrete as does Danny. The subject is so complex tens of thousands of words have been written about it. That said, I  can give you the Cliffs Notes version.

Deicing salt can harm concrete that’s not been mixed, placed, finished, and cured properly. The trouble is when you look at a concrete sidewalk, driveway, or patio you have no idea if all those things were done correctly.

I can show you concrete sidewalks in different towns that have had deicing salt on them for decades and the surface has not crumbled. That’s your simple proof that concrete can resist salt.

Before you purchase the magic fluid, do some math. I recently saw some deicing fluid and discovered it’s 37 times more expensive than salt. Most people put on way too much salt to deice. You only need to use 5 pounds of salt per 1,000 square feet of concrete.

Before winter set in, it would have been a great idea to spray a clear penetrating silane/siloxane water repellent on your concrete. Read the directions and put on two coats if possible one immediately behind the other. This sealer helps minimize the salt brine from soaking into the concrete.

Salt-damaged concrete usually doesn’t have to be replaced. Often just the top 3/8 inch of the concrete has crumbled. You can install a long-lasting cement stucco overlay using coarse sand, Portland cement, and hydrated lime to resurface the concrete. The secret is to use cement paint to bond the old concrete to the new stucco mix. I have detailed instructions for this process at AsktheBuilder.com.

Column 1279

December 11, 2018 AsktheBuilder Newsletter

If you're a new subscriber, greetings and salutations! If you've been getting the newsletter for a while, thanks for remaining here.

This has been one of the craziest years of my life.

All sorts of great things have been happening with my three kids. Just last week, my son got a fantastic new programming job after taking an immersive online course for three months that taught him computer programming.

As you might imagine, he's very happy as are Kathy and I. He starts on December 31st of all days.

One of the people in his class was a woman in her mid-fifties. There's a negative unemployment rate in much of the coding industry right now. If you can fog a mirror and write compact code, you can get a job. Age doesn't seem to be a barrier. The recent factory tours I've done hammer home the importance of programming skills. Some of the highest-paid employees at the factories are the programmers and maintenance crew that keep the robots working non stop. Think about that.

All that said, if you have kids or grandkids trying to think about their future, don't forget the trades. I've been a master plumber since age 29 and right now, here in humble central New Hampshire, I'd have no issue charging out at $125 an hour.

Do the math - that's $1,000 per day in gross wages. We NEED plumbers, electricians, carpenters, GREAT roofers, etc. People you love can have a rewarding and fulfilling career in the trades.

My Daughter's New House

I've not shared much about my daughter and son-in-law's new home up in Downeast Maine. There were a few delays, but here's what things looked like at the job site last Thursday.

foundation backfill excavator crawlspace

You're looking at the back of the house in this photograph.

The garage foundation is to the right with two floor drains - one under each car. The notch is for a 6-foot-wide overhead door that faces the backyard. It's perfect to drive a lawn tractor through.

The two men are spreading gravel in the crawlspace. The slab for the crawlspace is scheduled to be poured this Thursday or Friday. Next Monday, the framing starts and I'll be there recording video of the entire process. Wait until you see all the video.

The Structural Building Components Association is partnering up on the project and every piece of the framing was built in factories in Maine.

The floors will be floor trusses, not solid joists. The advantages of floor trusses are too numerous to list. I'm creating a special video just about these wondrous things!

All the walls were made in a factory and will be put up like Lego blocks in just a few hours.

The roof trusses are giant attic trusses with an 18-foot-wide room in them that runs the entire width of the house as well as the garage! The roof trusses have a built-in floor truss in them.

Basically it's MAGIC. I'm sure you can see the advantages of using pre-fabricated building components, right?

There's virtually no waste. The framing time is condensed to a few days instead of a few weeks by an on-site crew shivering in the cold wind.

The accuracy of everything is within a tiny fraction of an inch.

CLICK HERE to discover what lumber yard near you has all you need and how you can incorporate floor trusses, pre-fab walls, and any roof truss you can dream up for your next home OR room addition! Yes, you can have your room addition built in a factory too!

Recent Columns

I've published a boatload of NEW COLUMNS over the past few months. If you want to keep up with me, all you have to do several times a week is CLICK HERE.

Please consider bookmarking that page and just go there to see what's new.
Here are a few that may be of great interest to you:

Radon - You Should Be Aware!

1278 foundation wall new construction

Your Cooooold House - Why and Stop Algae and Moss

static pressure


Most Common Roof Leak Locations

Roof Step Flashings

Amazon Shopping?

Are you doing more Christmas shopping at Amazon.com?

If you CLICK HERE to get to Amazon, you help ensure this newsletter keeps coming your way with FREE tips how to save lots of sweet moola!

Thanks!

That's enough for today.

I've got to get ready to get up to Mt. Desert Island.

Tim Carter

Founder - www.AsktheBuilder.com
Certified ORGANIC Stain Remover - www.StainSolver.com
Radio Operator - www.W3ATB.com

Do It Right, Not Over!

Capturing Radon Secrets Revealed

1278 foundation wall new construction

Radon gas is going to pass through the coarse open gravel, go into the white pipe and be transported to the roof via the green vertical pipe on the far foundation wall. This column was SO GOOD that I shared with the 31,000 subscribers who read my December 11, 2018 AsktheBuilder Newsletter. (C) Copyright 2018 Tim Carter

Capturing Radon Secrets

DEAR TIM: I’m building a new home and someone at a Christmas party asked me what my builder was going to do about radon. I’ve never heard of radon and thought it was a joke. Is radon an issue and what can be done about it in new construction? The foundation is going to be poured in a few weeks and I’m hoping it’s not too late to do something. Leslie M., Mt. Desert Island, Maine

Have you ever been at a Christmas party, or some other gathering like it, when you go home more upset than when you came? It can happen when you share new home construction news! Everyone seems to have an opinion and you may get both good and bad advice from people who think they know a good deal about any given topic.

What is Radon?

In this case, Leslie got some good advice. Radon is a colorless odorless gas that can cause health issues. This gas is generated by the decomposition of uranium, a natural element. Some types of bedrock contain more uranium than others. The radon gas works its way out of the rock, up into the soil, and into groundwater. It’s constantly clawing its way to the atmosphere.

There’s some debate as to the amount of exposure that’s required to cause health issues, but I’ll leave that up to the medical experts to hash over. The good news is that it’s very, very inexpensive and easy to ensure radon doesn’t cause you any problems if you’re building a new home. In most cases, it takes just three hours or less and some simple pipe to eliminate worry.

How wide spread is the radon risk?

I went online and looked at several maps that indicate radon risk potential for the contiguous 48 states here in the USA. Just doing a simple estimation, it appears to me that just about sixty-five percent of the lower 48 US states have a moderate or high potential for radon infiltration.

You can talk with different radon experts and my guess is you’ll get multiple methods to capture and redirect the radon that’s underneath your home. Here’s how I’ve always dealt with this small challenge.

Most new homes that have full basements, or crawlspaces, have a poured concrete slab in the basement. It’s a good idea to put in a slab in a crawlspace too. These slabs, in almost all cases, are poured over some type of washed gravel. The gravel can be from 8 to 10 inches thick and often can range in size from green peas to grapes or walnuts. Water and gas travel fast through this type of material.

It’s important to realize this gravel shouldn’t have any sand in it. Sand slows down the movement of water and gas to an extent. The thick gravel allows a low-paid worker to install a perimeter pipe on the inside of the footing with minimal effort. For sake of discussion, let’s say the gravel is 8 inches thick and you’re going to install common 4-inch perforated drain tile pipe.

You’d put in about 2 inches of gravel over the soil, then you’d put in the perforated pipe. I prefer to use solid straight pipe that has two rows of 1/2-inch diameter holes drilled into it about every 6 to 8 inches. I always place the holes aiming down, not up.

You can install extra pipe that crosses over the center of the basement floor much like a large sheet of graph paper, but I don’t feel it’s necessary. The pipe around the entire inner perimeter of the foundation is sufficient to capture the radon gas because it can work its way through the open gravel.

At one spot in the horizontal pipe, you need to install a tee fitting aiming to the sky. A solid 4-inch pipe is glued into the tee. Once the house is constructed, this solid pipe, with no holes in it, will continue up through the house and out the roof. This pipe acts like a chimney and radon floats out of it. Anytime the wind blows over the top of the pipe, it creates a vacuum and radon is actively pulled out of the soil under your home.

Once the rest of the gravel is installed to cover the pipes and before the concrete slab is poured, it’s mission critical to install a giant sheet of cross-laminated vapor retarder over the gravel. This plastic should meet the ASTM E1745 standard. Do NOT skip this step. If you can’t get one giant sheet and there have to be seams, be sure you get the approved tape made by the plastic vapor retarder company and tape all the overlap seams of the plastic.

Be sure the plastic extends to the side walls of the foundation. This vapor retarder prevents radon from getting into your home through shrinkage cracks that will open up in your slab within a month or two after it’s poured. A year after the slab is poured you’ll notice a small gap between the slab and the foundation wall and in other locations. These gaps need to be filled with a very high-quality caulk.

Column 1278

December 7, 2018 AsktheBuilder Newsletter

New subscriber? I'm glad you're here and so are all your new friends who've been here for a while, some for over twenty years!

It was an exciting week here at the galactic headquarters of AsktheBuilder.com.

I had a new high-technology State Proline XE Combi boiler installed here at my home.

It's magic in a box.

CLICK HERE to see more photos and watch a video of it. Wait until you see the difference between this new boiler and my OLD one!

WOWZA!

state proline xe combi boiler
The existing boiler was a clunky cast iron one. It was installed nineteen years ago when the house was built.

This new State Combi boiler does TWO THINGS:

  • it heats the entire home
  • it provides all domestic hot water - unlimited

I say unlimited, but what I mean is as long as I've got propane in my giant outdoor tank, the boiler produces hot water. In other words, it's a tankless water heater.

The BEST PART is it's a modulating boiler.

My old boiler was either OFF or it was ON FULL BLAST.

The new State Combi boiler only produces as much fire as is needed to satisfy the demand.

It might just burn at 19% capacity, or some other number up to 100%.

What does this mean? It means YOU save big money on your fuel bills. Less wasted energy goes up the vent pipe.

CLICK HERE to see the photos and watch the video.

New Easy-to-Use Gas Cans

Three days ago, I talked with Dan Marshall. He's the VP of Marketing for the Scepter Company. Scepter is the leader in producing plastic gasoline containers.

smart control gas can

I tested their new Smart Control gas can for about ten days before talking with Dan.

I have to tell you it's a magnificent gas can. You're going to LOVE one.

If you're looking for a practical gift for someone for Christmas, this might be your go-to choice!

CLICK HERE to discover WHY I loved the Smart Control gas can.

Please listen to my conversation with Dan.

Kitchen Grease Fire Video

Do you know what to do if a pot or pan with grease in it catches on fire on your stove?

kitchen grease fire

Are you SURE you know what to do?

Do you know exactly what NOT TO DO?

CLICK HERE to watch two sobering videos. PLEASE share this newsletter with loved ones or anyone you feel might not know WHAT TO DO.

That's quite enough for a Friday afternoon. I'll have some good stuff for you on Sunday.

Tim Carter
Founder - www.AsktheBuilder.com
Cleanliness - www.StainSolver.com
Waves - www.W3ATB.com

Do It Right, Not Over!