The Klein 44223 is a handsome pocket knife. Don't allow your friends to hold it. You might not get it back. CLICK THE PHOTO to have one delivered to your pocket.
Klein 44223 Spring-Assisted Open Pocket Knife - Tough as Nails
The Klein 44223 spring-assisted open pocket knife will not disappoint you.
The first thing I noticed when I removed it from the packaging is its weight. It's got some heft to it as it tips my accurate postal scale at 5.5 ounces. Weight can be an advantage with some knives.
My favorite pocketknife for the past few years has been the Sog Flash II. The primary reason is it's so light. It weighs just 2.9 ounces.
Does the Klein 44223 Have a Stainless Steel Blade?
Yes, the Klein 44223 has a 440A stainless steel drop-point blade. You're fooled at first because the blade has a black finish.
If you need to cut things, this knife is going to not let you down. CLICK THE IMAGE if you want one of these in your pocket.
Does the Klein 44223 Have a Safety Lock?
The Klein 44223 has a handy safety lock. When you see the red showing, it means you can flip the thumb stud and it will open.
The Klein 44223 pocket knife is something Rambo would like. It's built to last. CLICK the photo to have one delivered to your pocket.
Does the Klein 44223 Have a Pocket Clip and Lanyard Hole?
You bet! The rugged 44223 has both a pocket clip and a lanyard hole. The only trouble I have with the pocket clip is it's not reversible.
There's the Klein name on the low-carry pocket clip. The lanyard hole is at the left end and is easy to access. CLICK THE PHOTO to have this knife delivered to your pocket.
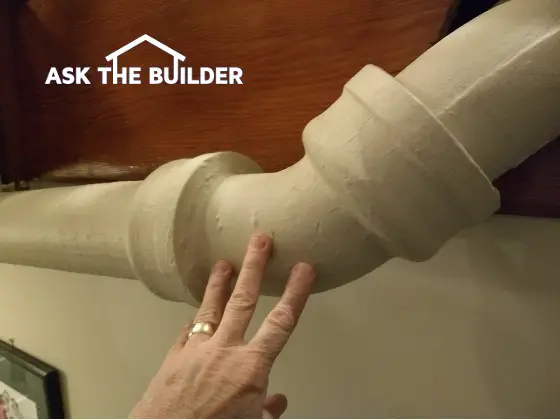
This cast iron drain pipe is over 100 years old and in perfect condition. (C) Copyright 2018 Tim Carter
Roof Moss & Algae
Question #1: I need your expert advice, Tim. My asphalt shingle roof has some green stuff on it. I’m not sure if it’s moss or algae. How do you tell the difference between the two? What’s the best way to remove them without harming the shingles? Once the roof is clean, is there a way to prevent the odious organic crud from growing on my roof? Many thanks. Cindy M., Mobile, AL
I’ve had the same problem at my home as does Cindy. The last home that I built had an asphalt shingle roof and was surrounded by some very large trees. The trees created lots of shade and provided a source of food for the moss and algae that grew in abundance.
While moss and algae tend to look good in illustrations in children’s books about fairy tales with cottages in the forest, most people don’t care for it on their own homes. Moss is a small plant. It comes in many forms, but the type I’m familiar with looks like small gobs of medium steel wool, although it would be green in color.
Algae is a very thin organic coating. It’s often the thickness of a sheet of paper or even thinner. It’s usually green and is extremely slippery when it’s wet. You don’t want to walk on a wet algae-covered roof.
I’ve discovered that moss is quite easy to remove. I use a very stiff scrub brush attached to a fiberglass extension pole. I start at the top of the roof and use downward brush strokes to dislodge the moss from the shingles. Never brush up the roof. You don’t need water to do the job and it works best when the shingles and moss are very dry.
Algae is harder to remove. It requires scrubbing with water, soap and sometimes other cleaners. Liquid dish soap and water will do the job. But this solution makes the roof even more slippery than if you put just water on the algae! Trying to clean algae from a roof is not a job for a DIYer because of the inherent danger of falling.
Roof cleaning is best done by a professional. You can slip in an instant even on a low-slope roof. The next thing you’ll know you’ll be at the ER or worse.
Once your roof is clean you can stop the growth of moss and algae. You’re going to use time-tested technology that shipbuilders have employed to keep the hulls of their ships smooth so they sail faster across the oceans. They used copper plates because copper is a natural biocide.
All you have to do is put a thin strip of copper on the cap shingles that cover the ridges and any hips on your roof. Each time it rains, some copper washes down onto the roof.
Question #2: Tim, I was visiting my son’s new home and someone upstairs flushed a toilet. It sounded like Niagara Falls across the ceiling and in the walls. I thought there had to be a leak. My older home doesn’t have this sound issue. Did the builder or plumber do something wrong at my son’s new home? What’s causing the problem? Phil C., Tyler, TX
Have you heard this same noise in your home or that of a friend or relative? Phil’s son is a victim of PVC drain pipes. I’ve been a master plumber since age 29 and can tell you that PVC has some advantages, but it comes with some baggage too.
Older homes almost always had cast iron drainage pipes and vertical stacks. The cast iron is dense and it’s very hard to get it to vibrate to create noise. PVC is the opposite. It’s not dense and the cascading water from a toilet flush vibrates the pipe creating the unpleasant noise.
New cast iron pipe is made much better than old cast iron pipe. Plumbers connect one piece to another using rubber seals and large stainless-steel band clamps. It’s easy to adjust and it takes just a little bit more work to install it. You don’t have to do the entire house in cast iron to stop the noise.
All the plumber had to do at Phil’s son’s home was to use cast iron for the toilet drain pipe and for the vertical stack in the wall. All the other pipes could have been PVC. You can try to insulate PVC pipes to stop the noise, but by the time you do that, you could have paid the small extra price for the cast iron pipe.
Two days ago, we got a message from Sandi. She was trying one of my products and felt it didn't work.
This is one of my teaching moments, so allow it to soak in.
Sandi decided she wanted her money back. I have no issues with that at all.
I offered to call Sandi to discuss what went wrong, but she wanted no part of talking to me. She had already taken the product to a UPS store to ship it back.
The issue is, in my opinion, Sandi didn't use the product right. She probably made a few mistakes. That's why it didn't work, not that it's a piece-of-crap product.
If you have a tendency to react like Sandi, I urge you to do one simple thing BEFORE you go to all the trouble to return a product you've bought:
CALL THE MANUFACTURER
Yes, call the manufacturer, or vendor, and ask for HELP.
Sandi now has a bitter taste in her mouth about this one product of mine.
Because I've been selling it for twenty-three years and have talked with customers over the phone when they call, I'm 99.9999% sure she didn't follow the use instructions.
Just a month ago, the same thing happened with Roberta. But guess what? I called her and discovered what was wrong.
Roberta is now a super-happy customer!
Why is this important?
Years ago, it was almost impossible for a customer to tell the world how they felt about a product.
Today you can go to numerous websites and leave reviews. In many cases, the reviews stay up there forever.
You may rail on a product talking about how bad it is, when the truth is it's a great product and you goofed up using it.
Promise me you'll always CALL the manufacturer, or vendor, for help if you have an issue.
TNX as we say in Morse.
New Revised Columns!
Here are a few revised columns for you. ALL of them have fantastic videos in them. Check them out:
New subscriber? Welcome and this is not a normal newsletter.
Veteran? Even more sad and disturbing news.
The Lanfords
A few days ago, I shared the story about my friends Audri and Jim Lanford who got sent to the Pearly Gates when their home exploded in Boone, NC last Thursday at 5:08 p.m.
This tragedy (click that link to discover what happened) made the national news last week.
I've decided to do a large in-depth article about how their deaths might have been prevented.
I'm in the process of gathering all I need to create a very authoritative article outlining the latest safety devices and simple steps you can take to save your life and those of your loved ones. It might take me a month to complete my research and write the article.
Yesterday, I had a conversation with Detective Carolyn Dragg of the Watauga County Sheriff's department. I had a list of questions for her. Unfortunately she could only answer a few of them at this point in the investigation.
My questions were based on the official press release issued this past Monday by the Watauga County Sheriff's department.
CLICK HERE to read it. The timeline of cascading events is chilling.
A question should be SCREAMING in your head after reading the Sheriff's official statement. I'm going to give you a troubling fact that will answer it:
There was only one call to 911. That call was made by a neighbor after she/he finally walked around the neighborhood to discover the source of the explosion.
Please don't bother asking me questions about gaps and oversights in the timeline. I don't have the answers and can only speculate.
Det. Dragg said most of the unanswered questions should be answered in a follow-up statement issued by the Sheriff and the local Fire Marshal. I don't know when it will be released, but Det. Dragg told me I'd be one of the first to know.
I was in contact on Monday with the American Gas Association and today I made progress talking with Greg Walker the Communications Director of the Propane Education and Research Council.
Greg sent me an email shortly after the call and there were two videos he shared with me.
You need to watch both of them IMMEDIATELY.
I've been making a HUGE MISTAKE at my own home for years and it's my guess you're making it too.
Sadly, Audri and Jim didn't do what you're supposed to do when you smell gas. That's covered in this video:
CLICK HERE to see what to do when you SMELL LEAKING GAS.
Please consider FORWARDING this newsletter to as many as you can so they can watch that video too.
What mistake do you think I've been making with small propane tanks? I'm wondering if you're guilty too.
WATCH THIS VIDEO and reply in the comments below the video if you've been goofing up too.
What an idiot I've been! Before creating this newsletter, I took care of the problem at my house. You need to do the SAME at your home ASAP.
I'll have a more normal newsletter for you probably Friday morning.
What to do if gas leak: Use a wrench like this to turn off the gas. Then immediately get out of the house and away from it. Then call 911. Copyright 2018 Tim Carter
What To Do If Gas Leak Video
Do you know what to do if there's a gas leak? Watch this video and save your life and that of loved ones:
Click to read Tim's article about the Lanfords. They were friends of Tim's and tragically were killed when their house had a gas explosion.
If you have natural gas, you'll need a wrench to turn off the gas at the gas meter. You should keep an inexpensive pipe wrench at the gas meter or very close to it. You don't want to be wasting time trying to locate a wrench in a cluttered workbench or have to go back inside the house to the basement to get the wrench.
If your gas meter is in the home's basement, do NOT attempt to turn it off, EVACUATE the house and dial 911 a safe distance away from the home.
The gas concentration in the basement could be deadly. Propane is heavier than air. It will COLLECT in a basement.
Natural gas is lighter than air, but it could still collect in a basement to deadly and dangerously explosive concentrations.
Do NOT attempt to open windows. GET OUT OF THE HOUSE.
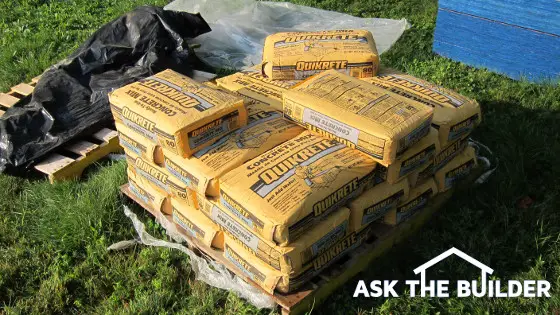
You may think that concrete in a bag is inferior. It’s not. (C) Copyright 2018 Tim Carter
Concrete in a Bag
Question #1: Hello Tim. This summer I’ve got a few outdoor projects that involve pouring small amounts of concrete. I looked into having a ready-mix truck do it, but the cost is so expensive. I’ve seen the bags of concrete in stores. Is it any good? Have you used it? Can I modify the mix to increase the strength? If so, what do you use and how? Malcolm McC., Albany GA
Do you have exciting project plans like Malcolm’s that involve concrete? I can clearly remember my first experience working with this magic material. I formed and poured a large set of steps that led up to the front door of the first house I remodeled. Looking back, it was too big a project for a rookie. That said, the job turned out not too bad!
The good news is the bagged concrete you can buy at local hardware stores is a fantastic product. The man who invented it built his first plant just a few miles from my childhood home in Cincinnati, OH.
It’s important to realize that basic concrete contains just four ingredients: small rocks, sand, Portland cement, and water. The cement is the glue or binder that holds the sand and rocks together. When water is added to the other three ingredients, it starts a chemical reaction. Countless invisible Portland cement crystals start to form and interlock all the sand and rock together.
I’ve used bagged concrete for years and had great success with it. My two most recent uses were for the in-ground piers that support a massive deck and the piers for my giant two-story shed. The piers are going to last for many decades because I used the right amount of water to mix the concrete. Add too much water and you’ll ruin the concrete.
You can add more Portland cement to bagged concrete to make it stronger. You can also add some hydrated lime. To make the strongest concrete, the sand should be sourced from volcanic lava that has a high silica content. This is not easy to locate and I’d not worry about it. But you should get a bag of pure Portland cement and lime and add some of those two things. Both ingredients are inexpensive.
Most bagged concrete comes in standard-sized bags. If I wanted to make it stronger, I’d take an old kitchen measuring cup and add 16 ounces of Portland cement and 8 ounces dry measure of hydrated lime to each bag of concrete.
You want to blend the extra cement and lime with the bagged concrete in dry form. Use a newer plastic mixing bag and roll around the dry ingredients before adding the needed water. The concrete should have a consistency like stiff applesauce when you add the correct amount of water.
Question #2: I’m about to put an offer in on a home that has a heat pump. I don’t understand how this machine could possibly produce heat in the winter months using air from outdoors. My friends are warning me that the air that comes out of the indoor registers is a cold heat. What does that mean and do heat pumps really get heat from cold air? Sue W., Orlando, FL
You may be like Sue and wonder about heat pumps and how in the world they work. It’s true, they can squeeze heat from the cold air. It’s all about the boiling temperature of the refrigerant that’s kept at very high pressure inside the heat pump and the copper lines that connect it to the indoor air handler.
The dirty little secret most HVAC people don’t tell you is the heat pumps also come with large electric resistance heating coils inside your home. As the temperature of the air drops outdoors and approaches 32 F, the heat pump needs help creating heat and electricity starts to flow through these coils making them glow just like a toaster. It’s common sense that as the outdoor air gets colder, there’s less heat to extract from it.
Heat pumps do a fantastic job of getting heat from the outdoor air if that air temperature is in the 50-55 F range. Technology is constantly making the machines more efficient so they produce more heat from a given amount of electricity.
The temperature of the air flowing out of the supply registers in the home will seem cold. Often the temperature of the heat-pump air is 90 F or less. Homes that heat with natural gas, propane, oil, or wood can see air temperatures of 110 F or even greater. This is why as a kid I used to put my feet right on top of the register in our living room. The metal got so hot I’d have to lift my feet every few minutes so I’d not get burned!
About ninety minutes ago, I sent out a newsletter about my two friends being killed in a tragic explosion.
I FORGOT to make a valuable suggestion. I failed to remind you to consider FORWARDING that newsletter from earlier today to:
your family
your friends
your co-workers
your neighbors
It's one of the RARE newsletters I send out that might save a life or two or three.
Please consider FORWARDING it to as many as you might think it will help.
I've reached out to the American Gas Association and will be providing you with much more information about automatic gas shutoff valves in the near future.
New subscriber? Welcome and I apologize for the tone of your first newsletter.
Veteran subscriber? You know I do this from time to time.
Two Friends Sent To Heaven Too Soon
Do you live in Watauga County, NC - more specifically the hamlet of Boone, NC? Then you know where this is going.
Four days ago, two friends and peers of mine, Audri and Jim Lanford, died instantly when their home exploded. The story made the national news.
Heavy rain the days before the tragedy caused a landslide above their home.
The rest is speculation because I've not seen an official detailed written report from the Watauga County Sheriff, and don't know if one will ever be issued.
I'm reasonably sure, because of the remote location of their home, they heated with propane. Based on the photography available to me, it's my guess the propane tank was on the side of the home that faced the hillside.
You typically put propane tanks someplace out of sight. They're not the most attractive things after all.
I'm surmising the ground slipped pushing the tank towards the house. This could have caused the gas line that entered the home to be pushed farther indoors. This movement could have somehow fractured the gas line and the full flow of gas began.
Study the photo to imagine what kind of force it takes to blow apart a house at the seams and cause the destruction you're about to see. Sadly it all could have been prevented with a $50 +/- automatic gas shut-off valve.
These valves are made to sense the unnatural FULL FLOW of gas through the line. When that happens, the valves SHUT OFF THE FLOW.
You can CLICK HERE to see an enlarged version of the photo.
You can CLICK HERE to read the tragic local news story.
RIP Audri and Jim!
I appreciate all you taught me even though I was not as diligent as you were at implementing all of your knowledge.
I'm going to write up a better story with a few illustrations for you explaining why the landslide happened. Once again, my geology degree comes in handy.
What's your primary takeaway?
You need to find out ASAP if you can have an automatic gas shut-off valve installed on your gas line. If you live in an earthquake zone, you probably already have one.
Some other accident or ??? could cause a ruptured gas line inside your home. Why take a chance? Why not install a valve that could SAVE YOUR LIFE or those of your LOVED ONES?
It doesn't matter if you use natural gas or propane. If you use propane, you can call your local propane supplier to see if they offer these valves.
Plumbers usually do this work. CLICK HERE now to get free bids from local plumbers about installing an automatic gas shut-off valve if you'd rather take that route.
Your secondary takeaways should be:
Bury all the hatchets you may have lurking in your life
If your primary focus is not family and friends, make it so
I've been very busy the past couple of weeks revising old columns. I've written so many columns over the years, I've FORGOTTEN some of the ones that could really help you.
I've gone to great lengths to locate fantastic videos about the topics. Each revised column has at least one video in it. Some columns have multiple amazing videos for you.
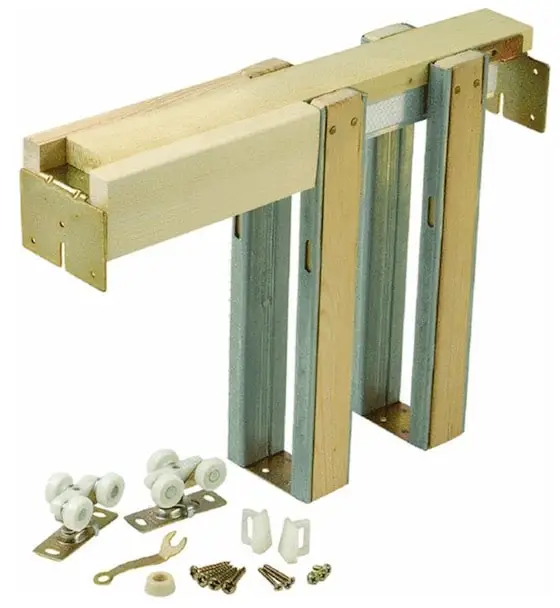
Pocket door installation starts with using the best kit. This is a miniature version of a Johnson pocket door kit. The vertical legs create the pocket. The track is hidden in the horizontal top member. The three-wheel trolleys are in the lower left. Copyright 2018 Tim Carter
"Installing pocket doors is not as tough as it sounds or looks, especially if you buy a quality hardware set. Remember, the key to a trouble-free installation lies in a proper rough opening."
Pocket Door Installation Checklist:
purchase an LE Johnson kit - best made in the USA
read installation instructions
perform string test to ensure rough opening is not twisted
follow simple instructions and be done in 30 minutes or less
The following instructions will help you install just about any pocket door hardware kit. I URGE you to completely read and follow the enclosed instructions you will find with your pocket door hardware. These systems are really easy to install. They require minimal tools and some patience.
The rough opening for the pocket door is the rectangle created by the wall studs. It's a very specific height and width both called out in the written pocket door installation instructions.
The rough opening is the foundation of your system. Get this wrong and you will suffer later. The rough opening will seem huge. Why?
The rough opening will be more than twice as wide as a usual one. The width is almost always two times the actual finished door with plus one inch.
For example, a 2-foot 8-inch door (32 inches) the rough opening needs to be 65 inches. The height of the rough opening off the rough floor surface is usually 84.5 inches. Be sure you measure from the highest point of the subfloor if your floor is out of level.
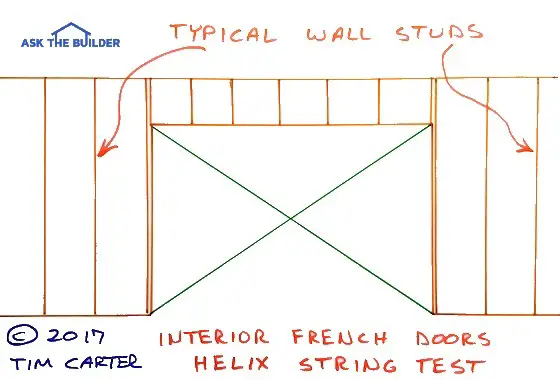
It's important to realize the rough opening needs to be plumb, level and NOT twisted (a helix). Perform a string test to ensure the rough opening is not twisted.
This is a crude drawing of a rough opening for a pocket door. The green lines are pieces of string attached to the corners of the rough opening. They must barely touch at the center of the "X". Switch one string back and forth across the other string to ensure it's just barely touching at the center of the X. Copyright 2018 Tim Carter ALL RIGHTS RESERVED. Do NOT COPY
How Level Must the Top of the Door Be?
The top of the rough opening really needs to be level. This is where the track is attached.
The side jambs must be plumb. That should be common sense.
Another key point is the bottom plate of the wall (before it is cut out) must be directly above the top plate.
All too often rookies frame the pocket door rough opening without a bottom plate in place. One end or both of the side rough jambs can drift out of plumb this way.
How Do You do the String Test?
String a line tightly from one corner to the opposite diagonal corner. Do the same across the other corners to make an X. The strings should just barely touch one another.
If there is a gap between the strings or one string presses significantly against the other, your rough opening is twisted or in a helix! You fix this by adjusting the position of the bottom of the vertical rough jamb studs.
How Do You Install the Pocket Door Track?
The Johnson pocket door track is the first thing to install. Two L-shaped brackets, one at each end, make this a simple task.
Each track is slightly different. Follow the individual instructions. Make sure it is level before you proceed with anything else!
How Do You Install the Thin Pocket Door Studs?
You install the pocket door studs by first snapping a fine chalk line that represents the sides of where the bottom wall plate would be if it were in place.
Snap chalk lines that are directly below the top plate. If your rough frame is not a helix, this is easy. Just snap the lines where the bottom plate stops at each end. These chalk lines serve as your reference point so you can properly locate your floor plates that hold the side split jambs.
What are the Pocket Door Side Split Jambs?
The side split jambs are the thin studs that create the pocket. The placement of two of these is critical.
They form the beginning of the pocket. Your instructions will tell you precisely where to mount these. The other two jambs simply are placed halfway between the first two and the actual wall studs.
How do you Finish the Wall?
If you installed the frame correctly, you can now add your drywall or plaster. Be sure your nails do not go through the thin side split jambs! If they do, they will scratch the door.
How Does the Door Connect to the Track?
The door connects to the track with two simple parts:
mounting plates for the top of the door
trolleys that connect to the door mounting plates
Paint the top and bottom of the door two coats before you attach plates to the top of the door.
Doors will warp and twist if you don't seal the top and bottom with paint or a clear finish.
After the mounting plates are put on the top of the door, place the pocket door trolleys into the track. The mounting plates on the top of the door allow you to hang the door.
How Do You Install the Finish Pocket Door Jambs?
Once this is complete, the door will slide in and out of the pocket. You can now install the finish side jambs. Always install the top jambs last. Be sure to install these with finish screws, NOT nails. To remove the door at a later date, you will need to remove at least one top jamb.
When you attach the door trim casing, try not to nail into the finish jamb material. This will interfere with the removal of the jambs at a later date.
The finish jambs can be tough to fabricate on your own. It requires using a table saw and sanding the rough cut edges. Certain manufacturers sell these materials already sanded and cut to size. It is a tremendous advantage to use these.
Installing pocket doors is not as tough as it sounds or looks, especially if you buy a quality hardware set. Remember, the key to a trouble-free installation lies in a proper rough opening. If you get the rough opening right, the rest of the job will flow like a smooth vodka and tonic.