Preventing Frozen Pipes

preventing frozen pipes

Preventing frozen pipes was not a priority for the plumber who did this poor job. These CPVC water lines froze even though they were covered with insulation. Copyright 2018 Tim Carter

Water Pipes Need Not Freeze

This is the column Tim added in his January 3, 2018 AsktheBuilder Second Newsletter.

Water supply lines in your home freeze because they get cold. Your plumber or builder should be smart enough to know to keep water lines on the warm sides of floors and walls.

If you want the best advice on how to prevent burst water lines, absolutely click or tap here.

Preventing Frozen Pipes Checklist:

  • Water lines should be installed on the warm side of walls and floors
  • Design house or room addition so plumbing fixtures are not on exterior walls if possible
  • Exterior walls and floors that must have water lines must be oversized and thicker
  • Water lines in exterior walls and cold floors must touch up against warm wall surface
  • Create one-inch air space between water lines and tight-fitting closed cell foam insulation in wall / floor cavity

Related Links:

Frozen Pipes in Outside Walls Are a Thing of the Past

Frozen Pipe Story and Solution

Why Doesn't My Shower Work?

Free & Fast Bids

CLICK HERE to get FREE & FAST BIDS from local plumbers that can install pipes that won't freeze.

Installation Requires Attention To Detail

Extra attention is required for preventing frozen pipes. Do all these things:

  • Use PEX piping in walls subject to freezing. PEX can handle repeated freeze/thaw events without bursting
  • Install separate easy-to-access shutoff valves for water lines that could freeze in case lines burst
  • Turn off water shutoff valves in bitter weather and open faucet valves to release pressure

PEX No-Burst Water Pipe is Easy to Install

Watch me demonstrate how to connect PEX piping to a fitting in about 15 seconds. PEX is something to use when thinking about how you'll take care of preventing frozen pipes. This plastic piping is true DIY plumbing piping material.

You don't need a fancy power tool like you see me use in the video. Simple hand-powered expansion tools can be purchased very affordably.

It's important to realize you can convert to PEX piping from copper, CPVC or any other water supply line. Just use PEX in those walls / floors that are in danger of freezing.


CLICK HERE to get FREE & FAST BIDS from local plumbers that can install pipes that won't freeze.

Laundry Room Ideas

laundry room ideas

Great laundry room ideas are much needed here. This is my laundry room. I didn't design nor build it. You may think it's a nice one. It pretty much SUCKS. Copyright 2018 Tim Carter

Laundry Room Ideas - Beware Of Function Flaws!

Laundry rooms are one of the hardest-working rooms in a house outside of the kitchen. I don't know about you, but I don't go into my laundry room to relax, read, watch TV or jump on my amateur radio.

I go in there to get clothes clean, use the utility sink, iron clothes, feed the dog, etc.

I'll bet you do the same, right?

It's important to realize you must avoid the mistake of making  your laundry room beautiful before making it fully functional.

For one thing you need great laundry room ideas that will allow you to work with minimal frustration.

Keep reading as I've got lots of the ideas you need!

Related Links

Laundry Room Plans - Avoid These Mistakes at All Costs!

Laundry Room Cabinets - Lots & Lots of Choices

Dryer Venting - IMPORTANT TIPS HERE!

Free & Fast Bids

CLICK HERE to get FREE & FAST BIDS from local remodelers who can create a dream laundry room.

Top Five Functional Laundry Room Ideas

Before creating this page I went online and looked at many laundry room photos. Almost all of them could have been in a magazine they were so beautiful.

Beauty is one thing, but function is another. You can have both, but always think of function first.

Here's my top five laundry room function ideas:

  • laundry basket height
  • double-bowl utility sink
  • floor drain
  • waterproof flooring
  • easy access for washer / dryer maintenance

None of the above ideas are sexy, but each one will make your life so much easier.

Laundry Basket Height - It's Most Important

How do you deal with your dirty laundry now? Do you put your basket up on a 36-inch tall countertop? The top of the basket is now almost 54 inches off the floor! That's hard on your shoulders.

Do you put it on the floor? Is the floor always clean and free of dirt and lint? How's your back feel bending over so much to lift the clothes into your washer?

Consider a rolling platform that puts the top of the laundry basket about 32 inches off the floor. Try this idea out now using a simple cardboard box in your current laundry room. Experiment until you discover the perfect height for you.

laundry room ideas

Here's my wife's laundry basket on a temporary cardboard box. The lip of the basket is just above the bottom of the HE washer opening. The box is about 14 inches tall. Copyright 2018 Tim Carter

Double-Bowl Laundry Utility Sink

I grew up with a double-bowl cast concrete laundry sink in my basement. Now I have a single-bowl thermoplastic one made by Mustee.

Mustee makes a fantastic double-bowl thermoplastic wall-mounted sink. CLICK HERE to order one.

You'll never regret having two bowls in your laundry room. One bowl can be dedicated to YUCK projects while the other bowl can be relegated to CLOTHES ONLY so it's always free of paint, oil, grease, etc.

laundry room utility sink

Here's my single-bowl laundry sink. I wish the builder had made the room longer to accommodate a double-bowl version. All that was needed was 20 more inches! CLICK THE PHOTO to order an affordable Mustee double-bowl wall-mounted thermoplastic sink. Copyright 2018 Tim Carter

Floor Drains Are A Must in Laundry Rooms

I had to install a new drain pump in my washing machine the day before New Years Eve. The job would have gone so much faster had there been a floor drain in my laundry room.

Washing machines can develop leaks. A floor drain can prevent thousands of dollars of damage and you'll have NO MOLD outbreak!

Waterproof Flooring Prevents Mold & Rot

Another key point is waterproof flooring. Don't even consider laminate flooring as it has a wood-dust core.

You want ceramic tile, natural stone or some other material that can be installed over the cement base that will be installed over the waterproof membrane that connects to the floor drain.

Easy Access for Maintenance & Repair

The water shut off valves for the washer need to be above the top of the machine and in clear sight. You should turn off the water each time after the washing is complete. Modern braided supply hoses can fail and a flood will be the result.

The metal vent pipe for the dryer needs to extend up from the base of the machine and go outside through the wall just above the top of the dryer. You should be able to unscrew two or three screws on the 90-degree bend allowing you to slide the dryer out away from the wall to clean out the pipe.

You'll need at least 4 feet of space between the front of the dryer and any cabinets across from it to be able to slide it out the entire way so you can get access.

December 28, 2017 AsktheBuilder Newsletter

-1 F temp
BRRRRRR!!! It's frigid here this week in central New Hampshire.

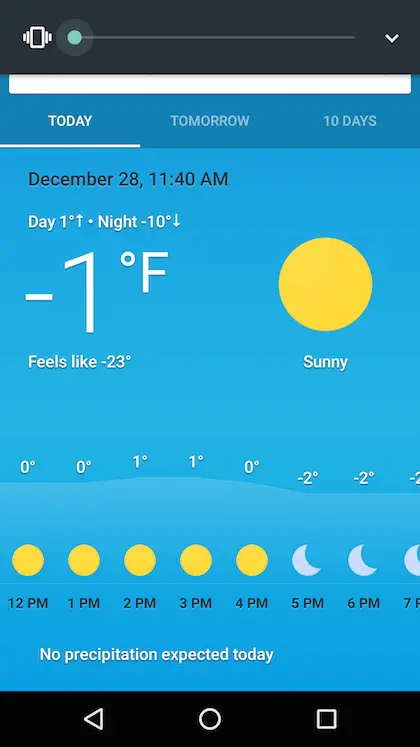
When I woke up this morning, it was -6 F. The high temperature is supposed claw it's way to 1 F. The wind is howling, it's just before noon and the thermometer says it's -1 F.

In other words, it's damned dangerous to be outside.

Great Teaching Moment - Heat Loss

Are you suffering from the cold too? Is your house cold even though the furnace is running non stop?

There's nothing wrong. This is normal when it gets bitter cold.

Furnaces, boilers, heaters, etc. are sized for an average low temperature. Professional installers look at the weather records and then select a temperature like 5, 10, 15 or even 30 F depending on where you live.

It's silly and wasteful to install a furnace in your home that's so large it can heat the entire Empire State Building! You want your furnace to be just large enough to heat your home and that's it.

Here's a coarse analogy. Imagine trying to heat a giant warehouse with a candle. The poor candle can't put out enough heat each hour to compensate for the HEAT LOSS through the floor, walls and ceiling.

Your furnace, boiler or heat pump is like that candle. When it's operating at full tilt, it can only generate a GIVEN AMOUNT of Btus per hour.

As it gets colder outside, the heat loss, measured in Btus, INCREASES per hour. At some point that Btu heat loss is greater than what your heater can produce.

When this happens, it's impossible to maintain your normal indoor temperature and you get cold.

The solution is to put on more clothes, long underwear and wear a hat. That's what I'm doing right now as I type this. Look at the photo just below.

tim carter askthebuilder


Go Patriots!!! Want the NEW Patriots knit hat like I'm wearing in the photo above?

It's got a fantastic felt-like material liner and is SUPER WARM. My youngest daughter gave it to me for Christmas. I love love love it...

CLICK HERE to have it delivered to you home.

There might be a special deal at Amazon where it comes with a free air-pressure gauge you can give to any NFL official you might know. 😉

New Products at AsktheBuilder.com

I introduced two new products at AsktheBuilder.com in the past two days!

Did you know I've been a master plumber since age 29? Yes, it's a fact. I enjoy installing plumbing pipes. To me, it's like a jigsaw puzzle but in 3D.

The new products came about because of increased demand for a service I've provided for years but did a HORRIBLE JOB of marketing.

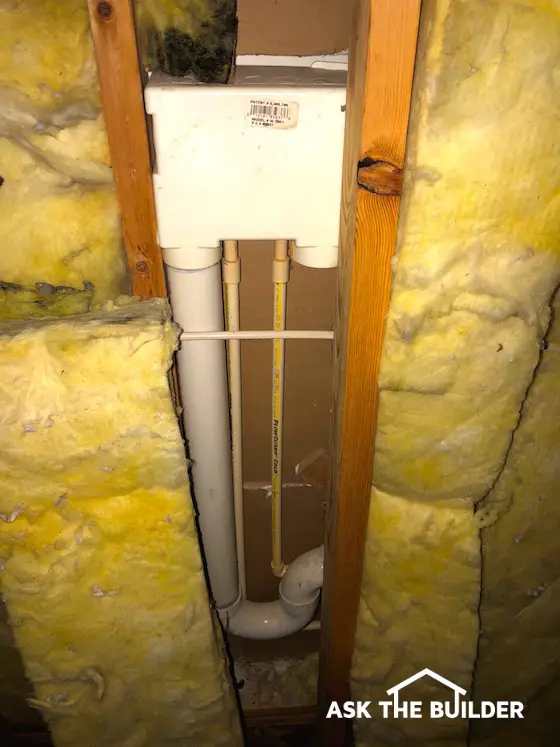
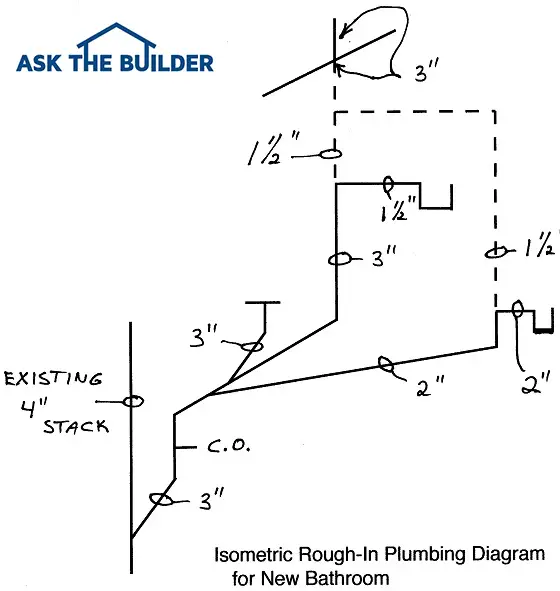
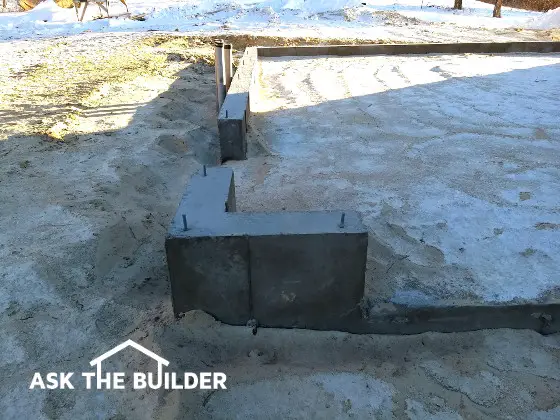
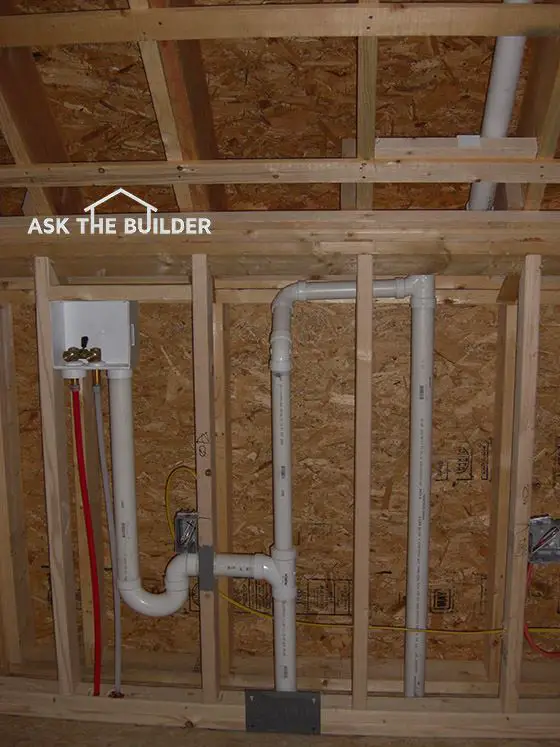
The first product is a service where I'll draw plumbing plans for your drain and vent lines in your new home or remodel job.

Draw Plumbing Plans

In the photo below, that's a washing machine drain line and it's associated vent line. You also see a vent line to the right coming up from a lower floor.

Do you think you could size all the pipes right and know how they connect in your home? I didn't think so.

Allow me to draw it all up for you.

washing machine drain and vent


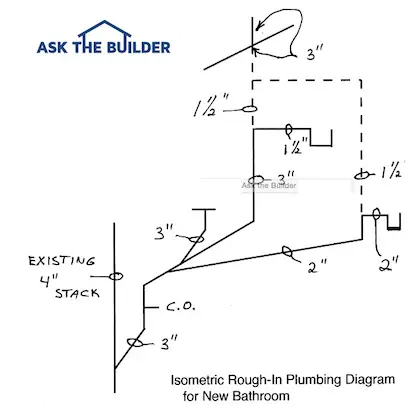
Most DIYrs have no idea about the correct pipe sizes and the best way to connect all the pipes in a full layout.

That's what I do. As crazy as it sounds, I love making these drawings.

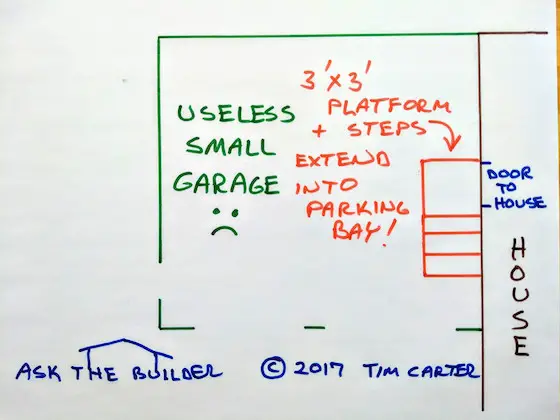
Here's an example of just PART of a drawing:

plumbing isometric drawing

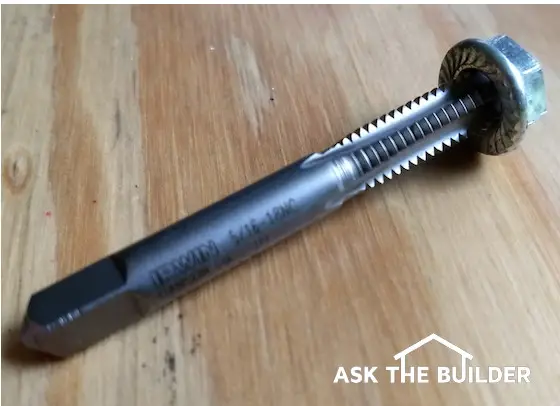
The second product is a short instant download of Best Practices for Installing PVC Drain and Vent Lines.

In this simple document I condense decades of hard-earned knowledge so you don't make the mistakes I did many years ago.

You can get professional plumbing results by following all of what's in this short document.

CLICK HERE to see what it covers.

IMPORTANT NOTE:

I'm about to start PRICE TESTING THIS NEW PRODUCT. The knowledge in this simple document is well worth hundreds of dollars. I know no one would pay that price.

But they might pay $19.95 or $24.95 to get just ONE of the tips. The way you determine this is to change the pricing and see what price sells best. Lowest price does not always win!

Right now it's priced at $14.95.

If you want it for $14.95, then PURCHASE IT NOW.

If you feel you may need this advice in the future - even if another plumber is putting in your system - you should get it right now.

You can include MUCH of what's in the document in your plumbing specifications so you get a fantastic system.

New & Revised Columns For You

I'd look at these columns if for nothing else but the photos and videos that are in them:

undermount kitchen sink

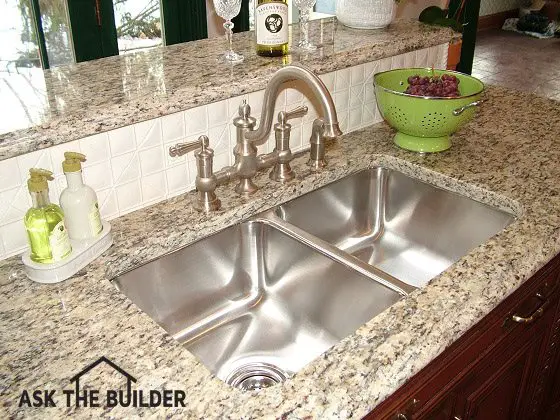
Bulletproof Undermount Kitchen Sinks

Secret Tip to Unclog Toilets FAST!

Load Bearing Wall Identification SECRETS

Granite Sealers - Bet You Didn't Know This

I'll be very busy the next three months revising hundreds and hundreds of older columns for you.

You'll benefit by CLICKING the links to them.

Orlando FL Meet Up

I'll be in Orlando, FL from January 8th-11th for the Builders Show.

I can do a meet up on the night of January 8th if you want. At this point I don't have anything scheduled. But after that, it gets pretty insane.

REPLY to this email if you want to get together. CHANGE the Subject Line to: Orlando Meet Up

That's enough for today.

Happy New Year!

Tim Carter
Founder - AsktheBuilder.com
Drawer of Plumbing Isometric Plans

Do It Right, Not Over!

Draw Plumbing Plans

draw plumbing plans

I'm a master plumber and I can draw plumbing plans like this one in 20 minutes. It shows the fixtures in a bathroom that's being added to an existing home. The solid lines carry water and waste. The dashed lines only carry air and some condensation water. CLICK HERE if you want me to draw your plumbing plans. (C) Copyright 2017 Tim Carter - Master Plumber

Draw Plumbing Plans  Using Years of Experience

You have to draw plumbing plans if you want your plumbing system to go in with no surprises. I've been a master plumber for almost forty years now and know how invaluable a great set of plans is to have on the job site.

I can draw plumbing plans for your new home or remodel. I love making drawings like you see above for an entire house! Watch this video that shows all you get with my Draw Plumbing Plans package:

Related Links

PVC or Cast Iron Drain Lines? What are the Pros & Cons?

Washing Machine Vent Line Tips

CLICK HERE to have Tim Carter draw your drain and vent line plans for your home or remodel job.

Pipe Sizes for Plumbing Plans

It's important to realize pipe sizes must be correct to avoid clogs. Certain fixtures require minimum pipe sizes.

As an illustration, showers need to have a 2-inch drain pipe.

Residential toilets require a minimum 3-inch drain pipe.

Fixture Units Add Up

Another key point is that plumbing drain pipes can only handle so much water flow.

Engineering studies determined many years ago the average amount of water discharged in X seconds by common plumbing fixtures.

These common fixtures in a house are:

  • toilets
  • kitchen sinks
  • vanity sinks
  • tubs
  • shower stalls
  • washing machines
  • floor drains

The first thing to remember as you draw plumbing plans is to keep track of the fixture units so you know when to upsize to the next larger drain line.

Lots Of Hidden Vent Lines

Watch the following video I shot in the winter of 2015 in central New Hampshire. Pay close attention to the pipe sizes and the direction of some of the fittings.


CLICK HERE to have Tim Carter draw your drain and vent line plans for your home or remodel job.

Advice For Architects-To-Be And You Too

garage layout

Can you see the mistake made by the architect in this photo? Look at the short stub foundation wall on the right then the height of the doorway from the garage to the house. (C) Copyright 2017 Tim Carter

Advice For Architects-To-Be And You Too!

Not only do I answer questions each day at my own AsktheBuilder.com website, but I also do the same at another major question site. Two days before Christmas, I answered a most unusual question.

The gentleman wanted to know the best books I’d recommend about building and construction for young architecture students. You might think my first reaction would be to provide a few links from Amazon.com to one or two top books.

I didn’t do that. Instead I uploaded a photo (see above) I had taken the day before of a house being built near me and a short story. I drive by this house each time I go into town. About a week before Christmas, the builder had completed pouring the foundation for a two-car attached garage. There are two separate garage doors in this structure.

As often happens, I did it at the last home I built for my family, the garage foundation is poured at a later date than the house foundation. Doing this allows better access to the house foundation forms for ready-mix concrete trucks. If you decided to pour both foundations at once, you might have to incur the cost of an expensive concrete pump truck.

I decided to take a few photos of the garage and once I pulled into the driveway I shook my head in disbelief. The two-car garage had a fatal flaw.

You need to know that the first floor level of the house is going to be about 2 feet higher than the garage floor. This means there has to be a minimum 3-foot by 3-foot platform that projects into the garage immediately adjacent to the door leading from the garage into the house. Two steps will get you from the platform down to the garage floor.

The edge of the garage door that’s closest to the house is about 28 inches from the sidewall of the house. The platform is going to occupy space that was supposed to be for the car. Now it’s only good for a touring Harley Davidson motorcycle or a golf cart.

My answer to the man asking about the books was that instead of reading about how to build, the young architects-to-be should just go work full-time on construction sites for a minimum of a year. Two years would be a much better investment of time. This hand-on construction experience would pay off in spades later in their career allowing them to better serve their clients.

I went on to mention how the young women and men should work for both remodeling and new construction builders. They’ll quickly discover the challenges faced by builders when trying to work from plans that contain flaws or oversights.

I had a similar mistake happen to me late in my building career. I was on the most challenging job I had ever bid on. The architect was seasoned and we were good friends. He had developed a niche of doing very interesting giant room additions and complex remodel jobs.

This job had me adding a small house onto a house for all intents and purposes. The existing attached garage on the home was to become the new giant kitchen. A new garage with two separate garage doors was going to be in the new structure.

The new structure was brick veneer and the plans called for gorgeous arched openings over the doors. I built the forms for the bricklayer and placed them exactly where the architect said to put them. I trusted the architect had done everything right.

The architect made a mistake and had the arches too low. When you tried to pull in the homeowner’s minivan into the garage, the roof of the van would hit the brick. Had a young architect-to-be been working with me the day we tore out the brick to redo it, I guarantee you she/he would never ever make that mistake in their career.

The young people would also see how frustrating it is to work from plans lacking great details of complex connections, blueprints missing interior elevations, and AWOL room finish schedules along with minimal written specifications.

All of these things lead to misunderstandings, drama, blown budgets and in the worst cases expensive lawsuits where only the attorneys win. If you know a person that expresses an interest in being an architect, please convince them to go get muddy, sweaty and dusty for two years. They’ll forever thank you!

Column 1229

Ring Floodlight Cam Review

ring floodlight cam

This is my Ring Floodlight Cam after it's unpacked and ready to be installed. You're going to LOVE LOVE LOVE the quality of this bad boy. Copyright 2017 Tim Carter

Ring® Floodlight Cam Review - A Dream Security Spotlight

My wife doesn't like our new Ring® Floodlight Cam.

"You're a creeper," she says to me. That's because our Ring® keeps a vigilant eye on who comes down our driveway. She doesn't like to be watched so she's not happy with me. I tell her, "Just don't go up the drive."

That goes over like a lead balloon. 😉

But I LOVE LOVE LOVE my new Ring® Floodlight Cam because I can see who's coming, I can talk to them and the floodlights make it look like daytime when they come on. It's a marvelous piece of technology.

Related Links

Ring Video Doorbell Review - WOWZA Is It Nice!

Nutone Knock Review - #FAIL Try Again Nutone

Are All Parts and Tools Included?

When you unpack the Ring® Floodlight Cam, you'll soon discover you have everything you need. All parts and tools are included. Check out all that came with mine:

Ring Floodlight Cam

Here's what you get with the Ring Floodlight Cam. You even get EXTRA parts in case you're a klutz and drop something. The orange screwdriver works to tighten the white finish nuts that secure the floodlight to the galvanized steel baseplate in the photo. Copyright 2017 Tim Carter

Does the Ring Floodlight Cam Have Lights, Sound, Siren and Motion Detection?

The Ring® Floodlight Cam comes with LED spotlights - this means no bulb changing. WOOT!

It's got complete audio so you can listen to what's going on outside. You can talk through the speaker too.

If you want to scare away any people of interest that cause the lights to come on, you can touch your smartphone screen and activate a siren.

Oh, and you can record all of this and Ring stores everything!

Is it Easy To Install the Ring® Floodlight Cam?

Yes, it's very easy to install the Ring Floodlight cam.

I've installed plenty of outdoor light fixtures in my career. Ring decided they wanted no hassles so the developed their own base or backplate for the floodlight. The rubber seal ensures everything to be watertight as long as you read the red sticker and put that at the 6-o'clock position!

ring floodlight cam

This is the base or backplate installed on my house. The slots are made for any size electrical box. Just pay attention to the red sticker! Copyright 2017 Tim Carter

ring floodlight cam

Here it is installed. See those gold squares in the spotlight? Those are the BRIGHT LEDs! Copyright 2017 Tim Carter

Is The Ring® Floodlight Cam App Easy To Use?

Yes, the app is very easy and very intuitive.

The first thing to remember after you install the floodlight on the wall is to turn on the power to the fixture.

You'll see a light start to blink inside the motion detector under the black camera box. The fixture even talks to you!

The instructions tell you to then install the Ring® app on your smartphone and follow the easy steps to activate the floodlight.

It took less than two minutes for this all to happen on my phone.

Here are some screenshots of what I saw on the app. It was SO VERY INTUITIVE!

ring floodlight cam app

Here's what you see after all is well. You'll note I also have the Ring Video Doorbell too. This is a very powerful app. Copyright 2017 Tim Carter

ring floodlight cam app

Here's just one of the screens. This is part of how you adjust the motion detection aspect. Copyright 2017 Tim Carter

ring floodlight cam app

Here's a fascinating screen on the app. This is where you create the part of the camera view where you want motion REPORTED to you and where the lights turn on and the video starts to record. You can drag and drop blue dots to create the polygon area you want. I wanted to know if someone is trying to get into my shed up on the hill. VERY COOL! Copyright 2017 Tim Carter

Summary

The Ring® Floodlight Cam is very very nice. It was easy to install, it works and the floodlights are BRIGHT!

My wife will still call me a creeper, but I don't care.

I love my Ring® Floodlight Cam, but not as much as I love She Who Must Be Obeyed!

Garage Plans 2 Car

garage plans 2 car

You might think this garage plans 2 car looks okay. You're right if the owner of the house is going to park a small sports car in the left bay and a motorcycle in the right bay. See that door into the house? They've yet to build the platform and steps to get from the garage up into the house. Both are going to extend INTO the right side parking bay! IDIOTS! Copyright 2017 Tim Carter

Garage Plans 2 Car - BEWARE Common Mistakes!

The 2-car garage in the above photo was built about five miles from my home. It's going to be a disaster.

Can you see why? Be sure to look down at the simple floor plan I drew up to show you the biggest mistake!

It's important to realize that a vast majority of two-car garages are too small. Here's a partial list of mistakes to avoid:

  • garage doors too narrow and short
  • distance from edge of doors to side walls of garage too narrow
  • distance between single doors too narrow
  • lack of floor drains to catch snow and ice melt
  • front to back distance too short
  • lack of attic or storage trusses above garage

Garage Door Width and Height

Garage doors are often too narrow for full-size pickup trucks. These vehicles are extremely popular and require a single-door width of 10 feet and the doors need to be 8-feet tall.

I didn't build the house I live in now in central New Hampshire and the single garage doors here are 9 feet wide. I own a Ford F-250 Super Duty 4x4 and my sideview mirrors are wider than the door jamb width.

Even with a 10-foot-wide door, I'd only have about 4 inches to spare on either side of the mirrors as I back into the bay.

Door height should be no less than 8 feet. Period.

Free & Fast Garage Bids

CLICK HERE to get FREE & FAST BIDS from local contractors that can build your dream garage.

Related Columns

Build A Dream Garage - Invaluable Tips Here!

Garage Door Insulation - It Helps But It's Not Perfect

Attic and Storage Trusses - A MUST-HAVE For Your Garage!

Sidewall Distance From Doors

garage plans 2 car

See the short foundation wall just above my ASK THE BUILDER logo? That wall is just under 30 inches wide. The building code requires a platform that's at the same height as the first floor of the house. Steps come from the platform down to the garage floor. The MINIMUM size for the platform is 3 feet by 3 feet. The platform and steps will extend INTO the bay where the car is supposed to be. Copyright 2017 Tim Carter

The distance from the edges of the garage doors to the side walls of the garage are the biggest mistake of all.

Often the distance from the car or truck, once in the bay, to the the side wall is less than 4 feet!

You can't open the car door completely and if anything is stored on the wall like garbage cans or bikes, the driver or passenger gets trapped in the car.

This distance should be a minimum of 6 feet.

Floor Drains Are A Must

Floor drains should be under each parked car. The concrete slab should slope so water dripping from a car or truck flows to the floor drain.

In many garages the concrete slopes to the garage doors. The meltwater freezes to the door weatherstripping in cold climates.

Total Garage Depth

garage plans 2 car

See the short stub of a foundation wall? The inside distance from the edge of the garage door to the side wall of the garage will be just about 2 feet, maybe 28 inches. It should have been a minimum of 5 to 6 feet. Copyright 2017 Tim Carter

The distance from the garage door to the back of the garage should be no less than 24 feet. Often it's just 20 feet. It's best to have 30 feet.

This may seem extreme, but if you have lots of bikes, a motorcycle, wheelbarrows, etc. to store, you'll need this space.

Speaking of motorcycles, that's about the only thing the homeowner is going to park in the right bay of this attached garage.

Look at my drawing below to see why. It's not to scale, but you get the idea if you read all the photo captions above.

garage plans 2 car

What idiot thought it was a good idea to make the garage this size? Copyright 2017 Tim Carter

Summary

When you go to look for garage plans 2 car be sure you READ my Dream Garage column above. You can't have enough space in a garage. You don't want to be banging your car doors against garbage cans or bikes CURSING each time you scratch the door.

The extra space you call for will not be that expensive and you'll be very happy in the future.

CLICK HERE to get FREE & FAST BIDS from local contractors that can build your dream garage.

Ring Video Doorbell Review

ring video doorbell

Here's my Ring Video Doorbell. The ivory cover plate is the one that's the best match for the paint. It came with three other ones and I may switch it out for a more sleek look. The moment you power it up, the Ring talks to you. Super Cool! CLICK THE PHOTO NOW to have one delivered to your home in days. Buy the Ring Floodlight Cam at the same time. Copyright 2017 Tim Carter

Before getting into this review, check out Tim's November 23, 2018 and  November 24, 2018 Newsletter and the story behind how this Doorbell solved the mystery of Tim's open front door.

Ring® Video Doorbell Is Easy and Fast

I installed my new Ring® Video Doorbell on a rare fair-weather December morning here in central New Hampshire. Christmas was just days away and I was filled with excitement as I opened up my Ring® box.

Snow meltwater was dripping on me, but I didn't care. I was so excited to try this product that marries technology with traditional doorbells.

It's important to realize a month before I had a terrible experience with a similar product, the Nutone Knock.

Ring Camera View

Here's what the Ring sees as you approach my front door. You can tell it's Christmas in New Hampshire. Once the holiday passes, the tiny Christmas tree and lights will disappear and the view will be unobstructed. Remember, you can HEAR what's going on at your door as well as see. See that round green button? Push it and you can talk to your visitor or another person of interest! Copyright 2017 Tim Carter

Email Exchange With The Ring® Inventor and Founder

Two weeks prior to installing the Ring®, I had an astounding back-and-forth email exchange with Jamie Siminoff the inventor and founder of Ring®.

Another key point is in all my years of reviewing products I NEVER had such a pleasant and rapid response. My wife Kathy had given me Jamie's private email address a few days prior as she had an exchange with him about a different matter.

I was STUNNED that he got back with me and in no time he had sent both the doorbell and the Floodlight Cam.

My gut told me right away that my experience with the Ring® was going to be unlike any other product I've tested and reviewed over the years.

Exquisite Ring® Packaging


ring video doorbell

Here's the box the Ring Video Doorbell Pro comes in. Jamie must be related to Steve Jobs. The only other products to have such a gorgeous box and clever packaging that I've seen are Apple goodies. The INSTANT I saw this box and opened it I knew this was going to be a dream installation. Copyright 2017 Tim Carter

ring video doorbell

After you unpack everything, here's what you have. All sorts of other very helpful literature, quick-start guide, stickers, etc. came too. Copyright 2017 Tim Carter

Everything - I Mean EVERYTHING - Included for the Ring® Install

The Ring® comes with everything you need to do the install. I had the Pro version of the doorbell because I wanted my Ring® to activate my 20-year-old traditional"ding dong" doorbell when someone pushed the outdoor button.

Here's a partial list of what's included:

  • Ring® doorbell
  • backplate
  • 4 trim cover plates
  • interior doorbell snazzy diode connector kit
  • handy screwdriver with Phillips and reversible Torx bit
  • 1/4-inch masonry bit for stucco
  • anchors
  • push-in wire connectors
  • quick-start guide and other helpful paperwork

Jamie even included extra screws in case you drop and lose one. What a nice touch!

Ring Pro Diode Accessory Kit

You need to install a handy little diode kit, if you want your new Ring to make your old "ding dong" doorbell to still work,.

This part of the install is so simple a caveman could do it. Jamie thought this through even down to the tiny patch of 3M two-sided adhesive on the diode box.

To put it another way, I've NEVER seen such attention to detail in my life. Thank you so much Jamie!

ring video doorbell pro

Here's the fancy little wire connector you need to use to make the interior "ding dong" doorbell work. It took seconds to install. What a dream! CLICK THE PHOTO NOW to have one delivered to your home. Copyright 2017 Tim Carter

ring video doorbell

Within two minutes, I had the entire accessory kit installed. The little white box that contains the electronics to make the old-fashioned *ding dong* doorbell work even came with its own small square of 3M two-sided adhesive. Incredible attention to detail. Copyright 2017 Tim Carter

The Ring® App - Seamless Install and Powerful

You use the Ring app to guide you through the installation. It's beyond perfect. I was prepared for frustration.

All I got was happiness. There were NO hiccups in downloading or using the app on my Moto G5+ phone.

I really appreciated Jamie's humor. Look at it below:

Ring connects to your WiFi network

Here's what you see as your Ring connects to your WiFi network. Pretty funny! When was the last time you saw such humor as you installed something? Copyright 2017 Tim Carter


ring app

Here's the front page of the app once you have everything working - which won't take you long! You can see I have two Ring devices - the doorbell and the spotlight cam. Copyright 2017 Tim Carter

Ring Pro® Video Doorbell Review Summary

I love my Ring. I've installed lots of products in my career, but NEVER have I had so much fun doing it.

Often instructions are incomplete - not so with the Ring®.

It's not uncommon you have to go find tools - not so with the Ring®.

All too often you might need an extra part - not so with the Ring®.

Usually, the apps are confusing - not so with the Ring®.

I guarantee you'll be THRILLED with your Ring®. If not, Jamie will make it right.

His email address is right on the side of the box!

CLICK HERE NOW to have the Ring Doorbell delivered to your home.

December 20, 2017 AsktheBuilder Newsletter

First and foremost, Merry Christmas!

If you celebrate some other holiday this time of year, I hope it's wonderful for you.

Here at my house, we celebrate a Christian Christmas.

After all, the day is named after Christ!

Kathy and I will be attending mass on Sunday afternoon at 4:30 pm.

St. Joseph Church is going to be decorated to the hilt.

A Strange End of Year

This has been a strange year all around. You may or may not know it, but I published my long-awaited Roofing Ripoff book in late April, 2017.

It's an expose' book about the deplorable state of the USA asphalt shingle industry.

CLICK HERE to read the first three chapters for FREE.

The amount of suffering the industry has caused tens - perhaps HUNDREDS - of thousands of consumers and businesses is mind numbing.

As I did research for the book, you may have been one of the hundreds of homeowners that took my survey. You may be one who drained their savings late in life to put on a new roof that's possibly going to go bad in just ten years.

Remember, my own 30-year asphalt roof FAILED in just a little over ten years.

A few weeks ago, I had another product failure in my home. I installed something just nine months ago that should have lasted about fifty years. I know as I'm a master plumber.

But the item failed in seven months.

I can list off a bunch of products that are failing far too early. It's maddening.

It's bothering me.

It's sucked the Christmas spirit right out of me and I've got just four days to get it back.

I'm headed to the Builders Show in Orlando, FL, in just three weeks. I'm going to have some discussions with top leaders in the manufacturing process to see if I can try to convince them to go back to the old standards.

I'm thinking of doing a survey just after the New Year to take with me to Orlando.

I need you to participate. I need you to tell the manufacturers of products what you want.

I'd love for you to tell them how upset you are - assuming you are upset.

Oh, and I'll end on this note. A month ago, I reviewed the Nutone Knock video doorbell. I gave it a thumbs up. You may have bought one for a gift.

I've got BAD NEWS for you. TAKE IT BACK.

My Knock stopped working, I contacted the PR firm, then the Nutone product manager and they simply left me hanging. They've gone dark on me now for two weeks.

I can only imagine how they'd treat you.

I ripped out my Nutone Knock today and installed a Ring video doorbell.

I'm writing the review of the Ring tomorrow. The Ring was a delight to install and it's working perfectly.

I think you can understand why I'm in a humbug mood.

Don't worry, I'll get over it like a bad cold.

Merry Christmas to you and to all your loved ones!

Tim Carter
Founder - Humbugs Anonymous and AsktheBuilder.com

Do It Right, Not Over and Get That Rant On Brother!

IRWIN 117 Piece Tap and Die Review

irwin 117 piece tap and die set

Here's all the taps and dies in the 117-piece IRWIN set. The drill bits for the taps are in the lid of the case out of frame. Copyright 2017 Tim Carter

IRWIN 117-Piece Tap and Die Set

I've used taps and dies for years. A machinist uses them all the time as he makes things from metal.

The IRWIN 117-Piece Tap and Die set is a beauty. You'll lust after this wonderful assortment of tools.

I'm a contractor and I use them primarily to clean up threads on nuts and bolts. Nuts, bolts and internal threads on things that got damaged at the job site.

Keep IRWIN Taps and Dies Oiled

Each piece in the set was coated with oil upon opening it. Oil is good. You don't want the parts to rust.

Keep yours oiled all the time. If you need to get oil off your hands, use Lava hand soap. Use Stain Solver to get oil out of your clothes.

IRWIN Taps

Taps are used to cut threads on the inside of a drilled hole in an object. You use a specific-sized drill bit that matches the tap.

irwin taps

These are just a few of the precision taps in the IRWIN set. Copyright 2017 Tim Carter

IRWIN Dies

Dies are used to cut threads on a round rod made from just about any material - metal, plastic, wood or ???

irwin dies

These are just a few of the many dies in the set. Both metric and SAE threads are possible. Copyright 2017 Tim Carter

irwin tap and dies

Behind that big IRWIN lettering you'll discover all sorts of goodies including all the drill bits you need for the taps. Copyright 2017 Tim Carter

irwin tap drill bits

These are the high-speed cobalt steel drill bits matched to the IRWIN taps. Drill SLOW and use oil while drilling to keep the bits in great shape. Copyright 2017 Tim Carter

irwin tap drill bit selector

These two cards are your road maps. The one on the left tells you what drill bit is for what tap. The card on the right helps you find the different taps and dies - assuming you put them back where they belong! Copyright 2017 Tim Carter

irwin die

This is what a die does. You're looking at a 1/4-inch bolt that now has squeaky-clean threads! Copyright 2017 Tim Carter

irwin tap

This is an IRWIN tap doing it's job. It could also have been used to cut threads in a hole drilled in a piece of plate steel. You'll discover SO MANY uses for IRWIN taps and dies when you own your own set! Copyright 2017 Tim Carter

Summary

I love this IRWIN tap and die set. I can tell you that it's going to be proudly displayed in my workshop. The best part is I'm going to pass it down to my grandkids. Yes, the taps and dies will last for decades if you just care for them.