March 15, 2011 AsktheBuilder Tips And Newsletter

What's in This Newsletter?

Latest News
A Wet Lot
Irwin Tools World Championship
Removing Cabinet Doors
Plumbing eGuides
Using Bleach Outdoors

I do product reviews frequently. Please read my Disclosure Policy to understand the relationship that I have between the companies that make the products or offer the services I review.

PERIODIC OFFERS: This is a free newsletter filled with thousands of dollars of advice for your use and pleasure. From time to time, I do offer you some of my products to help offset the time and resources I put into this newsletter. I hope that you consider this when you see me make you an offer.

FOLLOW ME ON TWITTER

Friendly Question Reminder!

If you have a question for me, don't hit the Reply button just yet. Go immediately to my web site and type in the keywords about your problem into my Search engine. The search box is at the top of every page of my web site. You could have your answer in seconds if you do this! Please pay attention to all links you see at my web site. The exact products and services you often need are right in front of you, and you might be ignoring them.

Latest News

Facebook - AsktheBuilderSeveral weeks ago, I launched an AsktheBuilder fan page on Facebook. Friends of mine had been pestering me to do this for well over a year, but the move from Ohio to New Hampshire stretched my time and resources way too thin.

http://www.facebook.com/askthebuilder

All I can say is that I'm blown away by the engagement at Facebook. Here's why. I'm having a blast uploading photos of building and remodeling things and having you answer questions about the photo. If you're one who's taking the small amount of time to do this, it sure seems like you're enjoying it.

door hinge with stopper

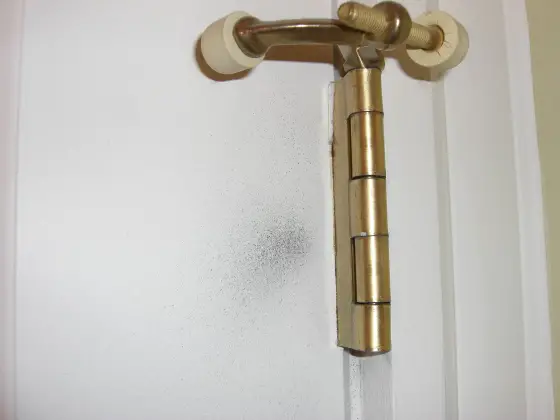
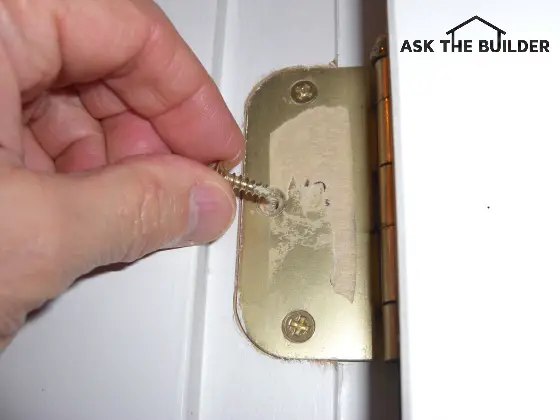
What is on the Door?

Here's an example. Yesterday, I uploaded a photo of a door hinge. Within 3 minutes of uploading the photo, possibly just two minutes, I had THREE responses. Keep in mind that each of those who responded had to view the photo, study it and then type a response. Then there was the slight lag in the email that Facebook sends me telling me someone commented!

The point is, if you're not using Facebook, you might be making a mistake. I'm devoting more time to it because it seems to be a good idea. If you're not an AsktheBuilder fan, I ask you now to go there and click the Like button. Join in the fun!

http://www.facebook.com/askthebuilder

A Wet Lot

Springtime brings soggy ground, leaking basements and lots of other *avoidable* problems. Here's an email I got just hours ago. Kathy Hamilton of Independence, MO wrote to me:

"My husband and I bought some land a couple of years ago and are planning to build a home with mother-in-law quarters in the full finished basement. My concern is that this piece of property is always damp and even has standing water sometimes in spring and summer. I am scared this is going to cause water problems if we build.

I know about the french drain system, but does is need to go as deep as the bottom of the basement? How do we keep the yard from having standing water? Should we reconsider and try and sell the land? Should I get a specialist out to see the land and give us his expert opinion? We have a paid off home and do not want to build a new home and sell our old one to be stuck in a moldy, wet BIG financial mistake!

Thanks, Kathy"

French DrainKathy, you need to read every column in my Drainage category.

What you'll discover when you read several of the articles, especially the ones about Linear French Drains, is that you can often transform a soggy lot into a dry one. The more fall you have across the lot, the better your results will be.

If the land slopes enough to where there is a spot on your lot LOWER than the footer for your basement foundation, you'll NEVER have a wet lot or wet basement if you follow all the advice in my Drainage articles and if you read all of my Foundation articles.

IRWIN Tools World Championship

Irwin ToolsThis coming weekend, I'll be in Bristol, TN, attending a massive IRWIN Tools media event. The schedule is full and we'll be on the go for two solid days. I'll get to witness the person who's going to be crowned World Champion of the IRWIN Tools Ultimate Tradesman Challenge at 10 am ET on Sunday. I'll be shooting a video of it and uploading it moments after it happens at my AsktheBuilder YouTube channel.

We'll also be seeing what's new with IRWIN Tools on Saturday. I'll have an opportunity to ask about different things if you want me to. Here's what I suggest. Go here and browse the IRWIN Tool line.

Let me know if you have a question that I can put to the top tool folks at IRWIN this weekend. What new tool do you want to see? What tool questions do you have?

Removing Cabinet Doors

Let's say you need to remove a kitchen or bath cabinet door. Usually this is accomplished by unscrewing one side of the hinges. If you do this wrong, you can ruin the door, hinge or both.

I've found it's always best to start at the bottom and work to the top removing the top hinge last. If you do it the other way and are not paying attention, the door can tilt so much that it rotates and bends the hinge or cracks the door. Have a helper hold large doors as you work on them.
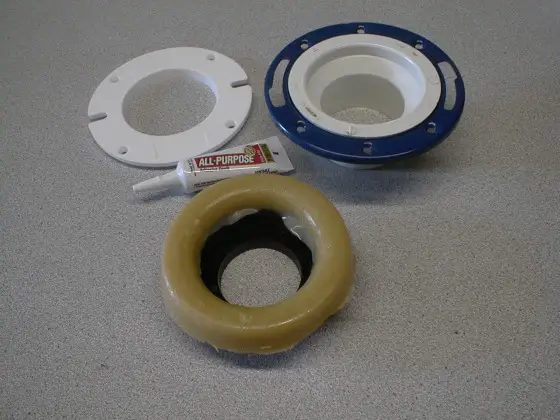
Plumbing eGuides

I always have projects of one sort or another on the table. But recently a string of requests, one may have been from you, has caused me to create a quick survey I need you to take.

Fixing A Stripped Wood Screw Hole eGuideIt seems that you, and others, want some great, simple and affordable ($2) step-by-step photo guides. Right? That's what you're telling me. If I'm wrong, let me know. These eGuides are Instant Download and you can open them on your computer, smartphone,  iPad or other tablet and have right with you where you're working. Here's the first one I did back about seven weeks ago:

http://shop.askthebuilder.com/products/Fixing-a-Stripped-Wood-Screw-Hole-eGuide.html

I intend to spend the entire spring and summer creating many of these. All facets of building and remodeling will be covered, but right now, let's deal with plumbing.

Hiring a plumber is really expensive. I know, because for years I've been a licensed master plumber. Why pay a plumber $75 or even $90 an hour when you can possibly do the job yourself? If you get in trouble, then call in the cavalry. Just be aware of the location of your main water shut-off valve and that it works.

Please help me. Take this quick survey and tell me, assuming you could wave a magic wand, what eGuides are of most interest to you. I plan to start on them in April. (This survey is now closed.)

Using Bleach Outdoors

I get home-improvement newsletters just like this one. One of them is from a very famous TV home-improvement celebrity. I was SHOCKED to see this in his latest email to me:

"When the weather warms up, it's time to remove that layer of mold or mildew on the outside of your home. In order to get rid of it, you have to kill it and remove the spores. On nonporous surfaces – like vinyl siding – a solution of bleach, detergent, and water will work."

ACKKKKKKK! This is really bad advice. Chlorine bleach is TOXIC to all vegetation around your home. You may have spent thousands of dollars on expensive landscaping and this person is telling you to poison it.

The safe and ORGANIC bleach to use is Oxygen Bleach. It's totally non-toxic to vegetation. In fact, it helps plants because it pumps oxygen into the soil as it soaks in. It does a superb job of cleaning mold from surfaces.

If you're planning to clean off your siding or your deck, I'll be having a MONSTER Stain Solver sale in about three weeks. Did you see the new Stain Solver website? Have you signed up for that SPECIAL newsletter?

AsktheBuilder.com
100 Swain Rd.
Meredith, NH 03253, USA

March 13, 2011 AsktheBuilder Tips And Newsletter

As I write this, the annual checklist sale of mine is about to end in just a little over twelve hours. Yes, midnight tonight, Sunday, March 13, 2011, Eastern Time, it's over. With the time change last night, that's an hour sooner than when I first announced the sale.

I'm pretty certain, with inflation starting to heat up, this may be the last time you'll see the checklists ever priced like they are now.

What's a checklist? I've been asked that thousands of times. Well, when you go to hire a contractor to do a job, how in the world are you SURE he's going to do it right? Wouldn't you LOVE to have a list - a checklist - of questions to ask him to make sure you're not going to get ripped off?

Don't you want to get the job done on time and within the bid price? That's exactly what my checklists offer! It's a road map to get your job done RIGHT, at the RIGHT price and RIGHT on time!

You can buy individual checklists now for only $5 each. But the BEST deal is if you get all of them at once. That way you have them when you need them. You can get them all for just $79.

But the sale ENDS at midnight tonight. (Note: Sale ended March 14, 2011.)

This may be your Last Chance ever to get all of them for just $79.

Here's the special link to get ALL of them for the $79 price:

Oh, I FORGOT to mention this last Wednesday when the sale was announced:

All my checklists come with a Money-Back GUARANTEE.

If you feel they'll not help you find a pro or get your job done better than you would have without it, I'll give you your money back. NO HASSLES.

Oh, and guess what? At midnight tonight when the checklist sale ends you know what's going to happen? You'll never guess.

The NEW Stain Solver begins!!! Wait till you see that at midnight tonight!!!

If you go to the Stain Solver website now, you'll just see the same old. In fact, you SHOULD go there now to see what the transition will be.

Then either stay up or go back tomorrow to see the NEW Stain Solver.

I'll have huge news on Tuesday all about Stain Solver. I've been working on this transition for a year. I can't believe it's finally happened.

Wait till you see it.

Tim Carter
Founder - AsktheBuilder.com

Do it Right, Not Over

P.S. You should really consider that Bundle where you get all the checklists for the hugely discounted price. I don't know if it will ever be that low again with inflation about to kick into high gear.

P.P.S. That's why you need the checklists. You CAN'T AFFORD NOT to have them. If you make one mistake hiring the wrong person, you'll spend FAR MORE than $79 to correct the mistake(s).


Counter Depth Refrigerator

DEAR TIM: What can you tell me about shallow refrigerators that don’t project out past the line of kitchen cabinets? They look gorgeous in my opinion. Are they really practical? Do you lose lots of space? I’ve seen some of these appliances that have a door panel on them to match the kitchen cabinets so you don’t even know it’s a refrigerator. How in the world do you make that work? Diana F., Austin, TX

DEAR DIANA: I believe what you’re talking about is a counter-depth refrigerator. These appliances have been around for almost thirty years, possibly more. Back in the 1980’s, I installed my first one and liked it so much I put one in the new home I built for my family. That refrigerator was still working perfectly 23 years later when I replaced it for another in a remodel job at my home!

Believe it or not, this ugly steel box is a counter-depth refrigerator. Once it is dressed up with the decorative wood panels and its kickplate, you’d think it was drawer cabinet. PHOTO CREDIT:  Tim Carter

Believe it or not, this ugly steel box is a counter-depth refrigerator. Once it is dressed up with the decorative wood panels and its kickplate, you’d think it was drawer cabinet. PHOTO CREDIT: Tim Carter

Back in those days there wasn’t much competition. The refrigerators were absolutely high-end appliances you’d typically find in expensive homes. But now, there are quite a few brands that offer refrigerators that don’t project out past the plane of the front of the cabinets in an average kitchen.

As you might expect, there is a vast difference between makes, models and features. What’s more, not all shallow refrigerators can be finished in the way you describe, that is, with the custom door panels. These are frequently called integrated refrigerators. Did you know that you can get integrated freezers, dishwashers, ice makers, etc.? If you want to hide all your kitchen appliances behind matching wood panels, it’s absolutely possible.

There’s no doubt these appliances are practical. If you were to open one of these refrigerators, I’d bet money you’d ever notice the couple of inches they lack in depth. What you’ll immediately notice on some of the better models is the extremely efficient use of space. The drawers, shelves and storage cubbies in the doors ensure there is no wasted space in these gorgeous refrigerators.

Five years ago, my wife and I embarked on a massive kitchen remodel in our previous home. I discovered something about refrigeration that I didn’t know. Prior to that remodel, we had a combination refrigerator freezer. I believe many people were like us. We did have a stand-up freezer in a back room for other frozen goods.

But what we discovered is that if you just have a refrigerator, foods tend to last much longer and don’t dry out because the humidity in a refrigerator-only appliance is higher than in a refrigerator/freezer combo unit.

Sure enough we got a separate refrigerator and a set of freezer drawers that were stand alone in another part of the kitchen. We were stunned to see how long vegetables, fruits and other things stayed fresh in the refrigerator. They didn’t dry out and shrivel up like they used to.

When you combine both functions in one box, the colder temperature of the freezer extracts lots of the humidity in the appliance simply because the colder air gets, the less water it can hold. You may want to consider getting a separate freezer if you want really fresh fruits and vegetables.

I don’t know if you’ve seen them, but the refrigerator drawers and freezer drawers are sensational. I just installed a set of refrigerator drawers in our current kitchen. This appliance is the exact size of a 27-inch base cabinet.

It’s an integrated set of refrigerator drawers so when I screw on the decorative wood panels, you’ll think it’s just a regular set of deep drawers one might store pots and pans in. My wife LOVES it. We put our leftovers in one of the drawers so they don’t get lost in the regular refrigerator behind other foodstuffs.

Attaching the decorative wood panels to integrated appliances, including refrigerators, takes some serious skill and patience. There are many finish carpentry tricks you have to employ, not the least is working with tolerances of 1/16th inch or less.

Typically there are metal brackets that interlock with the appliance. These brackets have to be carefully placed on the backside of the wood panel with the aid of a template. Using special screws often supplied with the appliance, you attach the brackets and then slide it into place on the door. It usually takes several tries to get the wood panel precisely where it needs to be.

Dealing with the sides of an integrated refrigerator are even more problematic. You almost always need to get a finished side panel from the cabinet supplier. This side panel takes the place of the cabinet frame in a regular cabinet. Keep in mind that the actual appliance is often the same depth as the cabinet boxes and that the drawer and door fronts of the cabinets are in the same plane as the finished panel you’ll place on the refrigerator.

Try to visualize how the countertop will finish out at the sides of the refrigerator and this finished side panel. You’ll probably need the help of an experienced kitchen designer or top fabricator to draw out this very important detail.

Column 874

March 9, 2011 AsktheBuilder Tips And Newsletter

What's in This Newsletter?

Latest News
New York City Trip
New Irwin Tools
AsktheBuilder on Facebook
Wood Fence Material
Avoid Problems
Checklist Sale
Latest Columns & Videos

Remember, Do it Right, Not Over!

I do product reviews frequently. Please read my Disclosure Policy to understand the relationship between me and the companies that make the products or offer the services I review.

FOLLOW ME ON TWITTER

Friendly Question Reminder!

If you have a question for me, don't hit the Reply button just yet. Go immediately to my web site and type in the keywords about your problem into my Search engine. The search box is at the top of every page of my web site. You could have your answer in seconds if you do this! Please pay attention to all links you see at my web site. The exact products and services you often need are right in front of you, and you might be ignoring them.

Latest News

Remember that story from the Old Testament about Jonah and the whale? Jonah was out on the sea on day and got swallowed by a whale. Three days later, he was coughed up like a hairball. Sorry about that graphic.

Well, that's how I feel. I've been swallowed up by a major kitchen remodeling project here at my home. That explains why I've been missing from your inbox. It's gone much slower than I'd like because I couldn't do the job like I wanted to. Because there are two people in the house with serious food allergies, I had to keep the kitchen working as I remodeled. Typically, I'd remove everything from a kitchen and the homeowners would eat out or make do with a microwave and the bathroom sink for water. That just wasn't possible here.

This was very problematic as the new design called for everything but the kitchen sink to play musical chairs. You'll see the before and after design in two different videos soon. The bottom line is the top fabricator is coming Friday, so the worst is over. I have a few more cabinets to set over the next few days, but that's not too bad.

One of the things that had to happen was the patching of the hardwood floor. In the middle of the room there was an old island. There was a large hole where a vent went through the floor. An expert hardwood floor craftsman came in and patched it without ripping up all the flooring and starting over. Did you know it was possible to do that with tongue and groove flooring? That you could take out an individual piece of hardwood in the middle of a room? You bet it is, and when done correctly you NEVER know the floor was patched!

New York City Trip

Last week, on top of remodeling the kitchen, I was in the Big Apple for just 24 hours. In that time frame, I hosted a big media event showing top magazine editors the new Stain Solver! Yes, this is the long-awaited news I've been wanting to tell you about for months. We did live product demos for the editors showing them how Stain Solver got rid of stains, many of them almost instantly. I'll never forget the look in the one editor's eyes when she saw the fresh red wine stain instantly disappear from a white carpet sample. She was astonished to put it mildly. When I told her it also got rid of pet odors and even skunk-spray odor, she was in disbelief.

I'll have huge Stain Solver news for you next week for sure. You'll not want to miss it.

The morning after the media event, I got the tour of my life. Mark Sullivan, a Field Operations Planner for Consolidated Edison, is a long-time subscriber to this newsletter. He extended an invitation to me to tour some of the behind-the-scenes parts of Con Ed. WOW is all I can say.

We shot video of some cool parts of different Con Ed centers, job sites and a power plant. I hope to have that edited and loaded to my YouTube channel by the end of the month. The highlight of the tour was the trip through the steam and electric generating East River plant. Oh, wait till you see that video and the flames created by the massive gas turbines. Suffice it to say you just never want to go to Hell.

Thank you Mark and thanks to Sara at Con Ed who facilitated and coordinated the visit.

New IRWIN Tools

I'll be attending an IRWIN Tools Editors Conference in less than two weeks. I plan to provide LIVE updates of the event while I'm there. I'll be uploading real-time videos of new tools I see to my Facebook Fan page. What? You're not a fan yet? What have you been waiting for? Read the next item.

AsktheBuilder on Facebook

www.facebook.com/askthebuilder

AsktheBuilder on FacebookHere's what you missed the past two weeks at the AsktheBuilder Facebook fan page:

We had a guessing contest about a new tool I tested. It was the strangest shape and only one person got it right.

Christy asked me about using Stain Solver in a jetted tub to clean it.

Tamara wanted to know how to calculate the angle of two walls that intersect.

And just after sending this newsletter to you, I'm uploading another photo of a tool to see who guesses what it does. I'll make it easier this time. Go there and guess for yourself!

Wood Fence Material

Roy Todd, from Birmingham, AL wrote to me:

"Greetings Tim, I have a choice between treated pine and natural cedar for a privacy fence.  What would you recommend?"

Deck SealerRoy, that's a softball question for me. It's a clear-cut choice. I'd go with natural cedar, because cedar contains natural preservatives that stave off rot. You'll still need to seal it periodically, and I would absolutely use the product I mention in this video of mine.

Be sure to clean the fence with Stain Solver before applying any sealer.

Avoid Problems

If you're planning a kitchen remodel or any other job where you're using moldings such as crown molding that extend beyond the face of the cabinets, you must plan for this. This means creating what's called a reflected ceiling plan that shows exactly where lights should go and how far out from walls the center of the light should be. The same is true for the floor plans. Wall and cabinet depths have to be well thought out.

Without this forethought, you can have major problems with recessed lights and side walls where the cabinets and moldings touch up against a wing wall.

It's mission critical that you calculate how far out the finished edge of the crown molding extends onto a ceiling so it doesn't crowd the trim on a recessed light. The same is true for where the crown molding ends against another cabinet or a wall. Some crown moldings stick out 2 inches or more. Plan ahead to avoid ugly results.

MONSTER Checklist Sale

Last year - if you're a long-time subscriber it's been a year! - I had a spontaneous checklist sale. It was an enormous success. I sold 20 times what I had predicted. The best part: Not one person asked for a refund. I got hundreds of emails after the sale telling me how much money the checklists were going to save each of the buyers like you. It was really an amazing event, and it all happened out of the blue.

So what's a checklist you might ask? It's an Instant Download document. The moment your order is complete, you get them into your computer. What's in a typical checklist? Easy.

My checklists are designed to show you how to discover the REAL professional in your city or town to do just about any job. After all, that's what you want? You want real value, you don't want to get ripped off and you want the job done right. I SHOW you how to find this master craftsman in your area!!

Each checklist comes with detailed questions about the specific job that the contractor has to answer. I give you the correct answers! The checklist becomes part of the contract between you and the contractor so there is no confusion about how the job will be done. You'll have less anxiety.

Each checklist contains four secret videos that are not on my YouTube channel. These videos show you exactly how I would find any professional if I was in your city. I take you on a journey showing you exactly what I would do!

Each checklist comes with a library of my past columns about that topic. You have tons of valuable information at your fingertips.

The checklists normally sell for just $17 each. I'm putting them on sale now for just $5 each. Yes, an insane $5 checklist. There are over 30 different ones.

But it gets better. When you see all the different ones, you'll want each one for when that job comes up to do around your house. Well, you can get each and every one of my checklists now for just $79. I may never have the price that low ever again.

Here's the link to the page where you can get ALL the checklists for just $79. If you were to buy all the checklists at the normal price, it would be over $500. When was the last time you could get such a steep discount? Wowza!

You can also buy them in smaller bundles if you want.

This sale ends Sunday, March 13, 2011, at midnight Eastern Time. If you're a long-time subscriber you know that I don't have sales like this very often. You'll regret not taking advantage of it.

I guarantee you'll LOVE the checklists. Wait till you read the reviews about them at the shopping cart.

Latest Columns and Videos

AsktheBuilder.com
100 Swain Rd.
Meredith, NH 03253, USA

Setting Type Joint Compound Video

Hi, I'm Tim Carter. What happens when you need to make a drywall repair quickly? Something where you need to tape it, finish it and sand it in say two hours time so you can paint. Guess what! There's a product available that can do that. Let me show you.

But first, let's talk about the old fashioned product which you probably have already used. This is a bucket of Joint Compound that you typically see in the home center or lumber yard. It is premixed and ready to go when you pop the lid off the bucket, and it looks a lot like cake icing. All it really is is a vinyl type glue and dust particles, that creates the solid after the material dries. It works well, sticky with a water-based glue.

But look at this bag. Same company manufacturers both items, but the bag contains a powder, which it mixed with water. This is Lightweight Setting-Type Joint Compound.

What's the difference between the two types of joint compounds. The powder type is a lot like concrete. When you take Portland cement and mix it with water, a chemical reaction, called hydration, is started. Little crystals start to grow and in some many hours, you have a plastic material that is rock hard, especially if you added sand and gravel. This is what happens with the setting-type compound.

The setting-type joint compound is available in different setting times. Some as quick as 20 minutes. Other setting times are 30, 45 or 90 minutes, depending upon what working time you require. Let me tell you, it gets hard and gets hard very quickly. So this is an advantage if you need to make a repair very quickly.

Another advantage of this material is you can water sand it and it starts to get hard. You can actually take a sponge to it and touch up the edges. Or take a trowel and with practice you can made it so you don't even have to sand. So the job gets done quicker and without a lot of dust.

The setting-type joint compound have been around for years. Comes in a bag as a powder you mix with water. Oh here's a tip, if the material starts to get hard in your pan or in your bucket, don't add any more water to the mix. Just throw it away. Adding more water will just ruin the strength of the material. Don't do it, avoid that temptation. Throw it out and mix up a new batch.

Cabinet Install Trick Video

Hi, I'm Tim Carter and I'm here on a kitchen remodeling job. I want to show you something interesting. This is a little trick I doubt you will see unless you are working with a finish carpenter.

In this situation, we have a cabinet, a range and another cabinet that had to be installed in a cove. All the items would be recessed back into the offset. The problem was that if you want to get the cabinets tight up against the wall, the drywall corner beam sticks out slightly, making the opening at the very front narrower then in the back of the cove.

So when trying to install the last cabinet, there isn't enough room to slide it back into the opening. What I did was to take a very long 2x4 and cut it 5/8" longer then the distance between the two blocks I mounted on the side walls. I had a helper hold one end of the piece of lumber and I started tapping the other end down using a 4-pound hammer.

This stretched the wall about a quarter of a inch, allowing me to get the cabinet into the opening. Once the 2x4 is removed, the side walls will move back in and the gap will be gone between the wall and the cabinet.

There will be a little damage associated with doing this. Be prepared for it. The corners on the outside of the cove could crack or "bubble". Once the 2x4 is removed, that wall will have to be refinished. But that is a small price to pay to get the cabinet into the opening and having a nice fit. Give it a try on your next project where you need just a little more room and the walls can be stretched a little.

Kitchen Remodeling Ideas

DEAR TIM: I'd love to move to a new home, but the economy is preventing that. So I've decided to do some new kitchen remodeling as it seems to be the center of activity of our current home. Based on the bids I'm getting, kitchen remodeling costs seems high. What can be done, in your opinion, to keep the total job cost as low as possible? Can you share any tips on how to minimize the disruption the construction work will cause? Mandy W., Richmond, VA

DEAR MANDY: Kitchen remodeling can create some financial stress as well as friction in your personal life. Most people simply don't grasp how much they use a kitchen each day, even if it's just walking to the refrigerator to get a glass of juice. Or they think nothing of walking over to the microwave and using it to heat up a cup of coffee. When those appliances are suddenly gone, life starts to imitate a deep-woods campground experience very quickly.

This kitchen is being remodeled. The contractor has kept the old sink in place till the last possible second to make life easier. PHOTO CREDIT:  Tim Carter

This kitchen is being remodeled. The contractor has kept the old sink in place till the last possible second to make life easier. PHOTO CREDIT: Tim Carter

Let's talk about the cost of kitchen remodeling first, then I'll share some tips I've discovered after remodeling kitchens for nearly 35 years. There's no doubt that in the average home, the kitchen contains the highest concentration of fixtures, cabinets and appliances. No one item may cost a lot of money, but when you add everything up it can be a frightening number.

If you want to keep the cost of your job as low as possible, I suggest you keep your current cabinets and just paint them. I say this assuming the cabinets are in good condition. You'd be shocked at how dramatic the difference can be by just investing in a gallon of paint. Painted cabinets, especially ones that have some highlighting, can look gorgeous at the end of the day. You can save thousands of dollars immediately by deciding to paint instead of installing new cabinets.

I would watch for appliance sales if you're in the market for a new stove, refrigerator, cooktop or microwave. You'll pay a penalty if you impulse buy. Plan ahead and watch for sales at appliance stores. Scour the Internet for promo codes or rebate offers.

The odds are you may need to invest in new countertops and flooring. The plastic laminate tops you may have shunned in the past should be considered. You'll discover many new patterns that mimic the look of expensive countertops that cost thousands of dollars more that what you might spend for durable plastic laminate.

Don't reject affordable vinyl tile flooring. Advancements in technology will amaze you when you see vinyl tile that looks like real slate, marble or granite. These are products you can absolutely install yourself in a day or less. That will save you sweet moola.

The disruption caused by the remodeling needs to be minimized. I would not start the job until you have everything you need stored in your garage and double checked to make sure it's correct. Once you start tearing apart your kitchen, you should not be wasting valuable time driving around getting materials or making selections only to discover the thing you want will take three weeks to arrive.

Think about doing the remodeling job in warmer weather. If you decide to rip out your kitchen entirely and start over, set up a temporary kitchen out in your garage where you can do basic tasks in relative warmth instead of frigid temperatures or blazing heat in the middle of summer. Use an outdoor grill as much as possible to cook, but don't use one of these in the garage. Fumes and the risk of fire are real threats.

If you're going to do some of the work yourself, practice the skills before you need to do the actual work. Discover if the paint you want will actually look good. Train yourself how to use additives in paint that will give you professional results. If you're going to paint your existing cabinets, go ahead and remove a cabinet front and paint it. When you get the perfect result, then advance to the rest of the kitchen.

Painting kitchen cabinets is much easier if you remove the hardware. This takes time up front, but you'll get fantastic results at the end of the day. Be sure to put the hardware for each cabinet in a separate marked plastic sandwich bag so that you can reassemble the cabinets and everything work perfectly.

Be sure to read all written installation instructions before you start any task. Read these days before you start so you have all the tools and materials handy. Don't hesitate to practice something if you've never done it before. For example, if you've not put down vinyl tile flooring before, try to install eight pieces on a scrap piece of approved underlayment. Learn how to cut the material before you're in a bind.

Column 872

Drywall Cornerbead Taping Video

Cornerbead Taping

Hi, I'm Tim Carter and I want to show you a really cool trick that not many people get to see when finishing drywall. If you look at this big opening that will just be drywall wrapped. The opening has the corner bead installed that will get hidden by the drywall joint compound. The corner bead will eventually get covered completely.

Here's the problem. You might be tempted to take some of the mud and apply it up and around the corner of the opening. But in the corner, there is a section where there is no metal beading. If you don't take care of that area, you will get a crack in the drywall mud.

Here's a simple little trick. Take some drywall mud and put it over the corner. Then take a small piece of the paper tape and place it over the gap in the beading. Push it in a little with your hand and wipe away the excess mud. This will keep that area from cracking.

Once the drywall is finished, you won't even know it is there. There is a good chance a drywall finisher did it at your home.

For more tips on drywall and plaster, visit my Drywall - Plaster section at AsktheBuilder.com.

February 22, 2011 AsktheBuilder Tips And Newsletter

What's in This Newsletter?

Lastest News
Termites and Water
Past Newsletters
Facebook Fun
Snow Dragons
Toilet Wax Gaskets
Water Pressure Booster Pump

Remember, Do it Right, Not Over!

I do product reviews frequently. Please read my Disclosure Policy to understand the relationship between me and the companies that make the products or offer the services I review.

FOLLOW ME ON TWITTER

Friendly Question Reminder!

If you have a question for me, don't hit the Reply button just yet. Go immediately to my web site  and type in the keywords about your problem into my Search engine. The search box is at the top of every page of my web site. You could have your answer in seconds if you do this! Please pay attention to all links you see at my web site. The exact products and services you often need are right in front of you, and you might be ignoring them.

Latest News

Oh how time flies. I'm swamped on the kitchen remodeling project here at my own home. It's fun but it's frustrating. I was to have a helper, but that person got tied up on another project. Lot's of dust here and I'm almost over the hardest part.

But what I wanted to share was something that happened to me when dealing with one of my suppliers. Yes, even I can get into a tussle about money. You would think I'm immune to that. Well, such is not the case. It's not a large sum, but it was the principal of the issue. I didn't want to pay for something that wasn't my fault.

There's no need to share the details of what happened, but I can tell you that the reason it's going to work out just fine is that I did follow all the advice I've given others for years: Put it in writing. You're thinking contract right? Well, you don't normally sign a contract to buy certain items.

In this case, the fact that my free Gmail email account SAVES every email, and that of my wife, allowed us to show the supplier where the communication problem broke down. You may use some other email program or online web-based email. No matter. The point is, don't delete emails. Gmail archives all of them automatically. Others I'm sure do the same.

Once we went back into our email archives, we were able to prove that we were NOT at fault. The emails clearly showed who dropped the ball.

This is the problem with doing business on the phone. You have no recording of what was said. If you do business like this, after you hang up the phone I urge you to do a quick summary of the key talking points. Put them in an email and send it to the person you're ordering from or doing business with. Ask them to reply to the email so you can prove they got it.

The emails that Gmail saved for us are going to buy a month's worth of propane. Thank you Google!

Termites and Water

TermitesMoe M. sent me a tip about termites. Here's what he said:

I just want to share with you one quick point which may be of interest to your subscribers. My in-laws had a leaky pipe basement (occasional small leak) and they never got around to do anything about it. Boy were they in for a surprise when termites came flocking in, moisture basement seem to be great locations for termites to set up shop.

True indeed, Moe! Termites really need moisture. I have quite a few past columns about termites. Know that the little worker termites constantly are foraging for food. They do this non-stop. They also try to supply the colony with different sources of food. They don't like to put all their eggs in one basket.

PAST Newsletters!!

AsktheBuilder NewsletterYou may go to the trouble to archive my past AsktheBuilder newsletters in your computer. Know that I do the same at my website. Also realize that the enormously powerful search engine at my site can really help you if you know that I mentioned something and you can't find it in your archives. Just type in a keyword or a phrase and see if my engine finds it faster for you.

Facebook FUN!

AsktheBuilder on FacebookDo you use Facebook? I can see why it's SO popular. A month ago, I launched an AsktheBuilder Fan Page. It's been great fun.

Here's what you missed the past few days by not being a fan. I took a photo of a problem here at my house. I then asked the fans to comment how they would fix the problem. My plan was to see if someone had a better way! You should have seen all the responses.

I plan to do that as often as possible. Go check this out. Heck, if you don't have a Facebook account - it's FREE - this may be the thing to get you going.

www.facebook.com/askthebuilder

Snow Dragons

Last issue of the newsletter, I lamented about the crazy Medieval knights who slaughter the last dragons causing them to go extinct. I need a pet dragon up here in New Hampshire to melt the snow on my roof.

Marty Hovey, a great friend of mine and one of the original subscribers to this newsletter sent me a link to a modern snow dragon!

Toilet Wax Gaskets

Helen Harris of Taneytown MD emailed me:

toilet wax gaskets

My granddaughter's husband put new wax seal on toilet. Problem - he flushed the old sticky seal down the toilet and we think that is what is causing the toilet to now clog up. We used a snake and it came back with some of that waxy stuff on the end. After snaking, it was okay for a few days then clogged back up again. Is there something that will dissolve it or flush the remainder away? I don't know if it is hung up in the pipe or what and the toilet paper adheres to it and that's how it is clogging or what. Any ideas or suggestions are greatly appreciated.

Helen, what a problem. I don't know of anything that would readily dissolve that wax. That would be very problematic as if a person used that with any frequency in a toilet, it would break the seal. I'm afraid you'll have to just continue to rod out the pipe.

Never ever put something sticky like that down a drain pipe. I'm sure he knows that now.

Water Pressure Booster Pump

If you could read my daily email, here's what your executive summary would be:

Tim, the people that email you just want the Easy Button. They are busy and just want the products and services you use personally. If it's good enough for you, then it's got to be great for them.

You know what? That's exactly the common thread in most of the email I get. You just want me to tell you what to buy or who to hire.

To that point, I made a decision over the past two years to go out and find what I feel are the BEST products out there. The ones that really work. I have problems of my own at my home and don't want failures.

This is why I found the best gutter guards. This is why I did the research and found the best water conditioning system, or what I feel is the best.

This home I bought here in New Hampshire is on a well. The well pump only produces 50 pounds of water pressure. That pressure drops to 30 pounds before the well pump comes on. It's dismal pressure, especially when you realize I came from a house in Cincinnati, OH that had 90 psi. That was just over the recommended limit, but I never had issues with any of the fixtures.

So on my list of things to find was a fantastic water pressure booster pump. It's a long story, but last summer the owner of a great Yankee New Hampshire manufacturing company called me. I got to meet Ned and his team back in November of last year while visiting his facility.

He showed me these gorgeous variable-speed booster pumps that were to be used on large buildings, college dorms, and restaurants. Places that needed reliable water pressure all the time.

I discovered there are vast differences between pumps. The variable speed one is quieter and does a superior job than some of the cheaper ones on the market.

I blurted out, "Wow, do you make smaller ones for a residential house that will take my pain away?" Ned grinned and walked me over to a shelf that had this pre-built system ready to go. I believe he said, "Tim, this little pump will deliver 80 psi at 10 gallons per minute till the cows come home. This assumes you have enough water coming into your home to supply the pump. I can't make water that's not there."

I've been a master plumber for over 25 years. I could see the pump could be installed with no problems. It was just like hooking up a new electric water heater. One water line in, one water line out and connect an electric cable.

The entire pump, expansion tank and all-important electronic pressure regulator is all mounted pre-wired and connected on a painted steel frame. You just set it in place, pipe it and wire it. It's unbelievable.

Ned was quick to point out that some of the smaller 120 volt pumps you just plug into an existing outlet that's on it's own circuit. In other words, they are SIMPLE to install. I went for a 240-volt model that required it to be hard wire it into my electric panel. That was easy to do.

Three weeks ago, I had one installed here at my New Hampshire house. The entire job took less than two hours. The moment the pump was turned on, I had incredible pressure. WOO HOO!!! I'm one happy camper as is Kathy. I'm going to tape a video showing my pump as soon as I get past this kitchen job.

So here's the bottom line. Ned wanted to buy advertising on my website. I said No. I've decided to do it a different way. Since you just want me to tell you what I use, then I'll just get compensated IF you decide to take action. So Ned and I worked out a deal where I get a tiny commission if you buy a pump like mine. It's a win-win-win.

At the end of the day, you win because you get a great product made here in the good ole' USA! Ned and his workers win as well. I win because I can start to reinvest the commission money to grow my team to help find even MORE products you want.

You can go to Ned's website, but I URGE you to call them. Make sure you tell them you heard about him from me. You can order directly online if you want, but it's best for them to ask some questions so they can absolutely make sure you get the right pump. Ned and I want to make sure the pump is going to work perfectly in your home.

Go to Ned's website and tell me what you think. He's got a great installation guide if you want to do it yourself. If you want to hire a pro, it should take about two hours. That's not bad!

AsktheBuilder.com
100 Swain Rd.
Meredith, NH 03253, USA

Central Vac

DEAR TIM: I was touring a new home that was open. One of the features that really interested me was the central vacuum system. It seems like one of these would be really handy. What’s involved when you install a central vacuum? Can you share some tips, especially what not to do? I hate making mistakes. Ray H., Newtown, PA

DEAR RAY: I've been really lucky for the past twenty-five years in that the past two houses I've lived in both have had a central vac. I have to tell you that I don't know if I would be able to handle going back to a traditional hand-held vacuum that you have to lug around the house.

This is a rare site. Here’s what a central vac outlet looks like with the plaster or drywall out of the way. PHOTO CREDIT: Tim Carter

This is a rare site. Here’s what a central vac outlet looks like with the plaster or drywall out of the way. PHOTO CREDIT: Tim Carter

Perhaps the biggest misconception about central vacuum systems is the myth that they can only be installed when building a new home. That's simply not true. It's absolutely easier to install one when the walls are wide open, but believe me, a talented installer can put one in an existing home with relative ease.

When you toured that new home, you saw outlets on the walls that looked something like an electrical outlet. These have a door that flips open and the end of the central vac hoses plugs into the hole. Small metal contacts inside the outlet cause the remote motor in the vacuum to immediately turn on and you're ready to work.

The pipe in the walls is 2-inch diameter. The inner diameter of the flexible hose that you use to clean with is approximately 1 and 1/4 inches in diameter. This is by design so that it's virtually impossible for the hidden pipe in the walls to become clogged. If an object can pass through the flexible hose in your hands, it can make it through the walls to the actual vacuum canister.

There are any number of mistakes you can make when installing a central vac system. One is putting in too few outlets. You have to account for furniture being in your way, so the length of the flexible hose doesn't always reach as far as you might think. You'll never regret having too many outlets. The central vac parts to do this are pretty inexpensive.

You can really make a mistake where you locate the canister. Most systems have the motor and the canister as one unit. The motor can be pretty loud, so I highly recommend putting this out in your garage. The added benefit to this is when you empty the canister or replace the bag dust is kept out of your home.

Some installers will take a shortcut and not run the exhaust pipe outdoors. Don't fall into this trap. You want the air to exit the house in case it has very fine dust particles in it. The only way I'd not exhaust a central vac outdoors is if the manufacturer could promise me there would never be dust in my garage or basement. Always follow the instructions of the manufacturer. If they say to exhaust the machine outdoors, do it.

If you put your canister and motor in your garage, be sure there is an outlet on the machine. If not, then put in a regular outlet in a wall on the garage. It's so handy to be able to use the central vac to clean a car.

Perhaps the most common mistake I see when installers put in a central vac, and one that does exhaust outdoors, is NOT installing a fresh-air intake. A central vacuum consumes vast amounts of air when it's turned on and it needs to get that air from outdoors.

central vac system

If you have a very tight home, the operation of a central vacuum could possibly cause backdrafting of combustion gases down metal chimneys or vents into your home which could cause carbon monoxide poisoning. It can also make a house smell like smoke if you have wood-burning fireplaces or wood stoves as the vacuum gets its replacement air by sucking it down a chimney.

Installing the piping for a central vac system in an average-sized new house usually only takes part of a day. The pipe glues together with regular PVC cement. You can cut the thin piping with a simple hacksaw, making sure you remove any burrs from the cut ends of the pipe. Burrs can grab onto hair and possibly lead to a clog years from now.

You have to also run low-voltage wire from the outlets back to the motor. This is very easy to do. Just use electricians tape to adhere this small wire to the side of the plastic vacuum piping.

Be sure you check your canister frequently to ensure that it's not full of dirt and debris. As the canister or bag fills with dirt, the suction power of the vacuum starts to drop. Use common sense and avoid picking up rocks or gravel with your central vac. Sweep up that with a regular broom.

I've not installed a Beam central vac, however I've put in quite a few Nutone and VacMaster units. Another popular brand is an Electrolux central vac. I'd always let price be my barometer in this situation as the better vacuum systems will almost always have better parts and motors. These cost more, so the total price of a better unit will almost always be higher than a cheap brand.

The column was mentioned in the April 28, 2011 AsktheBuilder Tips & Newsletter.

Column 871