Hole Saws Video

There will be times when your project will require a hole larger than a standard drill bit can do, but too small to use a jig saw. What do you do? Use a hole saw! These special saws will allow you to make those holes in wood, metal or plastic.

The newer hole saws come with an interchangeable drill chuck. You just put the proper size hole saw on the hole saw chuck, with it's pilot drill, and you are ready to drill. This quick change chuck allows you to change hole saw sizes quick and easy. Hole saws make those immediate sized holes easy to make.

Epoxy Deck Stain Video

EB015 Cleaning & Sealing Deck eBoo Cover

After cleaning your deck or wood porch with oxygen bleach and let it completely dry, it is time to seal the deck. This new synthetic resin epoxy fortified sealer works great. The epoxy is the key to this sealer. A lot of sealers contain natural oils that are food for algae and mildew. That's way your deck turns either black or green. This sealer does not have the natural oils to feed the algae.

The epoxy grabs onto the wood fibers and holds tight allowing it to last a lot longer than normal sealers. In the can, it appears to have a milky chalky appearance, but once dry it is semi-transparent. This gives an almost furniture like appearance to the wood.

For best results, two coats are required about an hour apart. Use a nice wide brush for applying and don't leave any extra sealer. Follow the label instructions and you will have a nice, long-lasting sealed deck.

Message from Tim:

Years ago while researching a column about cleaning decks, I discovered the wonders of Oxygen Bleach. It is perhaps the 'greenest' cleaner I know of as it uses oxygen ions to break apart stains, dirt and odor molecules. There are no harsh chemicals, and it works on just about anything that is water washable.

I decided to create my own special blend using ingredients made in the USA. In fact, the raw materials in the active ingredient are food-grade quality registered with the FDA. I call my product Stain Solver. I urge you to use it to help with cleaning your wood deck. You will be amazed at the results!

Electric Tool Belt Video

The following tools are a must for your home electrical repair jobs. Be sure your kit includes a set of linesman pliers, designed with a heavy wire cutter for that electrical cable and wire. Next, a wire stripper to remove insulation from the wire and crimp connectors.

A needle nose pliers allow you to bend the stripped wire in a loop to fit around the screws on the electrical outlet or light switches.

A flat blade screw drive and a Phillips screwdriver are necessities in your tool kit. A razor knife will allow you to cut the sheathing of heavy electrical cable.

To hold all these tools, get a handy little pouch that clips over your belt. It also has small pockets for pencils and a hook for storing rolls of electrical tape. The tool pouch with all the tools in it would make a great gift for that handyman. They'll get a charge out of it!!

Nail Gun – Finish Nails Video

Many household projects involve hammer and nails. If you are not careful in driving in the finishing nails in wood trim, you can created a defect in the wood that will be hard to repair. There are two ways to drive these finishing nails.

The old fashion way is with a hammer and nail set. You drive the nail in until the head is about 1/8" from the wood. Then, you use a nail set, properly sized, and drive the nail about 1/8" into the wood.

Second method is the use of powered nail guns. This model has an internal combustion engine. It uses gas, a battery and a spark plug to drive the nail. There are different style gas powered nail guns. One for the longer finish nails and another that drives smaller finishing nails to use in cabinet work, for example.

Try a powered nail gun on your next project. They do a great job and are easy to use.

Glass Replacement Video

If the insulated sidelight glass panel on your front door goes bad, it can be replaced without replacing the entire front door. Using a flexible putty knife and a light weight hammer, start by removing the stop molding holding the window in place. Because this molding is very thin, use care when driving the putty knife down the length of the molding. This is cut through the putty and sealant behind the molding strip.

Once the wood molding is out of the way, the other thing holding the window is place is usually some small nails or staples. Use a needle nose pliers to carefully remove the staples. With all the wood molding out of the way, measure the window and order the replacement glass. Leave the old sidelight in place until the new window arrives.

With the new window in hand, replace the old sidelight and reverse all the above steps for installing the new sidelight window.

Interior Painting Tips Video

To get professional painting results, before you get out the paint roller, there are some interior painting ideas you need to know. First, make sure you put enough paint on the wall. The paint goes from a liquid (in the can) to a solid (on the wall). That means a lot of water evaporates out of the paint. If you do not have enough paint on the wall, you will end up with bare spots. The paint can will indicate how many square feet it will cover. That takes into account the evaporation. Spreading paint too thin will not give you the proper results.

Now that you know how much paint to put on, you have to know how to paint with a roller. The best method is to start rolling paint on sideways, covering a small area. Then, make your finish strokes vertical. When you are finishing, lift the roller gently off the wall.

Roller marks are caused by holding the paint roller tilted on the wall. Be sure that the roller is flat against the wall and the pressure is even across the roller. Take you time and use nice easy strokes and your painting project will look great.

Fireplace Mantel Video

This column was SO GOOD that I shared with the 31,000 subscribers who read my May 30, 2014 and my January 8, 2016 AsktheBuilder Newsletter.

The challenge is to mount a fireplace mantel to the wall without putting screws or nails through the fireplace mantel wood. The solution is a French cleat. French cleats will allow you to remove the mantel, if needed. The French cleat is made using a piece of wood, cut so each section interlocks with the other. One section is mounted to the wall and the other on the back of the mantel.

To make the French cleat, take one piece of lumber and using a table saw rip the board lengthwise. Before cutting, set the table saw blade at 45 degrees. These two pieces will interlock when mounted.

Attach the piece to the wall so that the angle slopes back towards the wall. The chisel point will face up and out. The piece on the mantel and the chisel point facing down and out. When one section is placed on top of the other, they can not pull forward. The mantel will be mounted to the wall with no mounting screws or nails being seen.

Plywood & OSB Grading Specifications

Plywood and OSB Grading Specifications

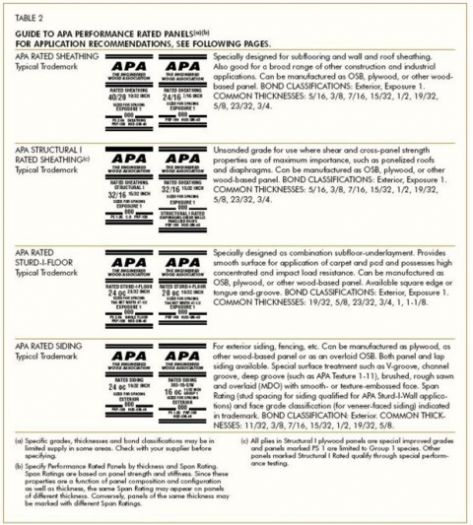
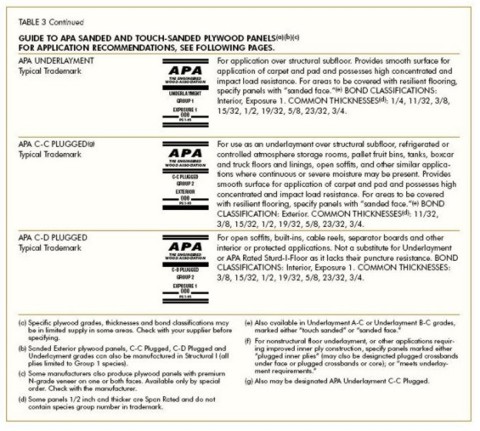
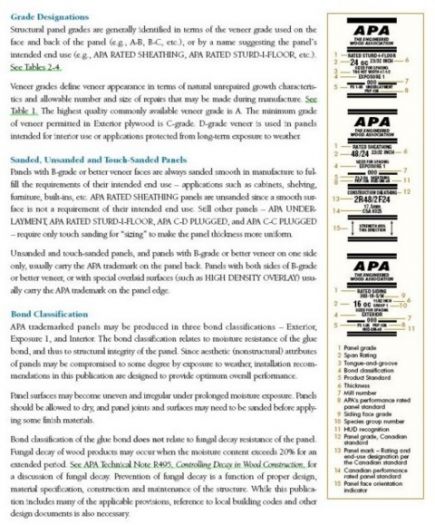
The following tables are courtesy of the Engineered Wood Association. They were copied directly from an awesome publication, Engineered Wood Construction Guide - Form E30. This publication is available from their website at http://www.apawood.org. A PDF copy can be downloaded for free. The rating stamps for plywood and oriented strand board (OSB) lumber are provided.

Table 1 shows you how to read and understand the stamp that makes up the label.

Table 2, titled Guide to APA Performance Rated Panels, explains how each type of sheet should be used.

Table 3 covers APA Sanded and Touch-Sanded Plywood Panels.

Pay attention as you read. The labels all look similar but the words, letters and numbers are different!

Table 1. Grading Stamps - How to read them.

Table 1. Grading Stamps - How to read them.


Table 2. Guide to APA Performance Rated Panels

Table 2. Guide to APA Performance Rated Panels


Table 3. Guide to APA Sanded & Touch-Sanded Plywood Panels

Table 3. Guide to APA Sanded & Touch-Sanded Plywood Panels


Table 4. Plywood Panels Table 3 continued.

Table 4. Plywood Panels Table 3 continued.


Column B304

Cordless Reciprocating Saw Video

Many home improvement projects involve cutting something - wood, metal, plastics. If you want to combine the hand saw with the power of a circular saw, but without the cord, try a cordless reciprocating saw.

A reciprocating saw are built tough and handle rough cutting. Some models have two speeds that provides either a longer or shorter stroke. The longer stroke is for rough cutting. The shorter one for finer cutting.

The rechargeable batteries are longer lasting and more powerful than the batteries in the past. 24 volt cordless power tools are very common.

The reciprocating saw, or sawzall, has a wide variety of blades available. There are specialized blades for cutting wood, wood with nails in it, metal, plastics, etc. There is also a special blade designed for pruning trees. Try it on your tree!

Caulk Video

What are the most important tools when painting an interior wall? The paint brush or the paint roller? No, it is the caulk gun. The caulk gun is used to fill all those cracks between the woodwork and the wall. The painting project just does not look finished if there are gaps between the door jamb and the wall.

The key to caulking is the size of the hole on the caulking tube nozzle. The opening should be the same size as the gap your are caulking. Start cutting the end of the tube a little at a time until you get the hole just right. Be sure to purchase the correct caulk. It should be siliconized acrylic latex caulk that is paintable.

To caulk, place the caulk gun nozzle right in the crack and gently start to squeeze the trigger. Don't over caulk. Just enough to cover the gap. Once the gap is filled, use your finger to smooth the caulk around the crack. Then take a sponge, with very little water in it, and wipe down the caulk to finish smoothing. Now, you are ready to paint that area. This will make a bid difference in your paint project.