HVAC Static Pressure

hvac static pressure

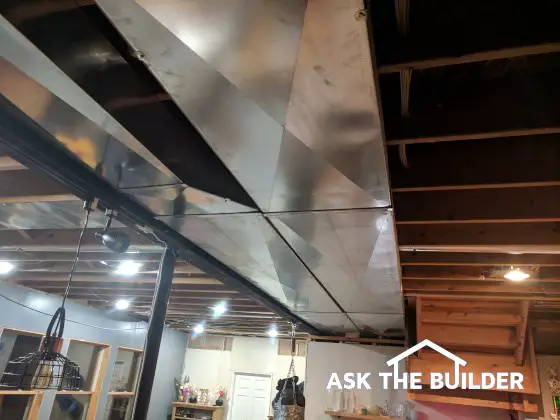
HVAC Static Pressure | See the long supply duct on the left next to the gray I-beam? Notice how it reduces down in width? That's what needs to be done in supply ductwork to maintain adequate static pressure as the main duct gets farther away from the furnace. The same-sized duct on the right is the main return air trunk line heading back to the furnace. This column has SO MUCH good information it's why I shared it with my 31,000 subscribers in my October 25, 2020 FREE newseltter. Copyright 2018 Tim Carter

HVAC static pressure is the measurement of the force the air inside your ductwork. The pressure reading at the furthest air register from the furnace or air handler must be equal to the pressure measured at the closest one.

HVAC Static Pressure Checklist

  • Main supply duct must get smaller as branch lines take off
  • Room farthest from the furnace can be just as warm/cool as the most comfortable room in the house
  • HVAC ducts should mimic blood vessels in your body
  • Install a damper control in each branch line

Related Links

Heating Ductwork - SECRET TIPS - Do NOT Share Please

Heat Loss Infrared Photos - MUST SEE Poor Workmanship!

HVAC Static Pressure Is Easy To Maintain

The first thing to remember is that each room in your home needs a certain amount of air flowing into it for you to be comfortable. I say this assuming your home has a forced-air heating system or an air-conditioning system for summer cooling.

It's important to realize that the air coming out of the supply registers in each room must be flowing at the same rate. This happens when the static pressure in the ducts is equal no matter where you measure it in the duct system.

Free & Fast Bids

CLICK HERE to get FREE & FAST BIDS from local HVAC duct contractors.

How Do You Balance Airflow In Ductwork?

The first step to balance airflow in ductwork is to calculate how many cubic feet of conditioned air must flow into each room to make the room comfortable.

Most people don't realize that residential heating and cooling systems are very complex. This is true for both forced air systems as well as hot water or steam heating systems.

There are many calculations that must be made to ensure that the properly sized equipment is selected. There are many controls on the equipment which must be properly adjusted to assure a well-balanced system. Ductwork must be properly designed and sized. It is by far the most technical aspect of residential construction.

How Do You Calculate the Correct Furnace Size?

When you decide to install a forced air furnace or air conditioning system, you need to make various calculations. Each room of your house, depending on its size, location, compass orientation, amount of glass, etc., requires a certain volume of air to enter it to properly maintain the desired temperature.
attic condensation

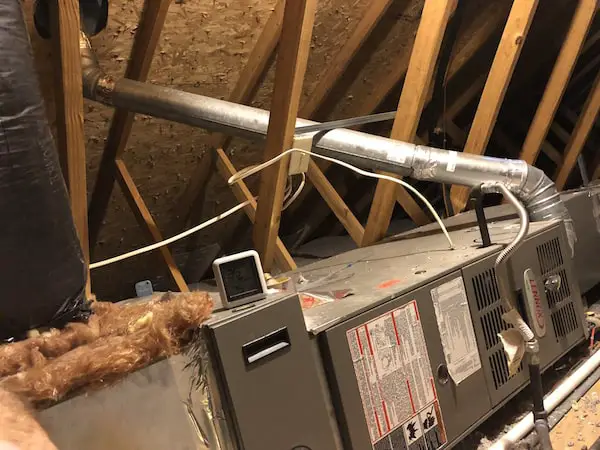
This is a furnace up in an attic. The photo was sent in by one of my newsletter subscribers. Several mistakes were made during its installation, not the least of which it's laying on its side instead of being a proper low-boy furnace. Copyright 2018 Tim Carter

As you can imagine, each room depending on the variables mentioned above will probably demand a different volume of air. A larger room will require more air than a smaller room.

A corner room may have two outside walls, while an interior room may have no exterior walls. You or your HVAC person must think and quantify all of these things to provide a comfortable interior climate.

What is the Primary Function of an HVAC System?

Interior climate control is the primary function of a heating and cooling system. A properly installed system will ensure that each room of the house is adequately heated or cooled.

An inferior system will result in widely different temperatures from room to room, hot and cold spots, excessive noise, etc. The trick is to make sure that the proper amount of air enters and leaves each room.

The calculations that are made to ensure the proper amount of air enters the room tell the HVAC person a very important number. It tells that person how many cubic feet per minute of air each room requires.

This, in turn, tells the HVAC person how powerful of a blower to install with the furnace. Common sense would tell you that if the calculations indicated that the entire house required 1,750 cubic feet per minute and the blower could only produce 1,200 feet per minute, there would be a problem. Let's assume that the HVAC person gets the right sized blower.

CLICK HERE to get FREE & FAST BIDS from local HVAC duct contractors.

How Do You Get the Right Amount of Air Into Each Room?

The challenge is to get the proper amount of air into each room at the same time. This is where things begin to get complicated.

Here's the problem. The furnace blower fan only creates a certain amount of energy at any given instant. This energy is constant. If one room gets too much air (energy), there won't be enough for the remaining rooms. Remember, different amounts of air (energy) are going to each room.

To achieve the goal of getting the proper amount of air (energy) into each room at the same time is to have equalized static pressure throughout the entire duct system. Static pressure in an HVAC system is the same thing as blood pressure in your body.

It's a time-tested principle that works. It is not that difficult to achieve in your HVAC system.

The principle is very easy to apply. Remember the initial calculation that indicates the total number of cubic feet per minute of air that your house requires?

How Important is it to Do the Airflow Calculations?

It's vitally important that you or your HVAC person correctly calculates this number. If you decide to do this calculation, you must obtain heating and air conditioning books which tell you how to do it. It is not that difficult, it just takes time.

Your local library probably has the books that you need. Once you have this number, and you have the separate number for each room, you are ready to design your ductwork.

HVAC Static Pressure & Ductwork Installation

Ductwork is like any other piping device. You can only get so much air through a duct at a given pressure. It makes sense. You must not forget this concept.

We also know that the furnace blower fan can only produce so much energy. This energy translates to pressure because it is pushing the air out of the furnace. The pressure at the blower will not be equal to the pressure at the air supply register in each room.

This is because the total pressure of the blower becomes divided by the number of air supply registers. However, the pressure at each register must be the same regardless of the size of the room or register.

Here is how it works. Once the air (energy) leaves the furnace blower it begins to travel down the main supply duct. This duct has a certain cross-sectional area.

An example would be a duct 8" high by 22" wide. Before the blower turns on, this duct, as well as all of the other ducts, are full of air. The blower is going to have to push this air out of the way in order to get the hot or cold air into the rooms.

It takes energy to push things. Remember, the furnace blower only creates a constant amount of energy at any given moment. When the furnace blower turns on, it begins to push all of the air down the ducts.

Every time a branch duct turns off the main duct there is less energy to push the remainder of the air. If the main duct does not reduce in size after several branches are taken off, the remaining air (energy) begins pushing extra air that it shouldn't have to push.

If this happens, this wasted energy results in lower energy (air) at the remaining supply air registers. The pressure of the air coming out of these registers will be lower than the pressure at the registers closer to the furnace.

As you can see, the main air duct must continue to get smaller and smaller as more branches go off to each room. This is exactly how your blood supply system is designed. The arteries close to your heart are much larger than the arteries in your hands or feet.

The downsizing of the main duct depends upon the amount of energy which is left after each branch duct leaves the main duct. Many factors come into play as to when this duct begins its downsizing.

However, if for some reason your main duct does not get smaller as branch runs are taken off, ask your HVAC person why. I hope they have a good explanation.

What are Other  Static Pressure Air Balancing Tips?

There are some other important points you should consider when installing a new furnace or replacing an existing one. Try to locate the furnace in the center of the structure.

Did you ever stop to wonder why your heart isn't in your head or your feet? By placing the furnace in the middle of the structure, you minimize the distance to the farthest room.

This means less air has to be pushed. Make sure that the HVAC person installs a damper control in each branch duct going to each room.
damper control

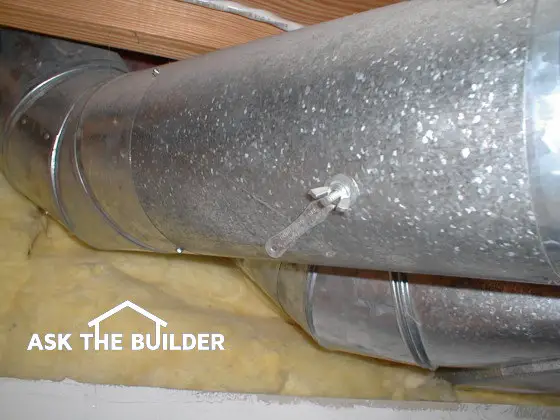
The lever you see on the side of the round metal duct is a damper control. It is connected to a round metal disk inside the duct pipe. If I rotated the lever so that it was straight up and down, the disk would block 90 percent of the air flow in the duct. Copyright 2018 Tim Carter

This damper control is very similar to a water faucet. You can limit the amount of air going to each room by adjusting this damper. This extra control will also help you to balance the system.

Ask to see the calculations that your HVAC person used to enable him or her to properly balance your system. These calculations will show each room and the amount of air each room needs. The air volume will be expressed in cubic feet per minute (CFM). Ask questions so that you fully understand the calculations. Spend a few minutes at the library or local bookstore. Believe me, you can't know enough about your heating and cooling system.

CLICK HERE to get FREE & FAST BIDS from local HVAC duct contractors.

Column B12
Foam Insulation Video

Need to put insulation around a window or door? Try this new spray foam insulation. It stays permanently flexible. Get the correct polyurethane insulation. One type gets rigid after curing, while the other cures flexible.

This expanding foam insulation bonds well with wood or metals. It is great for stopping those air leaks between doors, windows and the framing.

Do-it-yourself spray insulation is easy to do. Just follow the directions on the can for best results. As a precaution, wear rubber gloves and safety glasses.

When applying, only fill the crack about halfway with the polyurethane foam insulation. The foam will expand to fill the rest of the gap.

One last tip, wear old clothes. The foam can ruin your brand new shirt.

Wallpaper Around Windows Video

How do you get the wallpaper to match perfect above and below the window? You can't just draw a plumb line and hang the wallpaper. If you do the wallpaper pattern might not match the wallpaper that is already hung.

Most wallpaper, pre-pasted styles, expand when the activator is applied. In some cases, as much as 3/8" of an inch. Mark the wall with a plumb line that is 1/8" longer then the width of the wallpaper after the activator has been applied. Then when hanging the paper, keep it an 1/8" away from the line. That will ensure the seams top and bottom will look perfect.

Copper Fittings With Solder Video

There has been some changes in the process of soldering copper pipe and copper pipe fittings. Normally, you need some solder, soldering paste, sandpaper to clean the copper tubing, and a wire brush to clean the inside of the pipe. But, the solder is the most important component.

The new copper fittings eliminate the need for that roll of solder. They have the solder built-in the fitting! There is a small ring in the fitting where the solder is located. Just clean up the inside of the fitting and use the sandpaper to clean the outside of the pipe. Then apply the flux to both pieces, slide them together and apply the heat. When you see the solder coming out of the fitting, you are done. It's just that easy.

How to Solder Copper Pipe Video

solder copper

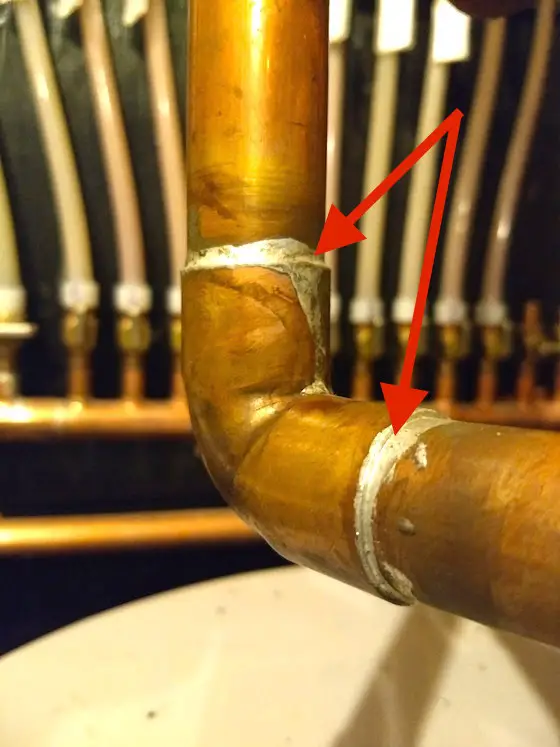
Solder copper - You do this when you melt solid solder and allow it to flow into the tiny gap between the tubing and the fitting. The red arrows point to the silver-colored solder. This popular video was shared with my readers in the  March 23, 2014 Newsletter. Copyright 2018 Tim Carter

You solder copper in seconds if you have clean copper, plenty of heat, some flux and no-lead solder. Heat the tubing and fitting enough so the solder melts with the torch away from the tubing and fitting.

Revised February 2018

Solder Copper Tubing In Seconds

You solder copper using a propane torch, flux and no-lead solder. You can use a torch that has mapp gas or even acetylene. Plumbers use acetylene because it burns hotter and they can get more work done faster.

Related Links

Soldering Copper Water Lines

Ten Easy Steps To Solder Your Copper Tubing and Water Lines

Clean Copper Is Key

You must clean the copper you intend to solder. Use abrasive cloth or plumber's sandpaper to make the copper look bright. A special round wire brush cleans the inside of copper tubing fittings.

Free & Fast Bids

CLICK HERE to get FREE & FAST BIDS from local plumbers if you're too timid to try to solder yourself.

Mix Up the Flux

Mix up the solder flux or paste in case it has separated. Take the solder paste brush and apply the solder flux onto the pipe and inside the fitting.

Assemble the parts to be soldered and heat up the torch. Acetylene or propane soldering torches work great.

Apply the torch to the joints for about ten seconds. Once the joint is hot, remove the torch and touch the solder to the joint. The heat in the pipes should be enough to make the solder flow into and around the joint.

If the solder doesn't melt after touching it to the copper for two seconds, pull the solder away and re-heat the tubing and fitting with the torch for an additional ten seconds.

Clean Off All Flux Residue

Once finished, use a rag to clean up the joint. Be sure to remove any excessive flux. Flux left on copper will corrode the pipe and cause a water leak.

CLICK HERE to get FREE & FAST BIDS from local plumbers if you're too timid to try to solder yourself.

This video was featured in the May 14, 2013 AsktheBuilder Newsletter.

Toilet Flange Installation Video

Due to technical issues, this video is not currently available for viewing.

The toilet flange must be installed on top of the cement board just before the ceramic tile goes in place. It is critical how it is mounted. Mark a line across the flange where the toilet bolts come up. Install this flange so the mark is exactly parallel with the wall. This will ensure that the toilet is square with the wall.

Toilet Video

Toilet Video

The tank is the business end of the toilet. It all starts in there. The water is stored in the tank until the handle is tripped. The handle opens the flapper valve, allowing the water to flow into the bowl. As it leaves the bowl, the water splits and goes to the water siphon jet hole and to the holes under the rim.

The waste water exits the bowl through the colon and through a passageway before leaving the toilet. That concludes Toilet 101. Tim's flushed with excitement!

Radiant Barrier Insulation Video

Due to technical issues, this video isn't currently available for viewing.

Radiant barrier chips are plastic chips that are coated with a highly reflective coating. They reflect heat back to its source. So in the summer, it reflects the heat from the sun back out of the attic. In the winter, the heat is reflected back down into the house. They are very effective.

A powered blower, much like a leaf blower, sucks the chips from a cardboard box and blows them into the attic. You want to achieve a layer of 7 - 8 layers of barrier chips. The advantage of this is if the top layer gets covered with dust, which blocks its reflective ability, the lower layers will continue to reflect the heat.

It is a great barrier insulation and is very easy to install.

Related Column: Radiant Barrier Chips Save Money

Exterior Door Insulation Video

The new exterior has been hung and it is time to insulate it. The gap between the door jamb and the framing has to be filled. Tim uses fiberglass insulation on the inside of the door and spray foam insulation on the exterior. The spray foam insulation should be one that is flexible. So will prevent the insulation from squeezing the door as the foam expands. If it would squeeze to much, it could affect the operation of the door. Only fill the gap about half way. As the urethane insulation cures, it will fill in the rest of the gap.

Once the spray foam has cured, seal the gap between the door jamb and the sheathing. The sticky flashing tape, used under the door, can be used to seal this gap. Only bring it out about a 1/4" onto the door frame. This will be covered by the trim around the door. This will keep any water from getting behind the door trim and into the house. If the spray foam expanding out past the edging, use a razor knife to cut it flush with the door jamb. You may have to fix the flashing tape if too much foam oozes out.

Now it is time to install the fiberglass insulation on the inside of the door. Rip some fiberglass insulation into strips that are slightly longer then the gap to be filled. Push it into place with a wood shim, but not pack it too tight! If desired, you can tape over the fiberglass filled gap with masking tape to block any additional air from coming in.

Replace the wood trim around the door and your exterior door project is ready for use.

This is the third of three videos relating to Exterior Door Removal, Installation and Insulation. Below are the links to the other videos in this series.


Click here to watch the Exterior Door Removal Video


Click here to watch the Exterior Door Installation Video

Exterior Door Installation Video

During one of Tim's FREE ON-DEMAND RADIO SHOWS, he recalled this video. Click here to read why he recalled this particular video.

Now that the old exterior door has been removed, it is now to install the new door. Follow these steps to make the job easy. First, be sure to check that the door will be at the right height to match the interior finished flooring. Be sure it is not installed on the subfloor level. Install a piece of plywood, if required, to raise the door to the finished floor height.

A flashing is required to keep water off the piece of wood the door will sit on and the floor joints. We want to keep the water outside. Use a self-adhesive waterproof flashing to cover the area under the door. Don't forget to seal the corners where the walls meet the floor. Be sure the last piece of flashing tape hangs over the exterior edge of the wood. If it is flush, water can get under the flashing. By overlapping the exterior of the door mount, water will run off and not into the house.

Once the flashing is installed, check the door opening for level. The sill have to be level so the door frame will fit properly and the door will operate smoothly. Set the door in place to check the fit. Helpers will be needed to tilt the door back and up into place. You can use some shims to hold the door temporarily in place. Check the reveal on the inside of the door and check the opening and closing of the door.

If the door is hung properly, start nailing it into position, checking the reveal as you nail it. The installation instructions should indicate how and where to place the nails and the shims. Be sure to follow the manufacturer's directions. Place the shims in the proper locations and nail the door in place.

Once all the shims are in place and the door securely nailed, it is time to insulate the opening and put the trim back up. View the last video of this series for insulation tips.

This is the second of three videos relating to Exterior Door Removal, Installation and Insulation. Below are the links to the other videos in this series.


Click here to watch the Exterior Door Removal Video


Click here to watch the Exterior Door Insulation Video