Shovel Choices 101

Four types of shovels

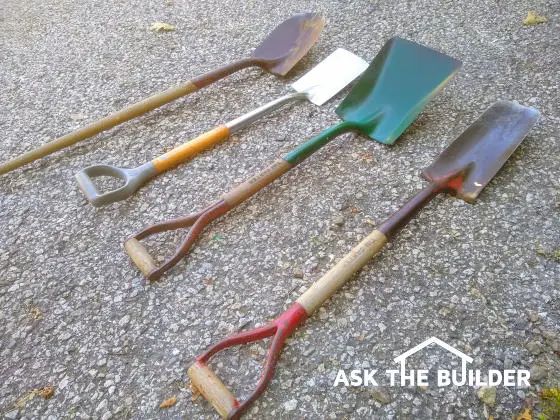
Shovel Choices 101 | This is an assortment of a few of my time-tested shovels. Each one is used for a specific task. This column was SO GOOD that I shared with the 31,000 subscribers who read my September 27, 2020 newsletter. Copyright 2020 Tim Carter

Shovel Choices 101 - Which One To Use

QUESTION: Mr. Tim, this past week I wasted all sorts of time and got frustrated trying to dig a simple hole in my yard. A neighbor looked over the fence and suggested I change shovels. Anyway, I figured you’ve used lots of shovels in your career and might help me start a decent collection so I won’t be frustrated ever again. Tell me all about the shovels I’d see if I came over to your house or stopped by one of your job sites. How do you store them? Barry K., Tulsa, OK

My guess is you might have been in the same situation as Barry at some point. It’s not that uncommon as I’d venture to say most people only have one or two shovels in their garages or sheds. Me, I’ve got about ten different ones with a few duplicates.

Just two weeks ago, I went on an adventure with my youngest daughter. She’s a potter and discovered I had a conversation a year ago with a local historian I met on a hike to a stunning overlook here in central New Hampshire, The Ledges. I found out that an early homesteader who’s old house foundation was on the hike had become a wealthy businessman. He discovered a large and deep continental glacial clay deposit and mined the clay making countless bricks for all the locals to use to build their fireplaces and chimneys.

Why did you bring that odd-looking shovel?

While hiking from my truck through the woods to the clay deposit my daughter said, “Dad, why did you bring that odd-looking shovel?” I had in my hand a duckbill shovel. It’s a long narrow shovel with a small cutting tip. It allows me to dig fast because there’s less resistance. I also knew I was only interested in getting about three-quarters of a cubic foot of clay to test it to see if it’s great for a few small pottery items.

It turns out it was the perfect shovel to use for this project because there was a small exposed vertical cut of the clay where I could scrape and cut a horizontal hole harvesting clay that had not seen the light of day for 15,000 years. Yes, my degree was in geology!

What type of shovel should be used?

The type of shovel you’ll use for a project depends on both the material you’ll be shoveling, whether it’s densely packed, loose, or even the shape of the hole you’re creating. For example, imagine the task that telegraph pole installers faced 170 years ago. They had to dig 12-inch diameter holes straight down about 5-feet deep! Think of how specialized those shovels had to be to create that perfect shaft! You can still see them if you’re able to watch a modern utility crew set a new pole!

The Basic Shovel

Let’s start with the most basic shovel. I feel it’s the round-point shovel. They come with all sorts of handle options including a short one with a D-handle. The tip of this shovel resembles what you see in a deck of cards when you look at the simplistic shape of the spade symbol. The tip of the shovel allows you to slice into dirt, through small roots, etc. with ease. Everyone should have at least one round-point shovel.

The Square-point Shovel

The next shovel I’d have is a square-point shovel. The industry usually calls these transfer shovels. They have a shallow pan profile but the cutting edge is straight across and blunt. These are perfect for shoveling loose material like sand, small rounded gravel, and grain. I’ve worn out quite a few of these shovels from handling tons of rounded pea gravel! You’ll never regret having one of these shovels.

The Duckbill Shovel or Drain Spade

If you plan to do trenching, you’ll want a duckbill shovel. Once again, you may find one called a drain spade. These have a rounded tip that cuts into soil or clay, but the body of the shovel is almost 2x longer than a normal shovel. It’s also narrower so you encounter less friction when making a deep cut. I’ve created thousands of feet of 16-inch-deep trenches with these shovels. Be sure to get one with a D-handle for ease of use.

The Garden Spade

One of my favorite shovels is the garden spade. These have a very flat shape and a blunt edge. They are my tool of choice if digging in clay where I want to create a very square hole with smooth sides. You can shave moist clay with these shovels like you’d shave off wood using a sharp wood plane or chisel.

Get this amazing stainless-steel one!

stainless steel spade

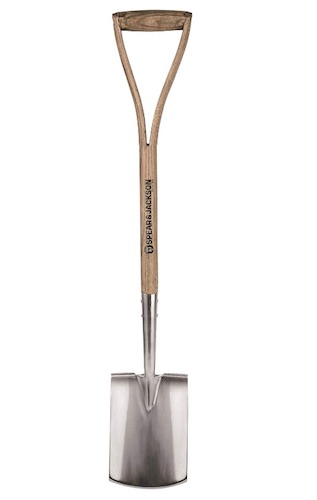
I've owned this stainless steel spade for almost 20 years. It looks PERFECT. NO RUST! CLICK or TAP HERE or the photo to have it delivered to your home.

Digging with a Pressure Washer

While it’s not a shovel, one innovative thing you can use to dig in certain situations is a pressure washer. You MUST wear goggles when doing this, but believe me, a pressure washer can cut through dense clay soil quite quickly. It’s a fantastic option to use should you need to tunnel under a sidewalk.

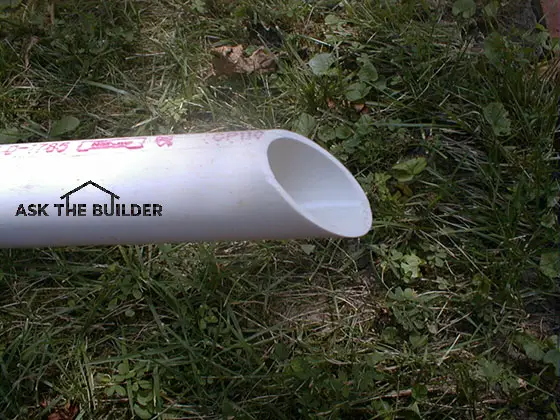
Using PVC Pipe as a Digger

Another method to tunnel is to use a piece of PVC pipe that you cut off an end at a 45-degree angle. You tap this cut end into the soil, twist it, and then pull it backwards removing the plug of soil inside the pipe. I recorded a video showing this method and you can watch it on my AsktheBuilder.com website. Type “tunnel” in the search engine on my website and the video will pop right up.

How to Clean Your Shovel after Each Use

If you want your shovels to dig with ease each time you use them, you must clean and oil them after each use. Hardened clay on a shovel creates more resistance when digging. If you have an old 5-gallon bucket, fill it with sand and pour some used motor oil into the sand until the sand is well saturated. Push the shovel into the sand and it will get coated in seconds with oil that will prevent rust.

Column 1367

Crumbling Concrete Foundation DIY Fix

Crumbling Concrete Foundation

Crumbling Concrete Foundation | This poured concrete foundation is looking shabby. Believe it or not, you can make it look gorgeous again with minimal effort and tools. Copyright 2020 Tim Carter


Crumbling Concrete Foundation - Easy DIY Repair

QUESTION: Hey Tim. I watched your three-part video series on patching a concrete foundation on your website. It’s exactly what I needed to help me repair the cosmetic crumbling of my concrete. I’ve got questions. Will that method work to also patch defects in steps and flat concrete sidewalks and driveways? I have a 4-inch-diameter hole in the foundation that needs to be filled. What’s the best way to do this, just pack in some of that cement stucco you show how to mix up? Do you have any other secret tips to share? Casey S., Antigo, WI

Wouldn’t you love to have a nickel for every person that needs to patch concrete? Oh my, that would be so many nickels! There’s a better-than-average chance that you might have some concrete at your home that needs some attention. Great news! I’m about to share how you can achieve pro results with very little work and cost.

How do You Repair a Crumbling Foundation?

I recorded the three videos that Casey mentioned about six years ago. It was pouring rain but we had to shoot that day. Fortunately, I was under a covered porch and could demonstrate exactly what to do. The first video in the series is below. Links to the other videos are shown.

Here are links to all of the videos in this series:
How to Repair a Crumbling Foundation Part 1 of 3
How to Repair a Crumbling Foundation Part 2 of 3
How to Repair a Crumbling Foundation Part 3 of 3

What Tools are needed?

The first step in a concrete repair is to remove any loose concrete and get rid of all dust. You can use a chisel and a hammer or if you have lots to do, consider renting a rotary-hammer tool that has a chisel tip. These power tools can do a remarkable amount of work in a short time. I like to use a garden hose and scrub brush to clean away all dust and loose particles of sand.

Why do Concrete Patches fail?

The next step I would have never known about had it not been for a generous old concrete craftsman that shared a few of his trade secrets with me forty-five years ago. This mason saw me trying to do a small repair job and stopped to talk to me. He could tell I was about to make a mistake, one that perhaps you’ve made and a great many others.

He explained why most concrete patches fail. There are so many reasons, but the biggest one is a lack of bonding between the old concrete and the new material. This gentleman shared tales about him being a young apprentice. It was fascinating.

He was born and raised in Cincinnati, Ohio as was I. Back when he was in his 20s, just about every new house that was built had concrete steps with a stunning sandy texture. The steps were actually stuccoed. You rarely see this technique today because it’s an extra step in the process.

This expert craftsman said they’d never pour a set of steps on a Friday because they wanted to apply the stucco no later than18 hours after pouring the steps. In hot weather, they’d often pour the steps in the morning and apply the stucco in the afternoon for optimal results.

What is the Proper Stucco Mix?

The stucco mix was just a blend of hydrated lime, Portland cement, and medium sand. He said they used 1.5 parts of Portland cement, 0.5 parts of hydrated lime, and 4 parts sand. Blend all this together dry and then add enough clean water to make a mix that resembles applesauce.

But the true secret to getting the stucco, or in your case the patching material, to bond to the old concrete is to apply cement paint just before you apply the patching material. Cement paint is just a mixture of Portland cement and clean water. You blend enough cement with the water to make it the consistency of latex paint.

Just before brushing on the cement paint to the old concrete, this master craftsman said to get the old concrete damp. You can use a sponge, a brush, or an old spray bottle. Remember, you want it damp, not soaking wet.

You then brush on the cement paint and immediately cover it with your stucco mix. Never allow the cement paint to dry. It must be covered immediately. You’ll discover you’ll not have to rush if you work in the shade or on an overcast day. Working in the direct sun on a hot day is too hard on the materials and you.

How do You Patch Larger Holes?

Patching larger holes is easy. You use the same process but find some rubble or small pieces of stone, brick or concrete to help pack the hole. Don’t try to fill large holes with just the stucco mixture. You want the rubble to be covered with the stucco mix so use rubber gloves if you want to do this by hand. Do what’s necessary so the hole has no voids in it. It needs to be completely filled with the rubble and the stucco patching material.

The old mason left me with one other very important tip. He said the patching material or stucco must be covered with burlap and kept wet for 48 hours. Back in his day, that’s all they had to slow down evaporation. You can use 4 or 6-mil plastic sheets, but be sure you weigh it down so it doesn’t blow away and so the wind can’t get under the plastic.

The plastic allows the patching material to get much harder and create a bond with the old concrete that will last for many decades. I’ve driven by concrete I patched in the mid-1970s using this method in the past year and it still looks perfect.

Column 1366

Install Tile Over Cracked Concrete Floor

crack in concrete floor
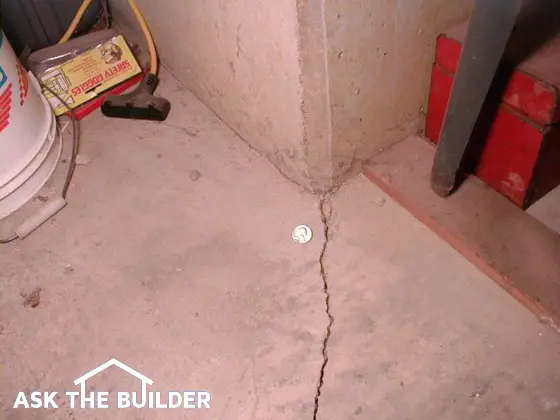
Install Tile Over Cracked Concrete Floor - Use a Membrane

QUESTION: I’m about to install ceramic tile on a concrete floor of a 40-year-old house. The concrete floor has cracks in it. This is a DIY endeavor and I don’t have the extra money to install the expensive membrane that I should use. Are my new tiles going to crack? What would you do? What about grouting the tile? Sarah H., League City, TX

Sarah’s got spunk. I applaud her spirit and she can have success if she does a few simple things. There are different crack-isolation membranes that uncouple the tile from the actual concrete slab. She might price all of them to see if there is one she can afford. Here's the industry standard, but it's fairly pricey:

Crack Isolation Membranes - Consider Affordable Felt Paper

There’s not a doubt in my mind that the new tile will develop cracks directly on top of the cracked slab if no membrane is used. Since Sarah’s budget is tighter than a banjo string, she might take a chance using two layers of 30-pound felt paper. This is a very affordable material and while I’ve never used it as a tile crack-isolation membrane, I feel it’s got a fantastic chance of performing quite well.

What About Filling Wide Cracks?

If the cracks in the slab are wider than 3/16 inch, I’d first try to bond the concrete together using a high-strength epoxy you can inject into the crack. This will go a long way to prevent future cracked tile. Here's a fantastic concrete-crack epoxy I've used with great success:

PC Concrete repair epoxy

This is a wonderful DIY foundation repair epoxy. I've used it with great results. CLICK  or TAP HERE or THE IMAGE TO ORDER IT NOW.

How Do You Install the Felt Paper?

I’d then install the felt paper just as you would one of the fancy membranes. This requires a bed of thinset adhesive that you then cover with the first layer of felt paper. Smooth the felt paper using a rented linoleum roller. Be sure to install the felt paper so it crosses the cracks at a 90-degree angle if possible.

I’d then install the second layer of felt paper over the first layer at a 90-degree angle. I’d not install any thinset between these two layers. The weight of the thinset under the tile and the tile itself will press this layer against the first layer.

Once the tile is installed, Sarah should go to my AsktheBuilder.com website and watch my four-part video series about how to grout ceramic floor tile. She’ll get professional results with a minimum of practice.

Column 1372B

Replace A Foundation

house having new foundation

Replace a Foundation | This house is being restored and a new foundation is on the to-do list. Copyright 2020 Tim Carter

Replace A Foundation - Just Lift Up the House

QUESTION: I’m thinking of buying a house that has a crawlspace. The foundation is in very bad shape. While the house looks quite bad, it’s got good bones. Is it possible to completely remove a bad foundation and install a new taller one? What’s involved? Who does this type of work? What would you make sure gets done if you’re going to all this work? Hanna S., Hartford, CT

Hanna needs to negotiate a really good deal on this dilapidated house. The good news is the old foundation can be removed and replaced with a new cast-concrete foundation creating a full basement. The task is not much different than eating an elephant. You just take one bite at a time.

Moving an Entire Neighborhood of Houses

Hanna’s question reminded me of a fascinating time early in my building career. Fresh out of college, I had just rehabbed my first house in Cincinnati, Ohio. It didn’t need a new foundation, but it was otherwise in pretty bad shape. Four months of work transformed the house back into its former glory.

About a half-mile away, a developer wanted to put in a small shopping mall, but there were about ten houses and an apartment building in the way. Not only did he buy all these properties, but he proceeded to move them about a mile away on some wooded land he purchased at the end of a street. I remember watching these houses, and parts of houses that were cut in half, creeping down the road to their new foundations.

Hanna needs to contact different foundation contractors to see which ones have done exactly what she wants to do. Not all foundation contractors have the expertise to work underneath a house that’s suspended above the work site sitting on cribbing made with timbers the size of railroad ties.

These foundation contractors will also know the names of the different house-moving companies in the area. The first step in the process of tearing out the old foundation and installing the new one is to prepare the house as if it’s going to be moved to a new location. House-moving companies do this like you might brush your teeth. It’s just another job for them.

Lift the House High Enough

I’d consider several things if this were my job. For starters, I’d want to make sure the house was lifted high enough so there was positive drainage away from all sides of the house. The building code’s minimum standard is 6 inches of fall in the ground in the first 10 feet of horizontal distance away from the foundation. I feel 12 inches of fall is much better.

Create a True Full-Height Basement

If the budget allows, I’d also try to pour the new foundation walls as high as possible so a true 8-foot ceiling height might be achieved in the basement. Hanna needs to make sure a great high-performance vapor barrier is installed under the new basement concrete floor.

To lift an entire floor, you'll have to jack up floor joists. Pros do this by sliding large I-beams under the joists so all the joists go up at the same time and same rate.

Install a Radon-Capture System

I’d also install interconnected perforated 4-inch pipes beneath the new basement slab to capture radon gas that might be seeping up from the local bedrock. A riser pipe that connects to the below-slab pipes should then be extended up to the roof to vent the radon.

Column 1372A

September 20, 2020 AsktheBuilder Newsletter

You might be a brand new subscriber. I’m so glad you’re here. You should know that this could be the most unusual newsletter I’ve ever produced in the twenty-four years I’ve been publishing them.

Please bear with me and next Sunday you’ll see a normal one.

Are you a long-time or recent subscriber? I’m sure you’ll appreciate this issue because it’s an opportunity for you to reciprocate. I’m quite certain I’ve shared information that’s helped you, now it’s your turn to lay some great feedback and tips on me!

I Truly Need Your Help

It’s important for you to realize not only am I the founder of Ask the Builder but soon after starting my syndicated column in October of 1993, Stain Solver came to be in a most unusual way. Stain Solver is a certified organic multi-purpose cleaner. If something can get wet with water, you can use Stain Solver to clean it.

CLICK or TAP HERE to discover how Stain Solver resulted from a routine phone interview.

IMPORTANT NOTE: This is not some cheesy long-form sales letter to get you to buy Stain Solver. If you’re a business person, work in a business, are a business owner, and/or have a strong business background, please keep reading.

Have you made mistakes in life? I know I have, and I continue to make them each week! They’re teaching and discovery moments. One of my biggest mistakes looking back through the lens of time was not investing more of my time in the Stain Solver business. This mistake has caused Stain Solver to languish and just putter along like one of the kiddie cars at an amusement park. It’s a product that should be mainstream.

Looking back over the past twenty-seven years, I spent nearly 99.95 percent of my time nurturing the Ask the Builder business. If I could get a redo, I’d have split my time 40 percent in the Ask the Builder endeavor and 60 percent in the Stain Solver business. But that’s water over the dam.

This is why rear-view mirrors are small and windshields are big. Right now, I’m looking forward through the windshield and you can help me have a better view.

You may be a loyal customer who uses my Stain Solver to clean countless things around your home. You know it works better than any other cleaner you’ve ever used. I get testimonials week in and week out attesting to this.

Just last week, I talked with a woman who’s a professional property manager. We had a great conversation. She said, “Tim, please don’t stop making Stain Solver and for goodness sake, please don’t alter the formula. I’ve NEVER FOUND ANYTHING that works as well and I’ve tried every cleaner out there.

She then proceeded to share a story about how Stain Solver saved a very expensive quilt that a renter had ruined with spray-on tanning lotion.

I’ve sold Stain Solver for over twenty years to a giant corporation. They use it at the end of each workday to clean coffee and food spills in cubicles and carpeted hallways throughout their massive office buildings.

I sell Stain Solver to a large motel in West Virginia. The manager uses it to clean the hallway and room carpets as well as all their ceramic floor-tile grout. Oil-field contract workers stay in the motel Sunday-Thursday.

They come back to the rooms with their oil-soaked boots and clothes and you can imagine what the carpet looks like when they check out. CLICK or TAP HERE to see how well Stain Solver gets rid of oil! Be sure to read Georgia’s short story.

Restaurants buy Stain Solver to deep-clean all their cutlery overnight and to remove grease from all kitchen surfaces.

A giant school system in California buys Stain Solver because they want to use a certified organic cleaner around the kids.

I could go on and on and on about all the different businesses that use Stain Solver to clean things with dramatic results.

How You Can Help

I’ve got an ambitious goal of doubling or tripling the Stain Solver business in the next year. That may seem like insanity but it’s possible with your help.

You may be a homeowner who uses Stain Solver and I’m glad you do. Now it’s time to increase my sales to businesses. I feel I can achieve my sales goal faster going this route. But guess what, I could be wrong and you might be able to tell me why!

I need you to help me discover the best way to sell Stain Solver to more businesses. I’ve created a giant list in alphabetical order identifying lots of businesses that can use Stain Solver.

CLICK or TAP HERE to see if your business is on the list.

VERY IMPORTANT NOTE: All businesses can use Stain Solver. Remember, any surface that’s water washable, Stain Solver can deep clean better than any cleaner you now might use.

Wave Your Magic Wand

What I want to know is this: if you had a magic wand, what might be the fastest and easiest way to get Stain Solver in the hands of your business or OTHER businesses like yours? What are the challenges of trying to sell a cleaning product to your business?

Would you please do me a HUGE FAVOR and answer those questions and a few others about your business?

Imagine you’re on the Stain Solver Board of Directors and at a planning meeting discussing this ambitious plan! You've now got the floor and we all want to hear your ideas!

CLICK or TAP HERE to help me grow Stain Solver.

Thanks so much! I’ll report back and share some of the best suggestions.

Tim Carter
Founder - www.AsktheBuilder.com
World’s Best Cleaner - www.StainSolver.com
Generate Cool Waves - www.W3ATB.com

SHARP Steam Countertop Oven SSC0586DS

sharp steam countertop oven

SHARP Steam Countertop Oven | Look at that yummy soft pretzel surrounded by a halo of steam! CLICK or TAP HERE to purchase one.

SHARP Steam Countertop Oven - It's Compact & It Works

I've been testing the SHARP superheated steam countertop oven for about two months now. I have to say it's exceeded my expectations.

sharp steam countertop oven

This is it. Gleaming stainless steel and easy to operate. CLICK or TAP HERE to purchase one.

The first thing I cooked was a store-bought deluxe pizza. I was really interested to see if it would get the crust crispy. I have to say it was the best store-bought pizza I've ever had out of any oven. The suggested temperature and time settings were perfect.

sharp steam countertop oven

Here's the pizza I cooked. It's still got time to go as you can see on the control panel. The crust was PERFECT! Burp! CLICK or TAP HERE to purchase one.

Recently I heated up some soft pretzel prizes given to me by a dear friend. The Bake/Reheat mode along with the steam made the pretzels the absolute best I've ever had even at a carnival or arena. Be sure to melt some butter and brush it on the pretzel before you sprinkle the coarse salt on it if you want the true soft-pretzel experience. It was all I could do to NOT eat three of them at once creating a carb coma. They were that good!

This oven is very compact and it uses, on average, 25 percent LESS electricity than your normal 240-volt large oven. It's perfect for just about every small cooking or heating task.

Does it Really Cook With Steam?

Yes! The oven has this small water reservoir that is just below the control knob. You fill it with about 8 ounces of water to the fill line and when the oven is on, it converts this water to steam. It's perfect to make hot dog buns just like I used to use at Skyline Chili out of the steam bun warmers! The steam also helps keep other food moist.

How Many Cook Modes Does It Have?

The SHARP steam countertop oven has five handy cooking modes:

  • Broil/Grill
  • Bake/Reheat
  • Pizza
  • Warm
  • Toast

These modes have pre-programmed settings to choose from so you get perfect results depending on what you want the oven to do for you.

sharp steam countertop oven

This is how you make delicious food. Just spin the round knob and push those two buttons and a food coma is sure to happen! CLICK or TAP HERE to purchase one.

Was it Easy to Use?

The controls are very easy to use. You just turn the round knob to select the mode you want, push the SELECT button, and then rotate the knob again to select temperature and cooking times.

Is It Easy to Clean?

Yes, it's easy to keep clean if you just wipe it down after each use. Be sure it's cooled down! Read the owner's manual for the best practices with respect to cleaning.

What Else Comes With It?

A broiling pan and crisper tray are included.

What About the Technical Specs, Measurements, Etc?

Easy! CLICK or TAP HERE do get the skinny from SHARP.

The FTC requires me to share that SHARP sent me this oven at no charge to review. I'm a small operation and simply don't have the resources to purchase products and invest all the time to test and create reviews like this. SHARP did not pay me money to create this review and all of my observations and opinions above are factual. The only thing I'm unhappy about is this oven may derail my weight-loss program.

What Causes Etched Glasses in Dishwashers

drinking glass - no longer clear

What Causes Etched Glasses | This drinking glass of mine used to be crystal clear. Cascade dishwashing gel ruined it. This column was SO GOOD that I shared with the 31,000 subscribers who read my October 4, 2020 newsletter. Copyright 2020 Tim Carter

Author Update: Don't skip over the last paragraph below from Brad Booth.

What Causes Etched Glasses - It's Chelants & Cascade

QUESTION: Tim, please help me. I remember reading in past columns that you’re a master plumber and have some sort of science degree.

My husband and I are at odds as to what’s slowly ruining all of my wonderful clear glasses and heat-treated glass items in my kitchen. Each time I remove them from my dishwasher, they look worse. My husband states it’s just hard water.

I tried soaking some of the ruined things in hot white vinegar and there was no change. It’s got to be something else, but I can’t figure it out. Can you shed light on this? Sandra P., Las Vegas, NV

Are you suffering like Sandra? I am! The clear drinking glasses in my own home are slowly getting ruined just as Sandra described. Sandra’s correct that I’ve got lots of experience with dishwashers being a master plumber since age 29 and having worked in a commercial kitchen operating a powerful chili parlor dishwasher for over 12 years. A five-hour physical chemistry class was a requirement for my geology degree.

etched drinking glass next to a new clear one

The glass on the left is brand new. The one on the right is etched beyond repair. Proctor & Gamble's Cascade dishwashing soap is to blame. Photo credit: Tim Carter Copyright 2024

Is the Cause Hard Water?

Many years ago, I was first introduced to this strange conundrum by my mother-in-law. I was a brash young man and she showed me one of her ruined small drinking glasses. She asked me if I knew what was going on. “Sure, it’s just hard water deposits. Let me take it home and restore it.” I tried soaking it in white vinegar, a mild acid that has no trouble dissolving hard-water mineral deposits. There was no change. I then got out my toxic bottle of muriatic acid and tried it full strength. There was no change. I was flummoxed.

As time passed, I deduced the issue had to be with the actual dishwashing detergents - be they powders, gels, or pods. In all my years of washing glasses by hand, they never suffered from etching, so whatever was happening was happening inside the steel box with the thrashing water spray.

Automatic Dishwashing Soap Etches Glass

Last month I finally had it. I reached out to what I believe is the largest USA manufacturer of automatic dishwashing soap, Procter & Gamble (P&G). They make the Cascade product I use. Since I’m a member of the working media, they were kind enough to accommodate my press inquiry.

A senior scientist from P&G explained that a perfect glass-etching storm can happen inside a dishwasher if you have these four things: soft water, low soil load, high temperatures, and chelating agents. She went on to say, “Chelating agents, or chelants, are a major part of auto-dishwashing formulations because they form soluble complexes with calcium and other metal ions, enabling them to remove food soils and limescale, soften water, and boost hygienic cleaning action.” When you soften water as I do at my home, you remove the calcium from the water. Uh oh!

To prevent glass etching, she suggested not rinsing dishes and glasses, wash in shorter cycles, not using the pots-and-pans or sanitizing settings, and using a dishwashing product that contains zinc.

The bottom line, in my opinion, is that if you want your clear glass to remain clear, you better do what I had to do as a kid. Wash them all by hand with normal liquid dishwashing soap. Your other option is to just keep buying new glasses after they get etched should you not want to wash them by hand.

AUTHOR UPDATE: Brad Booth lives in Columbus, Ohio. After reading the above column he sent:

"I just read the problem about glasses clouding in the dishwasher by Sandra P., Las Vegas. Cascade IS THE PROBLEM! I had the same problem with glasses, even coating my dishwasher filter using Cascade. Switched to Finish Powerball nine years ago and NO problem anymore! I've had no clouding of glass at any setting, temperature, or heat dry! Also, the screen filter no longer gets coated and clogged with white substance! Try any product except Cascade and see if that helps you."

Here's the Finish Powerball product. You can bet I'll be trying it:

Finnish Powerball diswasher soap

CLICK or TAP HERE to have this delivered to your home. I DOUBT you'll find this at your grocery store.

Dishwasher Detergent Warning! Is your detergent harming your dishwasher? CLICK HERE to see what happened to my dishwasher.

Column 1371

Certificate of Occupancy NH

"The building code is not a set of recommendations. It’s a pass/fail document. Something either meets code or it doesn’t. There’s no gray area."

Certificate of Occupancy NH - Don't Issue Until All is OK

QUESTION 2: Tim, I’m at my wit's end. My builder thinks my new house is finished but there are numerous defects. He had the building inspector through and this government official issued a certificate of occupancy (CO). The builder says this is proof everything is okay. I know there are numerous items that are against the building code and I hired an engineering firm to produce a report to verify this. How would you settle this scrum? Meredith S., Windham, NH

Oh my, Meredith’s plight is oh so common! I receive identical emergency requests from homeowners all across the USA on my AsktheBuilder.com website each week. The problem is growing and it’s very troubling.

I’ve done expert witness work in situations like this for the past twenty years. The last case I was on had me crawling over the roof of the Brazilian ambassador’s house on the Caribbean island of Antigua. It was a mess!

As I see it, there are two problems in Meredith’s case. Let’s assume she’s correctly identified numerous code issues. If that’s the case, the building inspector that issued the certificate of occupancy has made a mistake. The building code is not a set of recommendations. It’s a pass/fail document. Something either meets code or it doesn’t. There’s no gray area.

The way I prevailed in all my past cases was to ignore quality issues for the most part and just stick with code violations. I’d go page-by-page through the code and any section that had a measurement requirement, I’d go measure that item in the house. I’d then take a photograph or two to prove that the item didn’t meet code.

What Are Examples of These Measurements?

Here are examples of parts of the building code that require measurement standards be met:

  • stair risers and treads - look for the minimum deviation in riser heights - check the top and bottom riser
  • handrail height
  • deck railing post connection method and strength - see below video
  • hallway width - often hallways are 1 inch less than the code requires
  • stair/step landing size
  • amount of foundation showing between soil, siding, or brick
  • amount of fall of the exterior soil away from the house in the first ten feet of horizontal run

There are quite a few other places in the building code that provide minimum and maximum measurements. Be sure every part of your home or project complies.

Does an Expert Need to Do This Measuring?

You don’t have to hire an expert to do this. You can read the code and take measurements. Be sure to take photographs of the flaws. It's best to assemble all of the flaws you discover in a simple spreadsheet you can share with the head building inspector. the columns might have headers such as:

  • Descriptive Code Section Heading
  • Actual Code Section Number
  • Phrase describing the flaw
  • Amount of measurement deviation
  • URL of photos - upload photos to the cloud allowing you to link to them

CLICK or TAP HERE to see an example of construction photos in the cloud.

How Can I Resolve This With the Building Department?

You need to create the list of known building code defects and document them as stated above. Schedule a meeting with the head building inspector and point out all the flaws. Demand that the CO be rescinded and not re-issued until such time as a follow-up inspection verifies everything in the house meets code.

Column 1371

September 13, 2020 AsktheBuilder Newsletter

I know, you’re a seasoned subscriber and you might be miffed that I devote this top spot to welcome new subscribers. Rest assured; I appreciate your loyalty! But if you’re a new subscriber in the past six days, welcome! I hope I can save you scads of money and time with tips you’ll find here.

Do you remember the video I recorded after I went on my virtual trip to Paris, France? I dove into their culture and came up out of the water with the strangest tip! CLICK or TAP HERE and watch this short video to see what it was, Oui’ oui’!

Repair a Shallow Blacktop Pothole

Several days ago, I recorded a new video for you. If you’ve got puddling on your blacktop, you should fill in the spots before they become giant holes.
Blacktop Epoxy Repair - Shallow Hole Repair

CLICK or TAP HERE to watch how I do it using a fantastic exterior epoxy and magic stones and sand.

An Uncomfortable Conversation

Frank and Kim Carmichael have me on their Happenings radio show as a guest usually once a month. I simply love being on the show because I never know what they’ll ask me.
Happenings Q&A Radio Show

Sometimes we don’t even talk about home improvement! I was on a few days ago and Kim was trying to figure out how to avoid having uncomfortable conversations with contractors who come over to quote a job.

She said, “Tim, if I mention that you or some other source said to do a job a certain way, I know the contractor will get offended and the conversation’s going to go off the rails. How can I be sure the job is going to be done the right way?

Kim’s right. Many of the contractors I know have fragile egos and if you challenge them with suggestions, methods, and products they might l recoil. It can be very ugly indeed.

I shared with Kim how I’d do it. As is often the case, it requires more work on your part, but it’s worth it unless you have more money than Jeff Bezos. Most of us don’t.

Step 1. Select ALL the fixtures and materials you’re going to use before you call a contractor.

Step 2. Get the installation instructions for the items and read them. Note the important steps or warnings.

Step 3. When you meet the contractor, show him or her photos of what you’ve selected and begin to ask questions that probe how the contractor plans to install the items. You want to see if he knows what he’s doing.

Here’s an example. You might have picked out a new front door. The instructions clearly call out for a specific flashing pan under the door to prevent wood rot. CLICK or TAP HERE to see one.

door flashing pan

So you might ask, “Can you tell me what you do to prevent wood rot under the door?

If the contractor doesn’t mention using a flashing pan, then you might say, “I watched a video online that showed using this flashing pan. What do you think of them? Have you used them before?

These are simple non-aggressive questions and any PRO contractor will not be offended.

The best contractor will answer that he’s used flashing pans and he might even ask you what you want him to do. If he does, you simply say, “Well, I’d like you to install the new door exactly as the written installation instructions say to do it.

This is not hard, and after all, it’s your money.

Burrowing

Trisha, from Hartford, WI, reached out to me. She asked:

I have an animal that burrowed under the sidewalk that is attached to my front porch. It's small, probably a chipmunk. Should I use polyurethane 2-part spray foam or use hydraulic cement to fill the void? There is no damage and no cracks to the sidewalk but I'd like to fill it before it becomes a problem.

My answer was:

Neither! Just mix up a slurry of sand and get it to flow into the hole as best you can. The two products you mention are overkill and a waste of money.

Now, that said, let’s imagine you WANT to burrow under a sidewalk to extend an electric line. Here’s how I do it:

cut pvc pipe

CLICK or TAP HERE to see how I use that huge hypodermic PVC needle. Be sure to SCROLL DOWN and watch the video of me using the needle. There’s NO BLOOD involved.

Roof Maxx Review

I wanted to re-share my review of a product you may see advertised on TV - Roof Maxx.

CLICK or TAP HERE and be sure to spend some time combing through the comments.

Gutter Guard Truth

I’ve been seeing a significant number of ads on TV at night for a gutter guard product. Ads like that cost vast sums of money and you pay for the ads when you buy the product.

micromesh gutter guard

I’ve done exhaustive testing over the years about which gutter guard design is the best. I have ones on my home here in NH that perform very well.

CLICK or TAP HERE and be SURE TO WATCH ALL THE VIDEOS on the page.

That’s more than enough for you to munch on for a Sunday.

Tim Carter
Founder - www.AsktheBuilder.com
SUPER Cleaner - www.StainSolver.com
NH Champ Skeeter Hunt - www.W3ATB.com

Do It Right, Not Over!

P.S. Have you ever seen a color photograph that is then rendered in black and white? Modern photo software will do this for you.

CLICK or TAP HERE and discover WHY YOU SHOULD BE DOING THIS with INTERIOR WALL PAINT!