Drill Powered Pump | This is an impressive drill powered pump. Always match the pump to the liquid you wish to transfer from one spot to another. CLICK or TAP HERE or the image to have this delivered to your home fast.
"A drill-powered pump is an excellent tool to use to AVOID sucking on a hose to start a gravity-powered siphon setup. Why get all that algae-filled water in your mouth?"
Drill Powered Pump - It Will Save You Time and Your Back
You may not have been aware of a drill powered pump. They are inexpensive tools that have so many uses. Here are a few:
empty an aquarium
drain an outdoor fish pond
remove backed-up water from a toilet
transfer water from a rain barrel
A drill-powered pump is an excellent tool to use to AVOID sucking on a hose to start a gravity-powered siphon setup. Why get all that algae-filled water in your mouth?
Some pumps come with common threads that match those on a standard garden hose.
This pump has garden hose threads. That makes it easy to connect. CLICK or TAP HERE or the image to have this delivered to your home.
Will They Pump Liquids Other Than Water?
Yes, some pumps will pump safely liquids other than water. Be VERY CAREFUL if you decide to pump anything flammable. The drill can create sparks and ignite fumes.
Is this your first real issue? Thanks for signing up! If you've lost count of how many AsktheBuilder.com newsletters you've opened, thanks for sticking around.
Kathy and I spent last week up in Bar Harbor. Kathy helped Meghan with the new grandchild, and Brent and I worked on the cast iron drain waste and vent piping. Evelyn Rose really did puff out quite a bit since we saw her the day after she was born.
Look what arrived at my house while Kathy and I were in Bar Harbor:
One hundred thousand subscribers is not too shabby. Have you been to my AsktheBuilder YouTube channel? Do you have a YouTube account? If so, I ask that you consider subscribing!
I'm not standing behind the plaque. That's a shiny mirror in the award. Pretty cool, huh?
FYI: I'm in the process of recording COUNTLESS videos at Meghan and Brent's new home. You get automatic notifications when I upload them if you have a YouTube account.
Do you live in New York City? I'll bet you've never really thought about why the land in the boroughs is shaped the way it is.
Are you going to NYC for a few days of recreation? I'll bet you had NO IDEA NYC has a rich geologic history and that it was covered with thousands of feet of ice just 15,000 years or so ago. Can you believe that?
Carpentry work like this is food for the soul and it can fill your bank account. (C) Copyright 2019 Tim Carter
Find a Vocation Not a Job
DEAR TIM: I’ve read your column for years. I’d like you to share your thoughts on encouraging a young person to learn a trade or skill rather than go to college. Can you share what you did when you were young and more importantly if you could have a do-over, what would you do differently? In other words, should I encourage my grandchildren to pursue a career doing what you and many others have done? Melissa J., Palm Beach, FL
DEAR MELISSA: What a shame my editor won’t gift me double or triple the allotted space for my column this week! I could write for quite some time about this topic. Grab a chair, a beverage, and sit back for a trip down memory lane. I think you’re going to be quite interested in what I have to say.
I’m convinced the tumblers for my dual careers were set at a very early age. I got both home repairs and journalism merit badges in Boy Scouts. I was the editor of my high school newspaper. In college, a very good friend and I worked weekends for a man that bought old houses and fixed them up. My college degree is in geology with a focus on groundwater and the surface of the Earth. I loved physics and chemistry in school.
If you blend all that together you get a very interesting foundation for careers in building, syndicated columnist, and Internet video personality. It’s important to realize that I feel success in life is rooted in attitude. Another key point is that I feel we need to start emphasizing the word vocation instead of the word job.
Many years ago young people entered into trade and stuck with it. It was their vocation. They took pride in what they did. I have crisp memories of doing remodeling work on houses and uncovered wall studs and roof rafters signed and dated by the carpenter that installed them. He had that much pride in his work! I always sign my work to this day and often attach a business card as well. I routinely create time capsules too for future remodelers to uncover.
I absolutely recommend that young people pursue a career in the trades. We need thousands of carpenters, electricians, plumbers, roofers, masons, etc. We’ll always need them. It’s never been easier to stay busy as the explosion of social media allows homeowners to rapidly and easily share the contact information of tradespeople that do the job right, not over.
The key to both personal and financial success lies in doing the job right. It’s not hard to achieve this as there are countless trade associations that publish the best practices on their websites. Manufacturers have the written installation instructions readily available with just a few taps on your smartphone.
A tradesperson that takes the time to do the job right makes more money for a number of reasons. First and foremost, there are rarely any service or warranty calls. Those are a giant suck on profits. Service calls also erode homeowner and customer trust. Those tradespeople that do the job right are in high demand. The average homeowner doesn’t want problems or callbacks. They can demand a higher wage and get it.
I discovered all of this early in my building career. As a result, I never spent one dollar on advertising yet I routinely had a nine-month backlog of work. My customers and their friends were willing to wait for me to show up because they knew their job would get done right with no problems.
It would be quite fascinating to go back in time. One of my biggest regrets is the lack of solid business education. I wish I could go back and substitute business classes for all the silly electives I took in college. At the time, I really didn’t think I’d own my own business. Business classes are available online so you don’t have to go to college to obtain this knowledge.
Business knowledge teaches young people the importance of risk vs. reward. Not all jobs are worth the trouble. It’s important to realize that some jobs should be avoided because they’re just too risky.
I also wish I had taken quite a few courses in psychology. When you have a grasp of this science, you can more easily recognize homeowners that might be problematic. The trade journals routinely have articles about these “customers from hell”. On the other hand, you’ll discover how to identify dream customers. I had many and am still friends with quite a few of my past customers.
I can tell you that several of my best subcontractors are my close friends. Most are simple people who are among the happiest people I’ve ever met. They don’t have scads of money, but they feel good about what they did each day on the job site and their integrity is the highest.
When you think about it, what is important in life? I can tell you it’s not money. It’s the satisfaction of doing a job right, having a great family and friends, and having customers that call you back.
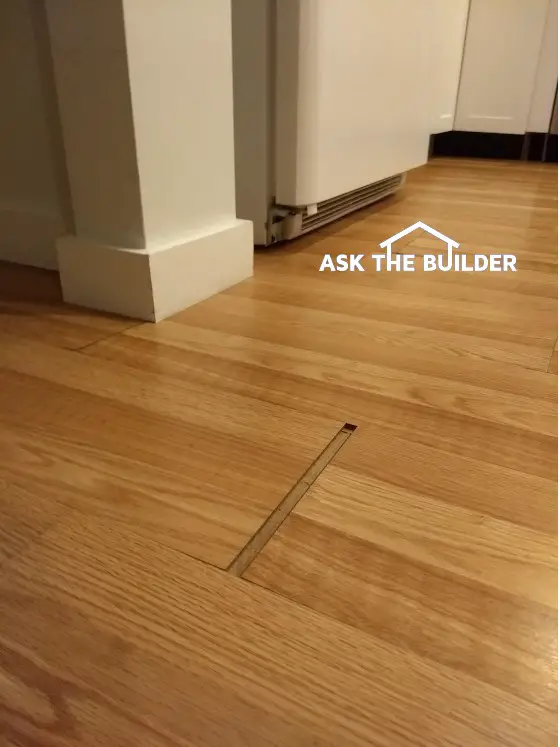
The gaps in this laminate floor come and go. The installer failed to read and follow the installation instructions. (C) Copyright 2019 Tim Carter
Creeping and Snapping Laminate Floor
QUESTION #1: Oh, Tim I need your help! A laminate floor in a friend’s house seems to be possessed. Overnight, gaps appear in the floor where one piece butts up against another. With some effort, you can slide them back tight again. When you walk across the floor in places it snaps and makes cracking sounds. What’s going on and can the floor be made to look and sound normal? What’s causing the issues in the first place? Roberta G., Eureka, UT
Does your laminate floor have a mind of its own like Roberta’s friend’s floor? Lately, I’m getting more and more emails from homeowners who suffer from the same problem. In all cases, the root cause of the problems is a failure to follow the written installation instructions provided by the laminate flooring manufacturer. Keep in mind that most laminate floors are floating floors that are meant to expand and contract to changes in humidity and temperature.
I clearly remember when laminate flooring was introduced to the marketplace. As with most products, the first generation products had a few bugs to squash. The laminate products have matured and my own office floor is covered with a stunning rustic oak v-grooved laminate floor that almost all visitors think is real wood.
My office floor looks as good as the day it was installed and it’s installed over an electric radiant floor heating mat. Radiant heating can cause gaps to appear as Roberta’s friend is experiencing. It’s imperative that you look at the instructions to see the maximum recommended temperature of the subfloor. One major manufacturer says to never exceed a temperature of 85 F. It’s not uncommon for the temperature of the water circulating through radiant floor tubing to be 120 F!
Heat causes laminate flooring to expand. This expansion is responsible for the gapping as the individual pieces of flooring start to expand at slightly different rates. When the radiant heat turns off because the room is warm enough, the flooring starts to contract as it cools. This back and forth movement can wreak havoc on a floating floor if it’s not installed correctly.
The snapping sounds are almost always traced to an uneven subfloor. Laminate flooring materials don’t tolerate humpy and bumpy subfloors. Subfloors need to be quite flat. Flat doesn’t necessarily mean level. You can have a nice flat subfloor that’s not level. The installation instructions call out how flat a subfloor must be. If a floor has too many humps or depressions, a filling compound needs to be used to get the floor flat.
Laminate flooring will snap and pop as you walk on it if it’s bridging across hollow spots under the flooring. Your weight stresses the interlocking tongues and grooves in the flooring causing the noise. It’s nearly impossible to stop this noise after a laminate floor is installed. You may have to start over to cure this defect.
Clogged Drain Line
QUESTION #2: Tim, I almost had a real mess on my hands yesterday. I couldn’t get a basement toilet to flush correctly and then heard bubbling and gurgling sounds in a shower stall next to the toilet. When I opened the shower door the basin was filled with disgusting colored water! A neighbor had a metal drain-cleaning flexible wire and was able to help me clear the line. I want to know what might have caused this wretched clog and how to prevent them in the future. Margaret T., Dublin, OH
I can feel Margaret’s pain and frustration! A year ago the exact same thing happened at my own home. A year before I had remodeled a basement bathroom and installed a very expensive brand-name toilet.
It turns out this toilet has two flushing settings depending on how long you hold down the flush handle. If there’s just liquid waste in the toilet you don’t need as much water for the flush. My son who was using this bathroom wasn’t holding down the handle long enough for the times when solid waste was in the toilet bowl.
I’ve been a master plumber since the age of 29. I have a personal beef with modern toilets as in many cases that small amount of water being released can’t always carry the waste and toilet paper all the way to the septic tank or city sewer connection.
Millions of people, including me, don’t have a water shortage. I have unlimited water from my private well and each time I use a gallon of water at my home a gallon of water is put right back into my aquifer as it flows out of my septic tank. The same happens in just about every major city as drinking water is extracted from rivers and the water homeowners use is dumped back into the same river downstream at the sewage treatment plant.
Cooking grease is also a common source of building drain clogs. It’s best to save lightly soiled paper towels and use those to sop up liquid grease in cooking pots and pans. Throw those grease-soaked towels in the garbage.
I now prevent unwanted clogs at my home by rapidly pouring two five-gallon buckets of water down a second-floor toilet once a week. I have a helper and we pour the water into the toilet at the same time making sure it doesn’t overflow the bowl. This massive amount of water creates a huge slug of energy and water in the building drain forcing solids out into my septic tank. You should do this same thing once a week to avoid clogs.
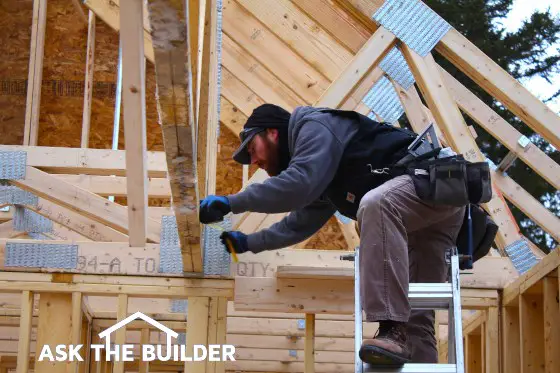
All of the exterior and interior walls of this house were made in a factory. The precision is remarkable. (C) Copyright 2019 Tim Carter
Factory-Built Walls
QUESTION #1:Hello, Tim. A new house being constructed near me was built using wood walls made in a factory. I was astonished that the house was under roof in just two days. What’s better, walls built on the job site by carpenters or those built in a factory? Can you get walls like this for a room addition or a separate outbuilding like a garage? Where do you find the places to order these things? Steve B., Akron, OH
You may have had a similar experience to Steve. Perhaps you’ve passed a huge tractor trailer on the highway that’s loaded with prefabricated walls. You may have seen some other houses get built in hours instead of days. No matter, you need to realize that prefabricated walls, both interior, and exterior, can be used on your next project.
Back when I was building I didn’t have the opportunity to use these magical building components, but they’re being used to construct my daughter’s new home right now. I witnessed the exterior walls of her home be set and secured in just a few hours. A standard carpentry crew could never achieve this task in the same amount of time cutting studs and headers and pounding nails at the job site.
The prefabricated wall panels go together like giant Lego blocks. They’re perfectly square from the factory and the precision is astounding. My daughter’s home was 44 feet long and the dimension was only off 1/16th of an inch. It’s possible that error was in my tape measure, not the wall panels!
There are countless advantages to using prefabricated wall panels. The walls are built in an enclosed factory so the material stays dry. High-tech computer programs are used to create the layouts and assist with the cutting of the material. Nails are driven exactly as engineering specifications call out. The walls can be delivered to the job site in the morning and the walls set by the end of the day.
The factory generates a plan for the carpenters in the field to set the panels. The panels arrive in stacks so the panels only need to be pulled off the pile and put into position. The carpenters don’t have to scratch their heads trying to find a panel. They’re erected in the reverse order that they were stacked on the delivery truck.
Builders and remodeling contractors are having increasing difficulty locating and hiring carpenters that treat what they do as a vocation instead of a job. If quality is important to you, then you’ll do whatever is possible to have prefabricated wall panels on your job.
The builder of my daughter’s home had only dealt with prefabricated panels on one previous job when he was a carpenter. After setting all of the exterior and interior walls that make up my daughter’s two-story home in just a few days he told me that he’ll never again stick build a house again. He was astonished at the amount of time the panels saved him.
Odds are any factory that makes these panels will gladly do smaller jobs for garages or room additions. You can find out for yourself by visiting a new website I discovered back in the fall: BestWayToFrame.com.
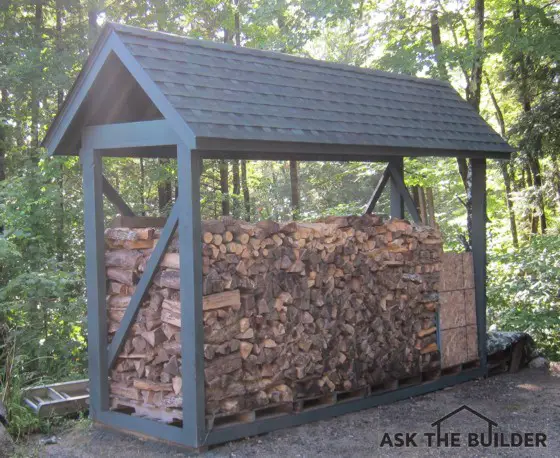
Firewood Storage
QUESTION #2:Mr. Tim, I just retired and I’d like to build a small structure to store firewood. My skills are limited as are my tools. What does success look like to you considering I’m going to do the work? Don’t sugarcoat it. If you feel I should hire a pro, just say so. Donna K., Boulder, CO
You might have the ambition that Donna’s exuding. I feel attitude is ninety percent, maybe more, of accomplishing anything including building a simple open shed for firewood.
There are countless designs for these firewood storage shelters out on the Internet. I’d pick one that you like and just replicate it. It’s important to realize that you look at a project like this as a few components. This reduces the mental challenge.
This firewood storage shelter matches the house perfectly. It was constructed in just a couple of days. Copyright 2019 Tim Carter
The simplest shelter might be a shed that’s 4 feet wide by 8 feet long. You can build the floor frame from treated lumber 2x6s that’s covered by a single sheet of treated plywood.
The walls can be built using standard 2x4s. There are countless videos on YouTube showing you how to build a simple wall. Be sure to watch a video that shows how to install a diagonal brace to keep the wall square. You don’t want to cover the sides of the wall completely with siding as you want air to move through the wood to help dry it.
The roof may be the biggest challenge, but once again, there are lots of online videos that will help you through this final challenge. You can get fancy with a gable roof or you can go with a simple low-slope roof that just slopes front to back. The key thing is to just keep the wood dry and it doesn’t take lots of ingenuity to accomplish this.
I can’t wait to see a photo of Donna’s finished wood shelter that she made with her own two hands!
You might be a brand new subscriber. WOOT and welcome!
All seasoned subscribers who have been here a while will most likely vouch that I might have had three cups of coffee too many as I create this newsletter. BWAHAHAHAHAHAHAHAAH!
But today's not one of those days. I'm actually sipping a nice hot mug of Bigelow's Orange & Spice tea as snow flakes flutter down from the sky.
Headed Back to MDI
Kathy and I are leaving to drive back up to Mt. Desert Island immediately after church this morning. Some natives up there say Mt. Dessert. That's the French pronunciation.
This past week the builder did get the garage trusses installed as well as the Grace Ice and Watershield over the garage. All the window and door openings are covered so it's bone dry inside now. I'm happy to report it's not a wretched wind tunnel inside either.
If you're a new subscriber, it's important to realize I'm NOT the builder on this job. I'm just an advisor, the plumber, the radiant burner man, and Sparky the electrician. I'll also be building a unicorn stable in the backyard, but that's not for at least a year or so.
There will be a very nice roof over the front door, but that can't be built until the front porch stoop is poured. That's at least a month away. We need warmer weather to do all the remaining concrete work.
Those tall trusses over the garage are just like the ones over the main house. There's now an 18-foot wide by 28-foot-wide room above the garage. The ceiling height in the room is over 9 feet!
It's just under five hours of drive time from my house to MDI. We get to hold our new granddaughter again. We'll all celebrate her third full week here on the rock on Tuesday.
Kathy's going to help out with Meghan while my son-in-law is going to help me finish up installing the cast iron drain waste and vent piping in their new home.
After that's complete, we'll install 900 aluminum radiant heating transfer plates on the underside of the wood subfloors. We purchased these from a FANTASTIC website you've probably never heard of: SupplyHouse.com
I'm getting all of the parts, manifolds, etc. for the combi modulating boiler as well as all the hot and cold water distribution manifolds from them. If you need plumbing, electrical, mechanical, thermostats, PEX and PEX parts, etc. this is the place to go. CLICK or TAP the above link to see all they have. It will BLOW YOU AWAY.
You can even buy a modulating combination boiler just like I have from SupplyHouse.com. I LOVE LOVE LOVE telling you about hidden gems like this.
Many More New Videos
Over the next two months, I hope to record at least 100 new videos. You're going to be overwhelmed, I hope, with the eye candy. I'm going to attempt to show just about every aspect of what's going on up in the new house.
SPOILER ALERT - Be sure you OPEN every issue of this newsletter moving forward and at least SCAN it for the new videos that I'll be telling you about. Each new video will be featured here in the newsletter.
That's enough for a Sunday. It's going to be frosty up on MDI this week. Do you want to know how I'll stay TOASTY WARM all day in single-digit WX? I thought so.
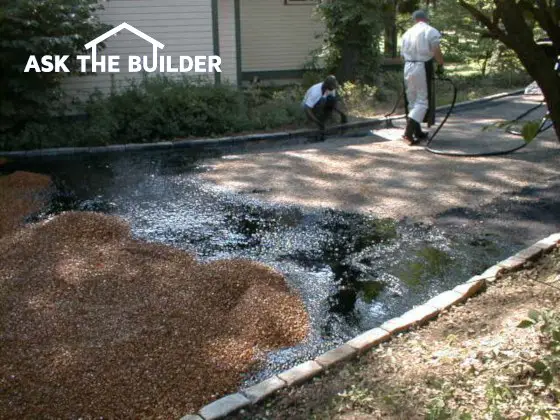
Look closely at the grout in between the patio tiles. You may feel like I do that it just needs a deep cleaning. (C) Copyright 2019 Tim Carter
Restore Patio Tile Grout
QUESTION #1:Tim, my outdoor deck is a concrete slab with gorgeous tile on it. The grout is a mess and I believe I have to replace it. The quotes to do this work took my breath away. How does one make the determination if the grout needs to be replaced? Is there an alternative to make the grout look presentable? What would you do if it were yours? Joan C., Santa Barbara, CA
Tile decks like Joan’s are very popular in places where you don’t get freezing weather. A little over a year ago I helped a friend of mine do some outdoor tile restoration work. He lives just about 100 miles east of Joan in Altadena, CA. A previous homeowner had decided to paint his Mexican tile. It was a mess!
The only reasons I’d think about going to all the work to replace tile grout is if it’s crumbling and falling apart. Grout can crumble if the installer added too much water when he mixed it, and/or he used too much water when he was wiping the grout to make the joints smooth.
Almost all outdoor grout for deck tile is sanded grout. The most basic sanded grouts are a mixture of fine silica sand, Portland cement, and dry pigments to give the grout color. Some grouts have other dry additives to give them more strength, but these are not needed if you install grout correctly.
Assuming the tile grout is in good shape but it looks deplorable, I’d perform a simple test first to see if I could get it to look like new. I’d deep clean a 3-foot by 3-foot area. There are several methods you can use to do this.
The simplest and cheapest method that produces outstanding results is to use an oxygen bleach solution. Oxygen bleach is a powder you mix with water. It’s non-toxic. It's best to use certified organic oxygen bleach and Stain Solver is the one I recommend.
Don’t confuse this with chlorine bleach sold in white jugs at the grocery store! Chlorine bleach is toxic to all nearby vegetation and it can, in some cases, remove the color from the grout.
You mix up the oxygen bleach solution, pour it onto the grout and tile, and allow it to work on its own for 30 minutes to an hour. Watch this video of me using Stain Solver to clean floor grout:
If the solution soaks into the grout, add more so there’s a standing layer of liquid. You’ll see countless tiny bubbles working to clean the grout. At the end of the waiting period, scrub the grout with a stiff scrub brush and rinse. Allow it to dry. It should look fantastic. If it’s not completely clean but looks much better, then do a second cleaning. The grout will look best when it dries in a few hours.
Stain Solver is MADE in the USA with USA ingredients that are food-grade quality. CLICK THE IMAGE to order some NOW.
You can also pressure wash the grout, but you have to be very careful as the pressure washer, if used improperly, can damage soft Mexican tile and/or the grout. Keep the nozzle of the wand at a very low angle, about 15 degrees, to the surface of the tile and grout.
Steam cleaning is yet another method that may restore the grout. I’d try all these things before I’d consider grinding out the grout and starting over. In almost all cases grout in good shape can be cleaned and made to look like new.
House Paint
QUESTION #2:Tim the Builder, can you give me some advice on the best house paint to use? Every brand says their paint is the best and it can be very confusing when trying to compare them. If I hired you to paint my house, what would you do to make the paint job last and last? Walt D., Rockdale, IL
I distinctly remember being placed in a trance by a savvy paint salesman many years ago. He was talking about the magical ingredients in the paint, how they’d perform, and why I shouldn’t go anywhere else.
It’s important to realize that paint is just a form of glue that has other ingredients and properties. Think about it, you apply paint to a surface and it’s supposed to stick to it. That’s what glues do - they stick to things.
As you might expect, there are all sorts of different glues and adhesives when it comes to paint formulation. The least expensive ones are vinyl acetate resins. Next up the ladder is 100-percent acrylic resin or glue. I’ve had the best success with urethane resins in house paint.
Urethane is a very sticky glue. You know this if you’ve ever applied clear urethane to wood. It grabs onto wood fibers and most other surfaces like a cat’s claws hook your sweater.
The first thing I always do before painting outside is to read the label on the paint can. I then follow the instructions to the letter. No matter what the label says, I always wash the outside of the house like I wash my truck. I use soapy water and rub the surfaces with a great brush I bought that’s used to clean RVs. I then rinse the house well.
The next step is to caulk all cracks and do any repair work. If there’s bare wood and the finish paint says to prime the spots, I do that. I never work in direct sunlight as that can dry the paint too fast.
Not-so-new? Thanks for staying on the list! I must be doing a few things right
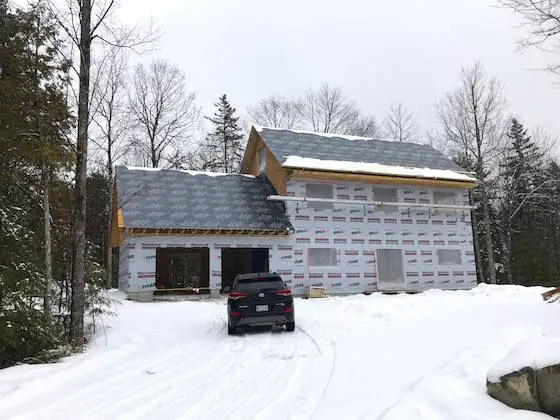
Mt. Desert Island House Update
Just after the new year, I shared that this newsletter would focus tightly on my daughter and son-in-law's new home up in Downeast Maine.
I'm not the builder of the home in case you're wondering.
My title is chief advisor, plumber, radiant burner man, and electrician. My editor, Dave Mulcahey, at the syndicate that distributes my weekly Ask the Builder column to over 60+ papers in the USA shared this observation with me today:
"I’m sure all this work is earning you undying filial gratitude."
I had to look that word up!
Here's a progress photo shot on January 31st. The weather turned brutally cold mid-January and just prior to that I was up there working for five days with no roof in place.
Earlier this week, the builder was able to get the trusses on the garage and I suspect that by today the sheathing on and it's fully covered with Grace Ice and Watershield.
There will be a giant room (future office, AirBnB rental, hobby space?) above the garage created by the same attic trusses that are on the main house.
While the house may look plain vanilla, its bones are anything but. All of the floors are built using full-span floor trusses. CLICK HERE to discover more about these must-have floor joists of sorts.
All the exterior and interior walls were built in a factory. The precision is FAR GREATER than anything any crew of rough carpenters could produce in the field. CLICK HERE to discover how you can have these wall panels at your next home or room addition.
The roof was made using attic trusses creating a massive room 18 feet wide by 43 feet long. A full-size staircase, not a wretched pull-down piece-of-crap staircase - leads up to this giant room. CLICK HERE to get more information about all the magical things you can create with pre-fabricated roof trusses.
I'm leaving on Sunday to go back up to re-start work on installing all the cast iron drain, waste, and vent lines. Then we'll start installing 900 heat transfer plates on the underside of the wood subfloors. Uponor PEX piping will snap into these plates to keep the floors toasty warm.
You're going to see all of this and much much much more on new videos I'm recording, so hang tight for those.
Oh, I want to mention one thing. It was brought to my attention by a mystery subscriber that the winder steps the builder created four weeks ago do not meet the current code.
Local building inspectors have the right to ignore or make more stringent parts of the national code. The builder is checking this week to see if the inspector is going to require the more modern winder steps. I'll have an update for you soon.
Here are links once more to the three most recent videos I recorded up there about twelve days ago:
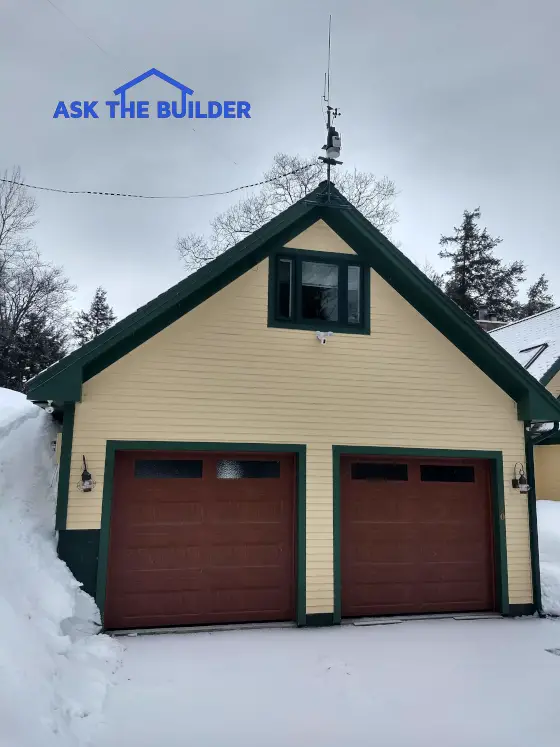
Detached Garage Ideas | This garage looks great, but it's not. It's too narrow. You can't get out of a car easily if you pull into the garage. The architect should have his license revoked. Copyright 2019 Tim Carter
"Detached garage ideas are like grains of sand on a beach. The most important one is to make your garage wide and deep."
Tim Carter | Founder - AsktheBuilder.com
Detached Garage Ideas - Bigger is Better Always
DEAR TIM: I bought a house with a dilapidated detached garage on it. It needs to be torn down. Now’s my chance to construct a superb garage that will be the talk of the neighborhood.
If you could wave a magic wand and create the best detached garage ever, what size would it be? I’ve got unlimited flat space and a healthy budget so don’t hold back with your suggestions. What other design features might you suggest? Stephanie G., Boise, ID
DEAR STEPHANIE: You’d be surprised how often folks ask me for detached garage ideas. The second house I owned had one. The house and garage were built in the early 1900s and the garage was in remarkably great condition. I know it’s still standing to this day. It’s a shame the previous owners allowed your garage to fall into disrepair.
It’s important to realize that poor planning is the most common reason for dissatisfaction with both detached garages and homes in general. I feel the root of the problem lies in the inability of most people to visualize the space once it’s complete. The second issue is if you look at an empty space, say in a model home or a business that sells garage packages, your brain thinks the unfilled void will be plenty big. The minimum size I’d make a detached garage is 26 feet deep by 38 feet wide.
You’re lucky that you have unlimited space, a substantial budget, and a nice flat spot to build. The first thing you should do is make a list of all the things you plan to put in the garage. I’m talking about all your landscape tools, mowers, snow blowers, motorcycles, etc. Give some thought if you want a nice workbench in the garage as well. You may even want a small bathroom and storage closet. Think big!
Don't forget paint colors! Look at this stunning paint job. Did you see the cupola too? Copyright 2019 Tim Carter
How Can I Create a Simple Plan?
Using some large-format graph paper, start to develop a draft plan of the space. Your challenge is to come up with a floor plan that allows you to store all the things you want out of the elements in such a way that you don’t crowd anything. The ideal garage is large enough so you can access anything without having to climb over or move something else.
How Wide Should Garage Doors Be?
Garage door openings should be no less than 9-feet wide and 8-feet tall. If you plan to have a full-size pickup truck, you’ll never regret having at least one door 10-feet wide. This allows you to pull the truck in without folding back one of the large side mirrors.
Be sure to create a 3-foot minimum space between two side-by-side garage doors. This allows you to open most car and truck doors fully without any fear of dinging a vehicle parked in the other garage bay.
How Far Should the Doors be from the Exterior Side Walls?
The distance from the edges of the garage door openings to the exterior walls should be a minimum of 5 feet. This distance allows you to store garbage cans and similar-sized things along a wall and still have enough space to open a car door to exit a vehicle without being cramped for space.
Can a Workbench Fit in a Garage?
The last garage I built for myself had plenty of space for a workbench because I added 10 extra feet of width to the garage between the one garage door and the exterior side wall. It seemed like far too much space at the time, but I came to find out it was perfect and allowed both a workbench along the wall as well as plenty of space for a table saw and a few other stationary tools.
What is a Great Ceiling Height?
The ceiling height in the garage should be given serious thought. Imagine having enough space to put in a loft that’s 6 feet 8 inches tall from the loft floor to the garage ceiling! You can have all sorts of extra storage up in a loft that’s along the back wall of the garage. You just need to make sure there’s enough headroom under the loft floor so you can walk around under it.
Can Special Roof Trusses Create More Space?
I’d also give serious thought to the roof trusses. At the very least, order storage trusses for even more bonus storage space. If you want a living, office, or hobby space above the garage, then order attic trusses. The steeper the pitch of the garage roof the larger a full-sized room can be inside the garage attic.
Can You Install Floor Drains in the Slab?
Plan for floor drains and shallow funnels under each vehicle parking space. Snowmelt and water dripping from cars coming in from the rain will not flow across the garage floor towards the doors if you do this. Floor drains in garages seem to have been kicked to the curb over the years and it’s a massive mistake in my opinion. Just ask anyone who’s garage door bottom seal has frozen to the floor in mid-winter because of meltwater that was trying to get outside!
How Much Electric Should Be Installed?
Don’t skimp on the electric service you extend to the structure. I’d put in no less than 240 volts and 100 amps. This gives you plenty of power if you might be using an electric welder or have other hungry power tools that might be used in the garage. You can put in much smaller service if you think you’ll never have these big tools.
Should the Floor Be Heated?
Radiant floor heat would be a delightful extra should you want to transform the garage into a workplace in the winter. You only get one chance to install the PEX tubing when you pour the concrete slab. Don’t forget to put in plenty of closed-cell foam insulation under the slab should you decide to heat it.
Every year at this time my biggest newsletter sponsor, LE Johnson, hosts a super fun game. Today is the day for the game. I GUARANTEE you'll have a smile on your face in a few minutes.
But before you start, I think you might enjoy this short story of how I came to know about LE Johnson and all the fantastic products they make.
We have to travel back in time to 1984 when I was building my first custom home for Mark. I'll never forget Kathy bringing our infant daughter Meghan to the job site on days to have lunch together.
The architect specified several pocket doors in the house and the lumber company brought these piece-of-crap door frames made from all lumber. I could tell right away that there was a good chance the thin wood slats would warp and then start to rub on the door sliding in and out of the pocket.
I sent them back and then went on a quest to find the BEST pocket door frames and hardware. I wanted a pocket door frame that would NOT warp. I wanted a pocket door where the trolleys supporting the door would NOT COME OFF the track.
It didn't take me long to find LE Johnson. After all, they started making amazing products when I was but six years old.
Fast forward to today and they've expanded their product line enormously.
They make the absolute BEST frames, rails, trolleys, etc. for all types of doors. My daughter Meghan and her husband are using some of their special full-open bi-fold door hardware on their new home. You'll soon see a video about these!
Would you like to have some FUN and see at the same time how you can transform one, or more, rooms at your home with LE Johnson products?
I thought so.
Here's the best part:
LE Johnson products recapture wasted space. They allow full access to closets. They make dull doorways DRAMATIC as MESMERIZING.
Let's have some FUN!
STEP ONE:
Please click all of these links and take a few moments to STUDY the photos.
CLICK HERE and answer the simple questions. Upon completion you'll receive a handsome certificate. I'm serious!
STEP THREE:
Sit back and savor your achievement! What did you think of those splendid photos?
If you like this newsletter, it's really important for you to participate in the game. LE Johnson makes it possible for me to invest the time each week creating the newsletter.
The best part of participating is that you'll walk away with at least one remodeling or design idea for sure. Some of the doors in the photos are UNBELIEVABLE.