Handy Hand Tools and Owner/Builder Mistake

Lufkin Shock Force Tape

You might not think a simple tape measure could be radically improved. You’d be wrong. (C) Copyright 2019 Tim Carter

Handy Hand Tools

QUESTION 1#: Tim, I’m sure you get to see new tools all the time. I’m curious if certain ones become your favorite or if you see vast improvements over older models. I want to create a set of simple hand tools for both my daughter and son who now live in their own homes. I figured you’d be a great source for a few fantastic hand tools. Janice T., Tampa, FL

Are you looking for great hand tools like Janice? Perhaps you’re just trying to replace some you already have. It’s important to realize that new hand tools appear in the marketplace each and every year. Keeping up with each and every release is a full-time job!

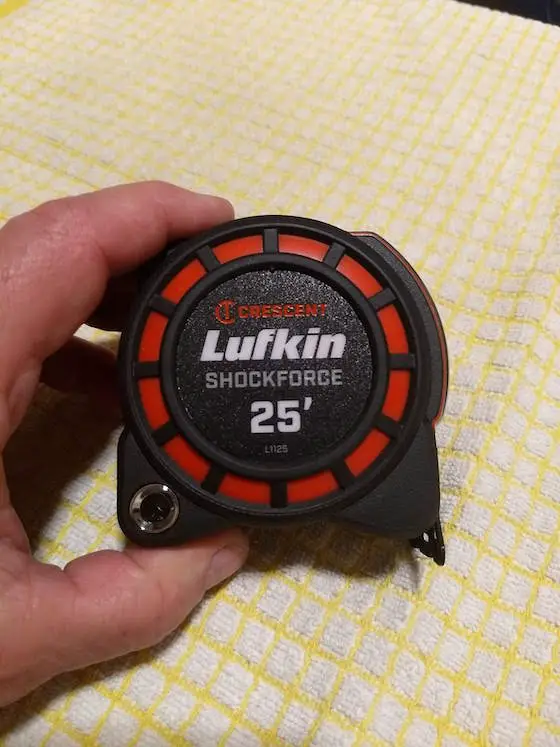
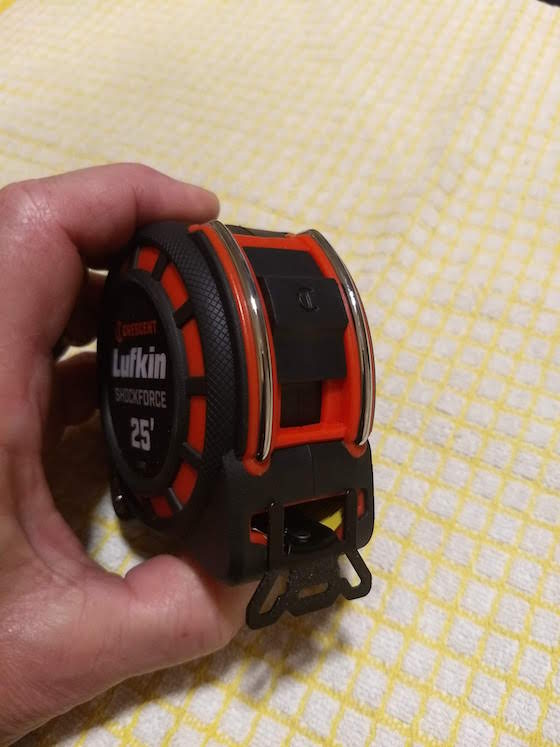
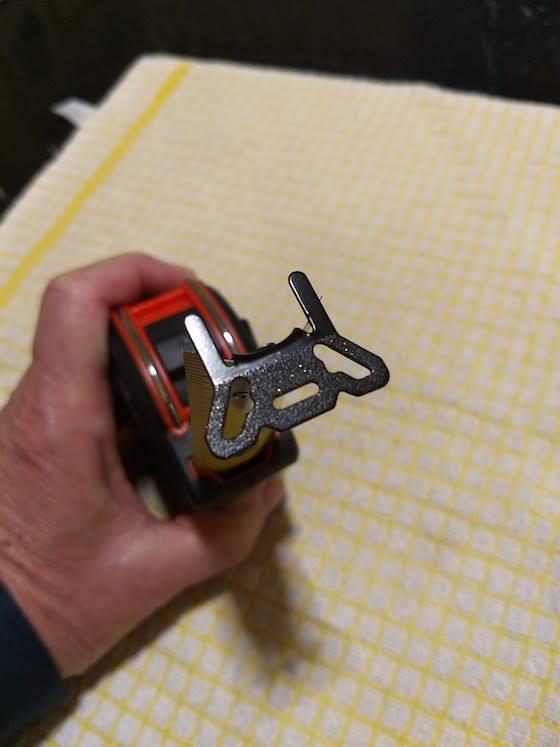
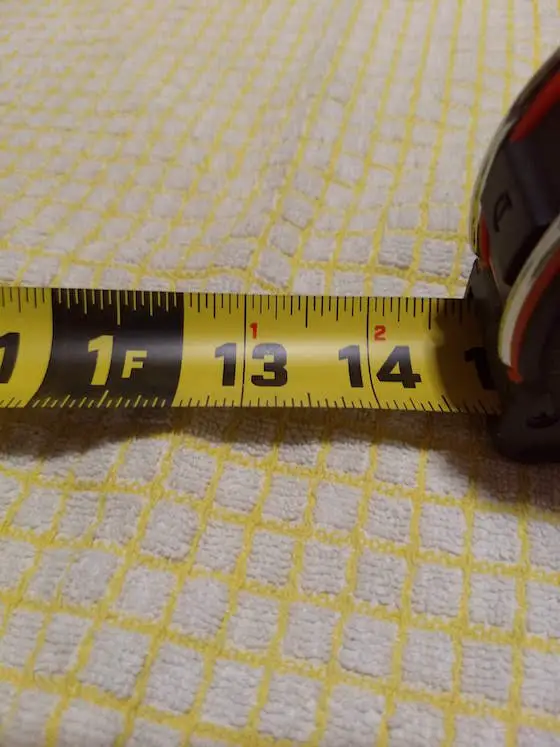
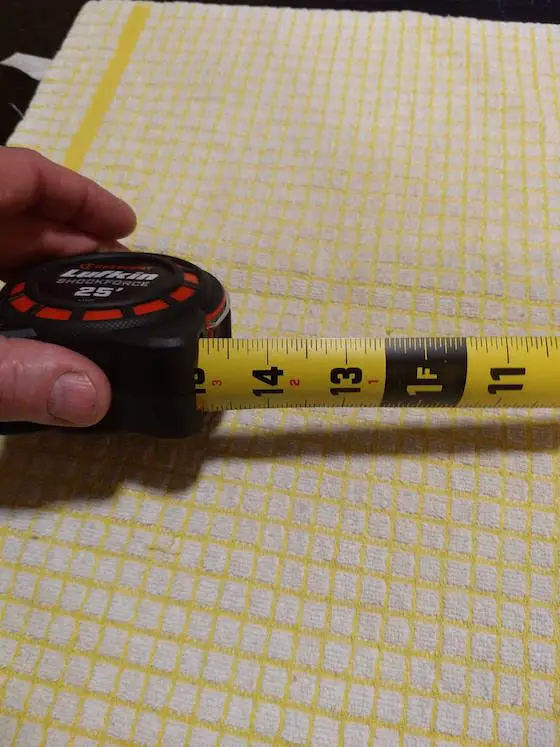
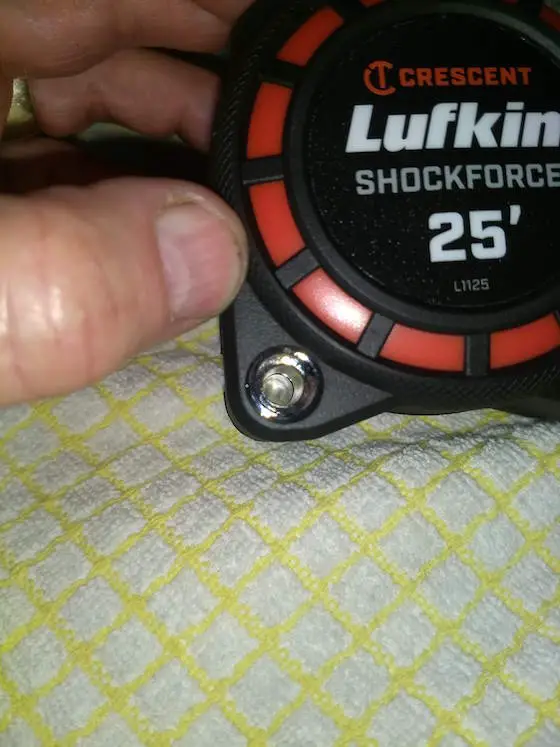
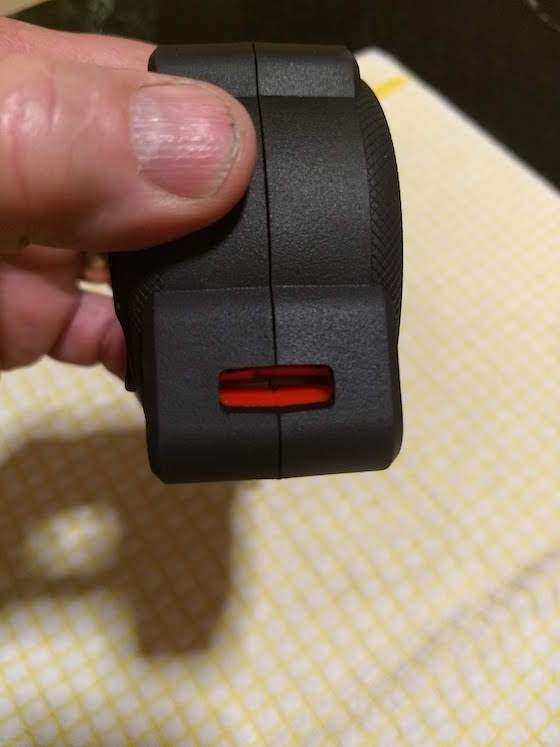
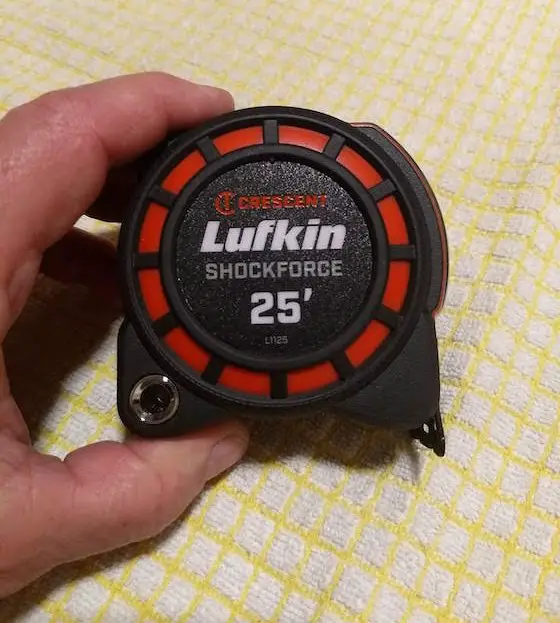
I have to admit it’s often hard to wow me when it comes to a new tool, but every now and then magic happens. Just two weeks ago two new tape measures put my head on a swivel. One would think it’s impossible to significantly improve a standard steel retractable tape measure. Think again.

This new tape measure had a blade hook that was coated on both sides with fine diamond grit. Every other tape I’ve owned had a shiny chrome hook that would slip off things you were trying to measure. The tape also had extra reinforcement ribs to protect it in case you drop it. Finally, it came with a hole in the lower left corner that allows you to transform it into a tool that will help you draw circles or ovals. It’s the new Lufkin Shockforce tape.

Screwdrivers are a must. I happen to gravitate to the screwdrivers that contain six or seven bits in the handle. This way you have multiple screwdrivers with assorted bits all in one tool. The screwdrivers like this that cost more money are usually the ones that perform best and will have the most comfortable fit in your hand.

Everyone needs a hammer, but most homeowners don’t realize they come in different weights. You need to match the hammer to the job. A 16-ounce hammer is probably the most common, but I typically use a 20-ounce one. The heavier the hammer the fewer blows are required to get the job done.

Drywall repair tools can be handy as it always seems a wall or ceiling requires some work. I discovered long ago it really pays to invest the extra money for stainless steel taping and broad knives. You can also get stainless steel mud pans. These tools, if cared for, will last for generations.

Tool storage should be high on your list. You want a nice box where you can store most of your tools so they’re protected and you know where to find them. Newer plastic boxes are a vast improvement over the old heavy steel boxes that would undoubtedly start to rust.

Owner/Builder Mistake

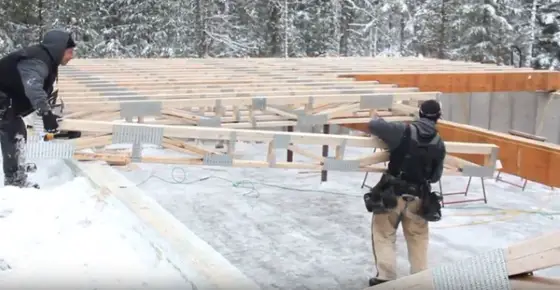
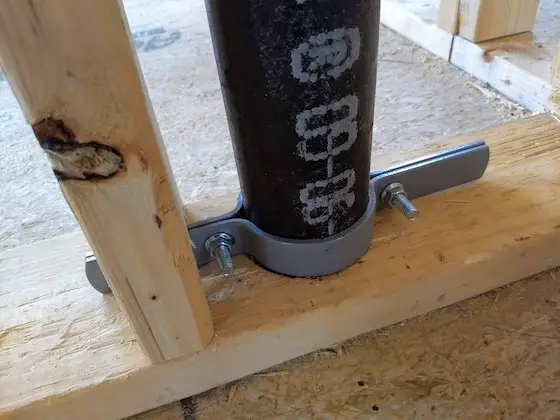
QUESTION #2: Tim, I’m an owner/builder of a new home. A few days ago an on-grade slab was poured. When I got to the job as the workers were finishing the concrete I noticed the plumber had put in the bathroom pipes on the wrong side of the house! I feel the plumber should pay to rip out all the concrete and redo everything the correct way. I think tearing into the concrete to move the pipes will harm the entire slab. What would you do if this was to be your home? Chris McC., Pelham, AL

concrete finish slab rough plumbing troweling machine

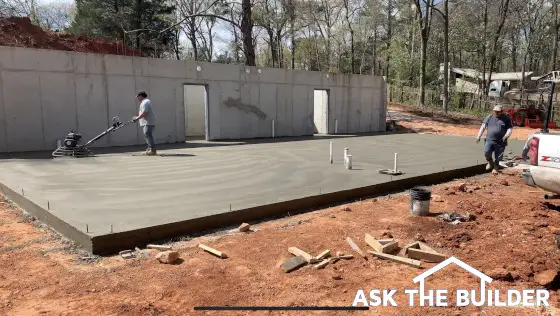
The white pipes sticking up out of the concrete floor are in the wrong location.

It’s never any fun to deliver tough-love answers. This happens to be one of those occasions. Let’s first discuss the concrete slab stability issue.

I would never rip out the entire slab. It’s an unreasonable request. The concrete slab can be cut all the way through with a large diamond wet saw that contractors often use to cut into roadways or other large slabs.

Once you make all the cut lines to create the space needed to relocate the pipes to the correct location, you jackhammer out the concrete between the cut lines. Because the saw cut all the way through the slab, the concrete that’s away from the pipes will not be affected by the pounding of the jackhammer.

After the new plumbing pipes are in and the fill material is compacted it’s time to pour the replacement concrete. I’d drill into the sides of the original slab with a 1/2-inch rotary hammer drill every 16 inches along the cut lines of the slab. Drill 3 or 4 inches deep and tap into the holes 8-inch-long pieces of 1/2-inch rebar. These pins will help lock the new concrete to the original pour. A great finisher can easily match the top surface of the concrete so it’s in the same plane as the original slab.

Now for the tough love. Chris bears 50% of the responsibility of the mistake. Yes, the plumber read the plans upside down, but Chris should have inspected the location of the pipes before the concrete was on its way to the job site. You can’t hope things are done right. Every aspect of the work done by the subcontractors needs to be checked by the builder before it’s covered up by something else.

March 24, 2019 AsktheBuilder Newsletter

Are you a newbie in the past week? Welcome aboard! If you're a subscriber of record in good standing, then you know I love and appreciate you too!

The Week of hePEX

This past week I started the installation of the special Uponor hePEX radiant heating tubing in my daughter and son-in-law's house up in Bar Harbor, Maine. I was pretty happy about it.

toasty warm floors

You're looking at the ceiling of the garage. The shiny strips are Uponor solid aluminum heat transfer plates. The tubing is 1/2-inch Uponor hePEX tubing that's looped through the plates in a very special pattern.

The hePEX is different from PEX tubing that you might used for potable hot and cold water in your home. The hePEX has a special barrier that prevents or minimizes oxygen from entering the tubing. This oxygen can cause rust in radiant heating system components.

I'm waiting on the builder to finish a punch list of interior carpentry items so we can move into the house to complete the PEX installation.

CLICK or TAP HERE to discover some other very important tips you should know about with respect to radiant floor heating.

The BrightOwl LED Battery Backup Night Light

Would you like an LED night light that:

  • sips power - 1.5 watts
  • STAYS ON if you have a power outage - up to 90 minutes
  • provides DOWN LIGHTING to floors
  • contains a switch to just work as an emergency light only
  • and more!

CLICK or TAP HERE to discover lots more about this amazing night light that I've had great success testing the past two weeks.

This night light takes the place of your regular outlet cover plate! It comes either standard configuration or the sleek Decora style.

BrightOwl Night Light
You can also CLICK or TAP HERE to watch a video I created about the BrightOwl Night Light.

Best Tape Measure EVER!

I get to review tools all the time. Every now and then one really astounds me.

Would you think it possible to RADICALLY improve the stogy retractable tape measure? I've seen manufacturers make all sorts of different designs and claims and been under impressed.

Not this time.
lufkin shockforce tape measure

I'm here to tell you after using countless tape measures for over 40 years this is the BEST ONE I've ever used.

Wait until you have one in your hands. CLICK or TAP HERE to discover WHY I fell in love with this tape.

This and That

This is a new feature in the newsletter.

Each week I answer lots of questions from homeowners like you. I'm going to condense them to tiny bite-size hoping you discover something new.

I also created a new product in the past few weeks and I'm getting lots of orders for it. This is where these homeowner questions are originating.

The new product is the VIP Fast Answer. Normally it can take me 10 days or more to work through the backlog of email I receive.

If you need an answer within hours or a day at most, I can do it for a small fee. CLICK or TAP HERE to see what is involved.

Chris's Plumber's Mistake

Chris needed a Fast Answer yesterday. He sent me this photo:
concrete finish slab rough plumbing troweling machine
See the white PVC pipes coming up through the slab? They're in the wrong place. Chris is the owner/builder of this house.

Chris wanted the plumber to completely remove the slab, put the pipes in the right place and then REPOUR the entire new slab.

I said that was unreasonable. The concrete can be cut with a giant wet diamond saw and you just remove what's needed to make the repair. You pin the new concrete to the existing concrete and all will be fine.

I also pointed out to Chris that he was 50% responsible for the error. Since he's the BUILDER, he was supposed to inspect the plumbing rough-in location BEFORE the concrete was poured. You don't HOPE things are right.

Rob's Rotting OSB Wall

Rob lives in Canada. His house has brick veneer outside. He noticed mold on an exterior wall. After removing the drywall and insulation he discovered the OSB sheathing is rotting.

He wanted to know what happened and how to ensure it NEVER happens again.

I answered Rob saying, "Rob, you need to read ALL OF MY Brick Veneer Leak columns."

Do you have a brick veneer home? Then you need to read them too.

CLICK or TAP HERE and you should see all of them in the search results page under the ads.

Non-Working or BROKEN Links

Each week you may be one that replies to me after I send this newsletter.

"Tim, the links in your newsletter are BROKEN. They don't work for me."

Here's what you need to know. The issue is 99.9999999999999999 percent of the time at your end or is an issue between you and my server.

The software I used to create this newsletter VALIDATES all the links I create. In other words, as I create the newsletter it TESTS the links to ensure I did it right.

There is the possibility that so many are hitting my server it's overworked. It's also possible my server has crashed. But both are a very tiny percentage.

If the links in this newsletter don't work for you try the following:

  • power down your device, let it rest for a minute, and power back on
  • try a different browser
  • try a different device
  • forward the newsletter to a friend and ask her/him to test the links
  • lead a more pure and simple life 🙂

That's enough for a Sunday. I think I'm going out to do outdoor ham radio after church today. It's going to be SUNNY and above 50 F here in central NH.

Tim Carter
Founder - www.AsktheBuilder.com
Certified Organic CLEAN MAN - www.StainSolver.com
Invisible Smiles - www.W3ATB.com

Do It Right, Not Over!

Lufkin Shockforce Tape

lufkin shockforce tape

Lufkin Shockforce Tape - This is a handsome tape and once you have it in your hand for just 30 seconds you'll NEVER USE another tape again. I guarantee it. CLICK or TAP HERE or the image to have one delivered to your home in days.

Lufkin Shockforce Tape - Stunning Innovations

The Lufkin Shockforce tape that I tested just a few days ago is by far the best tape measure I've ever used in my life. Three days prior I had been very frustrated at a job site using a standard tape. The highly polished chrome hook kept slipping off the tongue side of a piece of OSB. I know the Shockforce would have held tight. Why? Look at the photos below.

Lufkin Shockforce Tape Benefits

  • Survives 100-foot drop - Metal Guardrails
  • 14-foot Standout
  • Diamond Grit Coating Both Sides of 360-Degree Blade Hook
  • Nylon Blade Coating 5X Wear Lifespan
  • Two-Sided Blade Markings
  • Clever Radius or Oval Hole
  • High Visibility Nite Eye Model for Low Light Conditions
lufkin shockforce tape

The two chrome-plated steel bands protect the locking mechanism if you drop the Shockforce. CLICK or TAP HERE or the image to have this tape in your hands in days.

lufkin shockforce tape

See the shiny bits of diamond grit? It's on both sides of the blade hook. This blade hook will rarely slip when you hook it onto a stud or whatever as the blade is extended! CLICK or TAP HERE or the photo to have one delivered to your home by a special courier.

lufkin shockforce tape

The nylon-coated blade will last longer and it has crisp markings that are easy on the eyes. CLICK or TAP HERE or the photo to become the proud owner of a Lufkin Shockforce tape. Do it NOW.

lufkin shockforce tape

This is the UNDERSIDE of the Shockforce tape. The same clear markings are here and you'll be glad for it. CLICK or TAP HERE or the photo to have this tape magically appear in your home in days.

lufkin shockforce tape

This ingenious hole passes through the lower left corner of the tape. You can drive a 16d sinker nail through it to transform the tape to a circle or oval-making tool. CLICK or TAP HERE or the photo to have this tape before your job site nemesis gets one first.

lufkin shockforce tape

This is a slot that you slide a tether loop through. Have you ever seen this on another tape? CLICK or TAP HERE or the photo to get one BEFORE THEY SELL OUT!

lufkin shockforce tape

The black tape is the Nite Eye Shockforce. It's exactly what you need in low-light situations. CLICK or TAP HERE to get two of these tapes.

lufkin shockforce nite eye

This green logo tells you you've got the Nite Eye. CLICK or TAP HERE to get these before they stop making them.


Floor Truss Framing

Floor Truss Framing

Tim Carter demonstrates in a run-and-gun on-a-whim video how floor trusses save time and MONEY when installing pipes in a new home. More pictures and the story behind this video appeared in his March 31, 2019 AsktheBuilder Newsletter.

floor truss framing

Floor truss framing | See the giant void spaces in the floor trusses? You never have to spend time drilling a hole! Those aluminum plates are Uponor heat transfer plates. Uponor hePEX tubing will soon fill the channels. Look below at the next photo. Copyright 2019 Tim Carter

floor truss framing with Tim

Above me are floor trusses. See the Uponor hePEX tubing in the Uponor radiant heat transfer plates? No wonder I'm so happy! Copyright 2019 Tim Carter

Toasty Warm Floors

aluminum plates transfer heat

These high-quality aluminum plates transfer heat to the floors in your home. You’ll be snug as a bug in a rug. I got these Uponor heat transfer plates from www.SupplyHouse.com  This column was SO GOOD that I shared with the 31,000 subscribers who read my February 23, 2020 AsktheBuilder Newsletter. (C) Copyright 2019 Tim Carter

Warm Floors

DEAR TIM: It’s time to build our retirement home. The house will be in a four-season climate and I insist on it being as comfortable as possible when it’s cold outdoors. I’ve heard about radiant floor heat but always have had forced-air heat. What can you tell me about radiant floor heat? Is it really that good or is what I’m hearing all hype? Should I decide to do it, what are some of the tips and tricks to achieve maximum comfort? Elizabeth M., Mt. Desert, ME

DEAR ELIZABETH: Radiant floor and wall heating is by no means hype. In fact, it’s not hyped enough. It dates back to over 5,000 years ago as wise Chinese and Korean builders incorporated it into buildings. The Greeks and Romans also employed heated floors and walls.

I’ve been blessed to heat my own home for the past ten years with radiant heat. I have a combination of radiant floor heating in my walk-out basement and the rest of the house is heated with hot water that travels through baseboard radiators. Prior to that, I had stayed warm for fifty-five years like you with forced-air heat. It is luxurious heat, so much so I often lay on the basement floor.

Radiant heat takes advantage of the simple physics principle that heat travels to cold. The average human body just doing light or medium activity gets rid of about 400 BTU/hour. If you put yourself next to a cold surface or stand on a cold tile floor, the cold starts to suck the heat out of you at a faster rate and you feel the sensation of being cold.

This is why radiant heat is so magical because it tends to make floors and walls closer to the same temperature as your body. Eliminating moving air, as you have with forced-air systems, is also a benefit as the circulating air actually promotes evaporation of perspiration which makes you feel colder.

The topic of residential radiant floor heat is extremely complex. What you need to know are the basics so you have a system designed that’s going to spoil you with comfort. Let’s get started.

uponor hepex

This is an infrared photo showing the Uponor heat transfer plates and the Uponor hePEX tubing that keeps my feet toasty warm!

The first thing that needs to be done is an accurate heat-loss calculation on a room-by-room basis for your new home. There are all sorts of software products that will do this and it’s just a matter of adding measurements and data into a form.

The heat loss calculation allows the installer to design the system so you get the correct amount of heat into each room. I happen to be installing a top-of-the-line radiant heat system in my daughter’s new home frame home so all of this is quite topical right now.

The beauty of a radiant heating system is that you can divide your new home into heating zones with ease. Each zone has its own thermostat and in in-floor temperature sensor. This allows you to keep different zones at different temperatures during the day and night to save energy. My daughter’s home will have seven separate zones.

I’m using hePEX™ plastic tubing (see photo below with it in my hand) that snaps into solid aluminum heat transfer plates that are screwed to the underside of the wood subfloor. The plates are spaced at 8 inches on center for the most part. It’s important to realize you must use a special hePEX™ pipe that limits oxygen diffusion into the closed hydronic liquid part of the heating system.

I’ve had the best luck with the Uponor brand of hePEX™ piping and they make an hePEX(TM) product.

hepex uponor

This is 1/2-inch hePEX™ by Uponor. Uponor bought Wirsbo, but they continue to use that powerful brand name on the PEX. I purchase ALL of my PEX from a great online company - www.SupplyHouse.com Copyright 2019 Tim Carter

There are other PEX tubings that minimize oxygen diffusion into the system, but do your research and make sure you have the correct tubing installed at your home.

Many installers use 1/2-inch diameter PEX tubing, but 3/8-inch works just as well. It’s easier to install the smaller-diameter tubing.

The tubing is installed in a loop fashion under the flooring or in an insulated concrete slab. (WATCH my two videos above) The lengths of each loop should not exceed 300 total feet and the sweet spot, if you can achieve it, is about 220-240 feet.

A heating zone may require three, four, or more, loops. The ends of the PEX tubing feeding each loop are connected to manifolds. A secret tip to provide the best efficiency is to put the manifolds as close to each zone as possible. Many installers, unfortunately, put the manifolds down in the boiler room. You can hide these small manifolds behind access panels in closets near the zones.

Be sure to get the state-of-the-art recirculating pumps that use about 5 watts of power. Popular pumps used by many installers gobble up 70 watts of power. These low-wattage pumps are super smart and will save you lots on your electric bill.

Be sure to purchase a modulating combi boiler that only creates enough heat to fill the demand at that moment in time. CLICK or TAP HERE  to see the combi boiler I installed in my daughter's new house. Old boilers would be either on full blast or off. I have a new modulating boiler here in my home and my propane usage dropped significantly this winter.

March 17, 2019 AsktheBuilder Newsletter

New subscriber? Welcome! This issue may have you wondering what you've gotten yourself into, but hang in there for a week or three.

Subscriber of record? Get ready for a heaping dose of inspiration.

Heat Transfer Plates

I spent the entire week up in Bar Harbor, Maine working on my daughter and son-in-law's new home. We tried to install 900 Uponor heat transfer plates and just missed hitting that goal. Soon you'll see a video of these magical aluminum inventions. CLICK or TAP HERE to discover more about these plates.

heat transfer plates

The u-shaped channel in the center of each plate will soon have 1/2-inch hePEX tubing snapped into it. The water circulating through the tubing will be about 120 F. The aluminum will get that hot and transfer the heat to the wood subfloor above. The finished tile flooring above will end up about 80-85 F - so warm all you'll want to do is lay on the floor like a lizard all day.

I'm going to be recording LOTS of video explaining all the nuances of radiant floor heat, so hang tight for that. Yes, there will be 6 inches of fiberglass insulation pressing up against the hePEX and plates before the drywall is attached to the bottom of the floor trusses. This prevents the heat from radiating down instead of up.

What's Going on Here?

laminate floor gap

(C) Copyright 2019 Tim Carter

If you think you know the answer CLICK or TAP HERE to see if you're right.

If you have no clue what you're looking at, CLICK or TAP HERE to become enlightened!

Brent Hutchins - Living Inspiration

I met Brent Hutchins for the first time back in December when the builder was installing the floor trusses on top of the sill plates on my daughter and son-in-law's new home. It was a snowy windy day. CLICK or TAP HERE to discover more about floor trusses.

floor trusses on sill plates

Brent immediately impressed me as a friendly guy. He was like the Energizer Bunny and you'd never think he was the oldest member of the crew. Brent is 42 years old.

It's important to realize that just two days ago, I told Brent I was going to write about him in the newsletter. He said it was fine and even gave me permission to use his name. My original intention was to make him anonymous. You'll soon discover why.

Fast forward to this past Monday and Brent was working with my son-in-law Brent - yes, it gets confusing have two people on the job with the same name - helping to put in all those heat transfer plates. The builder allowed us to borrow Brent to speed up the construction process.

About twenty-five years ago, I interviewed the detective of the Amberley Village, Ohio police force. His name was Donald Clark. I lived in Amberley and the interview was done to get insight on what are the right questions to ask a contractor before hiring one.

I'll never forget one sentence that Don said early in the interview, "Tim, most people love to talk about themselves."

Brent Hutchins is one and he had a tale to tell! My son-in-law had been working side-by-side with him on Monday and I was not able to hear much because of the infernal racket made by the on-site electric generator that belched out sound all day like water gushing from a broken fire hydrant. Yes, I was wearing hearing protection and it still drove me nuts.

Over dinner on Monday night, I heard about Brent's life. He's a recovering drug addict and thief. He's been in prison twice. He's one of the invisible people you might hear about in the news when a story might appear on your radar screen about the opioid crisis.

Brent used to weigh close to 300 pounds. He had surgery to staple his stomach. His prescription pain killer started him down the dark pathway to heroin.

He's a stoic person, "I don't like asking for help and was convinced I could beat it." He was wrong. He was spending $300-$500 per week on heroin. He began breaking into houses to fuel the addiction. He got caught and was looking at ten years in prison.

Fortunately, he was able to enroll in a rehabilitation program and eventually a work-release program.

He's completely turned himself around. "When I got out of jail, I had no friends, no money, nothing."

Now he's got a great job, a wife, his own car, tons of tools, money in a savings account, he goes to church each Sunday, and above ALL ELSE - a contagious positive attitude.

I asked him on Friday morning, "Brent, what happened when you were at the bottom of the pit? What is it that made you turn yourself around and climb back up out of the morass?"

"Oh, that's simple. The day I was arrested the first time the officer, a high school buddy of mine, showed me the tear-stained complaint signed by my dad. I was arrested for stealing stored tires from his camp to sell for more heroin. He had hidden game cameras set up at the camp and he saw that I was the thief. That's how bad I was. Stealing from my own dad. Right then and there, I knew I had to beat this thing."

Rarely am I inspired by people, but this week was eye-opening for me. I say this because the opioid scourge is sending about 130 people a DAY up to Heaven. Brent has beat both the Devil and the Grim Reaper so far as he's been clean for three years.

I wanted to share Brent's story with you because you may be trying to overcome some challenge. With me it's ice cream, Peanut M&Ms and recently mini Reese's cups. You may have a battle with some other demon or substance.

Brent's story is evidence that you can overcome your struggle no matter what it is. Perhaps you know someone who's grappling with something. Share Brent's story of success. Hopefully it might spark her/him to break free of the bonds of addiction.

Brent's inspiring turnaround is what's going to get me back to the playing weight of 187 pounds. This is what I looked like I back in college when I played middle linebacker on the top intramural team at UC. That's me on the left in the photo.

Tim early construction site
Yep, that's me at about 187 pounds wearing pants with a 36-inch waist!

What goal are you going to set for yourself? I'd love to know.

College or a Vocation? Chose Wisely

Look at this photo for more inspiration. This is exactly what I was doing just 30 years ago and I had the same determined look on my face.

Construction Vocational Trainin

Are you constantly worried about getting screwed by a contractor? Are you fretting about if the work being done is shoddy?

Are you terrified you'll have to do the job over spending more money?

You're not alone. The general consensus is it's getting harder and harder to find a craftsperson that treats what they do each day as a vocation rather than just a job.

Millions of consumers are LOOKING FOR honest and knowledgeable tradespeople. When they FIND THEM, they HIRE THEM and SHARE their names far and wide.

CLICK or TAP HERE and read what I have to say about whether it's a better idea to skip college and head down a different career path.

That's enough for a Sunday. It's time to tie my bow tie for church.

I'll be leaving in the morning to drive up to Bar Harbor to work again for about ten days. If you live in Ellsworth or on MDI and want to get together for lunch next Saturday, you know what to do.

Did you discover ANYTHING in this issue that helped you? If so and you feel inclined to treat me to something HEALTHY, CLICK or TAP HERE.

Tim Carter
Founder - www.AsktheBuilder.com
Get Your Stuff CLEAN - www.StainSolver.com
Invisible Happiness - www.W3ATB.com

Do It Right, Not Over!

March 10, 2019 AsktheBuilder Newsletter

Are you a new subscriber? Welcome to my crazy world. If you've been observing me from afar for the past month or twenty-plus years, sit back and relax.

The Week of Cast Iron

I'm up in Bar Harbor, Maine, as I type this early today. The sky is just starting to brighten after the wretched switch to Daylight Savings Time.

I arrived here on Tuesday afternoon not wanting to drive through a wicked late-winter storm that dumped another 14 inches of fresh snow up here on Mt. Desert Island. Wednesday morning, I was at the job site by 7 am enduring a balmy 2 F temperature. The next three days were sunny but very very cold.

This was to be the week of cast iron. My son-in-law, Brent, and I were going to finish installing all the cast iron drain and waste lines in the new home he's going to share with my daughter and my one-month-old granddaughter.

cast iron lines
You're looking above at a giant 4 x 3 no-hub cast iron wye fitting. The 4-inch cast iron plumbing stack runs down to the crawlspace. A 3-inch stack goes out the top of the wye to the kid's second-floor bathroom and the second stack goes up to a future full-bathroom in the attic.

If you have the opportunity to build a new home and think you might expand the house, try to put in these future plumbing stacks now. Can you imagine how hard it is to do this after a house is built?

I've done it. It's expensive to do it after the fact and it's messy. You can save thousands of dollars by installing these stacks. Yesterday morning we installed a second future stack up into the attic trusses above the garage.

It took less than two hours to extend the stack up into each attic! It would take days of work to do this in the future counting all the patching and painting that would be required.

CLICK OR TAP HERE to SEE MORE PHOTOS of what we did and to read more about the benefits of cast iron plumbing stacks.

My Aching Back

Two weeks ago, I was up here with my wife Kathy. She helped Meghan with the new darling infant while Brent and I re-started up the installation of the plumbing. We had started the job back the first week of January and took it as far as we could in four days waiting for the builder to get the roof on the house.

Twelve days ago, I must have wrenched my lower back or re-aggravated an old injury. When Kathy and I got home about nine days ago, my lower back started to ache.

Last weekend, it got worse and it really flared up this past Thursday as we wrestled with the giant pieces of cast iron. Contorting my body up in the floor trusses and trying to balance walking around on the glare ice surely didn't help matters.

The Appointment

When we came back for lunch on Friday, Meghan saw I could barely walk. "Dad, let me schedule an appointment with a deep-tissue massage professional for you on Saturday." I resisted at first, but agreed it was probably the best thing to do.

It's important to realize that back in the fall my loving daughter and son-in-law purchased a ten-session rolfing experience for me. It just so happens one of the top rolfing experts in the USA, Kevin Frank, lives about six miles from me in central NH!

What is rolfing? CLICK OR TAP HERE to discover more about this little-known healing methodology.

Years ago, I fell off two roofs as a builder and survived. Nothing broke but both times I landed on my left side. My left hip pain was getting worse by the week and Meghan told me that rolfing might help.

The first rolfing session with Kevin ELIMINATED my hip pain. It was as if I had been dipped in magic waters. I became an instant believer in rolfing and deep massage of fascial tissue that surrounds muscles.

Yesterday I was in a treatment room of Massage Bar Harbor. Minutes before I had gingerly slid down out of my truck and hobbled across the parking lot trying to hide my pain.

Ms. Jen Macri, a highly trained professional, greeted me at the door and knew I was hurting. She asked if I could make it up a simple flight of steps to the treatment room. "Sure, I'll get up there one way or another," I replied.

Jen asked me a bunch of questions regarding what hurt and what might have caused it. She then explained that it's quite possible two, or more, fascial tissue layers had welded together when they should be sliding past one another. She also mentioned that there could be several other reasons for my discomfort.

"I'm going to do a deep-tissue massage and try to locate all your problem areas. It's possible I may have to use some acupuncture to relieve muscles that are spasming," she commented.

"I trust you. Feel free to do whatever you think might end the agony," I replied.

Past Problems

When I was 18, I injured my back moving an overloaded wheelbarrow filled with concrete. I caused a disc in my upper back to partially rupture.

Within 30 seconds of starting the treatment, Jen found it. "Oh my, what happened here?" I explained as she tried to sooth that part of my back.

The more she pressed all around my back the more bound-up muscles she discovered. Some she was able to release but others fought her.

"I'd like to use acupuncture to release some pesky muscles. Is that okay with you?"

"Do it. I've no fear of needles as I have my own 16-gauge monster needle I use to extract splinters."

I had always been interested in acupuncture but had never tried it. Jen had to insert, I think, at least four different needles to release muscles. I never felt the needles go in. I was astonished.

I was even more astounded as I FELT the muscles immediately relax.

The one-hour session ended and as each minute passed I felt better and better. By the time I got back to the house, I felt like a new man.

Jen suggested drinking more water, taking a magnesium supplement, and a few simple exercises to help heal faster.

I'm going back to see her on Wednesday for a full-blown acupuncture session as she indicated I've got quite a few areas that need attention.

The moral of the story is:

Don't kick to the curb other forms of treatment for your aches and pains. Rather than go under the knife to have a hip replaced, why not invest an hour and $150 in a rolfing session or deep-tissue massage to see if it works?

This coming week we'll be installing the aluminum Uponor heat transfer plates for the radiant under-floor heating system. Yes, I'll have photos and video for you soon, so be calm my Padawans.

The forecast is for much warmer weather this coming week and I plan to shoot quite a few new videos. I hope to have a few ready for your viewing pleasure next week.

That's enough for a Sunday. More snow is forecast for here today. The sky was glowing red just 30 minutes ago so the old sailors' adage must be true!

Tim Carter
Founder - www.AsktheBuilder.com
Get Certified Organic Clean - www.StainSolver.com
Happiness Can Be Invisible - www.W3ATB.com

Do It Right, Not Over!

Cast Iron Plumbing Stack

cast iron plumbing stack

Cast Iron Plumbing Stack | Here's a 4-inch no-hub cast iron plumbing stack that branches off to two different full bathrooms. I installed this in a Bar Harbor home in 2019. Copyright 2019 Tim Carter

"A cast iron plumbing stack is a thing of beauty, especially if it's the sleek newer no-hub cast iron." Tim Carter - Founder, AsktheBuilder.com

This article was featured as "The Week Of Cast Iron" in Tim's March 10, 2019 AsktheBuilder Newsletter.

Cast Iron Plumbing Stack - Quiet and Strong

Cast iron plumbing is still available and it's better than ever. The wall thickness of a cast iron plumbing stack is now consistent with modern spun-casting manufacturing methods.

You can have a plumber install a cast iron plumbing stack in your home. Here are a few benefits:

  • cast iron is quiet - you'll not hear water rushing down a wall or across a ceiling
  • cast iron is fireproof - PVC creates a toxic deadly gas when it burns
  • cast iron is immune from leaks caused by errant carpentry nails
cast iron plumbing stack

This is a first-class cast iron plumbing installation. Modern no-hub cast iron is being used. Copyright 2019 Tim Carter

How Are the Joints Sealed?

Modern no-hub cast iron relies on ingenious no-hub couplings that combine a durable rubber collar with a full-size stainless-steel band clamp. When the two bolts on the band clamp are tightened to around 60 pounds of torque, they squeeze the rubber against the outer walls of the cast iron creating a water and gas leak-proof joint.

Watch this video to see these no-hub clamps:

How is Cast Iron Supported?

Vertical cast iron plumbing stacks transfer the weight to the floor using a simple riser clamp. The clamp tightens around the pipe and the strong metal legs spread out the weight onto the nearby floor.

riser clamp

This is a riser clamp. When you tighten the two large bolts, it grabs onto the cast iron pipe like an eagle's talons grip a large tasty 8-pound bass it just scooped from Long Pond in Acadia National Park. Copyright 2019 Tim Carter

Horizontal runs of cast iron pipe are supported by clevis hangers that cradle the pipe. A threaded rod with washers and nuts on each end are used to connect the hangers to the ceiling above.

You can also rest cast iron pipe on strong wood blocking if it runs through floor trusses as you see in this photo:

cast iron plumbing stack

This cast iron stack is going to collect all the waste and drain water from a master bedroom in my daughter's home. Copyright 2019 Tim Carter

How Do You Cut Cast Iron?

I cut cast iron pipe using an electric cutoff saw equipped with a special carbide blade.

cut cast iron

This is a special carbide blade that fits into a standard chop saw. It cuts right through cast iron. The red arrow points to the small chunks of carbide. CLICK on the image to have this blade delivered to your home.

Is Cast Iron Expensive?

Cast iron is more expensive than the modern foam-core PVC pipe. It's important to realize you don't have to install cast iron throughout your home. Each vertical cast iron plumbing stack that has toilet water in it can be cast iron as well as and horizontal 3-inch pipes in ceilings.

All other plumbing drain, waste, and vent lines can be PVC.

How Does PVC Connect to Cast Iron?

You use simple PVC no-hub adapters to transition between cast iron and PVC pipe.

cast iron plumbing stack

This cast iron is so beautiful the plumber (me) is trying to convince the homeowner of using clear plexiglass as the ceiling so all can see it forever. Copyright 2019 Tim Carter