April 26, 2019 AsktheBuilder Newsletter

Are you a new subscriber? Howdy! Strap yourself in.

Are you a subscriber of record in good standing? You should be quite happy with this issue.

What's in This Issue:

  • Free Color Scheme eBook
  • Flushable Wipes DANGER
  • High-Strength DIY Concrete
  • and Much More

New House Update

I'm up in my office here in New Hampshire as I compose this newsletter today. I got back on Monday night after spending about 34 straight days up in Bar Harbor, Maine.

I've been helping my daughter and son-in-law build their new home. My contributions center around general advice and installing all the plumbing, radiant heat, and electrical. NOTE: I'm not the builder - that's some other guy.

I worked 28.5 days out of the first 30 averaging about 9 hours a day. I did take off Easter weekend but found myself doing planning paperwork for the next phase of work.

My son-in-law and I got a tremendous amount of work done during those twenty-eight+ days enduring bitter cold and 8 inches of new snow about two weeks ago. The day-in day-out work beat us to death physically and mentally. I needed a mental-health respite as did he. That explains why I came back home. I'll be going back up on Sunday afternoon.

This past Monday morning I had a great meeting with Paul Tibbits at the new house. He's the New England factory rep for Noritz. I'm installing a fantastic Noritz modulating combi boiler in the house. Paul and I went over all the details to ensure the combi boiler performs with maximum efficiency.
Noritz modulating combi boiler

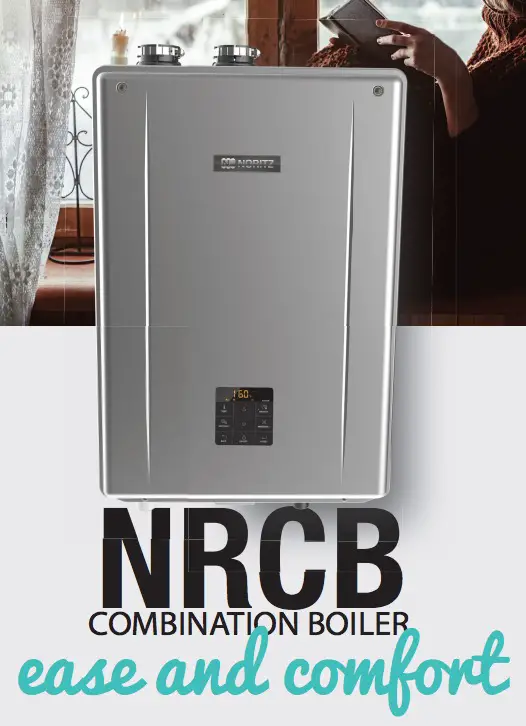
A modulating boiler is one that has a burner that operates much like a burner on your stove. You can adjust the burner to simmer foods or you can turn the knob to get a full flame to boil water fast. Modulating combi boilers do the same. The burner puts out just enough flame to satisfy the demand. This technology saves energy and fuel.

A combi boiler is one that heats the entire house AND it also acts as the domestic water heater. In other words, it's an on-demand tankless water heater as well as a boiler.

My daughter, son-in-law, and new granddaughter will have endless hot water so long as they have propane in the outdoor tank.

I installed a combi boiler here at my own home back in the early winter. CLICK or TAP HERE to watch a quick video showing you what they look like.

CLICK or TAP HERE to get more information about this sensational boiler/hot water heater.

You may have been a subscriber here for ages and know that in past columns at my website I've cautioned against buying tankless water heaters. CLICK or TAP HERE to read why switching out your existing storage tank water heater might not be such a great idea if you're looking to SAVE MONEY right away.

But if you're building a NEW HOME, a tankless water heater may be a brilliant idea. It's all about recapturing your investment when you switch out an existing water heater.

Free Color Scheme eBook

Have you struggled with exterior colors on your brick or stone home? Suffer no more!

CLICK or TAP HERE to download a FREE Ebook from Davinci Roofscapes.

Flushable Wipes Sewer Clog DANGER

One of my subscribers - he's been getting this newsletter for almost twenty years! - emailed me about a problem at his house. He had asked me for some advice on wax gaskets for toilets. About a week after I had given his some help, I emailed him asking what happened. Here's his response:

"After doing a great job on the wax rings, the toilet was still clogged. No surprise since I'd never done anything to fix it. When I tried to plunge it water backed up into the nearby bath tub, so I assumed the clog was deeper than I could get with a short toilet snake. I had too much work to do so I called a plumber. He was able to snake the line through the tub. It took awhile because the clog was 25 FEET AWAY, which I estimate may be where the line makes it to the slab.

The culprit was "Flushable" wipes. They're apparently all the rage, even Howard Stern raves about them. Well, the plumber pulled out a large pile of them.

They are flushable only in the sense that they make it past your toilet, but the plumber says they do not decompose and tend to float so he's seen them make it partway through a house's system and then float back up toward the kitchen to cause a problem there!"

This is a great story because I feel the manufacturers of these products are only telling a half-truth.

Yes, you can flush the wipes. You can also flush small plastic army men, plastic dinosaurs, golf balls, sand, gravel, underwear, cell phones, etc. down a toilet.

Is it a GOOD IDEA to flush all those things? NO!!!!!!!

Have you ever noticed what happens if you take a piece of toilet paper, get it wet and try to rub a counter or anything else with it? It rapidly disintegrates. It's designed that way for a reason.

Do the same with a high-quality paper towel. The paper towel holds together. Flushable wipes are stronger than great paper towels.

Only flush toilet paper and body waste down toilets. PERIOD.

Great DIY High-Strength Concrete

CLICK or TAP HERE if you're about to do some concrete repair work at your home. I've got a ton of tips for you in many past columns. Scroll down PAST the ads you'll first see to get to all the wonderful money and time-saving tips.

When you get ready to mix up some new concrete, check out Quikrete's new/newer Q-Max Concrete in a bag.
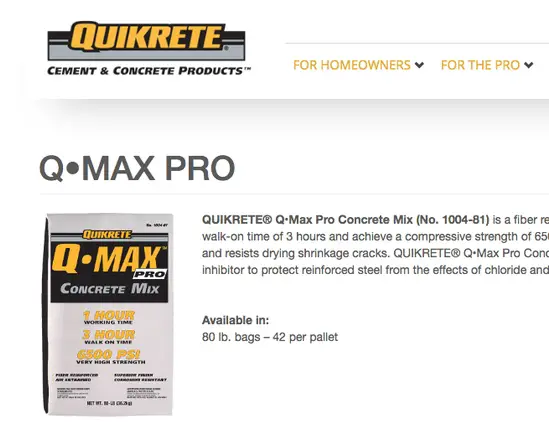
Quikrete Q-Max Pro
Q-MAX Concrete has:

  • one-hour working time
  • three-hour walk-on time
  • fiber-reinforced
  • 6,500 PSI strength

That LAST bullet point should get your attention. 6,500 PSI is very high strength and that amount of Portland cement in the mix allows the concrete to resist damage from ice, snow and deicing salts.

BE SURE to READ a few of my columns about the best way to finish the concrete so you maintain that high strength. CLICK or TAP HERE.

Massive Stain Solver Newsletter

This Sunday as I'm driving back up to Bar Harbor, you'll be receiving the next issue of this newsletter.

It's going to be devoted entirely to Stain Solver - a magic Certified Organic multi-purpose cleaner.

Kathy and I own Stain Solver. We've owned it for twenty-four years. We started the company.

You may be one of our tens of thousands of satisfied REPEAT customers.

If you've not yet tried Stain Solver, we're having our huge spring sale starting Sunday. You'll be stunned by all the things Stain Solver can clean.

Kathy and I also NEED YOUR HELP.

You'll discover why on Sunday.

I need to go get a haircut. More good stuff on Sunday.

Tim Carter
Founder - www.AsktheBuilder.com
Certified Organic CLEAN MAN - www.StainSolver.com
Happiness Comes in Waves - www.W3ATB.com

Do It Right, Not Over!

3 and 4 Way Switch Wiring – A Caveman Can Do It

3 and 4way switch wiring

3 and 4 Way Switch Wiring | Six different three and four-way switches will be installed here once the house is complete. The wiring looks complex, but it’s not. That's 12-gauge wire serving all switches. Don't use crap 14-gauge wire when 12-gauge costs just pennies more per foot, silly! (C) Copyright 2021 Tim Carter

3 and 4 Way Switch Wiring for Dummies - You're Not One!

QUESTION #1: Tim, I need you to mediate a dispute between my husband and me. We’re building a new home and there are quite a few places where two, or more, switches can be used to control lights. I like the convenience but my husband has had nothing but problems trying to troubleshoot these three and four-way switches. He wants nothing to do with these ‘wretched switches’ as he refers to them. Your vote will decide the issue. I have to add that pecan pie and moist pumpkin bread are two of the favorite things I like to bake. Veronica B., Lakeland, FL

CLICK or TAP HERE for FREE BIDS from local electricians if you're deathly afraid of electricity.

There’s no need for Veronica to bribe me with two of my favorite desserts as I’m a huge fan of three and four-way switches. I wish I could meet the engineer who many years ago figured out how to make these magnificent switches that allow you to control a light, or group of lights, from multiple locations.

Wire a 3 Way Switch - Watch

Where Do You Find 3 Way Switches?

The most common uses for these switches are at the top and bottom of staircases or at the ends of a long hallway. When you use one in a finished home, you might think it’s magic that’s making it all work. In reality, you just need special switches that are readily available. You also need to have a special cable with one extra wire that runs between the two switches.

What is the Simplest Wiring Diagram?

The simplest setup is to have just two three-way switches control one light. A three-way switch has three screws on it plus the green grounding screw. A standard single-pole switch only has two screws on it plus the green grounding screw.

What Wire Connects to the Third Screw?

That extra screw on a three-way switch confounds almost all homeowners and apprentice electricians as I get their emails each and every week asking for help. There are a few ways to connect two three-way switches together, but I prefer the method where you use a cable that has an extra red wire in it. It’s called three wire with a ground.

When Do You Need a 4 Way Switch?

The real fun and magic of these switches is when you have a situation where you want to control some lights or an appliance from three, or more, points. My daughter is building a new home right now and she’s got at least five sets of lights in here home that are controlled by four different switches.

Wire a 4 Way Switch

To achieve this higher level of electrical wizardry, you install four-way switches in between the two three-way switches in the circuit. A four-way switch has four screws on it plus the green grounding screw.

Should I Use 3 Wire Between the Switches?

To make the wiring work flawlessly so your husband becomes a lover of these switches you install the same special three-wire cable in between all the three and four-way switches in the circuit. That lovely red wire along with the black wire in the cable will do all the heavy lifting and your husband will think that all the switches in your new home were sprinkled with pixie dust.

I have three helpful videos here on my AsktheBuilder.com website showing you how fast and easy it is to wire up and troubleshoot three and four-way switches. Just type 3 way switch or 4-way switch into the search engine at my website to find them. Collectively these videos have been watched by over 2,400,000 (2019 Total - More Since Then) people saving them hundreds of thousands of dollars on electrician and divorce attorney fees!

Column 1298 A

PEX vs Copper – PEX is Much Faster

Running AquaPEX

PEX vs Copper | The red and blue pipes will supply hot and cold water to each plumbing fixture in this new home as soon as they’re connected to a distribution manifold inside this closet. Part of the problem of comparing pex vs copper is the fluctuating price of copper on the world market. (C) Copyright 2019 Tim Carter

PEX vs Copper - And the Winner Is!

QUESTION #1: Can you help me make a decision, Tim? I’m building a new home and have the option of using PEX piping for my hot and cold water in the house as opposed to traditional copper. Do you have an opinion about both materials? Have you used both? What do you have in your own home? Linda P., Rocky Point, NC

You may be building a new home or planning a large room addition that will have a new bathroom, kitchen, or some other plumbing fixtures that require hot and cold water. Your builder or plumber may lay at your feet the same decision Linda has to make. I can help you as I’ve been a master plumber since age 29.

When Was PEX Introduced?

Plastic PEX piping was first introduced in the late 1960s and its use as radiant floor heating exploded in Europe in the 1970s. The PEX plastic water piping for drinking water has been around for almost three decades now.

When Did You Use Copper?

During the early part of my plumbing career, I only installed traditional copper water lines. It was a mainstay in the Midwest. However, the plumbing codes started to permit the use of PEX and once plumbers became comfortable using it, its use started to grow like dandelions in the spring.

Do You Have PEX in Your Home?

I have PEX piping in my own home for both the radiant heating system and all of the hot and cold water that’s supplied to each faucet. It’s important to realize there are different brands of PEX. While the piping chemistry may be the same or very similar, the method you connect the pipe to fittings is different.

What Brand of PEX Do you Trust?

The one that I’ve come to trust and use is AquaPEX by Wirsbo or Uponor. It  employs an ingenious expanding compression collar at each end of the tubing to create a leak-proof connection. Watch this video showing this expansion collar.

Is Copper Installation Complex and Time-Consuming?

Installing traditional copper can be a complex and time-consuming process if you solder the tubing to the fittings. In the past decade, there’s been a shift to connecting copper tubing and fittings with a pressing tool that crimps the fittings onto the end of the tubing without using molten solder.  Watch this video to see how to solder copper.

An inner rubber o-ring in a raised collar on each fitting along with the crimping creates a leak-proof joint. I have these press fittings in my own home where the copper water lines connect my modulating boiler to the heating distribution manifolds.

Watch this video to see how to do press copper fittings:

The copper press fitting system saves enormous amounts of time. It only takes seconds to create a leak-proof connection. However, you may have to install quite a few of these press fittings to supply water to just one fixture. PEX piping eliminates all these fittings.

How Do You Install PEX Tubing?

PEX water piping installs just like electrical wiring. It’s flexible and you can run long lengths of it from a central distribution manifold all the way to the plumbing fixture without any joints. These long runs of tubing from a fixture to a manifold are called home runs. You can install one PEX pipe in just minutes if your home is framed using open floor trusses. The home run system allows you to turn off the hot or cold water to just one fixture and still have water working at all other fixtures.

What is Faster? PEX or Copper?

The fastest way to install hot and cold water lines in a home or room addition hands down is the PEX piping employing an uninterrupted single pipe between each fixture and the central manifold. To put this in perspective, my son-in-law and I installed all of the hot and cold water lines to his new four-bathroom home in less than three hours. You could never accomplish this feat using copper, even with the wonderful press fittings.

I have a video here on my AsktheBuilder.com website showing you how fast and easy it is to create one of these PEX connections using the simple expansion compression collars. I suggest you go there and type Connect Pex Pipe into my search engine and watch it. You’ll be astonished at how simple it is to work with PEX water lines.

Column 1297 A

April 14, 2019 AsktheBuilder Newsletter

Welcome if you're a new subscriber. I'm glad you're here. If you're a subscriber in good standing for years or a month, it's great you're still here.

Running AquaPEX and Wire

My son-in-law Brent and I have been working our butts off at the new house he and my daughter are building on Mt. Desert Island in Maine. Last weekend in just four hours we installed, are you sitting down?, nearly 1,800 feet of red and blue AquaPEX made by Uponor.

You use AquaPEX for the hot and cold water lines to plumbing fixtures and faucets.
Running AquaPEX

CLICK or TAP HERE to discover more about exactly why I chose to use AquaPEX made by Uponor.

If you had tried to install traditional copper lines using solder, perhaps you could have installed pipe to one or more fixtures in that four hours by cleaning, fluxing and soldering the pipe and fittings. Yes, you can use the modern press fittings for copper, but most people can't afford the $1,500 press tool required to crimp the fittings to the copper tubing.

By the way, I'll be demonstrating how to use one of these magical press tools that squeeze a copper fitting that has a rubber o-ring in it to create a leak-proof joint. I'm using this technology to install the copper around the modulating Noritz combi boiler going into my daughter and son-in-law's new home. You'll see that video in two months or less.

Wait until you see how amazing this press tool is and how soldering copper will eventually be kicked to the curb in most instances.

The primary advantage to using AquaPEX, or other PEX, is that you don't have fittings hidden behind walls and ceilings. You just have a connection point at the water distribution manifold and then you have a connection at the shutoff valve at the fixture.

The PEX installs like electric wiring. You just pull it through the open bays of the floor trusses or holes you might drill in solid floor joists or engineered-wood I joists.

I'm sure once again you can see why I specified to use open-web floor trusses on this job by looking at the above photo!

Can you imagine drilling HUNDREDS of holes in floor joists to run PEX, heating PEX or the electric cables???

12-Gauge Wire

A few day ago, we started to install the electrical wiring in the new house. I discovered long ago the advantages of 20-amp circuits as opposed to 15-amp circuits which most houses have. A 20-amp circuit can handle 2400 watts vs the 1800 you get with a 15-amp circuit.

Do you remember your high school physics class? Watts = Amps X Volts

One hundred and twenty volts is the standard here in the USA.

Yes, 12-gauge wire is slightly tougher to bend when you install an outlet or a switch, but it's worth it to have all that extra power for just $25 more for each 250 feet of cable you buy!

Yes, at the time I purchased the spools of cable, it was just ten cents more per foot for 12 gauge wire vs 14-gauge you use for 15-amp circuits.

12 guage wire

What are all the red wires for? You're looking at a massive bank of switches just as you walk in from the garage of their new home. These switches operate any number of lights using both 3 and 4-way switches. I prefer to use 12/3 wg cable to wire 3 and 4-way switches. Watch the two following videos to see why it's a huge advantage to use three-wire when wiring these special switches!

CLICK or TAP HERE to watch my 3-Way Switch video.

CLICK or TAP HERE to watch my 4-Way Switch video.

CLICK or TAP HERE to discover a bunch of other electrical wiring tips I've accumulated over the years.

DEEP Searching at AsktheBuilder.com

Last week I created a few new messages that new newsletter subscribers receive after signing up.

You've been receiving these same messages.

I got a HUGE GRIN on my face about three days ago when a subscriber responded to the message about doing Deep Searches on my AsktheBuilder website.

My suggestion is when you have a problem, just type the simple phrase into my search engine.

In his case, he had a hardwood floor scratch. He wanted to know the best way to repair it. This kind gentleman was actually responding to my message about Deep Searching instead of trying to find the answer himself.

I got the biggest kick out of that. If he had just typed:

hardwood floor scratch

he would have found right away this very useful column:

Hardwood Floor Repair

I'll bet you dollars to doughnuts you didn't know about the alcohol lamp guy, did you? Go ahead, click or tap here and tell me the truth. I know, I can't handle the truth! 😉

Downloadable AsktheBuilder Podcasts

A few days ago, Rachel reached out to me and suggested I make my podcasts downloadable. I pretty much assumed anyone who has in interest in podcasts would have an app allowing them to do this.

As usual, I was wrong!

It turns out there's a button I can click when uploading a podcast that allows you to download it easily without an app. This button defaults to NO downloading, so that's why I missed it.

I went back and turned ON all the buttons so you can now download my podcasts to listen to on your terms.

CLICK or TAP HERE to see the full list of podcasts.

That's quite enough for a Sunday! Happy Get-Your-Taxes-Done Day!

Tim Carter
Founder - www.AsktheBuilder.com
Certified Organic Clean Man - www.StainSolver.com
Cast RF Man - www.W3ATB.com

Do It Right, Not Over!

April 8, 2019 AsktheBuilder Newsletter

Are you a new subscriber? Hello from snowy Bar Harbor, Maine where I'm working on my daughter's home. Subscriber of record in good standing? There's 4 inches of FRESH SNOW on the ground and more falling! The winter with no end!

READ THE NOTICE JUST BELOW PHOTO OF MY BOOT

A Day Off

Today I'm taking the day off. My son-in-law and I worked the past eleven days straight here on his new home and that of my daughter. Each day was ten hours and yesterday we finally decided to work a half day so we could enjoy the gorgeous sunny day with a 52 F temperature.

I drove just 20 minutes to get to Acadia National Park's ocean walk. I then parked my truck, walked about a mile, and took a nap on the granite ledge above the sea. Here was the view when I woke up. I fell asleep for at least 30 minutes and was happy no sea gulls were pecking at my face.
Day Off at Acadia National Park

You're About to Receive Weird Messages From Me - Don't FREAK OUT

In a few moments, I'm going to add about four or five new messages to my Welcome-to-my-Family email series. These messages are designed to help NEW SUBSCRIBERS become more acquainted with all the content and services at AsktheBuilder.com.

Even though you're an existing subscriber, you WILL RECEIVE these new messages.

I can't stop these messages coming to you. You may actually discover something new, so don't freak out. If you're currently stressed out, just ignore them.

You'll know the messages are somewhat different because in the subject line you may see something like (2 of 5) or (3 of 5) or (4 of 5) etc.

There's NO NEED TO RESPOND to me about these weird messages.

Consider opening up the messages - they're short - and maybe you'll save some money.

New Columns and Videos

I uploaded several new videos today and a new column.

It's important to realize, you can always find the FRESHEST AsktheBuilder.com content by going to the Q&A navigation link at any page of the website. The topics you see at the top of the stack are the latest ones added to the website.

CLICK or TAP HERE and scroll down a bit to see a headline that's of interest to you. The headline about the Install Radiant Heat Under a Wood Floor is an amazing video you should watch!

I'll have a full-blown newsletter to you soon after I re-charge my mental and physical batteries.

Tomorrow we start to install all the electrical wiring in Meghan and Brent's home. Yes, it's all 12 gauge. I deplore 14-gauge wire. The 12-gauge wire, when I bought it a few months ago, was only ten cents more per foot. What a bargain to have a 20-amp circuit!

Tim Carter
Founder - AsktheBuilder.com

Do It Right, Not Over!

Install Radiant Heat Under Wood Floor 24 Inches OC

Installing Radiant Heat Tubing

Tim Carter shows the complex method of looping Uponor hePEX tubing in between framing that's 24 inches on center. Three heat transfer plates are in each truss bay, not two.

XO Rust Spray Paint Video

XO Rust Spray Paint Video

Watch this video to see how I used XO Rust spray paint to restore a rusted piece of wrought-iron patio furniture. The test panels will be just after the music interlude.

Please watch this video and then click REPLY and write me a short note as to what you thought about the paints. I asked for your comments on this video and one on EasyCare Interior Paints in my February 24, 2017 Newsletter and February 7, 2017 Newsletter.

Sticky House Wrap and Squirrels in Attics

house wrap

This is a marvelous newer full-adhesion house wrap. Installed correctly, you’ll discover your heating and cooling bills will be much lower. (C) Copyright 2019 Tim Carter

Sticky House Wrap

QUESTION #1: Tim, I’m building a new home and the builder wants to apply an exterior house wrap that reminds me of adhesive shelf paper. All the other house wraps I’ve seen come in large rolls and are nailed to the house. I’m afraid the adhesive house wrap might not stand the test of time. How do you feel about these self-adhering house wraps and what’s involved in getting it installed correctly? Pam T., Lexington, KY

You may be building a new home like Pam or having a room addition put onto your home. Self-adhering house wraps are a great refinement over the first-generation house wraps that require nails. I would absolutely use a self-adhering house wrap on a new house I’d build for myself, a family member, or a customer.

There are several manufacturers of the self-adhering house wraps. All the products are fabulous and it’s quite hard to differentiate them from one another. As with many things in construction, the devil is in the details. You can have a great product and it can be installed incorrectly thus voiding the warranty and causing nightmares down the road for the homeowner.

I witnessed a builder this past winter who did just that. He decided to use a traditional nail-on house wrap but used a hand tacker tool that pounds hundreds of small staples through the house wrap into the wood wall sheathing. The issue is the staples are an unapproved fastener and they actually create tiny holes around each staple that can leak both water and air.

The newer self-adhered house wraps won’t allow liquid water to touch the wood framing, but they allow water vapor in the wall assembly to pass through to the atmosphere. This is exactly what you want.

I’m attracted to the newer house wraps that have the adhesive because they do a superb job of bridging any gaps in the wall sheathing and virtually eliminate air infiltration into a house. Air infiltration is a major cause of higher fuel bills for both heating and air conditioning.

It’s very important for you, the homeowner, to read the simple installation instructions for the self-adhering house wrap you decide to use. The instructions are simple and not at all complex. Some products can be installed horizontally or vertically. I’d recommend a horizontal installation starting at the bottom of the structure. Be sure you overlap the next higher piece no less than 2 inches or whatever the instructions say to do.

Most products have great instructions how to deal with pipe and duct penetrations on the outside walls. You also need to follow the instructions with respect to how to apply the overlapping pieces of the house wrap around all windows and doors.

Some of the products require the use of a j-roller that works just like a giant steamroller that compresses asphalt paving on roads and driveways. The j-roller ensures the house wrap adhesive is in great contact with the wood wall sheathing.

Pay very close attention in the written instructions or videos about how to flash underneath all windows and doors. You need to inspect these openings to ensure it’s been done correctly. If you can’t be there, then insist the builder take photos with his smart phone of every window and door and send them to you so you can verify the job was done correctly.

Squirrels In Attics

QUESTION #2: Last night I came face-to-face with a squirrel up in my attic. I was astonished at his presence and wondered how he gained entrance. I looked at my roof and saw my ridge vent was higher in one spot. I had the ridge vent put in when I re-roofed the house thinking it would be a benefit to the traditional triangle gable-end vents that have worked well for 50 years. What’s the best way to stop the squirrel from becoming a permanent resident in my attic? I’m open to any and all suggestions. Chris A., Arab, AL

Animals of all sorts try to get into house attics. A few years ago, I had at my own home an infestation of flying squirrels in my attic. At night the little devils would roll acorns across my bedroom ceiling like they were bowling. It was infuriating. I solved my problem when I re-roofed my home by sealing off the entrances with heavy metal.

My advice to Chris, or you should you have the same issue, is to get rid of the ridge vent. I’d get a 10-inch-wide piece of heavy aluminum coil stock that siding contractors use. This would cover over the cut-out made for the ridge vent. Nail it securely over the shingles at the peak of the roof every 6 inches.

I’d then cover over the aluminum with standard asphalt cap shingles to match the current roofing. Since cap shingles are 12 inches wide, they’ll fully cover the aluminum so you’ll never see it. The squirrels will have to chew through the shingles only to encounter the thick aluminum. I’m quite sure they’ll give up and go to your neighbor’s home where it’s easier to get into the attic.

I happen to love turbine vents. I’d consider adding two or three on the back of your home up near the peak of the roof. Be sure you can’t see the spinning whirlybirds from the front yard or the street. Squirrels don’t like the spinning motion of these great wind-powered ventilators and you should have no issues at all in the future.

Column 1296


March 31, 2019 AsktheBuilder Newsletter

Are you a new subscriber in the last week? Welcome and you picked a great time to jump aboard. Distinguished subscriber of record? I've got some great new-house eye candy for you today.

Floor Trusses - Endless Joy

The construction of my daughter and son-in-law's house continues. The brutal cold weather is behind and I've been hard at work with my son-in-law continuing to put in the entire plumbing, radiant heat, and electrical systems in the house.

Before I jump into the topic of floor trusses, I wanted to give you an overview of what's going on.

The past few days, I pretty much finished all the rough plumbing drain, waste, and vent piping. Here's a couple of shots showing how to combine the benefits of cast iron with the affordability of PVC.

This first photo was taken in the living room looking above at the underside of the master bathroom. You see lots of no-hub cast iron piping installed for both durability and sound control. You'll never hear water flowing across the ceiling and down a wall after someone flushes the toilet or takes a shower! Cast iron is QUIET!

underside-living-room-floor
This next photo is showing the main wall in the master bathroom. You can see the vanity drain line sticking out of the wall. That vanity is going to be a 36-inch tall base cabinet with a shallow vessel sink on top of it. That's why the branch arm is roughed in so high off the floor.

The other white PVC pipes are vents (left to right) for the shower, free-standing tub, and the not-so-common 3-inch full-size vent for the toilet and the rest of the house. That 3-inch pipe will be extended across the ceiling this coming week and connect to the 4-inch pipe that pokes through the roof.

Note how the vanity stack has cast iron extending up through the floor, but at the tee fitting it has transitioned to plastic PVC. You can combine the two pipe types in your home just like this.

CLICK HERE to see why you'd want to use both cast iron and PVC pipes in your next new home or remodeling job.
cast-iron-pvc-pipe
Now about the floor trusses.

I've used floor trusses on a past job or two. It's been so long I forgot how wonderful they are.

Each day as we've been working putting in over 5,000 linear feet of the Uponor WIRSBO hePEX tubing for the radiant heating, I've come to fall in love with floor trusses. They have me swooning.

Look at the following photos and tell me if you could ever imagine putting in all you see using regular solid floor joists. Think of how many holes and friction points you'd have with solid lumber!


CLICK or TAP HERE to read about floor trusses. In that column, you'll discover a link you can click to get pricing for floor trusses and a local factory that will make them for you.

I recorded a FAST video about nine days ago on a whim about floor trusses. It was raining outside, it was dark in the garage and we used an iPhone. That explains why the video is not as good as my normal ones.

But I was SO overjoyed while working up in the floor trusses I had to share what I felt.

CLICK or TAP HERE to watch the fast video.

I can't begin to tell you how difficult it would be to run all the hePEX without the floor trusses.

Without floor trusses, I can't begin to tell you how many hundreds of holes would have to be drilled for all the:

  • hePEX heating tubing
  • plumbing drain lines - HUGE holes
  • plumbing supply lines
  • electrical wiring
  • low-voltage wiring

I can't begin to tell you how much my shoulder would ache. I can't believe all the extra time it would have taken.

Oh, and it's important to realize, when you decide to use floor trusses, you eliminate the need for interior bearing walls!

Can you see how that gives you all sorts of options when it comes to open floor plans and the ability to change the floor plan in the future with minimal disruption?

The other thing I love about the floor trusses is all the floors in the house are FLAT. Regular floor joists have crowns in them and the resulting floor can have all sorts of humps and dips in it.

Floor trusses allow you to have nice smooth floors.

I'm shooting a very interesting video today about how to install hePEX tubing that's 8-inches on center in 24-inch-on-center framing. You can have that in certain situations. I was unable to locate a video on YouTube showing how to do this very complex operation.

It's not going to be easy to record the video, because it's such a hard thing to visualize and do. But I'm going to give it my best shot.

It's time to get ready to go to the job site. I've already worked the past three days ten hours a day and the next eight are more of the same as my son-in-law took off a week of vacation so we could ram-rod this part of the job.

Have a great week!

Tim Carter
Founder - www.AsktheBuilder.com

P.S. NEXT WEEK is a full issue about our certified organic Stain Solver. Now that spring has arrived, you need to know all about Stain Solver and ALL of the things it can clean around and in your home. Of course there will be a special sale - especially on our most popular 4.5 and 9.2-pound sizes.

If you're a loyal user of Stain Solver, speak up now and send me your quick story about the most remarkable thing you cleaned or restored. Help Kathy and me convince others how wonderful Stain Solver is.

I'm going to be sharing many of the things you can CLEAN safely using Stain Solver. You'll also hear some incredible stories from homeowners just like you.

Here's my FAVORITE story of all time with stunning before and after photos. Look VERY CLOSELY at what's under the hat in the top BEFORE photo.

Do It Right, Not Over!