Transporting Propane Tanks - Do It Safely
Watch this video to see how to transport, handle and store propane tanks:
Watch this video to see how to transport, handle and store propane tanks:

What to do if gas leak: Use a wrench like this to turn off the gas. Then immediately get out of the house and away from it. Then call 911. Copyright 2018 Tim Carter
Do you know what to do if there's a gas leak? Watch this video and save your life and that of loved ones:
Click to read Tim's article about the Lanfords. They were friends of Tim's and tragically were killed when their house had a gas explosion.
If you have natural gas, you'll need a wrench to turn off the gas at the gas meter. You should keep an inexpensive pipe wrench at the gas meter or very close to it. You don't want to be wasting time trying to locate a wrench in a cluttered workbench or have to go back inside the house to the basement to get the wrench.
If your gas meter is in the home's basement, do NOT attempt to turn it off, EVACUATE the house and dial 911 a safe distance away from the home.
The gas concentration in the basement could be deadly. Propane is heavier than air. It will COLLECT in a basement.
Natural gas is lighter than air, but it could still collect in a basement to deadly and dangerously explosive concentrations.
Do NOT attempt to open windows. GET OUT OF THE HOUSE.
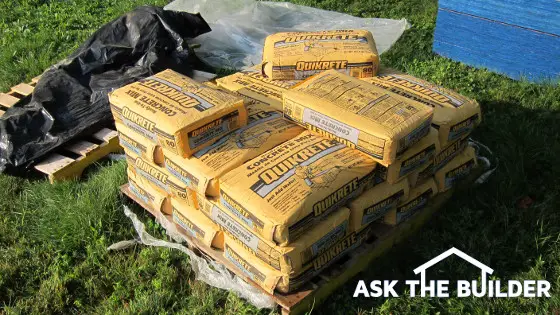
You may think that concrete in a bag is inferior. It’s not. (C) Copyright 2018 Tim Carter
Question #1: Hello Tim. This summer I’ve got a few outdoor projects that involve pouring small amounts of concrete. I looked into having a ready-mix truck do it, but the cost is so expensive. I’ve seen the bags of concrete in stores. Is it any good? Have you used it? Can I modify the mix to increase the strength? If so, what do you use and how? Malcolm McC., Albany GA
Do you have exciting project plans like Malcolm’s that involve concrete? I can clearly remember my first experience working with this magic material. I formed and poured a large set of steps that led up to the front door of the first house I remodeled. Looking back, it was too big a project for a rookie. That said, the job turned out not too bad!
The good news is the bagged concrete you can buy at local hardware stores is a fantastic product. The man who invented it built his first plant just a few miles from my childhood home in Cincinnati, OH.
It’s important to realize that basic concrete contains just four ingredients: small rocks, sand, Portland cement, and water. The cement is the glue or binder that holds the sand and rocks together. When water is added to the other three ingredients, it starts a chemical reaction. Countless invisible Portland cement crystals start to form and interlock all the sand and rock together.
I’ve used bagged concrete for years and had great success with it. My two most recent uses were for the in-ground piers that support a massive deck and the piers for my giant two-story shed. The piers are going to last for many decades because I used the right amount of water to mix the concrete. Add too much water and you’ll ruin the concrete.
You can add more Portland cement to bagged concrete to make it stronger. You can also add some hydrated lime. To make the strongest concrete, the sand should be sourced from volcanic lava that has a high silica content. This is not easy to locate and I’d not worry about it. But you should get a bag of pure Portland cement and lime and add some of those two things. Both ingredients are inexpensive.
Most bagged concrete comes in standard-sized bags. If I wanted to make it stronger, I’d take an old kitchen measuring cup and add 16 ounces of Portland cement and 8 ounces dry measure of hydrated lime to each bag of concrete.
You want to blend the extra cement and lime with the bagged concrete in dry form. Use a newer plastic mixing bag and roll around the dry ingredients before adding the needed water. The concrete should have a consistency like stiff applesauce when you add the correct amount of water.
I’ve got many other bagged concrete tips and videos showing the magic plastic mixing bag at my AsktheBuilder.com website. Just go to: https://www.askthebuilder.com/working-with-concrete-in-a-bag/
Question #2: I’m about to put an offer in on a home that has a heat pump. I don’t understand how this machine could possibly produce heat in the winter months using air from outdoors. My friends are warning me that the air that comes out of the indoor registers is a cold heat. What does that mean and do heat pumps really get heat from cold air? Sue W., Orlando, FL
You may be like Sue and wonder about heat pumps and how in the world they work. It’s true, they can squeeze heat from the cold air. It’s all about the boiling temperature of the refrigerant that’s kept at very high pressure inside the heat pump and the copper lines that connect it to the indoor air handler.
The dirty little secret most HVAC people don’t tell you is the heat pumps also come with large electric resistance heating coils inside your home. As the temperature of the air drops outdoors and approaches 32 F, the heat pump needs help creating heat and electricity starts to flow through these coils making them glow just like a toaster. It’s common sense that as the outdoor air gets colder, there’s less heat to extract from it.
Heat pumps do a fantastic job of getting heat from the outdoor air if that air temperature is in the 50-55 F range. Technology is constantly making the machines more efficient so they produce more heat from a given amount of electricity.
The temperature of the air flowing out of the supply registers in the home will seem cold. Often the temperature of the heat-pump air is 90 F or less. Homes that heat with natural gas, propane, oil, or wood can see air temperatures of 110 F or even greater. This is why as a kid I used to put my feet right on top of the register in our living room. The metal got so hot I’d have to lift my feet every few minutes so I’d not get burned!
I’ve got lots more facts about heat pumps and great videos showing exactly how they work for you. Go to: https://www.askthebuilder.com/heat-pumps-how-well-do-they-work/
Column 1251
About ninety minutes ago, I sent out a newsletter about my two friends being killed in a tragic explosion.
I FORGOT to make a valuable suggestion. I failed to remind you to consider FORWARDING that newsletter from earlier today to:
It's one of the RARE newsletters I send out that might save a life or two or three.
Please consider FORWARDING it to as many as you might think it will help.
I've reached out to the American Gas Association and will be providing you with much more information about automatic gas shutoff valves in the near future.
Thanks,
Tim Carter
New subscriber? Welcome and I apologize for the tone of your first newsletter.
Veteran subscriber? You know I do this from time to time.
Do you live in Watauga County, NC - more specifically the hamlet of Boone, NC? Then you know where this is going.
Four days ago, two friends and peers of mine, Audri and Jim Lanford, died instantly when their home exploded. The story made the national news.
Heavy rain the days before the tragedy caused a landslide above their home.
The rest is speculation because I've not seen an official detailed written report from the Watauga County Sheriff, and don't know if one will ever be issued.
I'm reasonably sure, because of the remote location of their home, they heated with propane. Based on the photography available to me, it's my guess the propane tank was on the side of the home that faced the hillside.
You typically put propane tanks someplace out of sight. They're not the most attractive things after all.
I'm surmising the ground slipped pushing the tank towards the house. This could have caused the gas line that entered the home to be pushed farther indoors. This movement could have somehow fractured the gas line and the full flow of gas began.
Study the photo to imagine what kind of force it takes to blow apart a house at the seams and cause the destruction you're about to see. Sadly it all could have been prevented with a $50 +/- automatic gas shut-off valve.
These valves are made to sense the unnatural FULL FLOW of gas through the line. When that happens, the valves SHUT OFF THE FLOW.

(C) Copyright 2018 WataugaDemocrat.com Re-published under the Fair Use Act
You can CLICK HERE to see an enlarged version of the photo.
You can CLICK HERE to read the tragic local news story.
I appreciate all you taught me even though I was not as diligent as you were at implementing all of your knowledge.
I'm going to write up a better story with a few illustrations for you explaining why the landslide happened. Once again, my geology degree comes in handy.
What's your primary takeaway?
You need to find out ASAP if you can have an automatic gas shut-off valve installed on your gas line. If you live in an earthquake zone, you probably already have one.
Some other accident or ??? could cause a ruptured gas line inside your home. Why take a chance? Why not install a valve that could SAVE YOUR LIFE or those of your LOVED ONES?
It doesn't matter if you use natural gas or propane. If you use propane, you can call your local propane supplier to see if they offer these valves.
Plumbers usually do this work. CLICK HERE now to get free bids from local plumbers about installing an automatic gas shut-off valve if you'd rather take that route.
Your secondary takeaways should be:
CLICK HERE to read Tim's Update.
I've been very busy the past couple of weeks revising old columns. I've written so many columns over the years, I've FORGOTTEN some of the ones that could really help you.
I've gone to great lengths to locate fantastic videos about the topics. Each revised column has at least one video in it. Some columns have multiple amazing videos for you.

FANTASTIC Videos Here!

Amazing videos here - MUST WATCH!


That's quite enough for a Sunday.
Please remember Audri and Jim in your prayers.
Please take preventative action at your home to ensure we don't see your house in pieces on the national news.
Tim Carter
Founder - www.AsktheBuilder.com
Purveyor of Cleanliness - www.StainSolver.com
Waves of Happiness - www.W3ATB.com
Do It Right, Not Over!
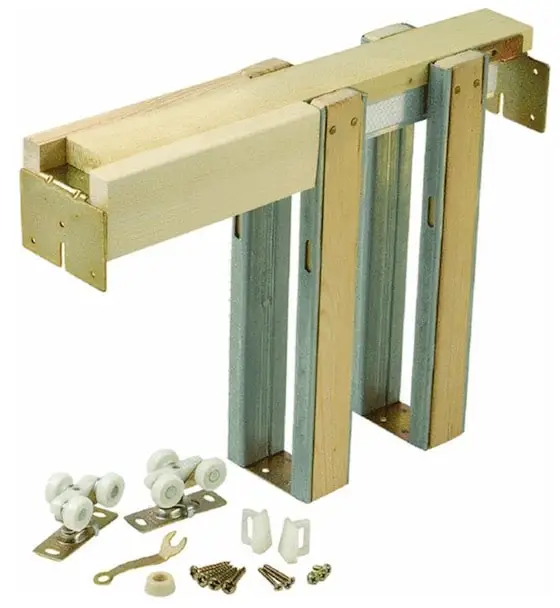
Pocket door installation starts with using the best kit. This is a miniature version of a Johnson pocket door kit. The vertical legs create the pocket. The track is hidden in the horizontal top member. The three-wheel trolleys are in the lower left. Copyright 2018 Tim Carter
"Installing pocket doors is not as tough as it sounds or looks, especially if you buy a quality hardware set. Remember, the key to a trouble-free installation lies in a proper rough opening."
Related Links
How To Install A Pocket Door - By Tim Carter
Tim's Favorite Feature of Older Homes (and new ones)
The following instructions will help you install just about any pocket door hardware kit. I URGE you to completely read and follow the enclosed instructions you will find with your pocket door hardware. These systems are really easy to install. They require minimal tools and some patience.
Free & Fast Bids
CLICK HERE to get FREE & FAST BIDS from local pocket door carpenters.
The rough opening for the pocket door is the rectangle created by the wall studs. It's a very specific height and width both called out in the written pocket door installation instructions.
The rough opening is the foundation of your system. Get this wrong and you will suffer later. The rough opening will seem huge. Why?
The rough opening will be more than twice as wide as a usual one. The width is almost always two times the actual finished door with plus one inch.
For example, a 2-foot 8-inch door (32 inches) the rough opening needs to be 65 inches. The height of the rough opening off the rough floor surface is usually 84.5 inches. Be sure you measure from the highest point of the subfloor if your floor is out of level.
It's important to realize the rough opening needs to be plumb, level and NOT twisted (a helix). Perform a string test to ensure the rough opening is not twisted.
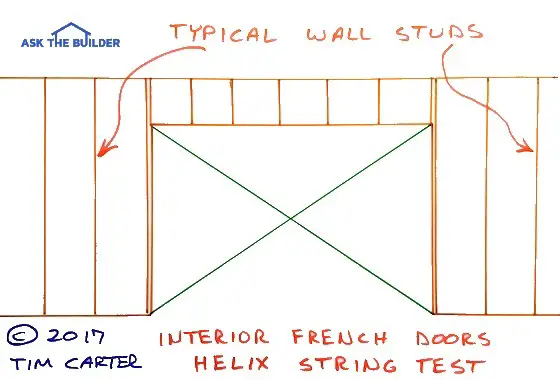
This is a crude drawing of a rough opening for a pocket door. The green lines are pieces of string attached to the corners of the rough opening. They must barely touch at the center of the "X". Switch one string back and forth across the other string to ensure it's just barely touching at the center of the X. Copyright 2018 Tim Carter ALL RIGHTS RESERVED. Do NOT COPY
The top of the rough opening really needs to be level. This is where the track is attached.
The side jambs must be plumb. That should be common sense.
Another key point is the bottom plate of the wall (before it is cut out) must be directly above the top plate.
All too often rookies frame the pocket door rough opening without a bottom plate in place. One end or both of the side rough jambs can drift out of plumb this way.
String a line tightly from one corner to the opposite diagonal corner. Do the same across the other corners to make an X. The strings should just barely touch one another.
If there is a gap between the strings or one string presses significantly against the other, your rough opening is twisted or in a helix! You fix this by adjusting the position of the bottom of the vertical rough jamb studs.
The Johnson pocket door track is the first thing to install. Two L-shaped brackets, one at each end, make this a simple task.
Each track is slightly different. Follow the individual instructions. Make sure it is level before you proceed with anything else!
You install the pocket door studs by first snapping a fine chalk line that represents the sides of where the bottom wall plate would be if it were in place.
Snap chalk lines that are directly below the top plate. If your rough frame is not a helix, this is easy. Just snap the lines where the bottom plate stops at each end. These chalk lines serve as your reference point so you can properly locate your floor plates that hold the side split jambs.
The side split jambs are the thin studs that create the pocket. The placement of two of these is critical.
They form the beginning of the pocket. Your instructions will tell you precisely where to mount these. The other two jambs simply are placed halfway between the first two and the actual wall studs.
If you installed the frame correctly, you can now add your drywall or plaster. Be sure your nails do not go through the thin side split jambs! If they do, they will scratch the door.
The door connects to the track with two simple parts:
Paint the top and bottom of the door two coats before you attach plates to the top of the door.
Doors will warp and twist if you don't seal the top and bottom with paint or a clear finish.
After the mounting plates are put on the top of the door, place the pocket door trolleys into the track. The mounting plates on the top of the door allow you to hang the door.
Once this is complete, the door will slide in and out of the pocket. You can now install the finish side jambs. Always install the top jambs last. Be sure to install these with finish screws, NOT nails. To remove the door at a later date, you will need to remove at least one top jamb.
When you attach the door trim casing, try not to nail into the finish jamb material. This will interfere with the removal of the jambs at a later date.
The finish jambs can be tough to fabricate on your own. It requires using a table saw and sanding the rough cut edges. Certain manufacturers sell these materials already sanded and cut to size. It is a tremendous advantage to use these.
Installing pocket doors is not as tough as it sounds or looks, especially if you buy a quality hardware set. Remember, the key to a trouble-free installation lies in a proper rough opening. If you get the rough opening right, the rest of the job will flow like a smooth vodka and tonic.
Once again, read the instructions carefully!
CLICK HERE to get FREE & FAST BIDS from local pocket door carpenters.
Column B190

This is a high-powered kitchen exhaust fan tucked up and inside a decorative wood cabinet. (C) Copyright 2018 Tim Carter
Question #1: Tim, I’m very excited about an upcoming kitchen remodel at my home. I need your advice about my kitchen exhaust fan. I’m getting conflicting information from contractors, the kitchen designer, and my husband. You’re my lifeline. Can you address the best practices for kitchen exhaust fans and any other aspects to ensure my family is safe and I don’t hurt my house. Leslie S., Tulsa OK
You may be in the same boat as Leslie. You’re either getting ready to do a big remodel of your kitchen or you’re building a new home. Much of the advice I’m about to share applies to bathroom exhaust vents, so it might behoove you to absorb some of what I’ve discovered over the years.
All you have to do is talk with a few seasoned firefighters to understand why it’s so important to pay attention to detail when installing kitchen exhaust fans. Many a restaurant has burned to the ground because of an exhaust-system fire that turned the vent pipe into a roaring jet engine.
When you cook greasy foods, the grease can vaporize much like water does when you boil water. The hot grease vapor touches exhaust fan filters, fan blades, the ductwork, your cabinets, the kitchen ceiling, and other surfaces in your kitchen. It then condenses on those surfaces. Soon there’s a layer of grease and it’s flammable. If there’s ever a fire in the exhaust ductwork, you want it to stay there.
This is but one reason you want a powerful kitchen exhaust fan so you can blow as much of this grease vapor outdoors before it has a chance to coat anything. The first step of the process is to purchase a top-quality exhaust fan that’s sized for the square footage of your kitchen.
Read the written installation instructions to understand the exact height of the fan over your cooktop for maximum performance. The instructions will also tell you the size, type, and length of the solid metal pipe or duct you must use between the fan housing and the exhaust hood on the exterior of your home. Be aware that bends in the pipe restrict flow. A 90-degree bend, for example, usually equals 10 feet of straight pipe with regards to friction.
Do not terminate the exhaust pipe in an attic or crawlspace. The exhaust must exit your home through a sidewall or out through your roof. Do not put the exhaust termination pipe under a soffit where the greasy vapor can enter soffit vents and get into your attic.
All joints where pieces of metal pipe or duct connect must be taped with a special metal tape. You can buy aluminum or even stainless steel tape that adheres well to the metal pipe. If there’s a fire in the duct, the tape prevents the fire from spreading to combustible things near the pipe.
I’ve got many other kitchen exhaust fan tips and some installation videos at my AsktheBuilder.com website. Just go to: https://www.askthebuilder.com/kitchen-exhaust-fan/
Question #2: Help Me, Tim! Not too long ago you had a column about the vexing 3-way electrical switches. Guess what? I’ve got to replace a mysterious 4-way switch and am terrified I’ll do it wrong. Have you installed a 4-way switch and are they hard to understand? I offer you my protection forever if you can share how to connect the wires so all is well. Tony A., Winchester, KY
Not all houses have 4-way switches, but I maintain more should. At the last home I built for my family, I had a switch on the wall outside of each of our second-floor bedrooms and the hall bathroom that controlled the hallway lights. Three of those five switches had a 4-way switch in it! Downstairs there were at least six other 4-way switches on different circuits!
I actually think a 4-way switch is easier to wire up than a 3-way switch. You put 4-way switches in between 3-way switches. The traveler wires leaving or going to, the 3-way switches connect to either the top two or bottom two screws on a 4-way switch. So long as you don’t mix up the travelers from one 3-way switch to the other, you can’t go wrong.
The best part is it doesn’t matter which of the traveler wires connects to the two screws at the top or bottom of the 4-way switch. That’s what makes installing one so easy.
I realize it’s very confusing to visualize all of this jujumagumbo wire and switch talk. That’s why I recorded a step-by-step video showing how to wire up a 4-way switch. You’ll also discover a secondary video showing how to wire a 3-way switch too! Go to: https://www.askthebuilder.com/4-way-switch/
Column 1250
Do you like this newsletter?
Do you want me to take the time to create and publish it each week for you? Then I need your help.
I need you to click the following links - you're going to see some amazing doors and rooms all outfitted with LE Johnson made-in-the-USA door suspension hardware.
LE Johnson is my primary newsletter sponsor and they'd like you to see how you can transform your home with doors that disappear and fold out of the way with ease.
You can reclaim space. You can amaze your friends and neighbors with your creativity.
And you can do it with the their newer Soft-Close hardware.
One of the links below takes you to a fine video showing this great feature so your LE Johnson door doesn't close with a BANG.
All I ask is for you to CLICK the following links, then I want you to take the fun quiz to see what you remembered.
Be SURE to look closely at each photo BEFORE you go to the next one. I'll be asking you about things you saw.
Have FUN!
Doors That Act Like Playing Cards
Impossible! How Could They Stack Like That????
A Door Fit For King Henry VIII
Doors Only A Geometry Teacher Could Appreciate
All Aboard! Yes, I'm a Conductor
Mirror Mirror On the Wall Who is the Cleverest of ALL
Videos Galore - Small But Mighty!
Shhhhhhh! Soft Close is Simply Soundless
Now it's time to take the FUN QUIZ!!!!
The most points you can score is 7.
Let's see how well you do.
Let me know in the comments BELOW THE QUIZ what you think about my quiz answers.
It's important to realize, I need you to TAKE THE FUN QUIZ if you want me to continue to publish this FREE newsletter.
Tim Carter
Founder - www.AsktheBuilder.com
Do It Right, Not Over!
Below is the LE Johnson Quiz as linked in the May 27, 2018 AsktheBuilder Newsletter.
Subscribe to the FREE Ask the Builder newsletter to receive professional advice for your home. Complete the form below and each week you'll get:
Unsubscribe at any time. We respect your email privacy.