What To Do If Gas Leak

what to do if gas leak

What to do if gas leak: Use a wrench like this to turn off the gas. Then immediately get out of the house and away from it. Then call 911. Copyright 2018 Tim Carter

What To Do If Gas Leak Video

Do you know what to do if there's a gas leak? Watch this video and save your life and that of loved ones:

Click to read Tim's article about the Lanfords. They were friends of Tim's and tragically were killed when their house had a gas explosion.

If you have natural gas, you'll need a wrench to turn off the gas at the gas meter. You should keep an inexpensive pipe wrench at the gas meter or very close to it. You don't want to be wasting time trying to locate a wrench in a cluttered workbench or have to go back inside the house to the basement to get the wrench.

If your gas meter is in the home's basement, do NOT attempt to turn it off, EVACUATE the house and dial 911 a safe distance away from the home.

The gas concentration in the basement could be deadly. Propane is heavier than air. It will COLLECT in a basement.

Natural gas is lighter than air, but it could still collect in a basement to deadly and dangerously explosive concentrations.

Do NOT attempt to open windows. GET OUT OF THE HOUSE.

Concrete in a Bag and Heat Pumps

concrete in a bag

You may think that concrete in a bag is inferior. It’s not. (C) Copyright 2018 Tim Carter

Concrete in a Bag

Question #1: Hello Tim. This summer I’ve got a few outdoor projects that involve pouring small amounts of concrete. I looked into having a ready-mix truck do it, but the cost is so expensive. I’ve seen the bags of concrete in stores. Is it any good? Have you used it? Can I modify the mix to increase the strength? If so, what do you use and how? Malcolm McC., Albany GA

Do you have exciting project plans like Malcolm’s that involve concrete? I can clearly remember my first experience working with this magic material. I formed and poured a large set of steps that led up to the front door of the first house I remodeled. Looking back, it was too big a project for a rookie. That said, the job turned out not too bad!

The good news is the bagged concrete you can buy at local hardware stores is a fantastic product. The man who invented it built his first plant just a few miles from my childhood home in Cincinnati, OH.

It’s important to realize that basic concrete contains just four ingredients: small rocks, sand, Portland cement, and water. The cement is the glue or binder that holds the sand and rocks together. When water is added to the other three ingredients, it starts a chemical reaction. Countless invisible Portland cement crystals start to form and interlock all the sand and rock together. 

I’ve used bagged concrete for years and had great success with it. My two most recent uses were for the in-ground piers that support a massive deck and the piers for my giant two-story shed. The piers are going to last for many decades because I used the right amount of water to mix the concrete. Add too much water and you’ll ruin the concrete.

You can add more Portland cement to bagged concrete to make it stronger. You can also add some hydrated lime. To make the strongest concrete, the sand should be sourced from volcanic lava that has a high silica content. This is not easy to locate and I’d not worry about it. But you should get a bag of pure Portland cement and lime and add some of those two things. Both ingredients are inexpensive.

Most bagged concrete comes in standard-sized bags. If I wanted to make it stronger, I’d take an old kitchen measuring cup and add 16 ounces of Portland cement and 8 ounces dry measure of hydrated lime to each bag of concrete.

You want to blend the extra cement and lime with the bagged concrete in dry form. Use a newer plastic mixing bag and roll around the dry ingredients before adding the needed water. The concrete should have a consistency like stiff applesauce when you add the correct amount of water.

I’ve got many other bagged concrete tips and videos showing the magic plastic mixing bag at my AsktheBuilder.com website. Just go to: https://www.askthebuilder.com/working-with-concrete-in-a-bag/

Heat Pumps

Question #2: I’m about to put an offer in on a home that has a heat pump. I don’t understand how this machine could possibly produce heat in the winter months using air from outdoors. My friends are warning me that the air that comes out of the indoor registers is a cold heat. What does that mean and do heat pumps really get heat from cold air? Sue W., Orlando, FL

You may be like Sue and wonder about heat pumps and how in the world they work. It’s true, they can squeeze heat from the cold air. It’s all about the boiling temperature of the refrigerant that’s kept at very high pressure inside the heat pump and the copper lines that connect it to the indoor air handler.

The dirty little secret most HVAC people don’t tell you is the heat pumps also come with large electric resistance heating coils inside your home. As the temperature of the air drops outdoors and approaches 32 F, the heat pump needs help creating heat and electricity starts to flow through these coils making them glow just like a toaster. It’s common sense that as the outdoor air gets colder, there’s less heat to extract from it.

Heat pumps do a fantastic job of getting heat from the outdoor air if that air temperature is in the 50-55 F range. Technology is constantly making the machines more efficient so they produce more heat from a given amount of electricity.

The temperature of the air flowing out of the supply registers in the home will seem cold. Often the temperature of the heat-pump air is 90 F or less. Homes that heat with natural gas, propane, oil, or wood can see air temperatures of 110 F or even greater. This is why as a kid I used to put my feet right on top of the register in our living room. The metal got so hot I’d have to lift my feet every few minutes so I’d not get burned!

I’ve got lots more facts about heat pumps and great videos showing exactly how they work for you.  Go to: https://www.askthebuilder.com/heat-pumps-how-well-do-they-work/

Column 1251

June 3, 2018 AsktheBuilder Newsletter Update

About ninety minutes ago, I sent out a newsletter about my two friends being killed in a tragic explosion.

I FORGOT to make a valuable suggestion. I failed to remind you to consider FORWARDING that newsletter from earlier today to:

  • your family
  • your friends
  • your co-workers
  • your neighbors

It's one of the RARE newsletters I send out that might save a life or two or three.

Please consider FORWARDING it to as many as you might think it will help.

I've reached out to the American Gas Association and will be providing you with much more information about automatic gas shutoff valves in the near future.

Thanks,

Tim Carter

June 3, 2018 AsktheBuilder Newsletter

New subscriber? Welcome and I apologize for the tone of your first newsletter.

Veteran subscriber? You know I do this from time to time.

Two Friends Sent To Heaven Too Soon

Do you live in Watauga County, NC - more specifically the hamlet of Boone, NC? Then you know where this is going.

Four days ago, two friends and peers of mine, Audri and Jim Lanford, died instantly when their home exploded. The story made the national news.

Heavy rain the days before the tragedy caused a landslide above their home.

The rest is speculation because I've not seen an official detailed written report from the Watauga County Sheriff, and don't know if one will ever be issued.

I'm reasonably sure, because of the remote location of their home, they heated with propane. Based on the photography available to me, it's my guess the propane tank was on the side of the home that faced the hillside.

You typically put propane tanks someplace out of sight. They're not the most attractive things after all.

I'm surmising the ground slipped pushing the tank towards the house. This could have caused the gas line that entered the home to be pushed farther indoors. This movement could have somehow fractured the gas line and the full flow of gas began.

Study the photo to imagine what kind of force it takes to blow apart a house at the seams and cause the destruction you're about to see. Sadly it all could have been prevented with a $50 +/- automatic gas shut-off valve.

These valves are made to sense the unnatural FULL FLOW of gas through the line. When that happens, the valves SHUT OFF THE FLOW.

house explosion

(C) Copyright 2018 WataugaDemocrat.com Re-published under the Fair Use Act

You can CLICK HERE to see an enlarged version of the photo.

You can CLICK HERE to read the tragic local news story.

RIP Audri and Jim!

I appreciate all you taught me even though I was not as diligent as you were at implementing all of your knowledge.

I'm going to write up a better story with a few illustrations for you explaining why the landslide happened. Once again, my geology degree comes in handy.

What's your primary takeaway?

You need to find out ASAP if you can have an automatic gas shut-off valve installed on your gas line. If you live in an earthquake zone, you probably already have one.

Some other accident or ??? could cause a ruptured gas line inside your home. Why take a chance? Why not install a valve that could SAVE YOUR LIFE or those of your LOVED ONES?

It doesn't matter if you use natural gas or propane. If you use propane, you can call your local propane supplier to see if they offer these valves.

Plumbers usually do this work. CLICK HERE now to get free bids from local plumbers about installing an automatic gas shut-off valve if you'd rather take that route.

Your secondary takeaways should be:

  • Bury all the hatchets you may have lurking in your life
  • If your primary focus is not family and friends, make it so
  • Create or update your last will and testament
  • Get rid of all that clutter in your home
  • Carpe Diem

CLICK HERE to read Tim's Update.

Countless Revised Columns

I've been very busy the past couple of weeks revising old columns. I've written so many columns over the years, I've FORGOTTEN some of the ones that could really help you.

I've gone to great lengths to locate fantastic videos about the topics. Each revised column has at least one video in it. Some columns have multiple amazing videos for you.

How Does a Heat Pump Work?

Heat Pump

Is Bagged Concrete Any Good?

FANTASTIC Videos Here!
Bagged Concrete

DIY Blacktop and Asphalt Patching - It WORKS!

Amazing videos here - MUST WATCH!

Blacktop Patching

Shed Ramps - Save Your Back

Shed Ramp

New Color Match Technology!

Color Match Technology

That's quite enough for a Sunday.

Please remember Audri and Jim in your prayers.

Please take preventative action at your home to ensure we don't see your house in pieces on the national news.

Tim Carter
Founder - www.AsktheBuilder.com
Purveyor of Cleanliness - www.StainSolver.com
Waves of Happiness - www.W3ATB.com

Do It Right, Not Over!

Pocket Door Installation Tips

pocket door frame

Pocket door installation starts with using the best kit. This is a miniature version of a Johnson pocket door kit. The vertical legs create the pocket. The track is hidden in the horizontal top member. The three-wheel trolleys are in the lower left. Copyright 2018 Tim Carter

"Installing pocket doors is not as tough as it sounds or looks, especially if you buy a quality hardware set. Remember, the key to a trouble-free installation lies in a proper rough opening."

Pocket Door Installation Checklist:

  • purchase an LE Johnson kit - best made in the USA
  • read installation instructions
  • perform string test to ensure rough opening is not twisted
  • follow simple instructions and be done in 30 minutes or less

Related Links

How To Install A Pocket Door - By Tim Carter

Solving Pocket Door Problems

Tim's Favorite Feature of Older Homes (and new ones)

Pocket Door Installation Tips

The following instructions will help you install just about any pocket door hardware kit. I URGE you to completely read and follow the enclosed instructions you will find with your pocket door hardware. These systems are really easy to install. They require minimal tools and some patience.

Free & Fast Bids

CLICK HERE to get FREE & FAST BIDS from local pocket door carpenters.

What is The Pocket Door Rough Opening?

The rough opening for the pocket door is the rectangle created by the wall studs. It's a very specific height and width both called out in the written pocket door installation instructions.

The rough opening is the foundation of your system. Get this wrong and you will suffer later. The rough opening will seem huge. Why?

The rough opening will be more than twice as wide as a usual one. The width is almost always two times the actual finished door with plus one inch.


For example, a 2-foot 8-inch door (32 inches) the rough opening needs to be 65 inches. The height of the rough opening off the rough floor surface is usually 84.5 inches. Be sure you measure from the highest point of the subfloor if your floor is out of level.

It's important to realize the rough opening needs to be plumb, level and NOT twisted (a helix). Perform a string test to ensure the rough opening is not twisted.

French Doors String Test

This is a crude drawing of a rough opening for a pocket door. The green lines are pieces of string attached to the corners of the rough opening. They must barely touch at the center of the "X". Switch one string back and forth across the other string to ensure it's just barely touching at the center of the X. Copyright 2018 Tim Carter ALL RIGHTS RESERVED. Do NOT COPY

How Level Must the Top of the Door Be?

The top of the rough opening really needs to be level. This is where the track is attached.

The side jambs must be plumb. That should be common sense.

Another key point is the bottom plate of the wall (before it is cut out) must be directly above the top plate.

All too often rookies frame the pocket door rough opening without a bottom plate in place. One end or both of the side rough jambs can drift out of plumb this way.

How Do You do the String Test?

String a line tightly from one corner to the opposite diagonal corner. Do the same across the other corners to make an X. The strings should just barely touch one another.

If there is a gap between the strings or one string presses significantly against the other, your rough opening is twisted or in a helix! You fix this by adjusting the position of the bottom of the vertical rough jamb studs.

How Do You Install the Pocket Door Track?

The Johnson pocket door track is the first thing to install. Two L-shaped brackets, one at each end, make this a simple task.

Each track is slightly different. Follow the individual instructions. Make sure it is level before you proceed with anything else!

How Do You Install the Thin Pocket Door Studs?

You install the pocket door studs by first snapping a fine chalk line that represents the sides of where the bottom wall plate would be if it were in place.

Snap chalk lines that are directly below the top plate. If your rough frame is not a helix, this is easy. Just snap the lines where the bottom plate stops at each end. These chalk lines serve as your reference point so you can properly locate your floor plates that hold the side split jambs.

What are the Pocket Door Side Split Jambs?

The side split jambs are the thin studs that create the pocket. The placement of two of these is critical.

They form the beginning of the pocket. Your instructions will tell you precisely where to mount these. The other two jambs simply are placed halfway between the first two and the actual wall studs.

How do you Finish the Wall?

If you installed the frame correctly, you can now add your drywall or plaster. Be sure your nails do not go through the thin side split jambs! If they do, they will scratch the door.

How Does the Door Connect to the Track?

The door connects to the track with two simple parts:

  • mounting plates for the top of the door
  • trolleys that connect to the door mounting plates

Paint the top and bottom of the door two coats before you attach plates to the top of the door.

Doors will warp and twist if you don't seal the top and bottom with paint or a clear finish.

After the mounting plates are put on the top of the door, place the pocket door trolleys into the track. The mounting plates on the top of the door allow you to hang the door.

How Do You Install the Finish Pocket Door Jambs?

Once this is complete, the door will slide in and out of the pocket. You can now install the finish side jambs. Always install the top jambs last. Be sure to install these with finish screws, NOT nails. To remove the door at a later date, you will need to remove at least one top jamb.

When you attach the door trim casing, try not to nail into the finish jamb material. This will interfere with the removal of the jambs at a later date.

The finish jambs can be tough to fabricate on your own. It requires using a table saw and sanding the rough cut edges. Certain manufacturers sell these materials already sanded and cut to size. It is a tremendous advantage to use these.

Installing pocket doors is not as tough as it sounds or looks, especially if you buy a quality hardware set. Remember, the key to a trouble-free installation lies in a proper rough opening. If you get the rough opening right, the rest of the job will flow like a smooth vodka and tonic.

Once again, read the instructions carefully!

CLICK HERE to get FREE & FAST BIDS from local pocket door carpenters.

Column B190

Kitchen Exhaust and 4-Way Switch Conundrum

Kitchen Exhaust Fan

This is a high-powered kitchen exhaust fan tucked up and inside a decorative wood cabinet. (C) Copyright 2018 Tim Carter

Kitchen Exhaust

Question #1: Tim, I’m very excited about an upcoming kitchen remodel at my home. I need your advice about my kitchen exhaust fan. I’m getting conflicting information from contractors, the kitchen designer, and my husband. You’re my lifeline. Can you address the best practices for kitchen exhaust fans and any other aspects to ensure my family is safe and I don’t hurt my house. Leslie S., Tulsa OK

You may be in the same boat as Leslie. You’re either getting ready to do a big remodel of your kitchen or you’re building a new home. Much of the advice I’m about to share applies to bathroom exhaust vents, so it might behoove you to absorb some of what I’ve discovered over the years.

All you have to do is talk with a few seasoned firefighters to understand why it’s so important to pay attention to detail when installing kitchen exhaust fans. Many a restaurant has burned to the ground because of an exhaust-system fire that turned the vent pipe into a roaring jet engine.

When you cook greasy foods, the grease can vaporize much like water does when you boil water. The hot grease vapor touches exhaust fan filters, fan blades, the ductwork, your cabinets, the kitchen ceiling, and other surfaces in your kitchen. It then condenses on those surfaces. Soon there’s a layer of grease and it’s flammable. If there’s ever a fire in the exhaust ductwork, you want it to stay there.

This is but one reason you want a powerful kitchen exhaust fan so you can blow as much of this grease vapor outdoors before it has a chance to coat anything. The first step of the process is to purchase a top-quality exhaust fan that’s sized for the square footage of your kitchen.

Read the written installation instructions to understand the exact height of the fan over your cooktop for maximum performance. The instructions will also tell you the size, type, and length of the solid metal pipe or duct you must use between the fan housing and the exhaust hood on the exterior of your home. Be aware that bends in the pipe restrict flow. A 90-degree bend, for example, usually equals 10 feet of straight pipe with regards to friction.

Do not terminate the exhaust pipe in an attic or crawlspace. The exhaust must exit your home through a sidewall or out through your roof. Do not put the exhaust termination pipe under a soffit where the greasy vapor can enter soffit vents and get into your attic.

All joints where pieces of metal pipe or duct connect must be taped with a special metal tape. You can buy aluminum or even stainless steel tape that adheres well to the metal pipe. If there’s a fire in the duct, the tape prevents the fire from spreading to combustible things near the pipe.

I’ve got many other kitchen exhaust fan tips and some installation videos at my AsktheBuilder.com website. Just go to: https://www.askthebuilder.com/kitchen-exhaust-fan/

4-Way Switch Conundrum

Question #2: Help Me, Tim! Not too long ago you had a column about the vexing 3-way electrical switches. Guess what? I’ve got to replace a mysterious 4-way switch and am terrified I’ll do it wrong. Have you installed a 4-way switch and are they hard to understand? I offer you my protection forever if you can share how to connect the wires so all is well. Tony A., Winchester, KY

Not all houses have 4-way switches, but I maintain more should. At the last home I built for my family, I had a switch on the wall outside of each of our second-floor bedrooms and the hall bathroom that controlled the hallway lights. Three of those five switches had a 4-way switch in it! Downstairs there were at least six other 4-way switches on different circuits!

I actually think a 4-way switch is easier to wire up than a 3-way switch. You put 4-way switches in between 3-way switches. The traveler wires leaving or going to, the 3-way switches connect to either the top two or bottom two screws on a 4-way switch. So long as you don’t mix up the travelers from one 3-way switch to the other, you can’t go wrong.

The best part is it doesn’t matter which of the traveler wires connects to the two screws at the top or bottom of the 4-way switch. That’s what makes installing one so easy.

I realize it’s very confusing to visualize all of this jujumagumbo wire and switch talk. That’s why I recorded a step-by-step video showing how to wire up a 4-way switch. You’ll also discover a secondary video showing how to wire a 3-way switch too! Go to: https://www.askthebuilder.com/4-way-switch/

Column 1250

May 27, 2018 AsktheBuilder LE Johnson Fun Game

Do you like this newsletter?

Do you want me to take the time to create and publish it each week for you? Then I need your help.

I need you to click the following links - you're going to see some amazing doors and rooms all outfitted with LE Johnson made-in-the-USA door suspension hardware.

LE Johnson is my primary newsletter sponsor and they'd like you to see how you can transform your home with doors that disappear and fold out of the way with ease.

You can reclaim space. You can amaze your friends and neighbors with your creativity.

And you can do it with the their newer Soft-Close hardware.

One of the links below takes you to a fine video showing this great feature so your LE Johnson door doesn't close with a BANG.

All I ask is for you to CLICK the following links, then I want you to take the fun quiz to see what you remembered.

Be SURE to look closely at each photo BEFORE you go to the next one. I'll be asking you about things you saw.

Have FUN!

Doors That Act Like Playing Cards

Impossible! How Could They Stack Like That????

A Door Fit For King Henry VIII

Doors Only A Geometry Teacher Could Appreciate

All Aboard! Yes, I'm a Conductor

Mirror Mirror On the Wall Who is the Cleverest of ALL

Videos Galore - Small But Mighty!

Shhhhhhh! Soft Close is Simply Soundless

Now it's time to take the FUN QUIZ!!!!

The most points you can score is 7.

Let's see how well you do.

Let me know in the comments BELOW THE QUIZ what you think about my quiz answers.

CLICK HERE to take the quiz.

It's important to realize, I need you to TAKE THE FUN QUIZ if you want me to continue to publish this FREE newsletter.

Tim Carter
Founder - www.AsktheBuilder.com

Do It Right, Not Over!

LE Johnson 2018 Q2 Fun Quiz

Below is the LE Johnson Quiz as linked in the May 27, 2018 AsktheBuilder Newsletter.

Sewer Lines and Tree Roots

Tree Roots in Sewer Line

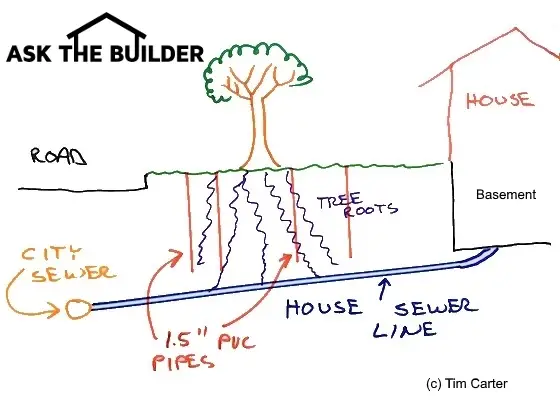
Stop tree roots sewer line problems this way. The red vertical lines are small 1.5-inch PVC pipes. Fill them with copper sulfate crystals and hot water and no more tree roots sewer line problems! Copyright 2018 Tim Carter

Tree Roots Sewer Line Tips

  • Poison soil surrounding the sewer line with copper sulfate
  • Install 1.5-inch PVC vertical pipes in the ground above the sewer line
  • Use a 2-inch hand auger to drill holes into the soil
  • Pour copper sulfate crystals into the pipe and add hot water
  • CLICK HERE to subscribe to Tim's FREE & Funny Newsletter

"The root control/elimination products that flush down a toilet do little to solve the problem in my opinion...... The chemicals often only burn those portions of the roots that actually contact the water flow."

DEAR TIM: The sewer line in my house recently backed up. The plumber who cleaned out the line discovered tree roots were the problem. I've seen products that you flush down the toilet to solve this problem.

Are they effective? Is there a better, more long-term solution? I really don't have the money to install a new sewer line. Chuck S., St. Cloud, MN

DEAR CHUCK: Tree roots in sewer lines are probably one of the top ten plumbing problems, especially in older homes. Mother Nature has equipped many trees with sophisticated sensing capabilities.

Related Links

Sewer Line Backflow Valves

Minimize Clogged Drain and Sewer Lines

Free & Fast Bids

CLICK HERE to get FREE & FAST BIDS from local drain cleaning companies.

Why Do Tree Roots Enter Sewer Pipes?

The trees send out feeder roots in all directions in a search for both nutrients and water. The trenches that contain sewer lines rarely contained compacted soil. Roots are naturally drawn to this disturbed soil.

How do Tree Roots Enter Sewer Pipes?

hand-powered earth auger

Here is a wonderful hand-powered earth auger. It drills a two-inch diameter hole with ease.

Tree roots enter sewer pipes through small cracks in the joints between individual pieces of pipe. Old clay pipes often had the joints packed with mortar.

This mortar shrinks as it hardens allowing a tiny micro-crack to develop in the female hub of the old sewer pipe.

If tiny feeder roots discover these cracks they enter the pipe and continue their search for moisture and food. Once inside the pipe the roots enlarge and gorge themselves on the plentiful supply of water and food. I have actually taken out grotesque roots that have been over ten feet long and nearly one inch thick in diameter.

Does RootX Kill the Tree Roots?

RootX and other liquid products you pour into your toilet, in my opinion, treat the symptoms to a small degree, but they do NOT SOLVE the problem.

Water flow in a typical sewer pipe only fills a small percentage of the bottom cross section of the pipe. The chemicals often only burn those portions of the roots that actually contact the water flow.

Some of the chemicals are drawn into the root system but not enough, in my past experience, to completely wipe out the roots. The tree continues to grow and send roots out to take advantage of the underground oasis.

How Can You Stop the Roots From Entering the Sewer Pipe?

You stop tree roots from entering the sewer pipe by poisoning the soil on the outside of the sewer pipe. The tree roots will not enter this soil and thus can't get into the sewer pipe.

I've solved this problem for customers and at an old house, I used to own. You need to install a series of small vertical pipes above the sewer line that resemble miniature oil wells.

Copper sulfate crystals are put into the pipes along with hot water. The hot water dissolves the copper sulfate and this solution enters the soil above and around the sewer pipes.

Copper is a natural biocide and tree roots, algae, moss, or any living thing will avoid the copper-saturated soil.

copper sulfate crystals

These are large copper sulfate crystals. The come in 50-pound bags. CLICK THE IMAGE to have them delivered to your home.

Will the Copper Sulfate Kill the Tree?

No, the copper sulfate will not kill the tree. The tree roots will just avoid the copper-tainted soil and go find other water and nutrients.

How Do You Locate the Sewer Line?

Your best chances of success will happen if you can find a company that sends a small camera into the sewer line. By looking at a video monitor, the best camera operators can pinpoint the exact location outside where the roots are entering the pipe.

What's more, with electronic sensing equipment the professional can tell you the depth and path of the sewer pipe below the surface of the ground at this location. Armed with this data, you can permanently solve the problem.

CLICK HERE to get FREE & FAST BIDS from local drain cleaning companies.

How Do You Drill the Holes for the Small Vertical Pipes?

Using a simple earth auger or large drill, you will drill a vertical hole down towards the sewer pipe.

IMPORTANT: Do not start to drill holes in your yard or the public right of way until you've reached out to Call Before You Dig - 811. This nationwide service will come out within 48-72 hours and mark where any buried utilities. The last thing you want to do is poke a hole in a buried gas line, water line, or get ZOTTED by drilling into a buried electric service cable!

A 2 or 2.5-inch diameter hole works best as it provides plenty of room to insert a standard schedule 40 1.5 inch PVC pipe into the hole.

Stop drilling when the hole is about 24 to 30 inches above the top of the sewer pipe. Slide the pipe into the hole and glue a threaded female adapter equipped with a plug onto the end of the pipe at the surface. Make sure this is flush with the soil so that lawnmowers do not cut it off.

Can I Use City Records to Locate the Sewer Line?

Hand-powered Earth Auger

I am ready to get to work. I made sure no underground utilities other than the sewer line were in my path.

Yes, you can use city records to locate the sewer line that runs between your house and the city sewer in the street or alley.

The records often will show you where the sewer tap was installed as it entered your property. You should be able to determine where the sewer line leaves your home. The plumber who installed the sewer line usually tries to install it in a straight line.

If you can't find a company with a sewer camera, use municipal sewer records to locate your sewer tap and try to estimate where the sewer line might be. Insert a number of PVC pipes in your yard hoping that you spot them above and near the sewer line.

How Much Copper Sulfate Should be Used?

Try to fill the vertical pipe halfway with the copper sulfate crystals. You can have the copper sulfate delivered to your home. CLICK HERE to order some. You'll need one or two 50-pound bags for sure.

Some home centers may carry them. Immediately pour hot water into the pipe until it flows out the top. The hot water will begin to dissolve the copper sulfate and then this solution will begin to seep into the soil above and around the sewer pipe. Tree roots do not like soil that has been treated with copper sulfate and they will avoid it completely. Add crystals as needed and pour hot water into the pipe every four months or so to stop those pesky sewer backups!

CLICK HERE to get FREE & FAST BIDS from local drain cleaning companies.

UPDATE: In the April 29, 2014 Newsletter, Jeff, a fellow ham radio operator, emailed about this very problem. Click to read his story. In September of 2021, another reader asked the same question. CLICK to read the September 5, 2021 Newsletter.

Column 326