Metal Wine Storage Shelves

Metal Wine Storage Shelves

DEAR TIM: I just put a deposit on unique metal wine storage shelves at an architectural salvage business. This metal monstrosity used to hold auto parts. It just so happens it would be perfect to hold my wine bottles on top of an open bar area in my new home.

Without wine in it, it weighs well over 200 pounds. How do I make sure this will not come crashing down in the middle of the night causing untold damage and the loss of some fairly expensive wine?

Do I have options with respect to hanging it on the wall? How would you do this if you were building my home? How would you suggest painting it? Dot B., Carmel, IN

Hunt Architectural Salvage Stores

DEAR DOT: You’re so lucky to have an architectural salvage business near you. I had a similar business near me when I lived in Cincinnati, Ohio. My wife and I purchased a gorgeous solid walnut fireplace surround and mantle we used in our new home. I get great pleasure from seeing old items recycled so they get a second or third life rather than end up in a landfill.

Without seeing your new metal wine storage shelves, I’m guessing you have several options to secure it to the wall. My favorite method is to use a french cleat.

Free & Fast Bids

CLICK HERE to get FREE & FAST BIDS from local finish carpenters who can hang your wine racks.

Related Links

Wine Racks of All Types

Remove Red Wine Stains with Stain Solver

French Cleats are Strong

A french cleat will have to be fabricated by a local welder. Two pieces of metal make up a french cleat. One piece is a strip that’s nearly as wide as your new shelves. It get welded to the top rear edge of the shelves.

wine storage

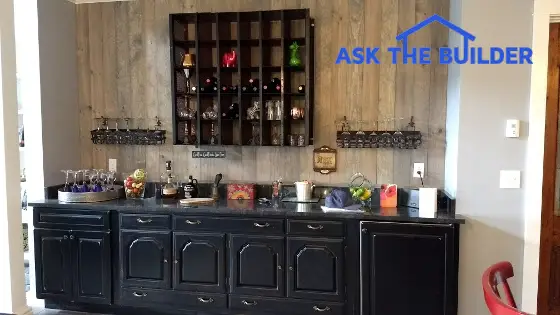
This wonderful metal storage rack used to hold auto parts. This ingenious method of reusing an auto parts shelving unit was done by Ms. Nancy McKechnie. Not only does she have a flair for decorating, but she also happens to be one of the best real estate agents on Mt. Desert Island in Down East Maine. Click here if you want me to put you in touch with Nancy. (C) Copyright 2017 Tim Carter

It’s important to realize the second piece of metal is bolted to the wall and it has a slight outward bend towards the top of the strip. It only needs to slant out about 1/4 inch. The metal strip on the back of the shelves slides down behind the slanted piece of metal on the wall. The two interlock and it’s impossible for the shelves to slide down from the wall or tip out so long as the metal strip on the wall is securely bolted to the wall studs.

French Cleat Video

In my opinion the best way to bolt this metal strip to the wall is to use through bolts. The easy way out is to use lag bolts that are just giant screws.

The issue with lag bolts is they can lose considerable holding power if the pilot hole is too large and/or if the bolt is overtightened by an aggressive installer.

wine storage

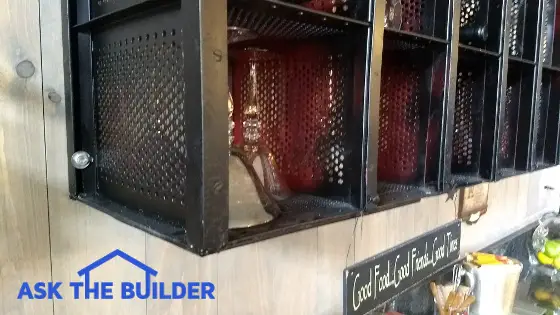
Closeup of the metal wine storage racks. This ingenious method of reusing an auto parts shelving unit was done by Ms. Nancy McKechnie. Not only does she have a flair for decorating, but she also happens to be one of the best real estate agents on Mt. Desert Island in Down East Maine. Click here if you want me to put you in touch with Nancy. (C) Copyright 2017 Tim Carter

Through Bolts Work Well

Through bolts are more work but they hold so much better. These bolts have nuts and washers on the end of the bolt that passes into the finished wall behind the metal wine storage shelves. In the event you were to use this method, the bolts would typically pass through solid blocking that’s been securely installed between the wall studs.

The only issue is you have to have access to the back of the wall to tighten the nuts onto the bolts. This requires lots of planning as the drywall on the other side of the room can’t be finished until the wine rack is installed.

Use Metal Rack Frame

If you can’t to a french cleat, then you might be able to bolt the shelves to the wall through strong metal that’s part of the outer frame of the shelving unit. It’s hard for me to give you expert advice here because I can’t see your shelves.

You’ll have to decide what type of bolt you’re going to use with this method. Lag bolts can work, they just have to be installed with great care and you need to make sure the bolt is passing directly through the center of a wall stud.

CLICK HERE to get FREE & FAST BIDS from local finish carpenters who can hang your wine racks.

Metal Wine Storage on Mt. Desert Island

Recently, I visited a new home where the wife did exactly what you plan to do. The salvaged metal shelving she purchased was a brilliant fire-engine red. She wanted it black.

Her husband got out a few cans of gloss black spray paint and did the front and sides and all he could easily cover. The inside vertical divider walls of the shelves still had some places where you could see some red.

The wife loved this two-tone look and I have to agree it was tastefully done. I mention this only because you may want to experiment with different colors.

Clean Off Oil & Grease Before Painting

Be sure you clean your metal shelving well before painting. I suggest you use mineral spirits to remove any and all oil that could be coating the metal. Be sure to do this outdoors as you never want to work with combustible liquids indoors for any reason.

Don’t throw away any oil-soaked rags or paper towels. I suggest you burn them safely as they can spontaneously combust if you just throw them in the trash.

Pay close attention to all the instructions on the paint can label to get the best results. Multiple thin coats of paint are usually better than a thick coat where you’re trying to save time.

CLICK HERE to get FREE & FAST BIDS from local finish carpenters who can hang your wine racks.

Column 1222

Behr Deck Over Problems

behr deck over

That's my left foot you see in the lower-left corner. See how this thick coating over the wood deck is peeling? What a mess! Once this happens, what do you do? Rip off all the wood? Do you think you can sand this mess? No way. (C) Copyright 2017 Tim Carter

Behr Deck Over Problems

Behr Deck Over is a thick coating you apply to worn-out decks. Dan from CT emailed me back in October 2016 about this very issue.

The coating was designed by the Behr chemists to both fill and bridge over large cracks you see in neglected wood decks.

It's important to realize that all coatings eventually peel. When this thick coating peels off your deck, it's going to be a nightmare.

Related Links:

Pressure Washers and Wood Deck Video

Deck Sealer Test Results

Free & Fast Bids

CLICK HERE to get FREE & FAST BIDS from local deck cleaning and sealing contractors.

Behr Deck Over and Applesauce

I attended the first-ever Behr Editors Conference a few years ago and had the opportunity to apply some of this product to worn-out treated lumber.

Not only was the product as thick as applesauce, but it also took some effort to apply it.

Wood Decks and Water

Wood is hygroscopic. This means that wood expands and shrinks depending on how wet it is. 

Metal is not hygroscopic nor is fiberglass or fiber cement siding. That's why paint has no problem sticking to your car, your boat or the Hardiplank cement siding on your home.

Treated deck lumber gets wet and dries out each time it rains. This back and forth movement of the wood will cause the Behr Deck Over to peel at some point just as you see in the photo above.

CLICK HERE to get FREE & FAST BIDS from local deck cleaning and sealing contractors.

Perfect Preparation Required

Oxygen Bleach

Stain Solver is MADE in the USA with USA ingredients that are food-grade quality. CLICK THE IMAGE to order some NOW.

You must do an excellent job of preparing the treated wood before you apply the Behr Deck Over if you want it to last a long time.

The best cleaner to use is certified organic Stain Solver oxygen bleach. Stain Solver is a simple powder you mix with water and apply to the dry treated lumber.

Best Way to Clean a Deck Video

Watch this short video to see the best way to clean a neglected deck.

Follow Behr Deck Over Instructions

Another key point is to make sure you read and follow all the instructions of the label of the cans. 

In the long run, it's the best way to ensure you get the longest life out of the product should you decide to use it.

CLICK HERE to get FREE & FAST BIDS from local deck cleaning and sealing contractors.


Tough Tested Solar Battery Review

Power Bank Solar Charger

June 2022 Update: Currently, it appears that the Tough Tested BRAND products are currently unavailable.

But CLICK HERE to get other Power Bank Solar Chargers just like it.

I checked out the Tough Tested Solar Battery recently. 

The moment I unpacked it I had a feeling it was going to become a sweetheart tool.

Within moments, I put it in direct sunlight to see how the 280 mA trickle charger worked.

Real Charging Done With USB Input

The first thing to remember is this battery gets charged using a standard USB cable that you'd use to charge your cellphone or any other small electronic device. The solar panel is just a trickle charger meant to top off the battery once you're away from an input power source.

tough tested solar battery

Here's the storage battery minutes after unpacking it. It comes with a handy carabiner so you can attach it to the outside of a backpack. This allows it to charge up as you hike. CLICK THE PHOTO to have one delivered to your home in days. Copyright 2017 Tim Carter

Related Links

Other Interesting Tool Reviews

Low Voltage Lighting Problems

Tough Tested Solar Battery is Durable

It's important to realize loved the durable waterproof rubber case. This will protect the battery if you take it on a rough and tumble outdoor adventure.

tough tested solar battery

The solar battery fits in my hand with no problems. It weighs more than you'd expect, but that because of the trillions of electrons inside waiting to flow into your cell phone or laptop! CLICK THE PHOTO NOW to have this battery delivered to your door. Copyright 2017 Tim Carter

Charge Two Things at Once

Another key point is the ability to charge two things at once. The battery has two standard USB output ports both equipped with Instasense technology. The charger is smart and knows how much power to deliver to each device you're charging.

tough tested solar battery

You can see the two charging ports labeled on the back. The input port is a standard micro-USB port. The four star-shaped things are the ultra-bright flashlight and emergency-beacon LEDS. Copyright 2017 Tim Carter

Tough Tested Solar Battery Lights

The front of the charger has blue LED lights that act as a fuel gauge. When all four are lit, the charger is full or nearly full. The charger can store 16,000 mA of power. This is enough to charge your standard cell phone at least five or six times.

tough test solar battery

The angled blue LED lights on the front are the fuel gauge. When all four are lit, you've got lots of power inside the battery. You can see the flashlight working behind it. CLICK THE PHOTO NOW to buy this amazing storage battery. Copyright 2017 Tim Carter

tough tested solar battery

The LED flashlight is blindingly bright. It's got two settings, plus a flashing emergency beacon. Are you sitting down? If you HOLD IN the power button for a few seconds, the flashlight sends Morse code SOS. I'm an amateur radio operator and this is a life-saving feature if your lost at night! Copyright 2017 Tim Carter

Final Recommendation

I really like the Tough Tested Solar Battery. It's not a bad size and the fact you can charge two things at once makes it a must-have for me.

In the final analysis, if you're outdoors away from normal charging electricity, you're going to LOVE this battery pack. CLICK HERE to have the solar battery pack delivered to your door.

November 2, 2017 AsktheBuilder Newsletter

It's been almost a month since I've reached out to you.

I can't begin to tell you how much has happened. So much I don't know where to start.

Three weeks ago, I went to Mt. Desert Island (MDI) in Down East Maine for six days. It was food for the soul.

Here are two of my best photos from the trip.

deep blue sea
long pond sunset
These look so much better full screen.

The top shot is why you hear writers call the ocean the "deep blue sea". The water was so blue it hurt your eyes to look at it.

The second photo was taken at the south end of Long Pond as the sun was setting.

If you've not been to Acadia National Park on MDI, put it on your list of things to do.

One of the best-kept secrets about MDI are the Rockefeller Carriage Roads. CLICK HERE to get a stunning book about them. I'm about 1/3 the way through mine.

Nutone Knocking

I just had the pleasure to install a technology gadget you may want for sure at your home.

The Nutone Knock.

nutone knock


CLICK HERE to read all about this wonderful thing you should have on your home.

Cordless Blower

I mentioned weeks ago, I'd let you know about a cordless leaf blower I've been testing.

It's the STIHL BGA 56.
cordless leaf blower
This is a fooler tool.

When you first pick it up, your mind screams it's a toy. It's that lightweight.

It's not. It works and works well.

It's become my go-to blower because it comes on within one second instead of me trying to start my gas-powered blower and then putting it on my back.

I love this blower for all sorts of small jobs like:

  • blowing out dust and leaves from my garage
  • blowing anything from my deck or drive
  • bonfire-assist tool - gets fire going faster

But it has its limitations. I'm only able to get about 15 minutes at most from a battery charge.

It's not the tool I'd use to blow leaves in my large yard, but for many, many other jobs, it's superb.

CLICK HERE do discover more about STIHL cordless blowers.

Thread Black Iron Pipe

Did you know I've been a master plumber since my late 20s? One thing I've ALWAYS loved doing was installing black iron gas lines.

Here's a video I just shot showing the magic involved in cutting threads.

I think you're going to like this video. I'll bet you there's some step you never knew about. Especially using that thing that looks like a medieval torture device! OUCH!!!!!

​​​​​​​Wait until you see it.....

CLICK HERE or the image below to watch it now.
black iron pipe threader
That's enough for today.

Next issue I'm going to start sharing some great Christmas gift ideas for you.

Yeah, Santa is coming!

CLICK HERE for one of my favorite scenes from Elf.

If that video clip doesn't bring a smile to your face and flood you with great memories as a kid visiting Santa at the department store, I don't know what to say.

Tim Carter
Founder - www.AsktheBuilder.com

Do It Right, Not Over!

Nutone Knock Review

nutone knock

Here's my Nutone Knock ready and waiting for you to push that green highlighted button. Once you do that, the magic starts! Copyright 2017 Tim Carter

IMPORTANT NOTE FROM AUTHOR:

December 21, 2017 (see December 20, 2017 Newsletter)

The following review was originally published on November 2, 2017. Within two weeks of publishing it, my Knock stopped working. The interior doorbell was the first thing to malfunction.

A week later, the app failed to work if someone pushed the Knock button you see above.

I reached out to the public relations firm representing Nutone. They put me in touch with the product manager. After repeated back and forth email exchanges, over a period of two weeks, Nutone failed to come up with a fix.

I ripped the Knock off the wall on December 19th and it's now in the garbage can in my garage. Within an hour, I installed the Ring Video Doorbell. CLICK HERE to read the Ring® review.

My recommendation now is do NOT purchase the Nutone Knock.

Back to the original review.

I installed the Nutone Knock wireless doorbell a few days ago.

So far so good, but it was a stroke of luck that it actually brought it to life on my new Moto G5 Plus smartphone!

I want to preface this entire review letting you know I LOVE the Knock, even though I was knocking my hand on my head trying to get it to work.

I think you're going to enjoy this story.

Nutone Knock WiFi Enabled Security

The Nutone Knock is a sleek doorbell that has a camera, microphone and infrared light. It also has a speaker built into it allowing you to have a conversation with anyone at your door no matter where you are.

It works just like making a Skype phone call over the Internet.

Related Links:

Doorbell Extenders - Hear Your Doorbell Everywhere

Doorbell Stories and Alternatives

Installation Challenges

I'm an amateur radio operator and have built small radios using tiny electronic parts. This skill came in handy as the instructions require you to install a small diode in the actual interior doorbell in your home.

My guess is most homeowners would not be comfortable doing this step. It's important to note that diodes must be installed one way as they regulate the direction of flow of electricity.

nutone knock

Here's the inside of the actual doorbell up on the wall inside my house. The yellow arrow points to the diode. How many homeowners do you think will be able to do this without messing it up? My money is on most will shy away from this step. Copyright 2017 Tim Carter

I installed the doorbell base plate outdoors with no difficulty. A point often overlooked is the importance of following the instructions.

It's extremely important that you have the above-mentioned diode installed correctly BEFORE you connect the new doorbell to the wires sticking out of the wall at your front door!

It was easy to attach the new doorbell wires to the ones sticking out from my wall with the supplied crimp connectors.

Nutone Knock

Here's what appears on your smartphone screen a second or two after someone pushes the green button on the Knock. Don't ask me how my German Shepherd got up to ring the bell. Smart Lady the dog! Copyright 2017 Tim Carter

Downloading the Knock App

Another key point is to go step-by-step following the easy-to-read instructions. I was able to download and install the free Nutone Knock app on my smartphone in less than a minute.

Just after that is when the trouble started.

I followed all the steps multiple times to get the app to work with my new Nutone Knock doorbell. 

Each time all I saw was a image of the doorbell on my screen with a nasty RED X showing the phone couldn't connect.

I'm fairly tech savvy and got frustrated. Not wanting to give up, I had my very tech savvy son give it a try.

He was unable to get it to work.

I decided to wait until the following day to reach out to the Nutone people to see what I was doing wrong.

The Monster Nor'easter

Hours later, a monster Nor'easter storm lashed central New Hampshire where I live. We lost power and Internet for 16 hours.

I have a standby generator, but the electrical circuit that powers the DC transformer connected to the doorbell is not on it.

The doorbell was dead for 16 hours.

It's (Nutone Knock) Alive!

When the power came back on, my cell phone was on the kitchen counter getting charged up. I left it there overnight.

Little did I know, but the doorbell was now working and the motion detector was sending alerts every few minutes that a leaf fell onto the front porch.

Lot of Settings

When I woke up, I was stunned to see the doorbell was working.

It was working VERY WELL!

The first thing I did was go into the settings and let the motion detector to the lowest possible sensitivity to stop the constant "bong tone" in my phone.

Suggestions to Nutone Knock Engineers

I can't prove that the doorbell needed to be powered down to make it work. But that's the only thing that happened once I had given up trying to make it work.

If that's the case, then it needs to be put in the instructions.

But there's an issue with that.

Most houses there's no indication on the circuit breaker box which circuit controls the low-voltage transformer that operates the doorbell.

Tim's Suggestions:

  • The Nutone engineers need to put an on/off power switch on the Knock
  • The pairing of the Knock needs to be as simple or even more simple than me activating my Arlo wireless security cameras
  • A video needs to be made showing how easy it is to install the diode
  • Update app to allow homeowners to prerecord messages that can play through the speaker when the homeowner is unable to respond to a ringing doorbell
  • Have a person who's fluent in the English language view every warning issued by the Nutone Knock - see below screenshot.
Nutone Grammar

Ouch! An editor needs to check all copy of all hard-coded messages. Plus, how could a brand-new Knock that's not even readily available not have the correct firmware in it? Copyright 2017 Tim Carter

Nutone Knock App Typo Heart

Final Rating of the Nutone Knock

I give the Knock four hammers out of five.

Once it's working it's a very nice tool to have.

But I struggled to get it working and I'm sure I won't be the last.


How to Thread Black Iron Pipe Video

How to Thread Black Iron Pipe Video

To thread black iron, you need to use special tools.

It's dirty work and if it's hot outdoors, you'll break a sweat for sure.

Related Links:

Sealing Black Iron Pipe Joints - The BEST Sealant

Flexible Gas Lines Instead of Stiff Black Iron

Thread Black Iron in Minutes

In this video, Tim Carter demonstrates how to cut threads on black iron pipe using a hand ratchet and cutting dies.

Black Iron Pipe SUCCESS TIPS:

  • Be sure the pipe dies match the pipe size
  • Ream out cut black iron pipe
  • Use plenty of oil while cutting threads
  • Be sure to stop cutting once end of pipe is flush with end of die
Pipe Die

Here's what a pipe cutting die looks like outside the hand ratchet. CLICK THE PHOTO NOW to have this delivered to your home in days.

This column was shared with Tim's readers in his November 2, 2017 Newsletter.

Pebble Shower Floor

Pebble Shower Floor TIPS

DEAR TIM: I stayed at a rental home that had a pebble shower floor. The pebbles were both beautiful and rounded. I loved how they massaged my feet as I showered. I now want these pebbles in my own home. How hard is it to install a pebble shower floor? Are there different types and colors? Is it hard to install the grout between the pebbles? It must be hard to install the pebbles one at a time. Nancy McK., Bangor, ME

DEAR NANCY: I love pebble shower floors! My college degree is geology and whenever I can incorporate stone into my building projects I do it. At the present time I’ve been looking for small granite pebbles myself to use in a planned man-cave bathroom.

Related Links:

Ceramic Tile Installation Tips

Four step-by-step How To Install Sanded Grout videos

Pebble Shower Floor Adds Magic

The pebble shower floor material is available in quite a few shapes, colors, and textures. In addition you can purchase the pebbles either flat or slightly rounded.

The first thing to remember when considering this natural material is it can be used on just about any surface including shower walls, a kitchen counter backsplash and even as a countertop. By all means use flat smooth pebbles for countertops.

Free & Fast BIDS

CLICK HERE to get FREE & FAST BIDS from local tile setters who can install pebble tile.

Easy To Install

It’s not hard at all to install a pebble shower floor. For one thing, the pebbles come on sheets so you don’t have to install each pebble one at a time. Perhaps the best feature is each sheet interlocks with the one next to it but in such a way that the pattern appears random.

pebble shower floor

Here’s a magnificent pebble shower floor. The pebbles come in many different shapes, sizes and colors. (C) Copyright 2017 Tim Carter

It’s important to realize you use all the same tools and techniques installing the thin stone pebbles as you would install normal flat ceramic tile. Shower floor installations require a waterproof membrane or pan to channel each drop of water into the plumbing drain.

Pebble Shower Floor Installation Video

Watch this video to see how one tile setter puts a pebble shower floor in using thinset.

For this reason I prefer to install the pebbles on a concrete mud base just as the master tile setters of old did it. The cement mud is a mixture of coarse and medium sand and Portland cement. It resembles a stiff bricklayer’s mortar as you install it on the waterproof membrane.

Slope Pebbles To The Drain

Keep in mind the cement mud must have a gentle slope towards the shower floor drain so all water in the shower runs into the drain and doesn’t puddle. The installation of a cement mud floor requires considerable skill. By the same token it’s possible for a rookie to get it right if you just take your time.

I use thinset mortar to bond the pebble sheets to the cement mud floor. The thinset is waterproof and it contains Portland cement which helps create a permanent bond.

Cut Pebbles With a Diamond Wet Saw

Another key point is cutting the pebbles. Master tile setters years ago used nippers to make precise cuts to mosaic tile that resemble the pebbles. Nippers are a tool that pinch tile or the pebbles taking small bites of material. Cuts made with nippers take lots of time.

A diamond wet saw is the modern way to cut the pebbles. It won’t make sense for you to buy one for just one job. Try to rent one of these saws from a tool rental business near you.

CLICK HERE to get FREE & FAST BIDS from local tile setters who can install pebble tile.

You can minimize your rental cost by dry setting the pebbles in the shower floor without the thinset. Make all your cuts at once and don’t worry about setting the pebbles in wet thinset. Professional tile setters may have a helper feeding them cut pebbles so the pieces are set in wet thinset that has not skinned over.

You don’t need that pressure as a rookie. Make all your cuts in a few hours and then return the saw to keep your cost to a minimum. Once you get back home, mix up the thinset and install all the pieces at once with no delay.

Spread Thinset With Correct Trowel

Use the correct notched trowel to spread the thinset. The pebble manufacturer should have in the written instructions which sized trowel to use. A 1/4 by 1/4-inch square-notched trowel is the most common one to use.

You’ll use sanded grout to fill in the gaps between the pebbles. Sanded grout is a blend of Portland cement and fine silica sand. As a result, it’s extremely durable. The silica sand wears like iron.

Rounded pebbles look more interesting and will massage your feet, but it will require more grout than if you had used flat or sawn pebbles. Grout is not expensive, so if you like the rounded look and feel, then don’t worry about how much grout is required.

To summarize, before you select your pebbles, take lots of time to look at the wide variety of colors, shapes and textures. Some colors are striking and when coupled with a complimentary wall tile, you’ll have a shower worthy of a cover shot for one of the leading home magazines!

CLICK HERE to get FREE & FAST BIDS from local tile setters who can install pebble tile.

Column 1219

Surviving the Storm

Deck Funiture after storm

The Nor'easter scattered the deck furniture and pasted leaves everywhere. Copyright Tim Carter 2017

Surviving the Storm

A ferocious Nor’easter lashed central New Hampshire last night and my family and I did a good job of surviving the storm. The howling wind and rain knocked out my electricity before midnight. My cable Internet access was cut as well. It was impossible to get a good night’s sleep.

Standby Generator For Storms

I have a standby generator that powers essential systems in the house, but for some reason it failed to automatically start. I trudged out to manually start it an hour ago in total darkness. When you live in a rural area, you have a crisp understanding of the phrase pitch black.

It’s important to note I set a very powerful flashlight by the front door just a few days ago. Without that handy tool, I may have had to depend on the LED flashlight in my cell phone that currently has no service.

Coast flashlight

I love love love this flashlight. I own two of them they're so good. CLICK THE PHOTO NOW to have one delivered to your home.

The powerful storm has obviously done serious damage to the local cellphone towers near me, but I’m unable to find out as I’m now completely and utterly disconnected from all incoming news.

I’d like to add I’m very fortunate that it’s a balmy 60 F outside right now. It could have been 15 F with a foot of snow on the ground.

Related Links

Amazing Litium-Ion Small Storage Battery with Solar Trickle Charger


Cut Off From The World - What Now?

I sat at our breakfast table in a small state of consternation after coming inside from powering up the 17,000-watt generator. The lack of sleep and my dependency on having constant access to the Internet has created a fog of complacency that has frustrated me as I sit here.

I suspect I’m not alone. I’m willing to bet you, or someone you know, has become far too dependent on technology and modern conveniences. You may be surrounded by the same fog that surrounded me the past few years but don’t realize it.

Create the All-Important Checklist

I decided to write this column to help you and to create my own checklist so the next time a big storm hits, I’ll not only be ready to deal with the aftermath, but I’ll be able to go about most of my normal daily routine.

I’ve seen countless get-prepared checklists over the years. Most of them are quite good. You may be one that says, “Those are great ideas. I’ll knock out that checklist when I get around to it.” A week, a month and a season goes by and you’ve done little or nothing to get prepared.

Electricity is the cornerstone of surviving for most of us. It powers just about everything in your home you use on a daily basis including flashlights.

I’m now a fan of rechargeable flashlights that don’t depend on traditional batteries. I now have several flashlights that can be recharged with a 16,000 mAh storage battery that has its own small solar trickle charger.

Solar Charger

Here's the storage battery minutes after unpacking it. It comes with a handy carabiner so you can attach it to the outside of a backpack. This allows it to charge up as you hike. CLICK THE PHOTO to have one delivered to your home in days. Copyright 2017 Tim Carter

I suggest you invest in several of these so you can keep your cellphone topped off and even recharge a laptop if need be.

28-Watt Solar Panel Charges Many Things

I also own a 28-watt folding solar panel that connects directly to a hefty lithium-iron-phosphate battery. This battery not only has a built-in controller that regulates the incoming electricity from the solar cells, but it also has an inverter so it can convert the stored DC power into 120 volts of AC power. Small appliances or a traditional transistor radio can be powered by this very clever power pack.

Solar Panel

This is a magnificent foldable solar panel. It generates 28 watts and will rapidly charge 12-volt batteries. It has a built-in transformer so you can charge anything that uses a normal USB cord! CLICK THE PHOTO NOW to have this great solar panel delivered to your door.

Don't Depend On Electronic Memories

How good is your memory? How many telephone numbers have you memorized? Something tells me you’ve delegated this job to the memory chip inside your cellphone. If your cellphone battery dies and you can’t access your contact list, how will you call up the contractors, roofers, electricians, plumbers, etc. that you might need to help you restore your life back to normal.

It’s time to get a small waterproof note pad and write down important phone numbers that are need-to-know not nice-to-know. I have some Rite-in-the-Rain waterproof note pads up in my office, but guess what? Each page is completely blank. By the end of today, you can bet I’ll have stored many important numbers the way it was done twenty years ago.

Rite In Rain Notepads

These are fantastic waterproof notepads. They come in MANY sizes, formats and colors. CLICK THE PHOTO NOW to have these delivered to your doorstep.

What are the absolute basic things you need to survive for 24 or 48 hours? Make that list. Where are these items? My guess is they’re scattered all about your house.

What happens if you have to leave your home fast? A wildfire, a train derailment or some other calamity could cause local authorities to evacuate your neighborhood.

Great Daypack for Documents / Must-Haves

Give yourself an early Christmas present and purchase a go bag or a nice daypack that has enough storage space to hold all you need. Inexpensive things that you can duplicate can be already packed. More expensive things you need can be rearranged in a nearby location so you can pack up and be gone in ten minutes or less.

Northface Daypack

You need to have a pack already made up. It needs to be NEAR an EXIT of your home. CLICK THE PHOTO NOW to have a great daypack at your doorstep in days.

There’s a huge advantage in going to this effort. When you get stressed out by the disaster, you might not think clearly. You may forget some all-important item. You may waste valuable time trying to find something in the dark or the debris field surrounding you. When your life gets upended, you don’t need small problems to take up valuable time and resources.

Create a Communication Plan With Friends

I was really frustrated an hour ago because I couldn’t even reach out to my best friend who only lives eight miles from me as the crow flies. We’re both amateur radio operators, but I had failed to set up some agreed-to plan as to exactly how we’d use our battery-powered radios to communicate. That plan will be in effect by the end of the week for sure.

Chainsaw Can Save the Day

You may want to consider hand or gasoline-powered tools you might need to claw your way back to civilization. I own a powerful chain saw. I always make sure I’ve got plenty of fuel and extra chains. Three years ago, a freak snowstorm with wet heavy snow trapped me at the end of my street. It took hours of work to cut a path to freedom.

I suggest you gather all of the disaster preparedness checklists you can find and pluck tips from them that fit your life like a glove. Devote a day or just part of a day in the next two weeks to complete the most important things on the checklist.

I know I’m going to do everything possible to burn away the nasty fog that slowly and covertly surrounded me over the past few years. You should too.

Column 1220

Builder Abandons Job

Builder Abandons Job TIPS

  • Talk with general manager of local lumberyard
  • Request detailed cost breakdown in bidding process
  • Only pay for satisfactory work and materials stored on job site
  • Plans and specifications must be excellent
  • CLICK HERE to Get Tim's FREE & FUNNY Newsletter!

This column will help prevent the agony caused when a builder abandons a job. Yesterday, my oldest daughter Meghan and her husband Brent arrived at my house here in central New Hampshire. They flew in from California and tomorrow my wife and I will join them on an adventure to Mount Desert Island on the coast of Maine.

They plan to buy a lot so they can build a new home. My wife and I were invited to tag along to help guide them so they don’t make a mistake purchasing a bad piece of land.

A No-Show Builder in New Hampshire

Three days before, as my wife and I were getting back home from church we drove past a new house on our street that’s still unfinished. The builder started the home in May of 2016 and it should have been occupied by last Christmas as it’s not a very big nor complicated home. I met the single mom who owns it back in March as the building site was covered in a slushy snow.

Free & Fast Bids

CLICK HERE to get FREE & FAST BIDS from local builders who can help your dreams come true.

Related Links:

Finding a Pro Builder / Contractor

Payment Tips to Contractors


Builder Abandons Job

Construction started on this house three years ago. The builder poured the foundation and put on the first floor subfloor and then abandoned the job. A month ago, the walls and roof finally went up. (C) Copyright 2017 Tim Carter

On that day, she told me how she was having a tough time getting the builder to show up each day. She was bound and determined to move in by May 31st. It’s important to realize there were thousands of man-hours of work still left to do. Not knowing her at all, I didn’t have the heart to tell her that she’d be lucky to be in by Labor Day having seen how slow the project was moving.

The progress on this home has now ground to a halt. There’s been no activity for weeks. Kathy said as I was pulling into the garage, “That poor woman’s life has been ruined by the builder. I don’t want this to happen to Meghan and Brent.

Job Restarted After Three Years

Each time I go into town, I pass another new home job site. The foundation was installed three years ago and the house sat. Construction has finally resumed in the past six weeks. I don’t know any facts about this situation, but I know how to avoid it.

How to Prevent a Builder Abandoning a Job

Dad, how do you prevent a builder from abandoning a job?” Meghan asked me yesterday afternoon while we sat at a table. I know from reading hundreds and thousands of distressing emails that many homeowners suffer from this dilemma.

I shared the following advice with Meghan and Brent while we chatted. It’s important to realize the issue is complex. In the first place, you need to perform due diligence to find a professional builder who drives a project like a determined marathon runner runs a race.

CLICK HERE to get FREE & FAST BIDS from local builders who can help your dreams come true.

Go To The Lumberyard

Generally speaking, the first thing to do is talk with the general manager or owner of the largest lumber yard in the town or neighborhood where you’ll be building. You ask this business person for the names of builders that pay their bills early, only buy the best materials and are the only builders that the general manager or lumber yard owner would have bid on their own homes.

It must be remembered that the people running the lumberyard know who the true professionals are. They also know the builders who are to be avoided like the plague. It’s best to visit two different lumberyards if possible to see if you can get one builder’s name to pop up twice.

Find The Pro Video

Watch this video to see how to find a great builder or remodeler.

Know All the Costs

It’s equally important to obtain a very detailed cost breakdown of the new home. I created a spreadsheet years ago that’s available at my website. This document has 100-plus rows where you enter a crisp number for each thing that needs to be done to build a home.

For example, the spreadsheet forces you to put in a number for the foundation cost, the cost of the windows, all plumbing fixtures, the rough carpentry labor, and all the other costs to construct the home.

Tight-Fist Control of Money

You must have this information so you can control the flow of money as the project proceeds. You only should pay for items that have been installed to your satisfaction as the home is being built.

If you have a construction loan, the lender will usually only issue checks for work that’s been complete, but believe me their inspectors can be fooled or give away far too much money.

IMPORTANT TIP: Money is the only real motivator you have when building. You never have to worry if you have hired a professional.

However, having a choke hold on the flow of money allows you to sleep at night in the event your builder walks off the job or slows the project down. You’ll always have enough money to bring in another builder to complete the project.

Must Have Great Plans & Specs

A point often overlooked is it’s vital to have excellent plans and written specifications. A great set of house plans might contain twenty or more pages. Written specifications cover all the other things that don’t show up on the plans. These documents allow you to avoid confrontations or change orders that can cause delays and frustration.

Fire-The-Builder Clause

It’s equally important to have a simple paragraph in the contract that allows you to void the contract with the builder if no progress is made for a specified amount of time. There are certain weather conditions that might lead to a delay, but that should be discussed before you sign the contract with the builder.

In the final analysis, there’s more you have to do to ensure the builder does not abandon your job. The most important thing to do in my opinion is to spend the time up front asking tough questions of the lumber yard managers, the top local realtors and even talk with a few of the local residential architects who regularly work with builders.

All of these professionals know who the best builders are. Put on your Columbo trench coat and do the detective work required to locate the best builder. Rest assured I’ll be starting that process this weekend along the coast of Maine!

CLICK HERE to get FREE & FAST BIDS from local builders who can help your dreams come true.

Column 1218

Helly Hansen Rain Jacket

Helly Hansen Rain Jacket

Here I am staying nice and dry in my vivid blue Helly Hansen rain jacket. It really helps make my blue eyes pop! Copyright 2017 Tim Carter

I've been testing a Helly Hansen rain jacket for months. If you want to split hairs, it's official name is the Helly Hansen Chelsea Shell Jacket. But few use all those words when doing an online search to find this gem.

It's my policy to put products through real and extended testing so I can share with you a valid review.

Helly Hansen Rain Jacket Performance

This rain jacket is the absolute best one I've ever worn for any number of reasons.

In the first place, it kept me dry as a bone when I wore it in heavy rain. The jacket also was cut to fit very well.

Equally important the jacket looks fantastic.

Great Visibility From Reflective Stripes

This Helly Hansen rain jacket has some very sleek reflective stripes on the back, front and the bottoms of the sleeves. This comes in very handy as I like to walk down the dark rural streets near my home in central New Hampshire late on a winter day.

In late December, it's completely dark by 4:45 PM so this safety feature is very welcome.

If you want to purchase the exact men's Helly Hansen rain jacket you see here, CLICK HERE.

To view all of the different Helly Hansen rain jackets for men and women, click here.

helley hansen rain jacket sleeve

Here's the bottom of one of the sleeves. I loved the adjustable hook-and-loop adjustment, the black color that doesn't show dirt and the reflective safety stripe does a great job alerting drivers as your arms swing as you walk. Copyright 2017 Tim Carter

helly hansen rain jacket underarm vent

Here's a handy feature - an underarm vent. Unzip this vent to help keep you cool and to vent water vapor back to the atmosphere. Very clever. Copyright 2017 Tim Carter

helly hansen rain jacket rain beading

Rain doesn't stand a chance. It beads up and rolls onto the ground. Copyright 2017 Tim Carter

helly hansen rain jacket interior liner

The interior of this rain jacket is an open webbing that really allows you to breath. Behind the webbing is another layer that keeps you warm. Copyright 2017 Tim Carter

Given these points made in the above photos, this Helly Hansen rain jacket is hereby awarded the prestigious Ask the Builder 5-hammer rating.

It doesn't get any better than that - five out of five hammers!

Thanks Helly Hansen for making such a wonderful product!

Click here to read my Duluth Trading Firehose Flex pants review. They're great too!