This switch looks somewhat normal, except for the soot around the edges. Wait until you see the back. ©2016 Tim Carter via anonymous friend contribution.
Dimmer Switch SAFETY TIPS
- Most dimmer switches rated for 600 watts
- Convert unused electricity to HEAT
- Electric heaters 1200 watts, or more!
- Wall switches could operate a full or half a wall outlet
- Use RED Sharpie pen to mark outlets
- CLICK HERE to subscribe to Tim's FREE & FUNNY Newsletter
Plugged in Space Heater
Several weeks ago a very good friend of mine and his wife almost became a grim statistic compiled monthly by the National Fire Protection Association (NFPA). He was trying to keep his wife warm in her home office and plugged a simple electric space heater into a wall outlet at her request.
Although it appeared to be a normal duplex wall outlet where you could plug in two cords, it was anything but normal. The outlet happened to be a split outlet. What's that? Keep reading as you probably have a few in your home.
My friend had a 50/50 chance of everything going just fine, but he chose poorly.
CLICK HERE to get FREE BIDS from electricians in your city or town to safely install a dimmer switch.
He plugged the heater into the one receptacle that happened to be controlled by a wall switch. The other half of the receptacle was wired directly to the circuit breaker and not controlled by a switch.
But it wasn't just any wall switch, it was a dimmer switch.
Switch on FIRE!
The instant current began to flow through the dimmer switch, it began to heat up.
Most common dimmer switches you install in a home have limited function. They can only handle about five amps or 600 watts.
The space heater my friend was using drew, at a minimum, 1200 watts!
CLICK HERE to get FREE BIDS from electricians in your city or town to inspect your wiring and switches now.
Heat From Unused Electric
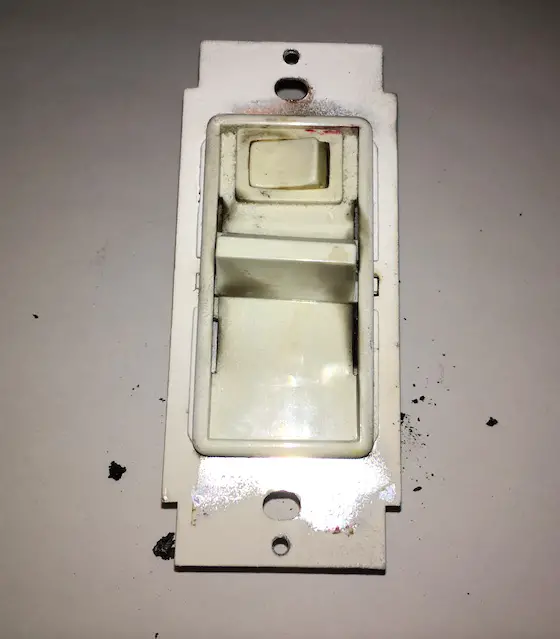
Here's what you need to know about dimmer switches. If you turn the dimmer knob or use one with a slide control like the one you see above so the lights get dim, the current that was supposed to flow to the lights is kept in the dimmer and transformed into heat.
600 Watts Usually
But the heat sink in the dimmer can only handle so much current. Almost all dimmers come with a CAUTION warning on the back of the switch telling you that you should not have more than 600 watts flowing through the switch.
That only person who sees that warning is the electrician who installs the dimmer. Once the switch is in the electric box and the cover plate is on, regular people like you are oblivious to the danger.
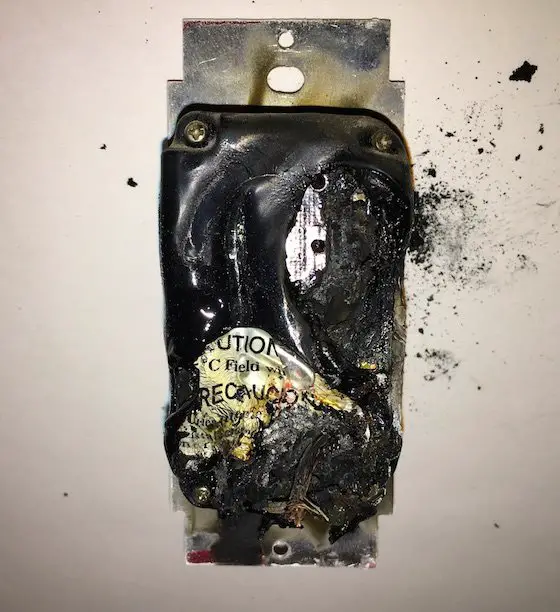
You can see how much plastic burned. You can also see some of the letters from the CAUTION warning label. Dimmers are time bombs waiting for their next victim. (C) Copyright 2016 Tim Carter via anonymous friend who is still breathing along with his beautiful wife.
It didn't take long for the fire to start in the electric box. Within minutes of plugging in the heater and turning it on, my friend luckily saw small flames coming from the switch.

Here's a dimmer switch for LED and regular lights. I believe it works for CFL bulbs to. CLICK THE IMAGE ABOVE TO ORDER IT NOW.
Empty Room = Death
But what would have happened had both of them left the room? What would be the outcome had they gone to bed?
We both know what would have happened.
Be sure you never overload a dimmer switch.
NEW Technology Protects You From Dangerous Arcing
Are you terrified of burning up in an electric fire at your home? You can install in minutes a sophisticated device called Ting that plugs into an outlet in your home. Look below at the photo caption for a SPECIAL promo code. It connects to the Internet via WiFi. The device sends data about your electrical system to a company that monitors your entire home.

This is the Ting Arcing monitor. It plugs into any outlet, connects to the Wifi in your home, and then starts to protect you, your family, and all your possessions. CLICK or TAP HERE for a Special Discount exclusive to Ask the Builder newsletter subscribers and website visitors. IMPORTANT: Use the promo code TIM10 (note UPPER CASE) at checkout for exclusive savings. Note that Tim Carter gets a very small commission from TingFire should you purchase using the above link. Tim only promotes products he trusts and uses in his own home.
An app on your smartphone allows you to check the condition of your home's wiring at any time. Here's a screenshot of the app on my phone showing all is well:
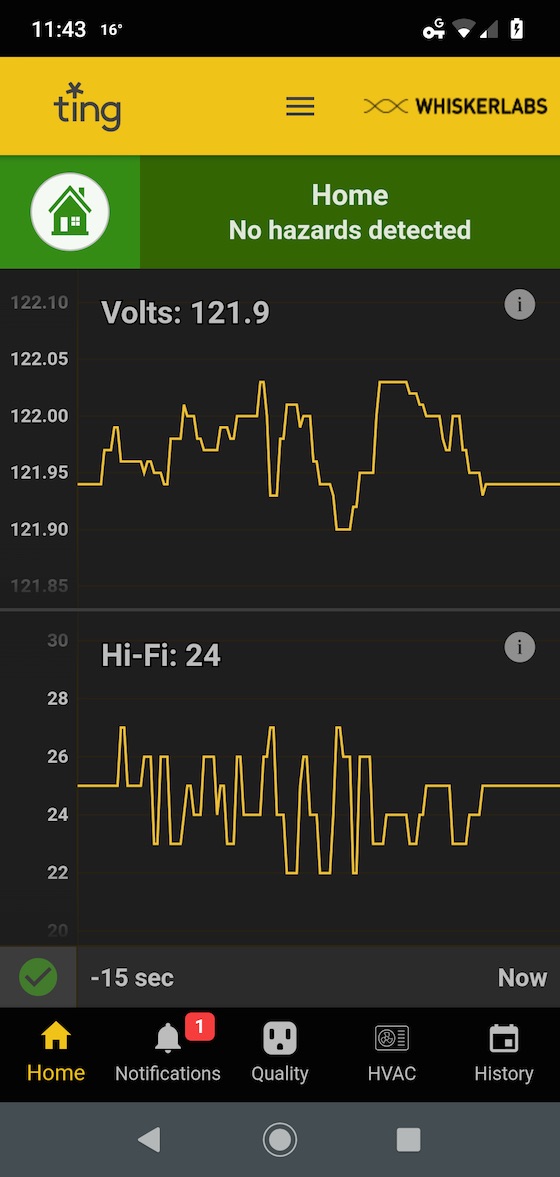
This is the home screen of the Ting App. The green bar at the top shows all is well. If Ting senses an issue in your home's wiring, you get an instant push notification on your smartphone app as you see above, the red #1 above Notifications. In addition, the Ting service center CALLS you on your phone should it detect hazardous arcing! In my case above, that notification told me that I had a minor power outage at my home. CLICK or TAP HERE to purchase one priced with a special AsktheBuilder discount. Don't forget to use the promo code: TIM10 for a big savings
Warning Label on Outlets
If you have outlets in your home in any room that are controlled by wall switches, PLEASE go to the outlet cover plate and use a RED Sharpie fine-point permanent marker and write a WARNING on the cover plate. You can write this:
If this outlet is controlled by a dimmer switch, do NOT plug in a heater, hair dryer or any other thing that draws more than 500 watts.
I suggest the 500 watts because you might as well have a slight margin of safety.
20-Amp Circuits
Electric space heaters should be plugged into circuits wired with 12 gauge cable that's rated for 20 amps. When I built my last home, that's all I used. I didn't have one piece of 14 gauge wire in my home. I refuse to use that size wire.
But remember, you can't mix and match cable sizes! Don't think you can add a piece of 20-amp 12-gauge cable or wire to an existing 15-amp circuit that is wired with 14-gauge cable! The amp rating for any given circuit is dependent on the SMALLEST SIZE cable in the circuit.
15-Amp Circuits
14-gauge wire is only rated for 1800 watts or 15 amps. 12-gauge wire is rated for 2,400 watts or 20 amps.
Are you worried about your dimmer switches? Are you wondering if you and your family are SAFE?
CLICK HERE to get FREE BIDS from electricians in your city or town. Let them come over and inspect your dimmers and circuits to make sure you don't die in an electrical fire.