Natural Stone Pathway

flagstone patio

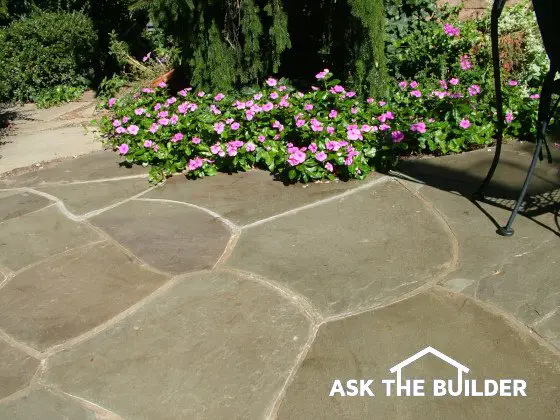
This is a flagstone patio I installed. You can't see the hydrated lime in the mortar, but it's there. Copyright 2023 Tim Carter

DEAR TIM: I would like to build a simple garden pathway using natural stone. Are there natural stones that I can use that are both durable and affordable? How would you create a natural-looking pathway using stones? Sarah T., Gastonia, NC

DEAR SARAH: I knew my college geology degree would come in handy! There are numerous natural stone products that can be used to create colorful and durable pathways in your garden or in any other part of your yard. Several products can also be used to build low, mortar-less retaining walls. I have seen quite a few highly durable and colorful natural stone products on my many geologic field trips.

Some parts of the nation are blessed with local outcroppings of natural stone that you can mine yourself. We have these in my own hometown. Southwestern Ohio happens to have an abundant supply of layered gray and buff-colored limestone. Limestone is calcium carbonate - a durable natural stone. Limestone deposits often appear in thin layers that make it easy to quarry.

Other parts of the nation have natural stones like slate, sandstone, flagstone, and granite. I was taught in college that stones that contain the highest amount of the mineral quartz tend to be extremely durable. Sandstone and quartzite are wonderful natural stone products that contain nearly 100 percent quartz. Some quartzites are available in a series of buff and brown tones while others can be found that are a rich medium green in color. The quartz particles within the rock shimmer when the sun strikes them just right.

The biggest problem in obtaining natural stone is usually the cost to ship the heavy material from the source to the point of use. For your garden path, you should consider a stone that is thin yet strong. By doing this you will get more surface area covered per ton of material delivered. Quartzite, slate, flagstone, and some limestones can be found that meet these requirements. Many large home center stores across the nation are beginning to stock natural stone products that are perfect for your project. Quartzite is available at many home center stores for just $2.50 per square foot. You can also locate natural stones by checking your Yellow Pages under the "Stone Products" heading. AUTHOR'S NOTE: You can tell this column was written before Google existed. The Yellow Pages and Classified Ads in newspapers were the search engines before the Internet existed.

To build the appealing path in your garden you will need minimal tools. A round-point shovel, a square point spade, rake, mason's hammer, level, string, small wood stakes, and a wheelbarrow will enable you to complete this project. Layout your path using the string and stakes. An 18 to 24-inch wide meandering path is usually suitable for one person to walk along. If you intend to have two people walk side by side down the path, plan for it to be 42 to 48 inches wide. Once the path is planned, you can calculate the square footage of stone material you will need.

I prefer to use crushed stone under and around the natural stone products. A 4-inch thick layer of crushed stone will provide plenty of support for foot traffic. You can purchase this crushed stone at gravel pits or quarries that sell this material to contractors who install blacktop or asphalt driveways. Be sure to get the grade of crushed stone that contains rock dust and stone chips that range in size from 3/4 inch down to the size of a pencil eraser. The rock dust and small stone chips will eventually interlock and resemble hardened concrete.

crushed washed gravel linear french drain

This is an example of crushed stone. It's best to use some that does contain different sizes of stone chips as well as some sand. Copyright 2018 Tim Carter

Use the round point shovel to do your initial excavation. The square spade can be used to cut a smooth surface in the soil to accept the crushed stone. Install the gravel and smooth it with your rake so that the center of the path is slightly higher than the edges. A slope of 1/8 inch per foot is acceptable, however, a one-quarter-inch slope per foot will work even better. This slope prevents the puddling of rainwater.

Trim the stones with the mason's hammer so that you have approximately one inch of space between the stones. If the stones wobble after you lay them in place, use hand fulls of fine stone chips and dust to fill in the void spaces beneath the stones. Once you are satisfied with the layout, sweep fine stone chips and rock dust into the joints around the stones. Water the pathway using a garden hose and enjoy the stroll through your garden!

Related Articles:  Natural Stone Path, Suppliers of Natural Stone, Building a Path of Natural Stone

Air Conditioning Sizing Problems

air conditioning

These are two AC units outside my own home. I have two separate systems in my home, one for the first floor and one for the second floor. Copyright 2018 Tim Carter

DEAR TIM: I have never been satisfied with the performance of our central air conditioner. Even though the unit runs 45 minutes or more each hour, the house never seems really cool. All of the rooms that face west become unbearably hot in the late afternoon. A neighbor's house across the street has an identical floor plan and their house seems very comfortable. Periodic checks of our system indicate that the refrigerant level is fine. Why am I so hot? Ron W., San Marcos, TX

DEAR RON: Your discomfort can be caused by any number of problems. However, I suspect that a mistake was made when you house was built. It is a distinct possibility that the outdoor air conditioner and the coil inside your air handler or furnace is too small.

I think that the cooling contractor either made an error in his sizing calculations or simply guessed at the size air conditioner needed to cool you home. Air conditioners are like shoes. Ones that don't fit are simply uncomfortable!

All houses attract and create heat. The infrared energy contained in natural sunlight is the heat energy that comes through windows, doors, air leaks, and through insulated walls and ceilings. Appliances, light fixtures, even our own bodies create heat within houses.

CLICK HERE to get FREE & FAST BIDS from local AC Technicians who can install the right sized AC Unit for your home.

All of this heat can be easily measured. Air conditioning contractors and manufacturers refer to the accumulated heat as heat gain. It is measured in British Thermal Units (Btus).

Air conditioning equipment comes in different sizes. The cooling capacity of a particular system is measured in tons. One ton of cooling equals 12,000 Btus or the amount of heat it takes to melt one ton of ice in a 24 hour period. Typical residential air conditioners can be purchased in sizes that range from 1 ton to 7 tons often in one-half ton increments.

My guess is that you and your neighbor have the same sized air conditioners.  Their house is comfortable because they have much less glass surface pointing west.  West or southwest facing glass allows enormous amounts of heat into your home.  This explains why your west facing rooms are so hot.

Air conditioning engineers have developed straight forward step-by-step procedures that allow just about anyone to calculate with considerable accuracy just how much heat accumulates in their house.

To calculate your house's heat gain, you simply need a measuring tape, notepad and pencil, a simple calculator, a compass, cooling load calculation tables, and several hours of your free time.

You first need to obtain a copy of the cooling load calculation tables. Cooling contractors and those in the industry commonly refer to this publication as Manual J. The tables are published by the Air Conditioning Contractors of America.

You may be able to find a copy of Manual J at your local library or from an air conditioning contractor of distributor in your city. The booklet looks intimidating but if you can follow step by step instructions, you can do the calculations quickly and accurately.  If your final total of Btus is in the tens of thousands (20,000 - 55,000 or more Btus), then you have done well!

Once you have completed your calculations and checked your math for accuracy, you need to look at your outdoor air conditioning unit.  Often you will readily see a plate that contains a model number, serial number and other numbers. 

The tonnage capacity of your unit is contained within the numbers on this plate. Your air conditioning service person can quickly tell you how many tons of cooling your air conditioner will produce after reviewing these numbers.  Divide your final total Btus by 12,000 and see if the two numbers match!

CLICK HERE to get FREE & FAST BIDS from local AC Technicians who can install the right sized AC Unit for your home.

Column 231

A Saw Horse Substitute – Tim’s Carpenter’s Bench

Years ago, a carpenter buddy of mine, Chuck Sallee, made some dandy carpenter's benches at a job we were working on. I liked them so much, I ended up making countless numbers for myself and friends. I even made a set on TV one day! You will love these strong benches.

Carpenter's Bench

DEAR TIM: I have never liked working with saw horses. I'm looking for a simple work platform or bench that I can use for various purposes around the house. My guess is that you were also frustrated with saw horses. What did you use in the on your jobs? Is it easy to find one in a store? If not, how do you build one? Melinda B., Cardwell, MT

DEAR MELINDA: Saw horses are okay for certain tasks but I only use them as a last resort. My weapon of choice around the jobsite is a wonderful multi-purpose carpenter's bench that I make from scrap lumber. The environmentally friendly benches are usually made by lunch of the first day. I use the scrap lumber that is generated during the construction of the wooden sub-floor or wall assemblies. The benches are far stronger than traditional saw horses and they also serve as a tool caddy, emergency stepladder, and a great place to sit down and eat lunch.

This bench has seen years of service. I use it as a painting platform as well as a tool bench.


You can see how well the bench supports a large miter saw. The lower shelf is handy for other tools or supplies.


You will not find my bench in a store, however you can build one in less than a half hour using some simple tools and minimal lumber. If your friends, neighbors and relatives are like my past customers, I guarantee you that you will be building quite a few of these great tools. I commonly left my benches behind for my customers as a gift. Trust me, your friends and neighbors are going to borrow your bench for extended periods of time and "forget" to return it.

To start this project you are going to need a circular saw, a drill with a one half inch spade bit, a jig saw, a level, a framing square, tape measure, pencil, a screw driver, and some 2.5 inch long galvanized coarse threaded screws. If you want a fancy bench you will need a router as well. Your lumber requirements are simple. All you need is a four foot length of 2 x 12 and a four foot by three foot piece of scrap 3/4 inch plywood or oriented strand board (OSB).

The completed bench measures 14 and 3/4 inches wide at the top, 32 inches long and it is 24 inches high. I always like to cut all of my lumber before I start to assemble the bench. The legs of the bench are made from two pieces of 2 x 12 that measure 11 and 1/4 inches wide and are 23 and 1/4 inches long. A V notch is cut in the bottom of each leg so that just a 2 inch long portion of the 2 x 12 contacts the ground at each corner.

All of the other bench parts are made with the plywood or OSB board. Six pieces need to be cut in order to begin assembly. If you are using plywood, be sure that all pieces are laid out so that the longest dimension is parallel with the grain of the wood. OSB layout is not as critical. The top measures 14 and 3/4 inches wide by 32 inches long. Cut out the top and bottom stabilizer braces next. The braces measure 3 inches wide by 30 inches long. The last piece to be cut is the bench's bottom shelf. It measures 11 and 1/4 inches wide by 27 inches long.

This is an adaptation of my workbench. It was built by Mike Radcow. As you can see, Mike used all 2x material to enhance the strength. But you also need to be strong to lift his model. It is a beautiful modification to my simplistic bench. Good job Mike!! PHOTO BY: Mike Radcow

This is an adaptation of my workbench. It was built by Mike Radcow. As you can see, Mike used all 2x material to enhance the strength. But you also need to be strong to lift his model. It is a beautiful modification to my simplistic bench. Good job Mike!! PHOTO BY: Mike Radcow

The bench assembly begins by attaching the top braces to the top outside 1 and one half inch wide corner of the 2 x 12's. Once attached, the top of each brace should be flush with the top of each leg. Use two screws at each connection point. The bottom braces are attached in the same manner. However, the bottom of the lower braces should be held up 4 inches from the bottom of the legs. The shelf can now be installed. If you cut your lumber correctly, it will fit snugly in between the legs and the bottom braces. The underside of the shelf should be flush with the bottom edge of the lower braces. Install 3 screws through each brace to secure the shelf. The braces act as shelf sides and form a convenient storage area within the bench. You will find this to be a perfect place to store nails, shims, paint brushes or other items for different tasks.

The final piece to be attached is the top. Once again, if all cuts are accurate you will find that the top overhangs the legs and top braces one inch on all sides. Attach the top by driving at least 3 screws into each leg and 2 screws into each top brace. Use the drill and jig saw to cut out a 2 inch by 4 inch rectangle in the center of the top. This cutout acts as a hand hold that allows you to easily lift and transport the bench using one hand. Equip the router with a profiled bit to give the top's outside edge and the interior edge of the hand hold a finished touch.

If you decide to stand on the finished workbench for any reason, be aware that it is unstable. If you shift your weight or change your center of gravity, the bench can tip without any warning (the voice of experience screaming!). You can fall and seriously injure yourself. Only use the workbench as a step stool as an absolute last choice. It is worth the trip to the garage or truck to get a stable step ladder.

Related Articles:  Work & Storage Bench Assembly, Carpenter Workbench with Tool Storage

Exterior Painting

DEAR TIM: I intend to paint the exterior of my wood house soon. I am confused about using primers. Is it a good idea to use a pressure washer on my house? Do I have to prime the entire house before I apply the finish paint? What can I do to maximize the life of this new paint job? Stephanie S., Athens, OH

DEAR STEPHANIE: I am not surprised that you are confused about primers. It seems like I get a different answer to each primer, paint and surface preparation question that I ask when I talk with paint salespeople. Fortunately the entire exterior painting process is fairly straightforward.

The largest obstacle you face is the one of instant gratification. I find that most homeowners and painters want to get the finish paint on the surface as quickly as possible so that they can "see" results. If you succumb to this temptation you can rob yourself of possibly 50 percent of the life span of your paint job. Surface preparation and the correct use of primers is essential to the performance of an exterior paint job. They also consume the most time.

The first thing I want you to do is to read the label on the can of your finish paint. I'll bet that you will find a sentence that contains the following sentence or phrase, "Apply paint to a clean, dry surface." How do you wash yourself each day? Do you just stand in the shower and let the water run over your body? My guess is that you use soap and rub it into your skin and then rinse it off. This is exactly what you are going to do with your house.

Pressure washing a house, in my opinion, is not a good idea. This method does not completely clean the surface. You can demonstrate this by using a pressure washer at a drive-in car wash. After using one there will still be a fine film of deep-set dirt on your car's finish. The same is true on a house. What's more, pressure washers used in the hands of a rookie can cause significant damage to wood. It can erode wood fibers and drive water deep into exposed soft woods. Water sprayed up under siding or into cracks between siding and trim can actually saturate the back side of the wood on your house and promote rapid peeling of the fresh paint.


Is the exterior of your house looking drab? Find the professional painters by using my Exterior Painting & Staining Checklist. I offer a 100% Money Back Guarantee.


Oil based primers are superb products. These products penetrate deeper into wood fibers. Oil primers also do a great job of sealing woods like cedar and redwood that can produce bleed stains when coated with water based products. Primers are a must on bare wood and previously painted surfaces that have bad alligatoring, blisters, or the paint film is eroded. If your existing paint job is fairly smooth and sound, you do not need to use a primer over the entire surface.

To get the most from you upcoming paint job the first thing to do is to remove all loose paint. Wash your house just like you wash yourself or your car. In other words, use soap and rub the entire surface with a sponge or scrub brush to remove all dirt. Rinse with clear water from a standard hose. Let the house dry for a minimum of two days before you continue.

Apply a rust inhibitive primer to any rusty nails. Countersink these and fill the holes with exterior spackling compound. Prime all bare wood spots and areas on the wood that require a primer. Apply a 100 percent acrylic latex top coat finish paint to all primed areas within 48 hours. This insures that the primer and finish coat will completely bond to one another. The acrylic paint also will not promote the growth of mildew on the paint. Oil based finish paints can support mildew growth.

Be sure to apply a sufficient amount of finish paint to the surface. It is not uncommon for a rookie to overspread the finish paint. Look at the label for the recommended coverage rate. If the label says a gallon of paint should cover 400 square feet, you better have used one half gallon of paint after you have brushed a 10 foot by 20 foot area!

Finally, try to paint when air temperatures are in the 70 F range and the relative humidity is in 50 percent range. Always paint a surface after the sun has passed and it is in the shade. Sunlight that strikes a freshly painted surface can dry a wet paint film too quickly and actually create blisters.

Related Articles:  Understand Paint & Painting Tips, Exterior Home Painting & Weather

Cutting Crown Molding – Upside Down and Backwards!

DEAR TIM: I have tried for the last 2 hours to properly cut the miters for crown molding that I am installing in my dining room. My cuts are not even close. What am I doing wrong? How do you cut crown molding correctly? What is the trick to getting tight fitting joints in corners? Dan K., Greensburg, IN

DEAR DAN: Been there, done that. I remember my first time trying to install crown molding. I struggled just like you did. After wasting three hours and countless feet of beautiful white pine crown molding, the lady politely showed me to the door of her house. I was really humiliated. After I finished beating myself up, I immediately went to the library and borrowed an illustrated book on crown molding.

It only took one illustration to show me what I had been doing wrong. It was so simple that I could scream. You probably were making the same mistake that I did. I'll bet that you were holding the back side of the crown molding up against the rear fence of your miter box saw, weren't you? After that didn't work you held the molding on the bottom of the miter saw frame. You then tried setting the saw at different angles didn't you? Those are all common mistakes.


Would you like step-by-step photos and instructions that show you how I install crown molding anywhere in a home?  If so, you might want my Instant Download Crown Molding eBook.

But, if you want to actually see me install crown molding in all the same places while watching an action-packed interactive DVD that was filmed in High Definition, then you may want my Crown Molding DVD.


Crown molding differs from wall baseboards and door and window trim. Baseboard, window and door trim moldings are basically rectangular in shape and fit flat on a wall once cut. Crown molding is actually a triangular shaped molding and the finished face sits at an angle to the wall and ceiling. Back when lumber was plentiful the moldings were actually triangular in shape. Modern moldings look similar to door and window casings because of the removal of the large mass of wood behind the molding face. This saves our precious natural resources but it causes lots of confusion when trying to miter it.

To get accurate corner cuts you have to hold the crown molding in the miter box at the same angle as it will be once on the wall. High quality miter box frames or power miter boxes can help you do this. The bottom and rear fence of the miter box actually mimic the 90 degree intersection of your wall and ceiling.


Remember,my Crown Molding eBook has complete step-by-step instructions with tons of color photographs that show you exactly how to cut crown molding. 100% Satisfaction Guarantee!


The first step in achieving professional crown molding cuts is to determine how far the molding projects away from the wall and how far down from the ceiling the molding sits when it is installed. Cut a 2 inch long piece of crown molding to accomplish this task. Place the small piece of molding into the inside corner of a framing square. Note how there is a small foot on the bottom back of the molding. You will also find a shoulder at the top of the molding. These two surfaces should contact the edge of the framing square squarely. Note the measurements where the molding ends in each direction and write them down.

Click here to watch a video on cutting crown molding the easy way.


Place the small cut piece of crown molding upside down in your miter box frame. Imagine that it is up on your wall. Adjust the molding in the miter box frame until the measurements match what you determined when it was in the square. Make reference marks on the saw frame so that you can hold the molding accurately as you saw it.

To accurately cut inside miter joints you simply need to remember that only the small bottom shoe of the molding will fit into the wall corner. The intersection of the finished face of two moldings meets out in space away from the actual corner. This means that the longest point of your molding once it is cut must be at the actual bottom of the molding.

I always first cut a one foot long left and right mitered corner. I check these for fit in each corner to see how they look. These pieces also serve as templates back at the saw to help me correctly visualize the molding as it sits upside down and backwards in the miter saw!


Remember, my Crown Molding eBook has complete step-by-step instructions with tons of color photographs that show you exactly how to cut crown molding. 100% Satisfaction Guarantee!


Powered Attic Fans – Attic Insulation Facts

powered attic ventilation fan

This is a powered attic ventilation fan. If it doesn't have excellent intake air around the soffits, it can actually vacuum air from inside your home.

DEAR TIM: I am trying to make my house more comfortable and lower my air conditioning bills at the same time. It seems to me that a powered attic ventilation fan will help. Will such a fan exhaust enough air to lower my attic temperature significantly? If not, what is the best way to exhaust hot air from an attic and lower cooling costs? Amy V., Magnolia Park, FL

DEAR AMY: This is a classic example of where common sense does not always prevail. I used to think like you that powered attic ventilators (PAVs) are a great way to get hot air out of attic spaces. It turns out that these rooftop and sidewall mounted attics fans can actually suck air conditioned air from your house into your attic space. What's more - in extreme cases - they can actually create serious life safety problems by back-drafting combustion gases into a house living space. I used to recommend PAVs for houses, but I don't anymore.

When a PAV is turned on to exhaust hot attic air, it begins to move massive quantities of air. Smaller fans can easily move 1,000 cubic feet of air per minute (cfm). More powerful or multiple fans can extract thousands of cfms of air.

This movement of air creates a natural low pressure inside your attic space. To equalize this pressure difference, air begins to rush into the attic space from multiple points. If you have many passive roof vents, large side gable vents, and/or excellent unobstructed soffit vents, then there is a good chance that most of the makeup air will originate from outside your home. If you have few passive attic ventilation inlets, then most of the replacement air will come from the inside of your home.

If you have your air conditioner running at the same time your PAV is operating, you are sending expensive cool air from your living space into your attic. This air seeps into your attic through the attic access panel and hidden holes in the interior wall top plates where plumbing vent pipes and electrical wires enter the attic. Air also can easily slip between the space between bowed wall plates and drywall. To complete the circle, hot and humid exterior air enters your living space. Your air conditioner now has to work harder and longer to keep you cool while that PAV is merrily spinning away up in the attic!

Recently, completed studies by the Florida Solar Energy Center have proven that as the sun heats up the wood roof sheathing and framing members in your attic they quickly and invisibly send this heat directly to the top layer of your attic insulation. The insulation in turn re-radiates this heat into the attic airspace. PAVs can lower the overall attic temperature to a slight degree but the secondary effects of sucking cool air from your house and possibly combustion gases into your living spaces offset this benefit.

The danger of sucking combustion gases from hot water heaters and any other combustion appliance is real. This is especially true in tighter, newer homes. To feed the voracious appetite of the PAVs, air will enter your home at the point of least resistance. This point is often a chimney or hot water heater metal B-vent pipe.

Your desire to lower energy costs and keep cool should begin by boosting the amount of attic insulation to offset high attic temperatures. Not only will the added attic insulation help you in the summer, it will also help you to lower winter heating costs. Remember that you must maintain at least 2 inches of air space between insulation and the roof sheathing. At the same time, you must be sure that air can easily enter the attic space through the lower portions of your roof or soffits and travel unimpeded into the attic space. Once there it can be gently vacuumed from your attic through continuous roof ridge ventilation systems every time Mother Nature exhales across your roof.

Related Articles:  Continuous Ridge & Soffit Vent Manufacturers, Insulation Values, Ventilation - Keeping Home & Attic Cool

Metal Roofing – Good Looking and Durable

DEAR TIM: I am in the market for a new roof. Asphalt shingles - even the fancy dimensional ones - do nothing for me. I really like the old fashioned look of the tin metal roofs. I see painted replicas on some commercial buildings. Can you install metal roofing on residential houses? Will painted metal roof colors fade? What kinds of metal roofs are available? Sally P., Simi Valley, CA

DEAR SALLY: Tin metal roofing was immensely popular in the late 1800's and early 1900's. Labor was inexpensive at that time and there was an abundance of craftsmen who could easily install the material. Metal roofing systems are still available and great strides have been taken to simplify their installation. Metal roofing also has a history of proven performance. Simple flat seam metal roofs have been found in buildings dated to 3,000 B.C.

Metal roofing is a superb material for residential buildings. If you choose the right system, you can get a roof that will easily last your lifetime and quite possible an additional 50 years or so. Expect to pay for this performance, however. Metal roofing is pricey. A metal roof can cost at least three to four times what you might expect to pay for a high quality asphalt shingle installation.

There are numerous advantages to using metal roofing. First of all, it is totally fireproof. If you live in an area that experiences wildfires, a metal roof just might save your home from a devastating roof fire caused by a wind blown ember. Metal roofs are made with environmentally friendly recyclable metals, such as steel, tin, aluminum and copper. A house with a metal roof can be extremely distinctive. When installed correctly, metal roofs are extremely wind resistant. A light colored metal roof can actually reflect a portion of the sun's radiant energy, thus lowering your cooling costs.

Aside from the traditional standing seam look, you can also install flat lock metal roofs and ones that look like traditional overlapping shingle type or Spanish clay tile roofs. Certain manufacturers have gone so far as to coat the metal roofing shingles with colored ceramic granules to simulate the look of asphalt shingles!

Don't hesitate to select a painted metal roof product. This is especially true if the paint has been treated with a clear fluoropolymer resin. This coating was originally used to inhibit corrosion on the inside of steel piping used in chemical plants. Fortunately someone decided to try it on top of paint to stop ultraviolet (UV) degradation and fading of colored paints. It works so well that painted roofs can retain 85 percent of their original color after 20 years of exposure.

If you decide to purchase a metal roof system, make sure that the installer uses all matching components during the installation. In other words, all assembly parts must come from the same metal roof manufacturer. Pay particular attention to instructions with respect to ventilation. Metal roof failures can happen and often the corrosion begins on the underside of the roofing. Condensation can form under some metal roofs. You need to make sure that the underside of your metal roof can breathe readily and dissipate the condensate water and water vapor.

Be sure your roofer follows written installation instructions to the letter. If you live in a high wind area, pay attention that the bottom and top edges of the roof are installed correctly. These areas of the roof receive the highest loads during sustained wind storms. Most metal roofs need to expand and contract readily. Special metal clips and fastening techniques are employed that allow the roof to move yet remain watertight. Be sure you hire a roofer that understands this vital concept.

Related Articles:  Metal  Roofing Cost ExamplesMetal Roofing ProductsResidential Metal Roofing

Interior Design

DEAR TIM: I am in a quandary. Recently I inherited some money from a dear aunt. I purchased an out-of-date home on a gorgeous lot. The entire inside of the house needs to be redone. Money is not really an object yet I don't want to waste nor make planning mistakes. What is the best way to design a perfect interior that will take advantage of the delightful exterior? Robin R. Sunbury, PA

DEAR ROBIN: Uh, let's see, have you given any thought to adopting a brother? You know, one that has extensive building and remodeling experience? Just kidding! I am sorry to hear about your aunt, but I am quite sure she knew you would invest the money wisely. The first thing to do is take a deep breath and relax. Intelligent planning will allow you to achieve exactly what you want.

To accomplish this project you are going to need to assemble three additional teammates around yourself: an interior designer, a seasoned residential architect, and the remodeling contractor who will put the finished plan into action. All three team members will need to work together towards your goal.

Early in the game the interior designer is probably the most valuable player. You need to draft a designer who is accredited by the American Society of Interior Designers (ASID). Many of these professionals have college degrees in interior design. They have been tested and trained to focus on how a room or series of rooms will be used. The designer will work closely with you to develop the best overall floor plan. After the function issues are addressed, they will address the feel and look of each room.

Before the designer gets to work you need to consult with the architect. This professional can quickly tell you what interior walls are the toughest to modify or move. Even though money is not an object, moving bearing walls can be costly and time consuming. Should it become necessary, bearing walls can often be replaced by large overhead or hidden beams. Have the architect draft a preliminary plan showing what walls are load bearing and those that are not. The interior designer will find this plan most useful.

You can assist the interior designer early in the process. Take photographs of any furniture that you currently own that you know you want to use. Begin to look at magazines and books that contain photos of things that you want. Assemble these and tell the designer what you like in each photograph. The designer may be able to detect a theme or color scheme based upon your photo gallery. Feel free to visit furniture stores as well. Fabrics, colors and textures in a simulated setting may trigger a desire in your mind.

Create a priority list. Put the things that are absolute needs at the top and the things that are lavish treats at the bottom. Eventually your budget will shake out what you will finally get.

Using all of your data, the interior designer should be able to draw up a preliminary floor plan. This illustration should be shared with the architect as soon as it is done. The architect will probably make helpful comments or suggestions that will keep the project pointed in the right direction. Once everyone agrees with the preliminary plan, the architect can begin to transform these ideas into working blueprints and specifications.

Once the plans and specifications are complete, the architect and designer can help you locate a reputable contractor. Architects and designers work with solid, knowledgeable contractors on a routine basis. They know the limitations of each contractor. Interview three contractors and ask for references. Go visit jobs that are at least one to two years old. Ask the homeowners about their contracting experience. Ask what they would do differently. If you do your homework, you will quickly spot the right contractor.

Say you can't afford an interior designer or you want to get some great ideas for decorating this may be a great way to start. Better Homes and Gardens' The New Decorating Book picks up where most large decorating books leave off. The illustrations and photos in this book are just fabulous. This 400 plus page book has nearly 500 glossy color photos of everything from whole houses to such details as picture arrangements and tabletop accessories that turn basic spaces into warm personal ones. Special features include, a quick-read format, house tours showing decorating solutions in action, room makeovers and much, much more. To purchase it, just click the photo of the book.

Decking Materials – Synthetic

Important - Read Author's Notes at Bottom of Column

DEAR TIM: I am going to build a deck. Some of the alternative decking materials appeal to me. The manufacturers brag that these products do not require periodic maintenance like traditional wood decks. It appears to me that many of the alternative decking materials cost more than wood. In your opinion, what are the pluses and minuses of wood and synthetic decking systems? What would you do? Mary T., Woonsocket, RI

DEAR MARY: This is a really tough question to answer. There just isn't a clear cut answer. I'm afraid it will boil down to an analysis of your personal texture and color preferences, mathematics, and how much long term work you want to put into your new deck.

Let's start with wood decking materials. I feel that a vast majority of people will agree that natural wood is the most visually appealing deck surface. The grain patterns, hues, and shades of different species such as redwood, cedar, cypress, and treated pine products is unparalleled. The synthetic decking systems have yet to produce a product that rivals the natural beauty of real wood. Wood naturally absorbs and dissipates solar energy. In other words, you can walk across many wood surfaces that have been in direct sunlight for hours without burning your bare feet.

The beauty of wood comes with a price tag. Wood deck surfaces require periodic treatments with synthetic wood preservatives and sealants. These products minimize damage caused by the sun's ultraviolet light and water. Synthetic sealants are not a food source for mildew and algae. Many highly advertised wood sealants contain natural oils that feed these organisms. Even the best deck sealants last only 2 to 3 years before re-treatment is necessary.

There are several types of alternative decking materials. Some are virgin vinyl materials. Others are made from recycled plastics or plastic resins and combinations of wood dust or fibers. You can even get aluminum decking materials. Many of these systems come with accessory railing and trim kits so that your deck will have a truly finished look.

Many, if not all, of these products are applied to a traditional treated lumber joist and beam system. This allows you to do your cost comparisons quite easily since the structural aspects of your deck will be virtually the same no matter how you finish the top of the deck. However, you can now purchase, in some markets, plastic joist and beam systems. These materials are completely rot resistant. Their only drawback is that they are bouncy. To achieve a stiff deck surface you need to oversize the plastic joists and/or space them closer together. This of course requires more labor and money than traditional wood.

EB015 Cleaning & Sealing Deck eBoo CoverA positive aspect of many alternative decking materials is that they require no periodic applications of sealers. The virgin vinyl products will look just like vinyl siding does after 10 or 15 years. Most decking materials that contain recycled plastics or resins and wood fibers or dust will weather to a gray color. The manufacturers tell you that these materials are stainable or paintable to achieve desired coloration, but if you do this, you start the vicious and never ending cycle of periodic maintenance.

The virgin vinyl products probably offer the best choice if you want minimal future work. However, on a sunny day, I guarantee you that you will need sunglasses and a pad while resting on the deck. These light colored materials readily reflect sunlight and can get quite hot. Don't forget that light colored decking products will require annual or monthly washings. They will show airborne dirt much more so than regular wood decks.

Before you make your final decision keep in mind that all decks will have to be cleaned on a routine basis. If you choose to go with natural wood, you will just have to calculate the annual or periodic cost of sealing the deck on a square foot basis and add this to the original installed price. Compare all systems on a simple square foot price completely installed. Factor in how many years you think the deck will last before you want a change. Divide the cost per square foot by the number of years and you will see the annualized cost of your new deck.


Building a deck? Make the best decisions with my helpful and thorough Deck Installation & Repair Checklist. I offer a 100% Money Back Guarantee.


Author's Notes:

February, 1999

After this column ran in the newspapers I received several letters and e-mails from vinyl decking manufacturers. Some of them objected to my editorial comments. Certain vinyl deck manufacturers claim that their materials are actually cooler to the touch in direct sunlight than wood. My advice is for you to visit a home or business that has the material you want to use in place. See for yourself if the decking is hot, warm, or cool. Look to see how clean it is. Take off your sunglasses while you are there as well. In other words, test drive your decking before you buy.

November, 2003

Since this column was written a substantial amount of different alternative decking products have been introduced to the market place. Many are composite products that mix either virgin vinyl or recycled vinyl/plastic with either new wood fibers and/or recycled wood fibers. As with vinyl siding, the manufacturers of many of these products are doing whatever they can to mimic the look and feel of real wood. I think they do this because many of us love the actual look and feel of real wood.

Perhaps the most interesting thing about these products has been the turn-around I have witnessed with respect to the stance on maintenance. Years ago when these products were introduced, many said they were "maintenance-free". I disagreed then and disagree now with that stance. Most of the sales literature from the alternative decking materials now says "low maintenance" not no maintenance.

So therein lies the problem for the average consumer. What does it really cost to maintain a wood deck over time vs. the cost to maintain a deck built with one of the composite materials? Do you really get a payback? Finally, don't ever believe you save money right out of the box when you buy a more expensive product. I have seen literature for these composite decking materials that say they save you money. You never save any money until such future time that you actually have gotten back the extra money you spent originally. Furthermore, to really save money you need to get backany interest you may have made on that money while it sat in a bank account.

July, 2004

I just received this e-mail from Martha Mokarry and had to share it:

I just thought I would add my two cents about vinyl decking. We had Durable Deck(R) (DD) placed over our old wood deck. It was a nightmare. If the wood beneath became dry the DD morphed. The deck was dirty all the time. It was easy to clean but who wants to scrub the deck every single day with full strength Simple Green or 409 and a scrub brush? It had to be swept, scrubbed and even blown off in the direction of the embossing.

The dirt and pine tags and debris collected in the spaces between the stuff and were tedious to remove. It was not hot to walk on like the wood but when it was wet it was very slick even with rubber soled shoes and when we pushed snow off the first time I nearly broke my neck sliding.

We have pulled off about 1/3 of the DD. Not an easy task since the installer put about 70 screws in each 20 foot board. The amount of dirt and debris under that portion was about a 5 gallon bucket worth. The wood under the vinyl was very wet and soft (hence rotting)........ Just thought I'd give you the scoop on DD. It may work fine in Florida on docks and around swimming pools but not on an 800 square foot deck in Virginia.

January 2005

I just finished writing an explosive new column about the newer wood composite decking materials. I urge you to Click Here to read it.

TC

Related Articles:   Vinyl Decking vs. Sealing DecksSynthetic Decking & SealersSynthetic Decking Manufacturers

Vinyl Windows Certification

! ! ! See Author's Notes at Bottom of Column ! ! !

Vinyl Windows Certification

DEAR TIM: We want vinyl windows for our home. After talking with 3 different salespeople I am more confused than when I started. Are there really big differences in the types of glass you can get? What makes a great vinyl window? Do you think I can install them myself? Tony P., North Platte, NE

DEAR TONY: I can surely see why you are attracted to vinyl windows. Since its birth in the 1950's, the industry has made giant strides in product types, styles, and finish options. Vinyl windows are truly a no maintenance item. The energy savings features are dramatic as well. Can you believe that vinyl windows made today are 4 times more efficient than the state of the art windows I installed in my new home just 12 years ago?

Vinyl replacement windows as well as vinyl windows for new homes are growing in popularity. Because these windows are often made at regional factories, you can get custom sizes with little or no problem. This means a window can be made to fit any rough opening without unsightly filler strips or extra wide jambs. Vinyl windows are also warm to the touch much like wood windows. Select the right window company and you can get simulated interior wood finishes in a variety of species like oak and cherry. The interior simulated wood vinyl is so realistic that it even has tiny relief lines that mimic actual wood grain.

The glass that comes with your windows is extremely important. It makes up the vast majority of the surface area of the actual window. You want glass that has the lowest U-value (U-value is a measurement of resistance to heat loss or heat gain). Vinyl windows that are made with Low E glass and those that contain an invisible heat film that is tightly stretched between the two panes of insulated glass often perform the best. Low E glass reflects low level infrared heat back to its source. This means that winter warmth from your home bounces back inside your house instead of passing through ordinary glass. Low E glass works the same magic each summer as it prevents outside heat from entering your home.

Look for windows that contain inert gases, like argon or krypton, in the insulated glass dead air space. These gases slow heat transfer and help to stop outside noise from entering your home.

There is a wide variance in the quality of vinyl windows. It doesn't take a huge capital investment to set up a simplistic fabrication plant. Those companies committed to producing quality windows can get them certified by three different bodies. Of the three bodies, the most recent one is operated by the Department of Energy and the Environmental Protection Agency in conjunction with the window and door industry. Together they have developed the Energy Star certification program. Windows that carry this certification exceed the most efficient energy building codes in the nation by 10 to 15 percent. These windows are commonly 40 percent more energy efficient than most common building codes.

To attain the Energy Star certification, windows must be first certified by one of the other certification bodies - the National Fenestration Rating Council. The Energy Star program has established three climate zones within the United States with specific testing criteria applied to each zone. If a vinyl window meets or exceeds the energy efficiency standards for the particular region it will be used, it can proudly wear the Energy Star label.

Installation of a vinyl window is not a task for a beginner or amateur do-it-yourselfer. Windows need to be installed plumb, level and square. They need to "float" in the actual rough opening. Concentrated loads can distort window frames and cause a poor fit that allows air and/or water infiltration. To achieve the best fit and finish, your windows should be installed by factory trained employees of the window company. The average homeowner doesn't have the tools or experience to achieve a first classs installation.

Sub-contractors may not be the best installers either. They get paid a fixed sum to install your windows. The faster they work the more money they make. They also may not carry sufficient liability and workman's compensation insurance. Employees of window companies have to answer to the owner. They are also more likely to respond to a future service call.

Author's Notes:

November, 1998

I received an e-mail from a reader of this column. This person was complaining about the last two paragraphs of the column. It was obvious to me from his comments that he has not installed vinyl replacement windows before. Among other things, his comments mentioned the do-it-yourself (DIY) clinics offered on Saturdays at many national Home Center stores. He felt that since these clinics are produced, vinyl replacement window installation must be simple. Nothing could be further from the truth.

I have installed thousands of windows both new and replacement. New windows require a certain level of skill to insure that the fit, operation and finish are perfect. Vinyl replacement windows are a completely different beast. They present extra challenges. Removing an existing window can be a huge task if you don't have the right tools. Existing (and even new houses!) houses can have out of square window openings. The restoration of interior plaster and trim surfaces requires significant coordination and special tools. Exterior caulking, interior insulation installation, etc. all must be accomplished perfectly or you will have a mess - and a drafty window - on your hands.

The point I am trying to make is that be careful of people, companies, stores, and even other writers/columnists who tell you, "...there is nothing to it. You can do it yourself!" This advice is not always accurate. In fact, it may actually cost you extra money.

One final note: If you decide to do-it-yourself, guess what? You become totally responsible - in almost all cases - for the window measurements. If you goof up a measurement and a replacement window doesn't fit, you have to pay to have a new one built.

Related Articles:  Window Glass Performance Comparisons, Energy Star Windows, Window Installation, Vinyl Windows Purchasing Quality