Winter Storm Gail | That's 42 inches of snow on the other side of the snowblower. This photo was taken at the height of Winter Storm Gail in central NH on December 17, 2020, in Meredith, NH.
Winter Storm Gail 2020 - Historic Deep Snow in Meredith New Hampshire
Mother Nature was starting to brew Winter Storm Gail in her atmospheric cauldron above the USA a week before December 17, 2020. While the center of energy was still thousands of miles away from my home as Bernie Rayno shows in the following video, I knew it was time to pay attention and get prepared. Here in central New Hampshire where I call home, I've come to discover you need to really take care of early season snow because months more of it is in store.
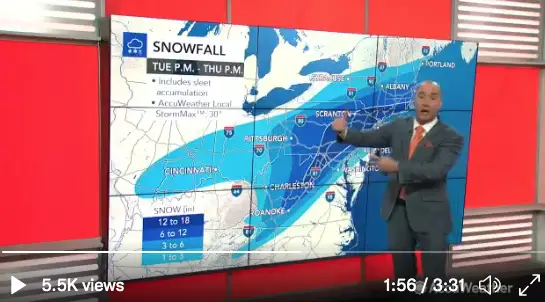
CLICK or TAP HERE to watch the video.
Bernie Rayno, the chief video meteorologist at Accuweather.com, predicted last weekend it was going to be a big Nor’easter, but even his estimates for snow depth were off. The National Weather Service (NWS) also got it wrong in their Winter Storm Warning. I thought maybe we’d get 8 inches based on past NWS predictions. Gail, unbeknownst to all of us, had decided she was in a record-breaking mood. The narrow band of central NH where I live received record-breaking snow.
One of Bernie’s famous sayings is, “Never trust an upper-level low.” You got that right. They can be liars and the Devil is their father. This one made its dad proud!
Getting Ready
I did some outdoor work on my main ham radio antenna on Monday as I knew the storm was coming. Winter storm warnings in New Hampshire are as common as jet skis on Lake Winnipesaukee on a warm summer day. I wasn’t overly concerned at that time.
By Wednesday, the predictions were starting to make me feel uneasy. I had all three of my snowblowers gassed up to the brim, but my gas can was empty. I was thinking, “No problem. I’ll get gas this weekend.”
But something inside me, a sixth sense, whispered in my ear to not wait. “Go to town and get fresh gasoline stabilizer and high-octane gas.” NOTE TO SELF: Always listen to that inner voice and do what it says. It's important to realize you always combine trips when going to town. I keep a list of errands that need to be run and do all of them when visiting town.
Off I went, first stopping to get a fresh bottle of gasoline stabilizer. Next up was the Irving station where I topped off my truck gas tank and filled my 2.5-gallon gas can with 91-octane gasoline. My third stop was at Aubuchon Hardware for 100 pounds of rock salt and finally, I popped into the Meredith, NH Hannaford to get three bags of semi-sweet chocolate chips so more Christmas cookies could be made. If you’re going to be snowed in, you need provisions.
It’s a great idea to use high-octane gasoline in small engines. Most owner’s manuals call for it. I've got other great small engine tips, especially if you want your machines to start on FIRST PULL as all mine do.
A Dusting at Zero Dark 2:30 AM
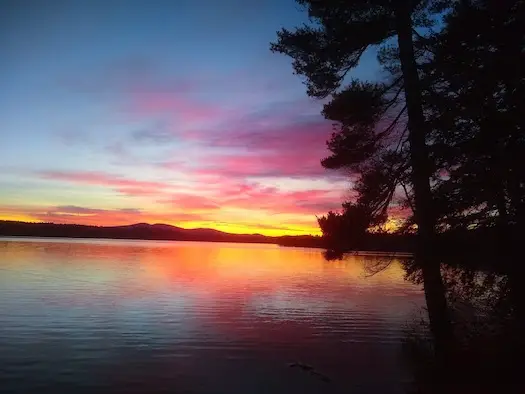
I got up for a nature break at 2:30 AM Eastern Time early on Thursday morning December 17, 2020. There’s a french door next to my bed that leads out to a giant deck that overlooks Lake Winnisquam. Looking through the glass I could see there was a fine dusting on the deck. At dawn I wasn't going to be greeted with a glorious sunrise, that's for sure.

This was the sunrise on December 11, 2020 at my house. Mother Nature had a different plan in store six days later.
The storm was at my doorstep and the maw was rapidly approaching. I drifted back to sleep, waking up about 6 AM. It was pitch black, but I could see we already had at least a foot of snow.
In that sleepy state, I mumbled softly, “What the heck? We’re already past 8 inches and it’s just starting.”
As the slumber drag wore off, I became increasingly concerned because I knew the center of the storm was still off to the south and southwest of me.
Typically the northwest quadrant of these Nor’easters gets the heaviest precipitation. Central New Hampshire was in the center of this bullseye as the storm clawed its way northeast. Under the cover of darkness, Gail was gulping and slurping up moisture from the shallow Nantucket Sound off Martha's Vineyard.
I went up to my man cave and checked to see what the current weather surface map showed. RUH ROH. That yellow band in the green is heavy snow and it was marching east right at me.
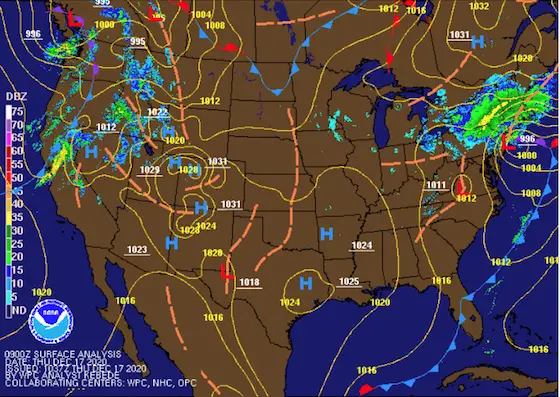
This was the NOAA surface weather map as of 4 am Eastern Time December 17, 2020. The eastern edge of the yellow coloration is starting to knock at NH's door. It's death on a stick.
As the sun came up over the storm clouds, the steel-gray light revealed the snow coming down fast and furious. At 8 AM I went outside to check the depth and it was already 17 inches. I recorded a video at this time. CLICK or TAP HERE to see that video, as well as others. You’ll also be able to view all the photos I shot of this historic snowstorm.
Buckets and Buckets of Frozen Flakes
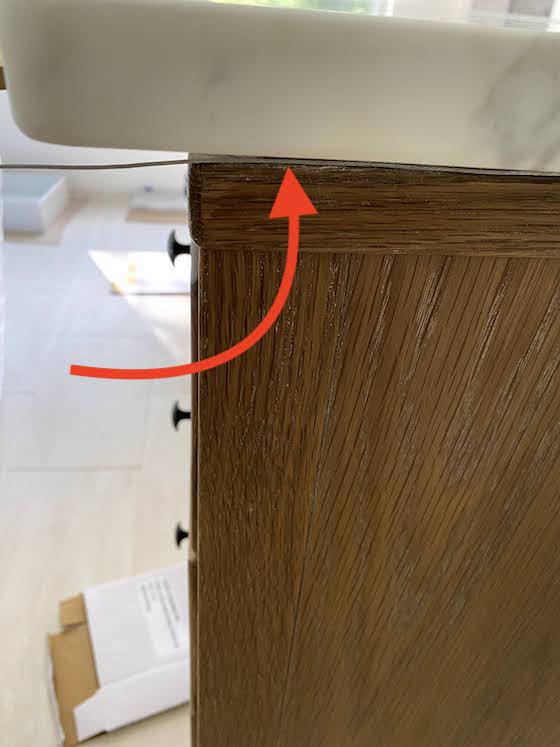
I put down a green 5-gallon bucket as a depth marker just outside the garage door and took a photo. I felt it would contrast well with the white frozen flakes. Look closely at my truck in the background in the pictures. Note how you can still see it for the most part. That was to quickly change.
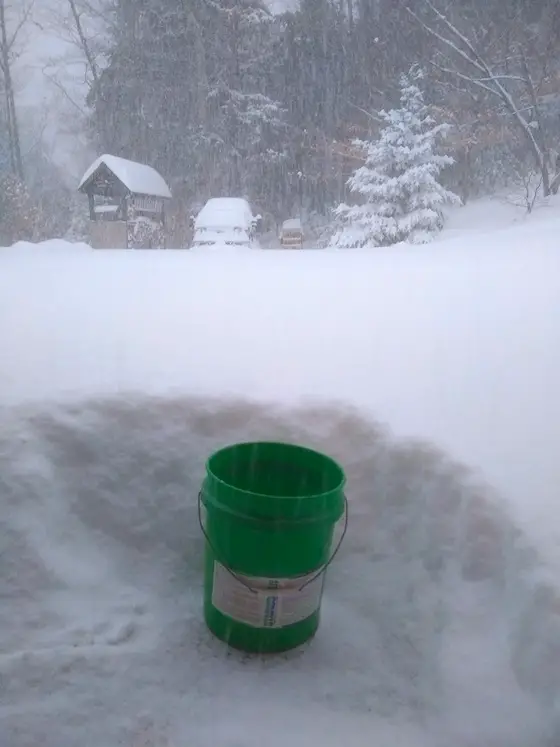
That 5-gallon bucket is just over 15 inches tall. Look at my truck in the background. Soon it will be buried with just the side mirrors visible.
Already this storm had delivered more snow than any other storm I’ve experienced in the thirteen years I’ve been here. As each minute passed, I began to get more anxious. I knew hours of falling snow were ahead and it was accumulating fast. As it would turn out, the average rate of accumulation for the storm was over 3 inches of snow per hour.
My Slick DaVinci Roofscapes™ Roof
Five years ago, I installed a gorgeous long-lasting synthetic slate Davinci Roofscapes™ roof. Everyone that sees it thinks it’s real slate. Watch the video below and decide for yourself.
Davinci told me that I’d never have to rake the roof because the snow would slide right off. Snow does slide off and when it happens, it sounds like elephants are rolling down the roof. You can’t imagine the total weight of snow on a roof. The weight of snow and ice on a roof can be enormous. You're talking thousands of pounds.
The snow gives no warning when it loses its cage fight with gravity. Three years ago I was one second away from getting buried on my front walk under four feet of snow when it let loose.
I was trying to clear the front walk and knew I was in the danger zone. Being hyper-aware, the instant I heard the snow start to slide, I jumped to relative safety. Even still I got buried up to my waist.
Back to the snowstorm. With the amount of snow accumulating, I knew I had to take care of the deck. I have a deck that runs the entire length of the rear of my home. It’s 65 feet long and 10-feet wide.
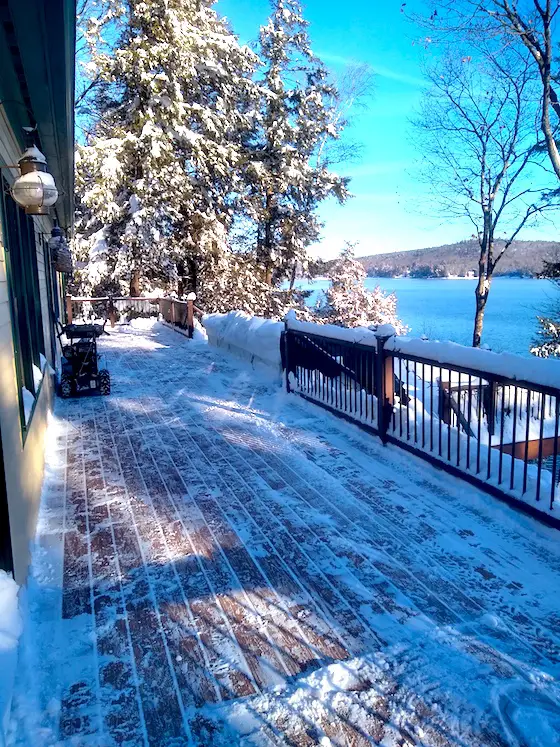
This is my rear deck that's 65 feet long. This photo was taken on December 19, 2020, after it was cleared three times by the blower next to the house. I roll the blower through the house each fall to get it onto the deck. Everyone always wants to know how it gets up 13 feet off the ground below!
I didn’t build the deck but I tried to reinforce it when I installed my Trex Transcend four years ago. Here’s the issue. In New Hampshire, you can get 60-70 inches of snow in a season on average. It can turn to ice and compact. Any snow coming off the roof increases the total amount. This means you must get each snowfall off the deck as soon as possible. If the snow turns to ice, the blower can't deal with it and you have to heft it off the deck one shovelful at a time.
I know for a fact that this deck would collapse under the weight of eight feet of snow. The builder who built this house probably didn’t think it through or he didn’t care if the deck collapsed. Back in the winter of 2006-07, there were about 12 total feet of snow here in NH. Roof and deck collapses were commonplace that season.
I have a dedicated snowblower on the rear deck that stays out there all winter long for the sole purpose of blowing snow the instant a storm is over.
I got out on the deck shortly after 8 AM to start blowing it. All the while I was trying to focus on the possibility of jumping towards the house if an avalanche came off the roof.
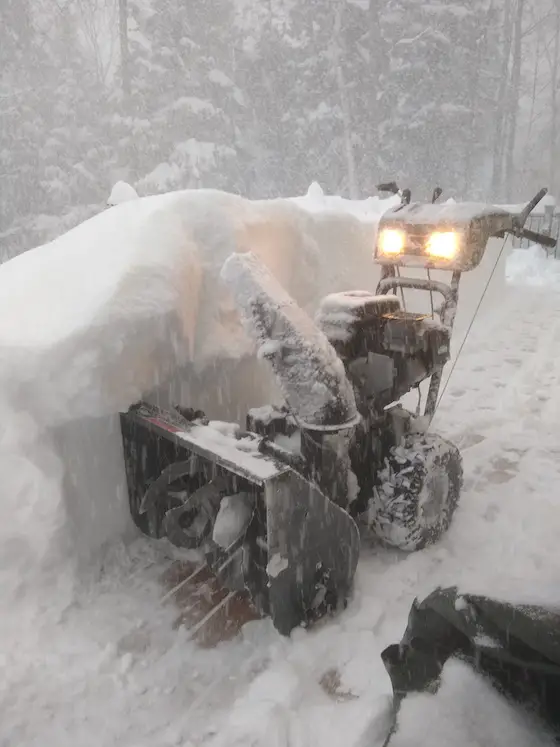
I got the deck blown before that happened but at 9:30 AM a massive avalanche came down. In seconds there were 42 inches of snow on the smooth Trex Transcend decking. And not all the snow had come off the roof!
Here’s the snowblower doing its best to get rid of the avalanche.
Remember, I had already blown 17 inches off the deck. The top of the discharge chute for most snowblowers is about 36 inches off the ground. BIG GULP.
The Toro Power TRX™ HD Blower
As I worked on the deck, I knew I had to start to clear the drive which has a steep grade to deal with. Past experience with a decade of NH snow has taught me that a traditional snowblower with wheels would not make it up the drive with snow like this.
Fortunately, about two months ago, I got a new Toro Power TRX™ HD Snowblower with tracks like a bulldozer instead of wheels. I’ve affectionately named this new snowblower Mary Anne because of a character in one of my favorite childhood books.
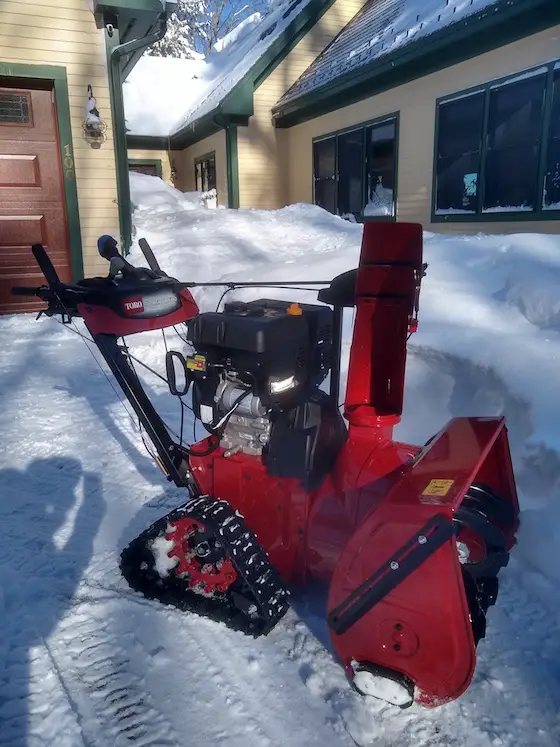
Here's Mary Anne! She saved the day for me just as she did for Mike Mulligan all those years ago.
The Toro Power TRX™ HD saved the day! I was able to make a pass up the center of the driveway. It was now just after 9 AM and the snow was 20 inches deep with no sign of slowing down. When would it stop? How much would we get?
I texted my neighbor telling him it was much worse than he might expect. He and I share the top part of the driveway and we have a gentlemen’s agreement to pitch in together to keep it clear. We both normally wait until the storm is over so we don’t have to blow the drive twice.
But this storm was different. If we didn’t act to clear the drive now, we might not get it done - or it would take far greater effort.
Steep Drives Can Be Tough
He’s got a steep drive too and I knew he’d never get up his hill using his traditional blower with wheels. It’s easy for a blower to cut a path going down a hill. But going up a steep drive is a horse of a different color.
Once you have a path cut through the snow, you can take partial bites out of the fresh snow going back up the hill or you can go up the path you just cut and have no resistance. It’s all about resistance and you’ll have some while the blower is gobbling up snow and blowing it out the chute like smoke from a speeding locomotive
I figured I’d have to cut two paths down to his garage to help him. By this time the snow was 24 inches deep and it was still dumping out of the sky with no end in sight.
Zero to Eight in Sixty
It took me about twenty minutes to blow the entire length of my driveway and the shared top portion during the height of the raging storm. I made about seven passes up and down the drive.
As I was working, my glasses were getting fogged up and covered with ice crystals from the wind blowing the snow. Once I was finished, the first pass I had made already had 4 new inches of snow on it! Holy Tomato!
Within an hour, there were eight more inches on the drive and it was still snowing. Fifteen inches more would fall before Mother Nature felt she had thrashed us enough.
And So It Ends
By about 2:30 PM, the storm was racing to the northeast over the Canadian Maritimes. It was still snowing here, but the worst was over. I’m sure Prince Edward Island (PEI) was punished too. PEI gets epic snow like you might order ice cream on a hot summer's day.
Snow started to tumble off the house roof and by 3 PM, there were over eight feet on my front porch. You're looking through my kitchen window to the front porch in this photo. My front door is to the right of the snow.
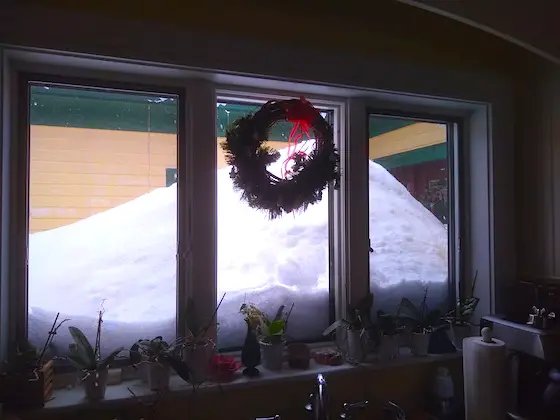
You're looking at over seven feet of snow on my front porch. It slides off the roof and creates mayhem.
The front walk had 4 feet of snow on it and the garage roof across from the kitchen window had yet to let go. It’s a lower-pitched roof than the main house and the snow takes a while to give up its tug a war.
I got out my tape measure and was astonished to see it read 37.5 inches. It snowed lightly for another 90 minutes and I ended up with 39 inches at my house.
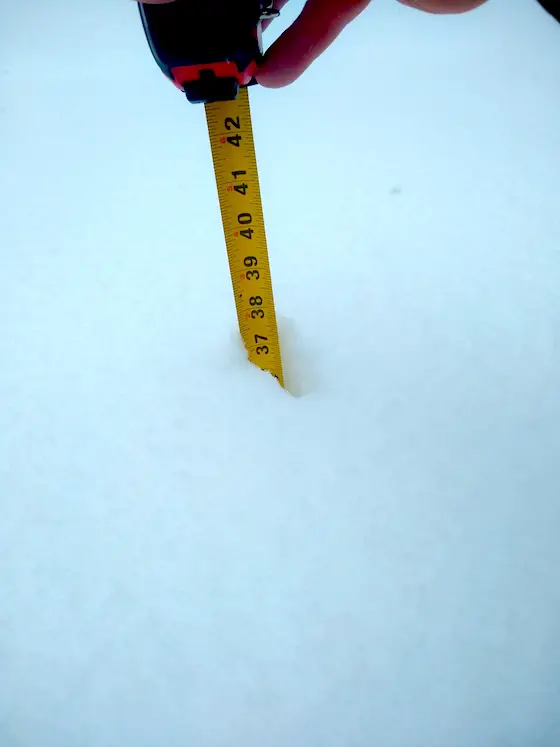
It was still snowing as I shot this photo and another 1.5 inches would fall. That's 39 inches total.
Never in my life had I seen so much snow accumulate in such a short time. I can tell you as the morning wore on I was so happy I had gone out to get the extra 2.5 gallons of gasoline. There was no doubt I’d need that much to do all the cleanup that remained.
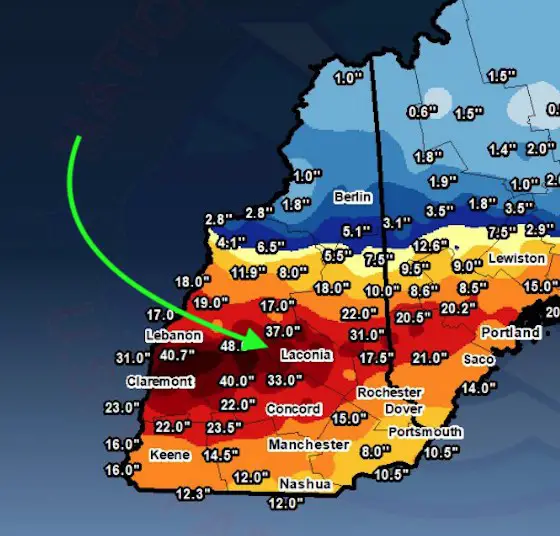
Here's a NWS map of the reported snowfall amounts. The green arrow tip points at my house.
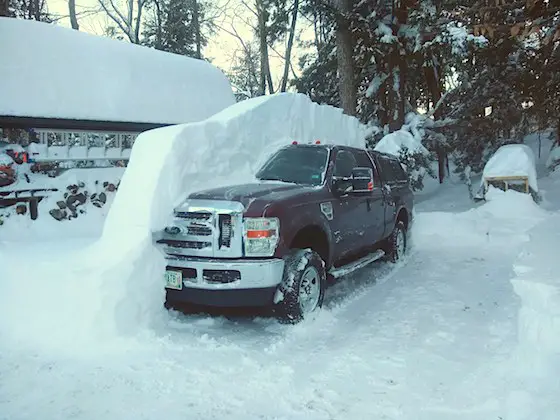
I think this photo tells the tale of Winter Storm Gail 2020 pretty well. The snow was deeper than what you see on top of my Ford F-250 Super Duty 4x4 truck as it blows off during the storm.
The moral of this story for you is to always do your best to be prepared. Stop depending so much on others. Try to become more self-sufficient. Don’t expect someone else to take care of your personal problems, your snow, your out-of-gas blowers, or whatever it might be.
When a major storm like this hits, everyone is affected. You’re going to be on your own. Your kindergarten teacher is not going to be coddling you doling out fruit roll-ups and juice boxes. It’s going to be your responsibility to get food and treats. Oh, and don’t forget the chocolate chips!

(C) PEANUTS © Peanuts Worldwide LLC. Dist. By ANDREWS MCMEEL SYNDICATION. Reprinted with permission. All rights reserved.