Garage Floor Drain Ideas

garage floor drain ideas

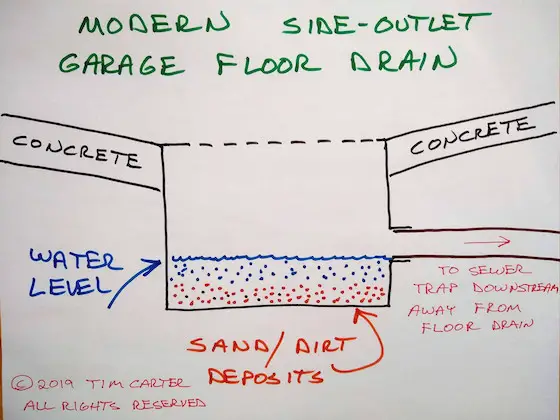
Garage Floor Drain Ideas | This is a simple illustration of a modern side-outlet garage floor drain. There's a small area at the bottom of the drain to capture sand, dirt, and debris so it doesn't clog the drain pipe.

Garage Floor Drain Ideas - Time Tested Technology

The inspiration for this column came from unexpected comments about a brief mention of garage floor drains in my December 1, 2019 AsktheBuilder newsletter and my December 9, 2019 AsktheBuilder newsletter.

The house I grew up in had a garage floor drain. The concrete floor was sloped like a giant shallow funnel so all water that got on the concrete flowed to the drain. That floor drain never caused any issues in all the years I lived in that home.

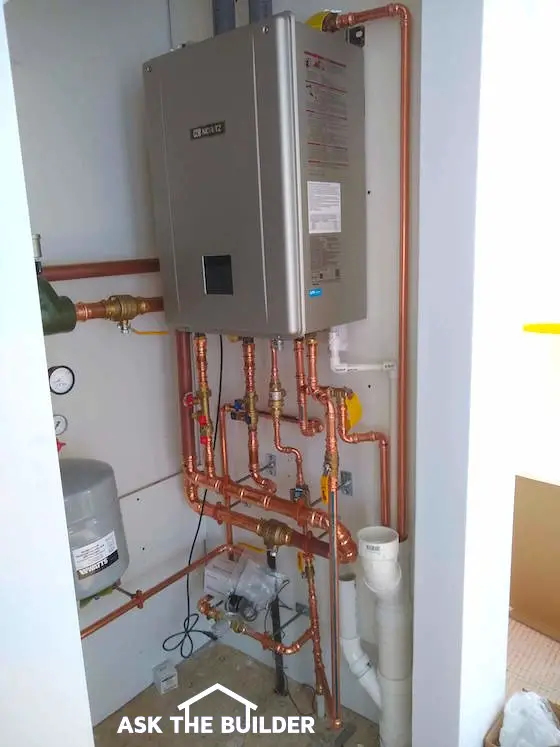
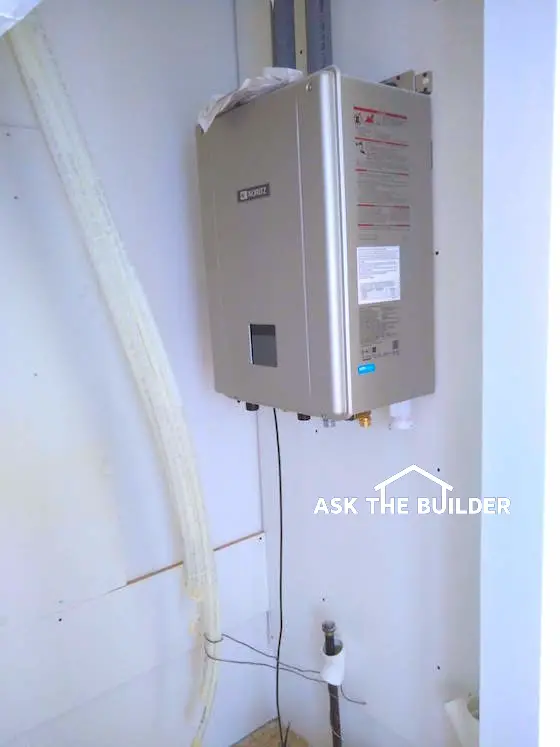
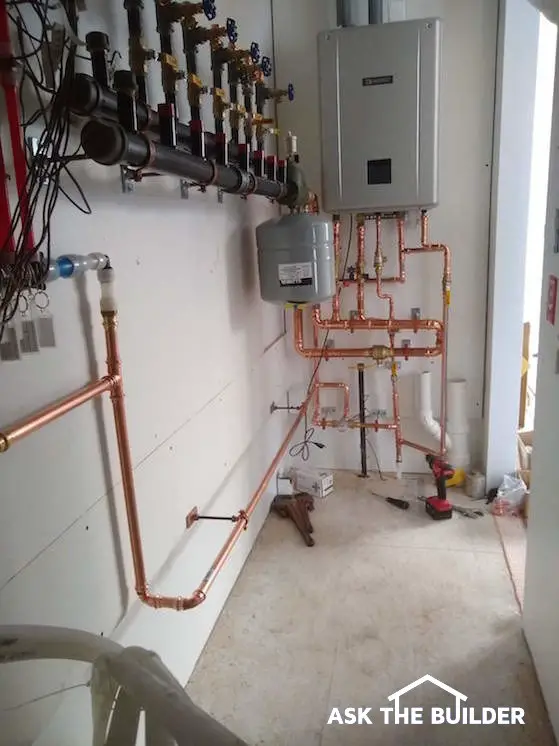
My current house doesn't have a garage floor drain. In fact, there's not even one in my all-important mechanical room where the boiler and water heater are located. You know at some point you'll have a leak in this room for goodness sake! I don't think plumbers in New Hampshire know about floor drains. My garage floor is sloped from the back of the garage to the doors.

I live in the snowy and cold Northeast USA where ice and snow are as common in the wintertime as whoopie pies in the grocery store. Water flows to the garage doors and puddles when snow and ice melt from my car and truck. Some seeps under the door and on cold days the garage door weatherstripping freeze to the floor!

It's ridiculous, as are many things in life! A floor drain or two in my garage would prevent this madness.

Silly Building Code Revisions - They're NOT Always Right

It's insane! The building code was altered some time ago prohibiting garage floor drains in certain cities and towns. The reasoning, I'm told, was that spilled gasoline and oil would cause explosions, death, and destruction.

Can you think of the last time in your city or town that you read about or saw on the local TV news that a house was destroyed and people killed by a garage floor drain or gasoline spilled in a garage without a floor drain?

Yeah, I thought so.

garage floor drain ideas

Did you know you can make your own silly TV news graphics like this one? Yes, you'll have eaten, drank, slept in a hammock, went kayaking, played epic games of ping pong against your nemesis, and maybe opened a prize or two before you ever hear about a garage explosion caused by a frivolous floor drain.

Newsletter Response - "Where's the Oil Separator, Tim!"

One or two subscribers who read my newsletter wondered if I had a special way to clean out debris from the floor drain. I've been a master plumber since age 29 and you bet I took that into consideration. Go back up and look at the illustration to see how debris is captured and prevented from entering the drain line.

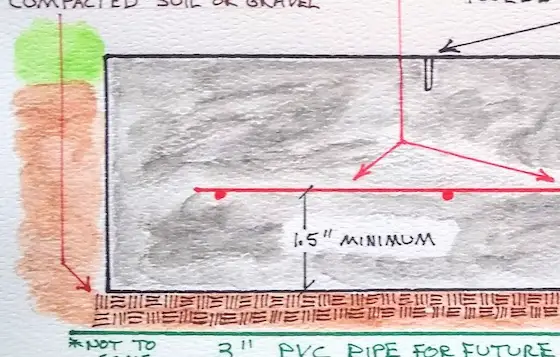
It's important to realize you need to clean out the debris periodically so it doesn't accumulate to the height of the drain pipe. Look at the following illustration to understand how old floor drains, like the one in the house I grew up in, were piped.

garage floor drain ideas

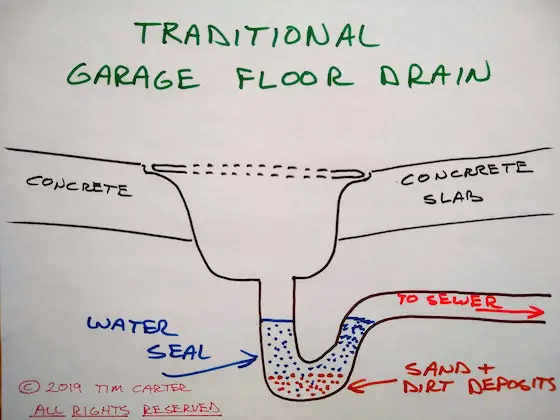
This is how hundreds of thousands, perhaps millions, of floor drains are piped. You can see that the bottom of the trap can fill with sand and debris. You can't get your hand down the pipe, but you can insert the end of a wet-dry vacuum hose!

You can see old floor drains are much like the p-traps under your bathroom or kitchen sink. It's easy for them to get clogged.

Why Put Traps in Garage Floor Drains?

Traps should be incorporated into garage floor drains to prevent vermin from entering the garage. This is especially true of drains that are piped directly outdoors on the land just outside the garage.

I'd never connect a garage floor drain to a septic system because I don't want any oil or mystery chemicals stored in the garage to have a chance to get into the septic tank.

It's unlikely that a plumbing inspector would allow a garage floor drain to be directly connected to a municipal sewer system. At the very least it should only be connected to a municipal stormwater drainage system.

The traps should be under the garage floor to help prevent them from freezing in cold climates. Water frozen in a p-trap will stop the flow of water out of the garage.

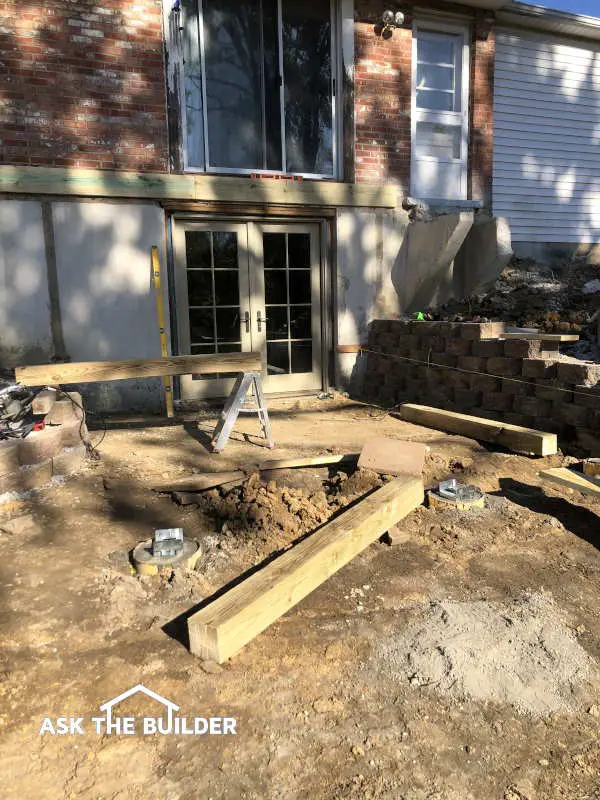
In April of 2019, I had to re-plumb the floor drains in my daughter's garage. The contractor who put them in didn't include a trap and he just ran the drainpipe to the footing drain. This allowed radon to fill the garage like hot air fills a political debate.

garage floor drain ideas

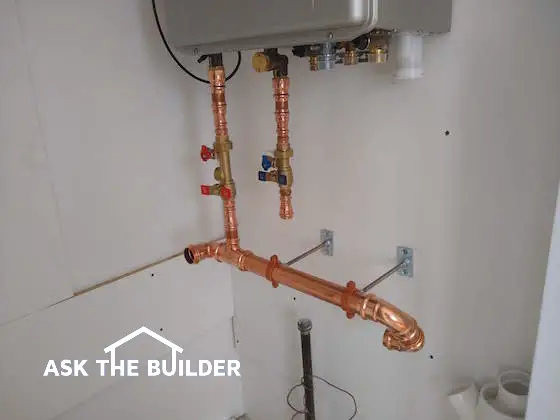
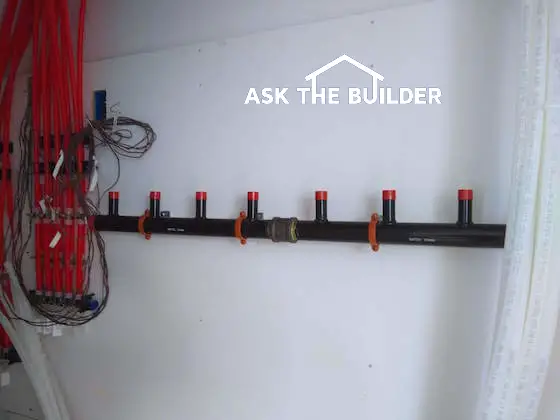
Look at how I installed the drain so it has a vertical riser that allows you easy access to the p-trap. That capped pipe is flush with the concrete floor now that the slab is in place. In addition, I made sure the drain line leaving the floor drain on the right was a straight shot into the p-trap for the same reason.

Quite a few subscribers were wondering where the drain water goes from the garage and if I had installed an oil separator.

The pipe drains to the ground outside about 40 feet from the garage door. I didn't install an oil separator and it's not required by the code.

Let's Apply Common Sense

What do you think the odds are of more than a tablespoon of oil reaching that floor drain on any given day? When was the last time you had a massive oil spill in your garage? If you did, did you clean it up or just hose it outside?

How many total gallons of oil drip from trucks, cars, and heavy equipment up on Mt Desert Island each day where my daughter will live?

What happens to that oil? Is most of it broken down in the soil at the side of the road and/or does a certain amount evaporate over time? Think about where you live. Think about how much oil is spilled on the ground in your town or city each day.

Much/most of the motor oil you put in your car or truck comes from the ground in the first place. It's as organic as it gets. Yes, it almost always needs to be extracted from bedrock, but there are natural seeps.

The point is most responsible people will clean up spilled oil in a garage. Most probably put down old cardboard under a tired engine or transmission.

Lastly, Mother Nature has great healing properties. She can and does clean up oil spills. It may take her more time than you would like, but She gets the job done.

Oil Separators

Let's imagine you're very concerned about getting oil on your land or into the ecosystem. You can install an oil separator as part of your drainage system. You just have to remember to get the oil out by pumping it or scooping it into bottles that you then drive to the recycle center.

It's important to realize the oil in the separator will be underground. You'll be on your hands and knees dealing with it.

If you have strong feelings about garage floor drains and oil, I urge you to spill your thoughts below in the comments. I moderate all comments to prevent SPAM, so it could take a day or two for your comment to appear. I publish all comments that aren't SPAM.

Coast EAL13 Lantern Review

coast eal13

Coast EAL13 Lantern | You can see how petite this powerful lantern is. You can use it for emergency lighting for your car or soft lighting for your campsite or even on your patio in the summer.

Coast EAL13 Lantern - It's Small But Handy For Sure

I've had the opportunity over the years to test many flashlights and lanterns. I even own an official Amtrak lantern used by train crews. I was a conductor on a scenic train in New Hampshire for two summers and had to follow all the FRA rules.

The Coast EAL13 lantern is a very handy one that I recommend in every vehicle you own. It's small enough, only 5 and 3/4 inches tall and 2.5 inches in diameter, to fit in center consoles or glove boxes.

The following pictures tell the rest of the story.

coast eal13

This is the handle you hold it with if you were an old-time RR switchman telling the engineer the switch is safe to travel over.

coast eal13

This is a carabiner on the top so you can hang the lantern from anything that will fit into the spring-loaded clasp.

coast eal13

I know! You want to see how much light it puts out. It's got three levels: low, medium, and blinding. This is on low.

coast eal13

There are five lantern settings. This one just glows red to alert anyone, including space aliens, of danger and they should stop and deposit all cheese coneys they have in their possession. The last setting on the switch is blinking red. This comes in handy if you're broken down on the road.

coast eal13

This dandy lantern has a carabiner on the bottom too! It's specifically made for all users Down Under!

coast eal13

You need three AA batteries to power this bad boy. Remember, always take the batteries out if you're not going to use it for a while.

coast eal13

The lantern will attach and hold itself to any steel or iron surface. It's got four magnets in the base. If you fly an F/A-18 Hornet, don't expect it to hold onto the fuselage.

Did you like this lantern? Speak up in the comments below for goodness sake!

Zircon Breaker ID Review

zircon breaker id

This is the receiver that you touch against the circuit breakers. CLICK or TAP HERE or the image to have one delivered to your home.

Zircon Breaker ID - Works Well

I've had the Zircon Breaker ID for a while, but only today had a reason to put it to the test. It got an A++!

How Does the Zircon Breaker ID Work?

The tool has two parts, a transmitter, and a receiver. The transmitter is the black part you plug into the wall and the receiver is the yellow part of the tool. The receiver is used at the circuit panel.

zircon breaker id

This is the transmitter. You plug this into a regular 120-volt outlet on the circuit you're trying to locate. CLICK or TAP HERE or the image to have this dandy tool in your trembling hands in just hours.

zircon breaker id

The receiver has two LEDS on top. One red and one green. They're so bright they wash out the color in the photo. The tool also has a buzzer, but I couldn't get mine to work even with a new battery. Not to worry, just trust the LEDs. CLICK or TAP HERE to purchase this tool before clicking on and off all your breakers hoping you hear the person inside the house.

zircon breaker id

Here I am scanning the breakers. You need to calibrate the tool by running it up and down all the breakers in the panel. It only takes seconds to do. CLICK or TAP HERE to preserve your sanity and voice. Once you scan all the breakers, you do it one more time. When the tip of the scanner is on top of the breaker that powers the outlet that the transmitter is plugged into, the green LED lights up brighter than your eyes when you get a prize from your best friend!

zircon -breaker id

When you go to store the tool, you insert the receiver into the transmitter and this is what it looks like. CLICK or TAP HERE to order one of these now. You'll not regret it.


Don’t Sweat Copper, Press It

Install Copper Tubing Pipe Tool

You can rent, or sometimes borrow for free, a tool that allows you to install copper tubing pipe with no soldering required! (C) Copyright 2019 Tim Carter

Don’t Sweat Copper, Press It

DEAR TIM: I love reading your column in my local paper. Several months ago you wrote about which plumbing pipe might be better for water lines, copper and PEX. You briefly mentioned a new tool that eliminates the need for soldering copper. I’d like to know much more about this magic method of making leak-proof copper connections. How does this tool work, how fast is it and would you depend on a copper connection that doesn’t rely on solder? Brandy S., Spokane, WA
Brandy’s not the first reader that was intrigued by that quick mention of a newer method to create leak-proof connections between copper water supply tubing and copper fittings. I received several other requests for more information about this newer technology from folks just like you who visited my Ask Tim page at my AsktheBuilder.com website.

For decades, the gold standard of making leak-proof joints when installing copper tubing was solder. As a young plumber back in the 1970s, it’s what just about everyone did. The issue is it takes some effort to prepare the copper, heat it up, melt the solder and allow it to cool down. Soldering also is risky. Ask any seasoned firefighter and he’ll share at least one story of a house fire created by a plumber or DIYer that allowed the torch to set the house ablaze!

As with many things, new ideas and technology debut and disrupt the landscape. Such was the case about seven or so years ago, when I saw the first copper press tool at an editors conference hosted by a major power tool manufacturer. Being a master plumber since age 29, you can bet I zeroed in on this tool like a mosquito lands on my arm each summer evening here in New Hampshire.

WATCH this video to see how FAST the tools work:

The tools are called press tools. The most popular tools have a set of jaws ranging from 1/2-inch all the way up to 2 inches. You may be able to find larger jaws for bigger copper tubing, but I doubt you’d ever need that huge size!

The fittings, like 90-degree bends, tees, couplings, and even valves, have the magic in them that makes the system work. Each fitting has a raised ridge and this formed part of the fitting holds a rubber o-ring.

You cut the copper tubing using a cutting tool that produces a clean cut with no burrs. Never use a hacksaw or if you do, file the edges of the cut to remove all burrs as they might cut the o-ring as you slide the tubing into the fitting.

Once you fully insert the tubing into the fitting, you select the tool jaw that matches the size of the piping you’re working with. You open the jaws, they spring back and lightly clamp around the raised ridge of the fitting and you squeeze the trigger. In three to five seconds, the jaws compress and produce a slight crimping around both the fitting and the tubing.

This compression squeezes the o-ring tightly around the copper tubing creating a leak-proof joint. To do this same operation soldering one end of a fitting to a piece of tubing would take at least two minutes, maybe more.

The cost of the special press fittings is more. While writing this column, I checked the top website I use to buy plumbing supplies and the cost for a 1/2-inch sweat 90-degree fitting was 39 cents. The same size press fitting was $1.83. That’s a difference of $1.44 but think about the time you’ll save!

There’s another huge advantage when it comes to press fittings. You can’t solder a copper pipe that’s got water in it. The steam and water don’t allow the pipe to get hot enough to melt the solder.

You can actually have water flowing out of a pipe at full blast and shut it off using a press tool! All you have to do is purchase a ball valve that has the press fitting built into the valve. You open the valve up so water is squirting out of it, slide the valve onto the pipe, press the end of the valve that’s on the pipe, remove the tool and then close the ball valve to stop the water flow. This is absolute magic when you stop and think about it. Plumbers of old would have given their eye teeth to have this capability to work on dripping pipes!

You may wonder what these press tools cost. They’re expensive as are the jaws. But here’s what you can do. There’s a very good chance your local tool rental store rents them. I know of a plumbing supply house in Maine that will allow you to borrow one for free for one day! They do this as a complimentary service since you buy materials and fittings from them.

These press tools allow you as a DIYer to install copper tubing in your home or to do a repair where otherwise you’d not have the courage to solder. I recently used a press tool to install all the copper tubing that connects my daughter’s new high-efficiency combi boiler to the heating manifolds. This same boiler also is a tankless water heater and I used the press tool to make all the connections of the copper water lines. I saved countless hours and didn’t have one leak.

Press it, don’t sweat it!

Column 1330

December 1, 2019 AsktheBuilder Newsletter

Is this your first rodeo with me? Your first newsletter? Saddle up!

If you've rode with me before, no matter how long, you know things can get a little dusty. The chow wagon is filled with pecan pie, so we're going to eat good tonight!

Firing Up the Noritz Combi Water Heater Boiler

This past Monday, I fired up the fantastic Noritz Combi water heater boiler at my daughter's new house with the help of Paul Tibbetts. Paul is a Noritz rep and he travels around much of New England making sure all is well with the magic machines from Noritz.

Paul Tibbetts Noritz Combi

CLICK or TAP HERE to see many many more photographs of the install process.

Paul's hand, although blurred, is pointing at the heat exchanger. It's about the size of a loaf of bread!

It's important for you to realize this crazy machine can produce 199,000 Btus in that little stainless steel box!

We had no leaks at all in the 6,000 feet of Uponor hePEX tubing that runs under the floors. CLICK or TAP HERE to understand why I used this amazing plastic tubing to make all the floors in the house toasty warm.

I'm stunned by how quiet the Noritz combi boiler is. This boiler is in a small closet that's in the entrance hall of the house. It's centrally located and even with the door off the closet, you could barely tell it was running. Amazing!

BOTTOM LINE: I can't say enough good things about this Noritz combi boiler. Another key point is it's a modulating boiler. This means the fire inside the heat exchanger can range anywhere from about 20,000 Btus, all the way up to 199,000 Btus. The boiler only sips as much energy as is needed to handle the demand for either heat in the house or domestic hot water to shower, bathe, clean or wash the car in the garage.

Yes, I installed a special hot/cold water faucet in the garage so in the winter my son-in-law can wash his car with refreshing HOT water! Oh, you wonder about the water and where does it go?

Why yes, I made sure there was a floor drain under each car and the concrete floor in the garage is sloped like two giant shallow funnels so the water flows to the floor drains! This means all snow melt will go to the drain and not flow towards the garage door!

If you heat with a boiler and it's time to get a quote for a new one, CLICK or TAP HERE and tell the contractor you want the Noritz NRCB.

SHOP AT AMAZON

If you're shopping at Amazon.com for Christmas presents, please consider using my affiliate link. CLICK or TAP HERE to help make sure this newsletter keeps coming to you.

Testing TrueWerk

Three weeks ago, I was asked to test some clothing. I received a handsome vest, a hoodie and two pairs of pants from TrueWerk. The vest and hoodie are made from the same fabric and have the same look and cut. To picture the vest, just look at the photo below and imagine no sleeves and no hood.

TrueWerk Jacket

Both the vest and the hoodie have become my GO-TO favorites. The fabric of both is medium-weight and they're so soft! They both have strategic pockets for smart phones and the side pockets are nice and spacious. The fabric has some stretch to it, but not much.

These would make GREAT GIFTS for anyone that wants stylish clothing.

CLICK or TAP HERE to see the specs on the hoodie. Keep in mind the fit is a little sculptured so you may want to get the next size up if a normal fit is just a bit snug for you.

The pants that were sent to me were a little long so I'm taking them to a local seamstress to have them hemmed correctly. I already tried them on and they fit perfectly. They're made from a unique smooth synthetic fabric.

I'll report back on these once I get to wear them.

Tom's White Brick Troubles

Look at this photo. Do you know what's going on?

It's not whitewash. But if you do want to know how to do traditional REAL whitewash, CLICK or TAP HERE.
Tom's White Bricks

Tom, who resides in Wallace, NC, sent in that photo and wrote:

"Tim, my bricks have a white chalky look to them, and it does not power wash off. What can I do to get rid of it?"

Well, the first mistake Tom made was trying to fix the problem BEFORE researching it. Power washing it made it WORSE.

Do you know why power washing made it worse?

CLICK or TAP HERE and read as MANY of my past columns about this and for goodness sake, be sure you WATCH MY VIDEOS about this white menace!

That's enough for a Sunday.

A pretty big snow event is about to happen here in New Hampshire. It could be our cover snow. This means I'll not see the grass or earth until April as the ground will have snow covering it for the next four months!

Tim Carter
Founder - www.AsktheBuilder.com
Buy Certified Organic Cleaner - www.StainSolver.com
Morse Muff Man - www.W3ATB

Do It Right, Not Over!

P.S. What do you think is the best exterior house paint? Think about what paint really is before answering. CLICK or TAP HERE to see what I'd use on your home if you hired me.

November 29, 2019 AsktheBuilder Shopping Reminder

If you're a new subscriber in the last five days, this is a very unusual edition of my newsletter. Two days from now you'll see a normal one.

If you've received more than one issue in the past, then you know this is an out-of-the-ordinary message!

Black Friday at Amazon.com

Today is historically a massive shopping day online. There are amazing deals to be had. If you're shopping at Amazon.com, you can really HELP keep this newsletter coming to you by using my affiliate link. CLICK or TAP HERE to start shopping at Amazon.com.

When you shop using that link, I get a tiny slice of the sale price of the item for brokering the deal. It doesn't cause your price to go up. What happens is Jeff Bezos, the founder of Amazon and richest person in the world, gets less money he can use to fuel up his private jet fleet.

Do you know why so may businesses are IN YOUR FACE about Black Friday? Why they are DESPERATE for you to buy their item(s)?

Do you know why you see things going on sale EARLIER and EARLIER each year?

It's actually quite interesting.

Businesses know that you have a limited budget for Christmas gifts. The businesses want to stake their claim on part of your limited money so they aggressively court, seek, pursue your sweet moola.

They want to get their SLICE of it before you run out.

It's that simple.

I want to thank you in advance should you decide to help out Ask the Builder by using my link into Amazon.com.

The revenue I receive from this monster company goes a long way to help pay for the costs of running my business.

The more you help me, the better guarantee you'll have of AsktheBuilder.com and THIS NEWSLETTER being here when you most need it! CLICK or TAP HERE to use my affiliate link to start shopping at Amazon.

My Thanksgiving was pretty quiet but enjoyable. It's my favorite meal of the year and the brined turkey was the best ever. It was so moist, I thought I might drown eating each bite!

I'll be back on Sunday with some juicy leftover columns and tips that will absolutely save you money as we now march towards Christmas!

Tim Carter
Founder - AsktheBuilder.com

Do It Right, Not Over!

P.S. Brining a turkey is really easy. It makes all the difference in the world with respect to how moist the meat is.

November 24, 2019 AsktheBuilder Newsletter

Welcome aboard if you're new in the last seven days. You'll soon hear the AsktheBuilder.com train whistle moan moments away as we prepare to depart the station.

If you've been riding on the AsktheBuilder.com Newsletter RR for months or years, then you know what happens when I start to board you onto the coaches. Ladies, get those cameras ready!

If this RR jargon is confusing to you, perhaps you need to CLICK or TAP HERE to see one of the skills and magic I list on my business card. I GUARANTEE you're going to like the photo you're about to see.

Thanksgiving

Have you ever thought about the symbolism of Thanksgiving occurring just six weeks before the end of the year?

It's a great time to reflect back on the past year and all the gifts God has bestowed upon you. I can tell you that 2019 for me is a year I'll never forget as I was truly blessed with so many prizes.

I'm thankful for many things not the least of which is you being part of my AsktheBuilder.com family. Not too awful long you might have played an important part in making sure I've got a continuing presence here on the Interweb. I'm forever thankful for your help in keeping me in the game.

Thanksgiving features my favorite meal of the year. I love everything about Thanksgiving dinner and I'll splurge this year on desert - both pumpkin and pecan pie.

I've recently altered my diet and pretty much cut out 90 percent of the sugar in what I eat. I'm sure I can survive a few pieces of pie spread out over a few days, what do you think?

FAST Bathroom Remodel?

Are you needing to remodel your bathroom before Christmas? You've got time to get it done. Years ago, the average time for me to complete a standard bathroom remodel was six DAYS. Kitchen remodels took longer and some kitchen jobs stretched out for quite a few weeks!

CLICK or TAP HERE to get FREE QUOTES and IDEAS about your upcoming bathroom remodel job.

Installing A Noritz Combi Boiler

installation noritz boiler

About ten days ago, I had the distinct pleasure to install the Noritz NRCB combi boiler in my daughter's new home on Mt. Desert Island in Downeast Maine. Not only does that small box - about the size of a medium piece of luggage! - heat the house, but it also provides the house with UNLIMITED domestic hot water so long as you have propane and a wet well!

Yes, I installed much of the copper you see in the above photo. The rest was installed by my son-in-law. He also took the bull by the horns and installed all of the high and low-voltage wiring for the recirculating pumps.

The installation was really easy. We used a Ridgid Press tool to make all those fancy copper connections you see in the above photo. There was NO SOLDERING! How is that possible you ask? CLICK or TAP the following link!!!!!

CLICK or TAP HERE to see quite a few step-by-step photos of the installation. It was in a very small closet and we got everything to fit. When you visit that page you'll see a short video of how unbelievable the Ridgid Press tool is. Strap yourself in to be WOWED!

Olight Stocking Stuffer

Olight LED flashlight

Here's a fantastic stocking stuffer for all those folks on your Christmas list that love handy gadgets. CLICK or TAP HERE to get one, or maybe five of them.

I reviewed this LED light last year and want to report it's been on my keychain for eleven months without an issue. It works, it holds a charge and it's BRIGHT.

This is a gift that every loved one you give it to will appreciate. If not, have them give me a call and I'll help them recalibrate their gratefulness sensor.

Concrete Sidewalk Specifications & Drawing

A few weeks ago, you may have helped me with your ideas about new simple drawings and specifications that will allow you to:

  • make sure your projects are done RIGHT
  • get great bids because all contractors are bidding the SAME THING

I uploaded my first one of these products several days ago to my shopping cart. Here's just a part of the hand-drawn full-color drawing you get:

Concrete Sidewalk Sample Drawing

Using these simple specifications and drawing you'll significantly INCREASE your chances of getting your new concrete sidewalk done the RIGHT WAY so it lasts for generations.

CLICK or TAP HERE to get your set now.

I've dropped the price from $14.95 to $9.95 because you're a member of my AsktheBuilder.com family.

This discount will last for one week, so don't delay. You get a PDF file that you text, email, or send by carrier pigeon to your bidding contractors.

Shop at Amazon?

If you plan to shop at Amazon for Christmas gifts, you can help ensure this newsletter keeps coming to you each week by using my affiliate link to shop at Amazon.

I get a very tiny slice of the purchase price of anything you buy. It doesn't cost you any extra money, as all it does is lower the amount of money Jeff Bezos gets to pump JP-1A (kerosene) into his private jet.

CLICK or TAP HERE to use my special link.

Square a Deck

Look at this photo and imagine the challenge in front of you:

square a deck

CLICK or TAP HERE to see if you would solve the conundrum as I would. Remember, there are ten ways to skin this cat.

That's quite enough for a Sunday morning. I hope you have a happy Thanksgiving if you live here in the USA. If your country has a similar holiday, I wish you tidings of gratitude, peace and good fortune..

Tim Carter
Founder - www.AsktheBuilder.com
SUPER CLEAN EVERYTHING - www.StainSolver.com
Transform a Dock into an Antenna - www.W3ATB.com

Do It Right, Not Over!

P.S. The bay rum cologne really works. CLICK that link and scroll to the bottom of the page. Ladies, consider giving it as a gift to your soulmate if you want him to intoxicate you each time he walks by or sits next to you on the couch eating popcorn watching a movie.

Installation Noritz Boiler

installation noritz boiler

Installation Noritz Boiler | Here's all the piping complete on the Noritz NRCB boiler. I only had 23 total man-hours invested to do everything sans the electrical connections to the Grundfos Alpha2 recirculation pumps. Stop and think for a moment! How many MORE hours would have been involved if I had soldered all those copper fittings you see? Watch the video just below to see how those joints were completed in SECONDS!

Installation Noritz Boiler - NRCB Combi Boiler

I had the great pleasure to install a Noritz NRCB Combi Boiler in my daughter's new home in November of 2019. Read the backstory in my November 24, 2019 Newsletter.

Modulating Magic

One of the main reasons I love this Noritz Combi boiler is that it's a modulating boiler. This means that the fire in the boiler works like your gas stovetop. You adjust the flame on your stove to match what you're cooking, right? Sometimes you want the burner on full to maybe boil water fast, but other times you want a sauce to simmer so you have the flame nice and low.

This boiler has built-in intelligence to know how much flame, or Btus, to produce to MATCH the demand for heat. This SAVES YOU LOTS of money. Your current furnace may be one that is either on FULL BLAST or OFF - there's no between. That's how my old boiler was at my house.

It's important to realize I've been a master plumber since age 29 and have done all the aspects of working with copper tubing and black iron pipe for decades. You just combine these simple skills to complete the task.

CLICK or TAP HERE if you want to get FREE quotes from boiler installers in your city or town.

CLICK or TAP HERE to discover why I decided to use the Nortiz NRCB Combi Boiler.

Allow me to share the story using these photos. But first, watch this short video to witness the magic of newer technology revolving around how to create leak-proof copper connections in seconds. There's a rubber o-ring inside the raised ridge on the fitting. The tool crimps ever so slightly the fitting and the tubing squeezing the o-ring tightly against the tubing. You can see an o-ring right below inside the open end of the fitting:

installation noritz boiler

This is what the tiny closet looked liked the morning I started. The closet is but 3 feet wide and about 8 feet deep.

installation noritz boiler

The first step for me was to install the isolation valves. You need to get this done so you know the height of the primary boiler loop. The pipes coming out of the boiler were 1 inch but the valve reduces down to 3/4 inch. I went back up to 1 inch to connect to the primary loop. There's no noticeable flow loss in that short distance. It's much like using a 5/8-inch water meter on a 3/4-inch water main coming into a home.

installation noritz boiler

Here's the primary supply/return loop being built. That's 1.5-inch type L copper. It's vitally important that the tees for the two isolation valves be no more than 12 inches apart. The closer the better within reason. This is easy to overlook in the installation instructions as it shows up just as a small notation in an illustration. In my case, the center-to-center measurement for the tees was 7.5 inches. I haven't cut in the second tee yet because it had to be figured out using two 1-inch press copper 90s.

installation noritz boiler

Here's the return header installed. It's a tight fit as the domestic hot water lines are showing up on the left side of the photo. There are seven zones in this house so the last short 3/4-inch nipple welded to the header on the left will go unused. I just put a 3/4-inch black iron cap on it. If I could go back in time, I would have raised this header up another 5 inches to minimize conflicts between the boiler drains you'll soon see and the Grundfos Alpha2 recirculation pumps.

installation noritz boiler

The supply header is now installed and it's forward of the return header by about 4 or 5 inches. You need to make sure it's out far enough so the expansion tank doesn't hit the wall. You'll see that in a bit. If you don't know how these headers work, just think of your own vascular system in your body. Your heart is the boiler and the supply header here represents the core arteries where blood gets sent out to the different parts of your body. The return header represents your core veins that send your blood back to your heart to get a fresh boost of oxygen. In the case of the Noritz NRCB boiler, the return water gets reheated and sent back to the supply header. For every gallon of water pumped by the Alpha2 pumps out to the heating zones, a similar gallon of water is sent back into the boiler to get reheated.

installation noritz boiler

You're looking at the shut-off valves and boiler drains on the return header. It makes sense to install these first so you're not blocked by the Grundfos Alpha2 recirculation pumps. You'll discover very quickly that you need to offset the nipples rising off the headers as you don't want the pumps directly in front of the shut-off valves and boiler drains on the return header. The supply header is very heavy once the pumps are installed and you must provide sturdy brackets bolted to the wall or use threaded rods to suspend the header from the ceiling. Note the green air scoop that's on the right side of the supply header. This simple device removes air that is released from the water in the boiler. Air is dissolved in the supply water that enters the boiler. If air gets into the heating loop pipe, it creates an airlock and the water from the Alpha2 pumps doesn't recirculate.

installation noritz boiler

This shot gives you how tight it is in this closet. I'm here to tell you that you want MUCH MORE SPACE. Believe me, you'll never regret having a room that's 10 x 12 to put all your stuff in. That way you can space out the supply and return headers for a much-less painful installation.

installion noritz boiler

The first three Grundfos Alpha2 pumps are installed. The 3/4-inch Uponor hePex supply and return lines that extend out to the Uponor manifolds are connected. These manifolds distribute the hot water to all the individual loops in each zone. We installed about 6,000 feet of 1/2-inch Uponor hePex to the underside of all the floors.

installation noritz boiler

There's still a little bit of work to do, but you can see how everything fits together here in this small closet. The burgundy boxes are the computer controls for the Alpha2 pumps. Power will come out of each of the boxes and extend to each Alpha2 pump. The wiring is really not tough, although at first, it seems intimidating. You just have to read the instructions!

installation noritz boiler

Here you can see all the Alpha2 recirculation pumps are installed. BX flexible cable has also been run to the pumps. We're just about ready to turn on the boiler!

infrared photos

Infrared Photos | These are the heating supply pipes in my daughter's new home. Can you tell how many zones of the seven are calling for heat? Can you see which are the outgoing supply pipes with hotter water than the return pipes coming back to get reheated? Can you see why having one of these infrared cameras is such a good idea?

installation noritz boiler

Here's a peek at some of the 6,000 feet of Uponor hePex that's going to keep the floors in the house toasty warm. You bet I'm happy as this was a complex job that we completed using the three D's: diligence, discipline, and determination.

November 17, 2019 AsktheBuilder Newsletter

Are you a brand new subscriber? Is this your first issue? I've got a few prizes for you below!

You may be a subscriber in good standing for any number of weeks or years. If so, then you know that each issue of the AsktheBuilder newsletter has one, or more, surprises!

Is Your House Cold?

Winter is upon us. Here in the Great Northeast Kingdom, as well as the Midwest, a brief blast of frigid Arctic air swept over millions the past four days.

You may be a person that gets cold easily and need your house warm. The issue with that is the greater the difference in temperature between outside and inside your home, there's a significant cost to maintain that indoor temperature. If you know any algebra, it's a non-linear function.

I've got an idea for you that you just may want to try. Don't pooh pooh it until you at least try it. CLICK or TAP HERE to see how I stay warm in my house and keep my fuel bills LOW.

BTW, if you want a free quote on a new furnace or boiler before it gives up the ghost on the COLDEST DAY of the winter, CLICK or TAP HERE.

Brick Mortar - Secret Recipe

lime brick mortar

Check out that mortar between the brick.

The mortar is stronger than the brick! This photo was taken in Puerto Rico and they don't have freezing weather there so for the brick to erode like this is somewhat remarkable.

But why is it the mortar - which typically is the first thing to deteriorate - stronger than the brick?

How can you make mortar that can give Mother Nature all she can handle in her never-ending cage fight of transporting things to the oceans?

Oh, it's so very easy! CLICK or TAP HERE to see how I'd mix the mortar if you hired me to build your brick home or serpentine brick garden wall.

Amazon Reminder

You may do lots of Christmas shopping this time of year. If so, you can help make sure this newsletter keeps showing up in your Inbox by going to Amazon using my link. CLICK or TAP HERE to start shopping.

Each time you buy something at Amazon using my link, I get a tiny part of the profit Jeff Bezos would otherwise keep to help fund his growing empire.

I use that revenue to help pay for my valuable team members, the cost of my server, and the watercolor pencils I just bought to color drawing I'm creating for you. Blah blah blah.

I really appreciate you using my above Amazon link as it helps this small AsktheBuilder.com business continue to be there when you need advice and help.

Cool Christmas Gift Light Idea

Here's a dandy prize you can buy for that special someone in your life that will help them illuminate the path they're on!

Klein Tools LED Light

CLICK or TAP HERE to discover exactly why I really liked this handy LED light that can help you while you're doing some detailed sewing, maybe making a delicious chocolate pound cake in a dim kitchen early on a winter's day and need help reading the faded recipe, or maybe you're trying to install a boiler in a dark closet.

There are countless situations where this light will come in handy. You can even hang it from a hook!

Jerry's Peeling Paint

Jerry landed on my Ask Tim page earlier in the week. Here's what he wrote:

"We bought a wonderful house two years ago. It has a large deck that keeps peeling paint in various places. I have repainted in these area and it still keeps peeling. Is there some way to prime or some other way to stop this from happening? The former owner had the same problem. I think the wood is pressure treated. Thanks."

How would you answer Jerry? What do you think is the problem?

CLICK or TAP HERE for some insight into why coatings - paint is a coating - peel from HORIZONTAL exterior surfaces more easily than vertical surfaces.

CLICK or TAP HERE to really understand what's going on with decking lumber and WHY it's nearly impossible for you to get paint to hold onto it.

You're going to be SHOCKED at what you discover. In fact, I'm willing to bet you three dark chocolate Aglamesis pecandes that you didn't know all the facts I present to you about lumber shrinkage.

If you don't like pecandes, then you can substitute walnut, cashew, chopped dates and raisins mix! Oh, I'm hungry after typing that!

Ice on Gutter Guards or Gutters

icicles on post office

Do you know why ice really forms in gutters and on those expensive gutter guards you bought?

I'm serious.

CLICK or TAP HERE to get insight about the mystery of super-chilled water.

That's quite enough for a Sunday morning. I need to get a few other things done before leaving for church. I'll be out walking this afternoon as the temperature here in New Hampshire will be moderating a bit after noon.

Tim Carter
Founder- www.AsktheBuilder.com
Clean Your Grout With Ease! - www.StainSolver.com
Morse Mitten Man - www.W3ATB.com

Do It Right, Not Over!

P.S. Riddle me this: What is one way to figure out how to put the wires back on a 3-way switch you thought you knew how to replace? Want to save $150 an electrician will charge? I thought so. CLICK or TAP HERE.

Squaring Up a Deck

building a deck

Squaring Up a Deck | You might think building a deck is really easy. It is and it’s not. There are some hacks that will allow you to get pro results. (C) Copyright 2019 Tim Carter

Squaring Up A Deck With Two Tape Measures

DEAR TIM: I’m going to build a deck. Don’t try to stop me. I’ve got many questions for you. First, what’s the smallest size a deck can be and still have a table on it for eating? How does one figure out where to put the support posts for the beam out at the end of the deck? There’s little room for error even with a 12-inch-diameter concrete pier. What about attaching the deck to the house? Leslie B., Albany, GA

Leslie is on top of her game asking all the right questions. As you might suspect, I look at every deck I go on. First, I try to look underneath it to make sure it’s safe to be on. Then I start to look at all sorts of other things.

How Big Should A Deck Be?

It’s important to realize that most decks are built too small. The deck on my own home is only 10-feet wide but it’s 65-feet long. I didn’t build the house I’m currently in and didn’t build this existing deck. However, I did build a second deck attached to the first one three years ago. This new deck I built extends out 16 feet from the other deck and it’s 24-feet wide.

I maintain the smallest size deck you can build and have a table on it for four people is 12-feet by 12-feet. This assumes the table will be 4-feet in diameter. You can easily visualize this by just going into your own dining room or kitchen and look at your table. There needs to be enough room behind each chair when a person is seated so other people can walk behind them without being scrunched. You’ll soon discover you need 4 feet of space from the edge of the table to the deck railing to accomplish this. 4 + 4 + 4 = 12 feet!

You’d be very wise to make your deck 14 feet or even 16 feet out from your house. You’ll never regret the extra space.

What Size Deck Posts Should Be Used?

Deck posts need to rest on concrete piers that extend down beneath the frost line in your area. Many people use round heavy cardboard tubes that resemble a giant straw as the form for the pier. It’s quite common to see a 12-inch diameter pier. I prefer to use 6x6-inch posts to support all of my decks. I do this because I like to create an L-shaped notch at the top of the post for my deck support beam to rest on the post and be through-bolted to the vertical part of the L.

A 12-inch concrete pier only allows you to have about 3 inches of concrete showing around the edge of a 6x6-inch wood post if you get it perfectly centered! This is not an easy task if you try to take measurements away from the house and if the ground is falling away from the house.

How Do You Determine The Location Of Deck Support Posts?

Years ago I discovered a very simple way to determine the exact location of deck support posts. I would just bang together the outer frame of the deck. This meant you had to attach the ledger board to the house and then nail or screw together the other three joists to create the square or rectangular frame.

I’d temporarily add simple 2x4 legs on the two joists that extended out from the house and level the frame. Next, I’d square it up using a helper or two. You don’t have to know calculus or deep math to do this. All that’s required is you have the two joists projecting out from the house the same length and whatever length the house ledger board is, make sure the outer parallel joist is the same length as the ledger board.

Take two tape measures and extend them across the deck from the corners making a giant X. When the two measurements from each tip of the corners are the same, the deck is square. Shift the frame until you get the measurements to be the same. Once the frame is square, nail a few 8-foot long 2x4s at a diagonal across at least two of the corners so the frame doesn’t move.

With the frame level and square, you can now extend a level down to the ground from the two outer corners of the deck. With these two points precisely marked on the ground, you can start to locate where your posts need to be. Your structural design may have your beam in several feet so the outer portion of the deck is cantilevered. No matter what your beam location, you can see how you’ll be able to use strings on the ground now to perfectly locate the center of the concrete piers so your posts are centered on the piers.

What Do You Use To Attach The Ledger Board To Your Home?

Attaching the ledger board to your home is the hardest part of the job. Many a person has been seriously injured in deck collapses caused by a lack of attention to detail of this extremely important structural connection.

Simpson Strong-Tie is an American company that makes a wide variety of metal connectors you’ll probably use to build your deck. They have a fantastic library of technical notes and drawings that show you how to use special connectors and threaded rod to ensure your new deck doesn’t pull away or drop down to the ground in the future.

Years ago I also created a helpful drawing that’s at my AsktheBuilder.com website. It shows you how to flash the deck ledger board against the house. It’s the only drawing I’ve ever seen that incorporates small fire cuts on the top of the joists. These cuts allow the deck flashing to drop down over the ledger board and have the all-important kick-out lip on the flashing. Go look at the drawing now so your house doesn’t rot out!

Column 1329