Senco F-15 Finish Nailer Review

senco finish nailer

Here's the tool I tested. It drove nails perfectly. CLICK THE PHOTO now to have one delivered to your home.

Senco F-15 Finish Nailer

I've driven hundreds of thousands of nails with many different nail guns since the late 1970s. This fact should be of great interest to you.

Why?

That deep experience allows me to give you a pro's opinion about a new tool so you don't waste your money.

Here's another fact. You might come across other tool reviews written by hobby bloggers who've never set foot on a job site nor have ever worked inside or outside the home of a paying customer.

Always be sure you check out the reviewer's About Me page so you can judge their qualifications when it comes to evaluating a tool. How can a person who's not used tools on a job site for years render an opinion you can trust? It's your money at stake when you buy, not his for goodness sake!

But I digress!

A Senco Neighbor

I grew up in Cincinnati, OH and my entire construction experience was in and around Cincinnati.

My first nail gun was a Senco SN-4 I believe. It was a large gray gun that shot 16d sinkers and 8d nails for roof and wall sheathing and thicker subflooring.

That gun never failed me. I don't believe it ever jammed. If it did, I have no memory. At the time, I had no idea that Senco was based in Cincinnati. What a small world.

Within five years, I owned no less than five pneumatic Senco guns. They made me lots of money.

The F-15

Over the past five years I've been to countless editors conferences where tool manufacturers ply their wares to the members of the media. I've witnessed the amazing transformation of cordless tools and ever-increasing battery chemistry and performance.

Perhaps the biggest advancement has been micro-processor technology built into power tools to protect the tool and the battery.

It only made sense to bring this magic to finish nailers.

Fast Recharge

I continue to be impressed by the rapid recharge time once you've depleted a battery. The F-15's battery can attain 80% recharge in just 15 minutes and a full charge in just 45 minutes. That means after a long lunch you can get back to work and not fear running out of power.

The Specs

I don't waste the time repeating specs. If you want them, CLICK HERE.

Weight and Performance

There are pros and cons to every tool. I've reviewed hundreds of them. The same is true for this gorgeous finish nailer.

I love the fact that I don't have to mess with a compressor and a hose. I grab the tool, push it against the wood, and squeeze the trigger. Kerchunk - it fires!

I may have put up five pieces of trim in the time it takes you to get your compressor and hose set up making sure you don't mess any surface up.

However, you pay a small price for this convenience.

The tool with the battery weighs a little more than I'd prefer. It's not much, but it could be enough to cause some fatigue later in the day.

My Rating

I'm a sucker for bright red and blue so this tool already had an inside track. Just kidding!

In all honesty, I'd give this nail gun 4.5 stars. I love the convenience of no hose and no compressor.

Senco can get the other half star when the next version of this tool goes on a diet.

You'll not be disappointed using this nail gun and I feel you'll agree with me about the convenience.

Let me know in the comments below.

Build Deck Bench Seating

Build Deck Bench Seating

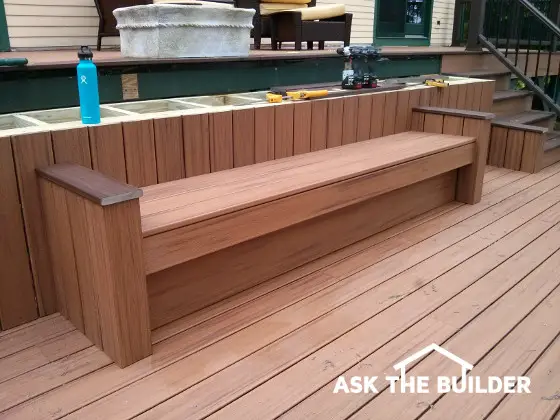
Deck bench seating like this is not hard to build. The shelf above needs to be covered, but that’s child’s play. (C) Copyright 2017 Tim Carter

"Benches are just very wide chairs in my opinion. I don’t like hoping something is going to work so I always look at existing benches and take measurements."

Build Deck Bench Seating Checklist

DEAR TIM: This past weekend I was at a party and sat on a bench that was built into the deck. It was such a clever idea and it had handy armrests that were perfect to set food plates or drinks on.

I want to build bench seating on my deck. What are the most important things to consider?

Although I’m not a great do-it-yourselfer, I can follow directions. I want it to be strong and durable. Aimee P., Carbondale, IL

Related Links

Top Ten Deck Building Secrets - DO NOT SHARE!

Deck Screws or Nails? Which is Better?

DEAR AIMEE: I’m a big fan of deck bench seating.

What is Comfortable Deck Bench Seating?

A few years ago my wife purchased a free-standing teak bench that was seven feet long and about 24 inches wide. It came with a cushion. I loved laying down on that bench in the warm sun like a lizard would on a rock.

Last year I completely remodeled two decks on my home and I constructed a new deck that attached to the posts that support my upper deck. I knew when I was planning this new deck that I wanted to put in a new built-in bench as the teak bench had seen better days.

Free & Fast Bids

CLICK HERE to get FREE & FAST BIDS from local deck builders that can build a bench for you.

What's the Best Plan for Deck Benches?

The best plan for deck benches is to go sit on a few existing benches until you discover one that's comfortable. Take photos and measurements so you can copy the design.

I used the teak bench dimensions as a basis for my plan, but I ended up altering it to a degree to fit bench cushions we could find online that were a standard size. You don’t have to have cushions to sit on, but I recommend it.

Find the cushions you like at an affordable price and then size the bench seat to fit the cushions. If you order custom-sized cushions made to fit a bench you make, the price might take your breath away.

What Are Deck Benches?

Benches are just very wide chairs in my opinion. I don’t like hoping something is going to work so I always look at existing benches and take measurements.

I’m sure you have a favorite chair in your home that’s extremely comfortable. Measure how high off the floor the top of the seat is and how deep the seat is from front to back.

What are Common Chair Dimensions?

My guess is you’ll discover the seat is usually about 19 inches up off the floor. The front to back measurement will be about 22 inches. If you build a bench too high your legs dangle. If it’s too low, you end up squatting uncomfortably. The front to back dimension is also critical so you don’t end up leaning back too far.

I built my bench with a 90-degree orientation to the seat and the back. The reason is the back of my bench does double duty as it’s a wall that supports a long shelf my wife wanted me to make for potted plants.

Build A Bench Video

This Australian has got the right idea about a few things. I think his video should help you.

What is an Adirondack Deck Bench?

An Adirondack deck bench is one that has a sloped seat and sloped back at the same angles as those on an Adirondack chair.

If you’ve ever sat in an Adirondack chair you may want to mimic this design for your bench. It’s more work to create the angled back and seat, but the long-term comfort of sitting on the bench may be worth it. The only disadvantage to this design is you can’t lay horizontally on the bench without getting jammed into the corner where the seat meets the back of the bench.

The other issue with the Adirondack style is the armrests on the typical chair help you get up out of the low chair. People sitting on a bench would not have these and it could be problematic for older folks to get up. Just keep that in mind as you plan.

CLICK HERE to get FREE & FAST BIDS from local deck builders that can build a bench for you.

How Long Does It Take To Build a Bench Frame?

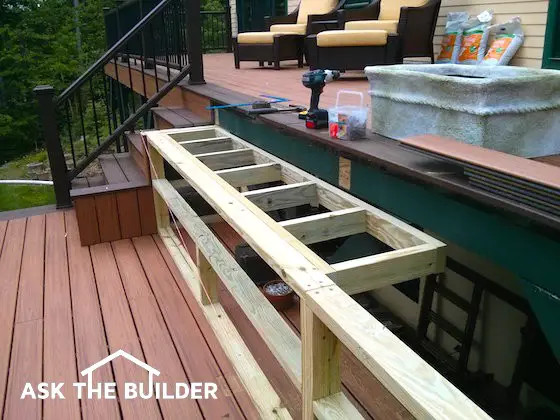
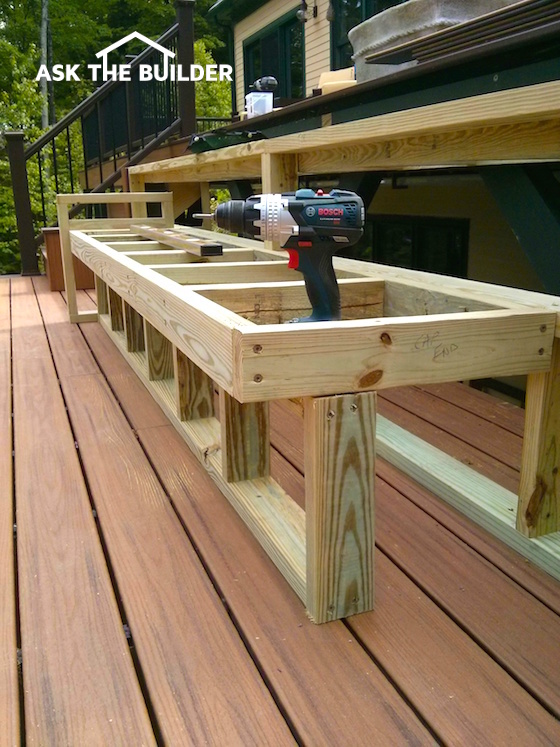
I built the framework for my deck bench in less than an hour. If you looked at the different components after they were built, I just had four small rectangles that were various lengths and widths.

deck bench seat

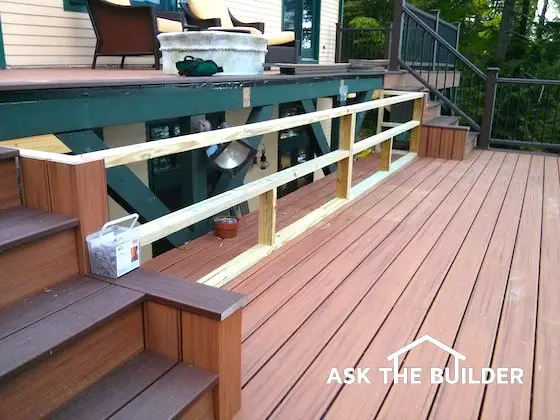
Here's the framework for the back wall of the bench. The top of it will become a platform for flowers. Copyright 2017 Tim Carter

deck bench seat

Here's the top of the platform going in. Rather than build a giant 16-foot long wall for the top, I did it in two sections I could handle without help. Copyright 2017 Tim Carter

One of the rectangles formed the seat and I screwed the long edge into the tall vertical wall that formed the back of the bench. You might end up screwing your seat to your deck railing posts or to the wall of your home.

deck bench seat

You can clearly see the seat coming into form. It's just a rectangle wall built with treated 2x4s. I have a block supporting it until I finish the tiny wall under it that will support the seat and any people. Copyright 2017 Tim Carter

deck bench seat

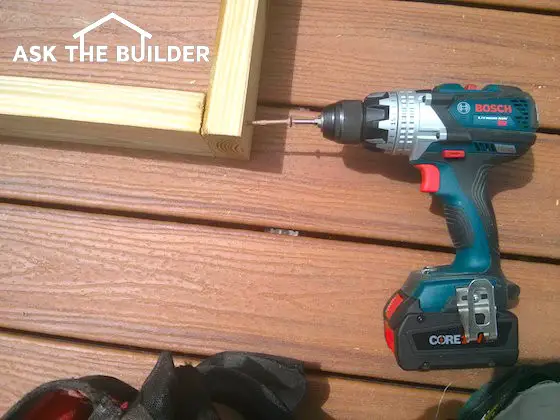
I'm using my handy Bosch impact driver to drive the coated timber screws. It's a bad idea to use nails. They'll loosen over time. CLICK THE PHOTO NOW to have the Bosch impact driver delivered to your home.

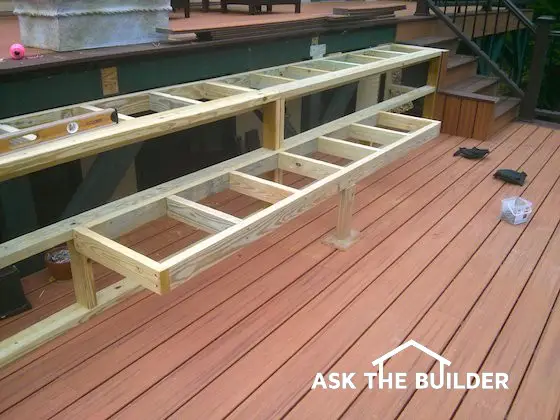
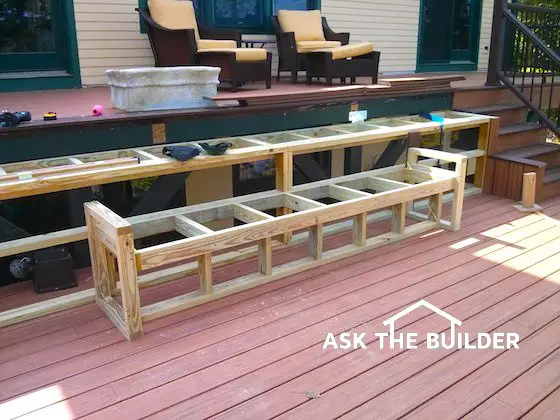
I built a tiny long wall that was the same length as the seat. This wall was inset from the front of the bench about 5 inches. This wall provided plenty of support so the seat would never collapse. The inset is easier on your legs as some people tend to tuck their legs back a bit when sitting in a chair or on a bench.

deck bench seating

Here's the tiny wall under the seat. You can see how it will make the bench as strong as the Rock of Gibraltar. Note the coated timber screws driven by the amazing Bosch impact driver. Copyright 2017 Tim Carter

What Supports the Ends of the Deck Bench?

At each end of the bench, I had small walls that were the same height off the deck as the arms on several chairs I measured around my house. Once again, don’t guess. Find chairs that have arms on them and decide which height is the most comfortable and make your end walls that high.

deck bench seating

You can see the two end walls. I ripped down the 2x4s to a specific width so when I cut my Trex Transcend decking to cover it, I'd be able to do it with one piece of decking. Look at the next photo and it will make perfect sense. Copyright 2017 Tim Carter

I capped my end walls with 1 x 6 material so it would serve as a great place to put smaller dessert plates and glasses or mugs. So far it’s been perfect.

deck bench seating

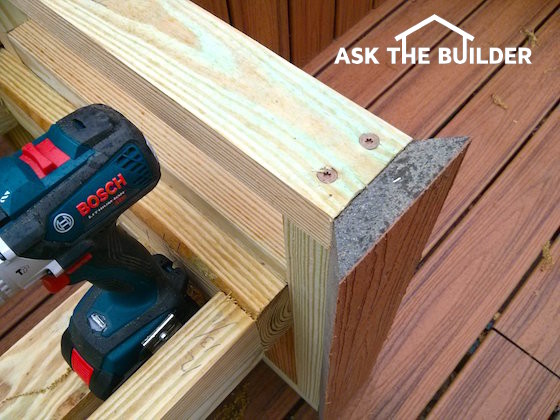
Look closely at the mitered piece of Trex Transcend. I cut the maximum width of a piece of decking on my table saw. The smaller back dimension of the decking is what the treated wall thickness had to be. Copyright 2017 Tim Carter

I’d avoid using any nails when assembling all the components for this bench. You can purchase wonderful coated timber screws that take the place of regular 16d nails. All the framing lumber should be treated to resist rot. CLICK HERE to see an assortment of the timber screws.

Finished End Wall Corner

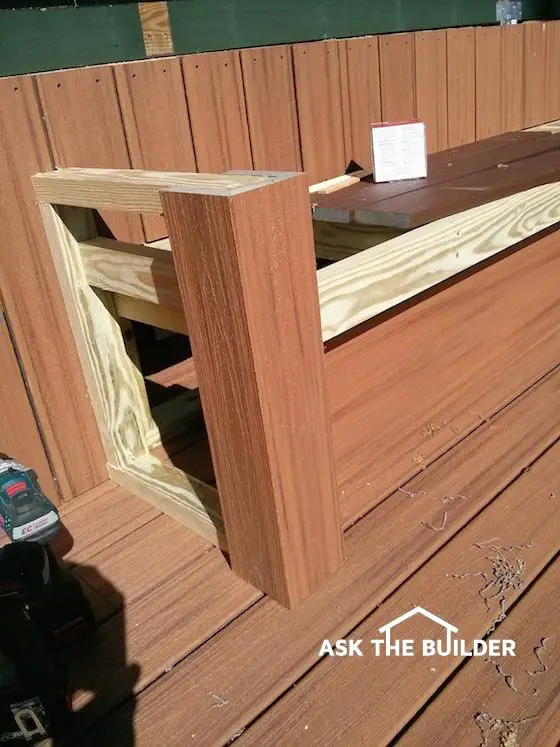
The other two pieces of Trex Transcend decking have been ripped with a miter joint and applied. All this work produces a look that the end of the bench is made from a solid piece of wood instead of just overlapping the pieces at the corner. It's more work to do it this way, but I feel it looks better. Copyright 2017 Tim Carter

Be sure to purchase treated lumber that’s nice and straight. Store it inside in the shade if you can’t use it right away. You need all the pieces to be nice and straight as you go to assemble all the parts.

deck bench seat

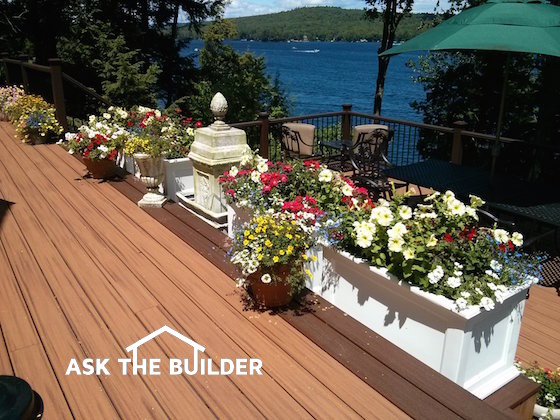
Here's the flowers on top of the platform above the bench. How would you like to be sipping a drink sitting on the bench looking at sailboats? Copyright 2017 Tim Carter

CLICK HERE to get FREE & FAST BIDS from local deck builders that can build a bench for you.

Column 1210

STIHL Electric Chain Saw Review MSA 120 C

stihl saw cutting

Here it is doing what it does best. Yes, I should have had a glove on for the photo. Yes, I should have had on safety boots with kevlar uppers. Yes, my left hand should have been on the black ring to balance the saw. Guess what? It was being used to take this photograph. ALWAYS READ AND FOLLOW the safety instructions found in the owners manual. NOTE: The saw was NOT in use as this is a beauty photo of the saw. The chain was not in motion while the camera captured this shot. Copyright 2017 Tim Carter

STIHL Electric Chain Saw Review

I took ownership of a STIHL electric chain saw about three months ago. It's the battery-powered MSA 120 C.

Over those ninety days, I've used the saw extensively on all sorts of different jobs around my home.

To the best of my knowledge, I'm one of a very few tool reviewers that puts a tool through rigid testing before sharing the news about it's performance.

I know of one tool reviewer that publishes some tool reviews within hours of the UPS truck pulling away from his apartment. You can't evaluate a tool in just a few hours.

Period.

Sharp & Sassy

This handy STIHL chain saw really surprised me. When you first pick it up, you think it's a toy. It's that lightweight.

It's a great example of the old saying, "You can't tell a book by its cover."

While this micro saw doesn't pack the power found inside its gas-powered big brothers that work in the deep forest all day in the hands of professional loggers, this saw is able to cut down a sizable tree with little effort.

I know as I did it in my own backyard.

The 40-Foot Oak

I decided to go big with the first job. I had a 40-foot-tall oak tree that needed to come down. It's trunk just a foot off the ground was 7 inches in diameter.

After making the suggested cuts in the trunk to fell the tree, it came down exactly where I wanted it to fall and the little STIHL saw never flinched. It's sharp teeth bit into the oak wood like a bald eagle's talons grasp onto a fish from the lake I live on here in central New Hampshire.

Wood chips were flying in all directions, and within a minute the tree was on the ground.

Trimming Branches

This saw is now my go-to tool for trimming any branches on the many trees at my home. Since it weighs so little, you have excellent control and rarely experience fatigue.

Sips Oil

As with any chain saw, you need to fill the oil reservoir with lubricating oil. I prefer to use the oil from STIHL because I know it's been formulated to work best with the saw and chain.

stihl saw cutting

Fill the saw up and check the oil level regularly. Copyright 2017 Tim Carter

The Battery

This is a battery-powered saw. It's new technology for STIHL. The battery should last you long enough that you need a break. It charges fast and you can get back to work. If you want to keep working, then purchase a second battery.

stihl saw cutting

Here's the beefy battery. It's got a handy LED power-level meter so you can judge when to stop for some liquid refreshment or a whoppie pie. Copyright 2017 Tim Carter

Five Stars

I've owned STIHL chain saws for decades. It's the first saw I ever used. This new addition to the line rates five stars. If you care for it, it's going to work hard for you for many many years.

How to Clean Vitamix

Vitamix Blender

Your Vitamix blender will look BRAND NEW like this one after using Stain Solver.

How to Clean a Vitamix Blender

I get questions all the time about how to clean a Vitamix blender.  (August 23, 2017 Newsletter)

But the most interesting thing I've received is an email from Molly a year or so ago. Read this:

"I never, never write manufacturers.... Did I say never??? I have a Vitamix I have used once a day for about 7 - 8 years. The blender looks like I had blended car parts in it...

Stained, cloudy, just plain yuck. I had read many websites, including the Vitamix site, saying clean with lemon juice , vinegar etc. None of them worked at all. 

Then I stumbled onto your Stain Solver product. I have a new blender after just a one hour soak!!!

I am just non-plussed ... Truly miraculous. Thank you!!!! You should contact Vitamix and partner with them. Their remedies don't work. Good luck!"

My wife and I developed the fantastic product called Stain Solver Molly loves so much.

Stain Solver is made with FDA-approved food-grade-quality ingredients. There are only two and both are made in the USA.

Oxygen Bleach

Stain Solver is MADE in the USA with USA ingredients that are food-grade quality. CLICK THE IMAGE to order some NOW.

Stain Solver is certified organic, so it's safe to come into contact with your valuable Vitamix blender.

It's very simple to clean a Vitamix mixer and requires NO SCRUBBING.

Step One: Purchase a 2.2-pound container of Stain Solver Certified Organic oxygen bleach.

Step Two: Fill the blender with HOT tap water to the top and set on a level surface.

Step Three: Add two tablespoons of Stain Solver powder and let sit overnight.

Step Four: Wake up to clean blender! Rinse well and make a smoothie!

August 16, 2017 AsktheBuilder Newsletter

I'm sitting at gate 54A here in the San Francisco airport waiting to get back home. I've been out here on the Left Coast of the USA for over two weeks.

Two weeks ago, I was just starting a very interesting tour of the KEEN shoes and boots factory in Portland, Oregon. CLICK HERE to read that story and watch a video of me making boots!

I then had to be in San Francisco yesterday for a small conference at Google's offices at 345 Spear Street. Here was my view from the 7th-floor roof deck as I ate lunch.

In between the two business events I wandered down through Oregon and Northern California. This past weekend, I was blessed to stay with my oldest daughter Meghan and her husband Brent.

We had dinner on Sunday with some of their friends. Tanya was there and she came to the USA from Vietnam about forty years ago. She told us the harrowing story about how she and dozens of people were rescued minutes before their leaky boat sank in the Pacific Ocean. It was a riveting story of survival.

Two days ago, I received a second blessing and got to meet Beth, a long-time subscriber. She uses my Stain Solver for all sorts of cleaning chores around her home, and for several years, I promised to stop by as I drove past her in Palo Alto, CA.

I'm so happy to be going home to see Kathy and get back into a normal routine! My guess is Lady the dog is going to be quite happy to see me tonight.

Steel Beams & Wood

Overnight Dan emailed me. He's building a home in Crown Point, Indiana. Look at a photo he sent me. Pay attention to where the red arrow points. What's wrong there?

What you're looking at is a treated lumber sill plate and an untreated block of wood under the steel I beam. There are some thin steel shims on top of the untreated wood.

Dan wanted to know if this was acceptable.

The answer is NO!

Steel beams must be placed on solid masonry or something else that can't compress or ROT.

Yes, treated lumber ROTS. CLICK HERE for proof.

Building On Solid Rock

Topsoil is often not too thick. You may have to build on solid rock.

What are the challenges and what should you avoid at all costs?

There are quite a few things you need to know when faced with rock.

My college degree is in geology and I was intrigued with hydrogeology while in school. What's that?

CLICK HERE do discover more and how to protect yourself when faced with bedrock.

It's getting close to boarding time. I'll have more news and photos probably this weekend.

Oh, you may want to read about the most exciting thing that happened to me last week! I was deep in a redwood forest in California.

CLICK HERE and tell me what you think about this story!

Tim Carter
Founder - www.AsktheBuilder.com

Do It Right, Not Over!

Bath Remodel Pictures

bath remodel

The before view of the shower. Copyright 2017 Tim Carter

Bath Remodel Pictures

Matt works for Ranger Roofing, a roofing company in Oklahoma.  Someone hired his company to complete a bathroom remodeling project. I'm not quite sure how a roofing company got into bath remodeling, but you can be the judge if they should get back up in the hot sun or stay inside!

Free & Fast Bids

CLICK HERE to get FREE & FAST BIDS from local bathroom remodeling contractors.

Below is Matt's story, in his own words. Matt submitted the photos, but he transferred the copyright ownership to me by asking me to publish his story.

"We were tasked with renovating this bathroom and decided to write a bit about it in case you want to do the same.

Remove Old Tub

Starting from the bathtub, we placed a waterproof layer beneath, to prevent any leaks. After making sure it was waterproof, we proceeded to put the tub and started securing it and making sure it was in place.

Silicone and Mold

Later we waterproofed the edges with silicone to prevent the leakage of water beneath; this could cause mold and the structure of the house to become compromised, which we obviously want to avoid.

Test For Leaks

After we tested everything and made sure it's waterproof we installed the faucet and set up the drainage system.

CLICK HERE to get FREE & FAST BIDS from local bathroom remodeling contractors.

bath remodel

Tile going up. They made a HUGE mistake not protecting the tub with tarps during the install. A dropped tile can CHIP the tub. #FAIL Remember, this job is being done by Ranger Roofing, not me Tim Carter. Copyright 2017 Tim Carter

Trouble Time!

For the shower, we had a bit more trouble, after making sure all of the installations are working we started by leveling the floor. After leveling it we placed a waterproof layer and started layering tiles, we filled the space between the tiles with waterproof silicon made for showers.

Silicone Curing

We left the silicone to dry while we installed the faucet and the shower head, making sure everything is waterproof.  A small leak could mean you have to go under the tiles and dig up the whole thing. In these critical steps, it's better to triple check than to have a mistake force you to dig up everything and start over."

bath remodel

After - the finished shower. It's hard in photos like this to see extreme detail. We have no real idea how well the tile joints are and if everything is excellent workmanship. Copyright 2017 Tim Carter

CLICK HERE to get FREE & FAST BIDS from local bathroom remodeling contractors.

Thanks for sharing Matt.

August 9, 2017 AsktheBuilder Newsletter

If you're a new subscriber in the past two weeks, this is not a normal newsletter. Don't judge my newsletter on what you're about to see.

I'm in the middle of an extended vacation that had a business meeting last week in Portland, OR, and in six days I have another one in San Francisco.

I've been wandering down through Oregon and Northern California since last Friday afternoon.

Here are a few photos. The first one is at Crater Lake in southern Oregon. I had always wanted to see the deep blue water in the crater, but the smoke from giant forest fires in Canada and right in Crater Lake National Park thwarted that dream! This was the best photo I was able to capture but it's still quite smokey.

The next photo was taken yesterday at Humboldt Redwoods State Park in Northern California. That's an old-growth redwood tree just behind me. It had to be over 200 feet tall.

The next one, I took yesterday at Point Cabrillo Light Station along the Pacific Ocean. If you want to see what I was doing sitting at the picnic table with that crazy lime string, CLICK HERE. The story is about me doing radio at the photo below, but I was doing the same thing among the majestic redwood giants.

Roof Ventilation Myths

Ninety minutes ago, I had a fascinating conversation with a man in Canada about what he *thinks* you feel about roof ventilation.

I decided I'd go to the source - that's you - and find out.

Would you humor me and please take a two-question survey?

It will take you LESS than 30 seconds.

CLICK HERE to get to the survey.

KEEN Shoes and Boots Factory Tour

Last week, I was in the record HEAT up in Portland, OR. Let me tell you it was HOT. I think it got to 105 F last Wednesday.

I was invited there to visit the fascinating KEEN shoe and boot factory as well as their headquarters and infamous KEEN Garage.

CLICK HERE to read my story about the adventure. There are TWO videos in the story and one of them is me working on the assembly line!!! How cool was THAT???? Three people are going to be wearing boots that I helped make!!!

CLICK HERE to see what I think of KEEN boots. Read my review of one of their boots.

Latest Columns

I had to write four columns before leaving on this trip. Here they are:

Polymeric Sand Installation - WHAT is that Tim?

Building on Rocky Land

SELLING Used Building Materials - Not Donating

Brick Mortar Repair Mix - Guess the MAGIC Ingredient!!

Okay, that's enough. I need to scoot out the door to do more amateur radio today.

I'll report in when I get back to New Hampshire.

Tim Carter
Founder - www.AsktheBuilder.com

Do It Right, Not Over!

KEEN Factory Tour Summary

keen footwear

This is the company canteen side of the KEEN Garage. On the other side of those garage doors with the glass panels is the retail store. CLICK HERE to read a story about the amazing restoration of this historic building built in 1907. Copyright 2017 Tim Carter

KEEN Footwear Factory Tour

The first week of August, 2017, I found myself in Portland, Oregon. As fate would have it, I arrived in the midst of an historic heat spell.

I had been invited to visit the KEEN Utility factory, headquarters and epic KEEN Garage where they have a retail store in downtown Portland's Pearl district. About ten other hobby bloggers and one or two full-time professional members of the media like myself were part of the tour group.

Best Tour Ever

I hate to admit it, but I've been a member of the working media for so long that I've lost count of the number of factory tours I've attended. The reason is I cover an industry that makes lots of tools and products.

The company owners are always proud of what they make and they invite media to see and share with their audiences how things are done. Some tours have been fascinating as you sometimes don't realize how many aspects of building a thing are still done by humans. That may change moving forward, but that's a story for another day.

This KEEN tour was the best ever for a number of reasons. KEEN is a family-owned business. Rory Fuerst, Sr. started the business just a mere fifteen years ago in 2003. Two of his sons work each day in the factory, Rory Jr. and Connor.

keen footwear

Connor Fuerst is holding his arms up praising the members of the media. No, seriously, I caught him at an awkward moment. His brother Rory, Jr. is in the blue t-shirt opening the door to lead us out to the factory. Marshall Alexander, a member of the KEEN marketing team is on the left against the wall. The woman between Connor and Rory, Jr. runs the quality control lab at KEEN. I forgot her name! Sorry! Copyright 2017, Tim Carter

I got to spend lots of time with them and they are as friendly and normal as can be. Both were wearing t-shirts and you'd never know they were part of the business if you just happened to see them walking around the factory.

On a selfish note, I felt it was the best tour I've ever attended because they allowed me to work on the assembly line! How silly is that, but it meant so much to me.

Three people are going to wear a pair of boots that I helped work on. I was able to fit an upper onto the form before it goes into the assembly line, I got to load two soles into the forms and I got to trim off the urethane flash from one boot.

Connor had to do some extra trimming because my workmanship didn't meet their standards, but he was very understanding of my first attempt!

The Process

Watch this video to get an idea of what it's like to be in a factory that makes amazing boots and shoes. I could write about it, but it's better that you just see it.

The People

At the end of the tour everyone gathered in a conference room at the factory. It's somewhat normal for this to happen. The purpose is for those on the tour to ask follow-up questions.

A few of the hobby bloggers asked some tech questions, but I then jumped in with my over-arching question I always ask. I pointed the question to both Connor and Rory Jr.

"If you could wave a magic wand that would allow you to communicate to all consumers messaging you feel they don't really know about KEEN Utility and what you do, what would that message be?"

You could hear a pin drop. Connor and Rory, Jr. looked at each other and with their eyes said, "Dude, you go first!"

I think Rory, Jr. finally said, "Boy, that's a great question." He shook his head and then said, "Connor, you go first."

Connor thought for a second and replied, "I really would love consumers to know about the dedication and values of the entire team that assembles here each day to make our boots and shoes. These people love to come here and they work hard. They take real pride in what they do and I feel it shows when you open the box and try on your boots."

Rory, Jr. then jumped in. Rory runs the Fuerst Innovation Lab where all the conceptual ideas are born about all new products and processes. They often look at failure points of products made by others and try to solve them with a new KEEN product.

"I think that our customers need to know that money doesn't drive all decisions. We try to remember that all the time. I'd like them to know that we thrive on doing things that are challenging. It's easy to do easy things.

What's more, I'd love for them to know that sometimes you have to ignore the experts and consultants who say you're going to lose money on something. In certain situations you need to do what's right, not what's going to make you the most money. Finally, I'd like our consumers to know we have fun here."

The Takeaway

I think Rory Jr.'s comments hit the nail on the head for me. After all, the AsktheBuilder.com motto is:

Do It Right, Not Over!

I could see the workers at the factory trying to do it right. Everyone was diligent that I saw. They want your boots and shoes to fit perfectly, be comfortable and last a long time.

It's also about fun. What a dream to have a job that's fun. I've got that with my AsktheBuilder.com vocation and it's obvious Connor, Rory, Jr. and the other dedicated employees at KEEN Utility in Portland have this rare gift where work is fun.

keen footwear

What you see under the signs is a tiny fraction of the KEEN product line. CLICK THIS PHOTO now, buy a pair and you'll get them delivered to your home in days. You'll have a similar smile on your face once you try them on!

CLICK HERE now to purchase a pair of KEEN shoes or boots and put a similar smile on your face when you insert your foot into the cocoon of pleasure. That's what I call my KEEN boots!


KEEN Factory Tour Video

KEEN Footwear Factory Tour

I had the distinct pleasure to attend a media event at the KEEN Utility factory in Portland, OR in August 2017.

I've been on many factory tours over the past twenty years and this was the BEST ONE ever. 

First, it's a smaller factory with about eighty people working diligently to make some of the best work, hiking and casual shoes I've ever worn. Read my review about one of their boots I own.

Another reason it was a great tour is we were allowed to help make actual boots and shoes that you might wear! Yes, I got to put an upper on a form at the beginning of the line, I got to put a sole in the machine before it gets bonded to the upper and I got to trim off the urethane flash that oozes out the sides of the lower part of the upper after the boot is made.

KEEN - Made in the USA and you'll LOVE them. They make them for women, men and kids!

CLICK HERE to see a variety of them you can buy right now.

CLICK HERE to go to the KEEN website.


Deck Material List

Decking Material List & Cost Comparison for a 12 x 10 Foot Deck

The following is material list that will enable you to construct a simple 12-foot-wide by 10-foot-deep deck. Your situation may require some specialized hardware, however, this list will get you 98% of the way.

The deck in question sits only several feet off the ground. If yours is higher, you may require longer posts to reach the ground.

6x6s Baby - The Only Post To Use

I prefer to use 6x6 posts instead of 4x4s. Six x six posts allow you to create a notch so the beams rest on a wood ledge. I then through bolt the beams through the remaining 3 inches or so of lumber that is left of the post.

The diagram below is a side view of a beam as it runs over the 6x6. If you build it this way, the floor joists sit on top of the two beams.

deck material list

Free & Fast Bids

CLICK HERE to get FREE AND FAST BIDS from local deck contractors. You may be shocked how cheap it is to hire a pro.


If you choose to keep the beam in the same plane as the joists, you would make a 3 inch deep singular notch in the 6x6. The two beam boards would end up side by side. This would allow joist hanger nails to penetrate both beams.

Material List & Prices (Cincinnati Prices - August, 1996)

Yes, I left in the prices for 1996 to show those in the future what lumber used to cost! It gives you an appreciation for inflation.

Prices in ( ) are for substitute material in Construction Heart Redwood. The first item on each line is the quantity of material. The second entry is the description of the item. The third item is what it is used for. The final item is the total prices for the items on that line.


Rough Framing / Below Decking Materials EB015 Cleaning & Sealing Deck Cover

(10) 2x6x10 foot CCA Treated Floor Joists $74.00

(2) 2x6x12 foot CCA Treated Band Boards 17.90

(2) 2x8x12 foot CCA Treated Beam at Posts 23.98

(1) 6x6x12 foot CCA Treated Post(s) cut into 2 lengths 17.50

(5) 80 lb. Bags Concrete Mix Piers at Posts 21.25

(6) 1/2 inch x 8 inch Carriage Bolts Bolts for Band Board at house 9.30

(4) 1/2 inch x 6 inch Carriage Bolts Bolts for Beam at Posts 6.20

(10) 2x6 Single Joist Hangers Attach Joists to House Band 5.45

(1) Box Galvanized Joist Hanger Nails Attach Joist Hangers 2.95

(5) lbs. 16 CC Galv. Ringed Nails Nail joists, beam, etc. 6.95

(15) lbs. 2 1/2 inch Galvanized Screws Decking Screws 45.00


Decking & Railing Materials

(22) 5/4 x 6 x 12 CCA Decking Deck Boards 209.00 (277.20)

(70) 2x2x 42 inch CCA Pickets Railing Pickets 76.30 (140.00)

(32) Lineal Feet 2x6 Railing Railing 25.60 (46.40)

Note the small premium to upgrade to redwood for the Deck Surface and Railing System

CLICK HERE to get FREE AND FAST BIDS from local deck contractors. You may be shocked how cheap it is to hire a pro.

Column B142