Real Estate Inspection

Just last year (2008), I had to pay for a real-estate inspection. For the first time in over 32 years, I purchased an existing home that I didn't build myself. Fortunately, I hired the best inspector around to perform my real-estate home inspection. The inspector was certified by the American Society of Home Inspectors. As I followed him through the house, it was obvious that he had done many real-estate inspections. He zeroed in on all the mission-critical aspects of the house and was extremely thorough.

Many years ago, I used to have my own real-estate inspection service. Back in the 1970's, when you opened the Yellow Pages, there wasn't even a heading that existed for home inspections or real-estate inspections. Many young people have no idea what the Yellow Pages are or were. They were the first search engines. The Yellow Pages were phone books that listed businesses under different categories. If you needed a problem solved, you opened the Yellow Pages. Now people solve problems by typing their problems into search engines!


Purchase my Easy-to-Use Home Inspection Checklist Now. This Simple-To-Use Tool allows you to spot many defects before you have to hire a real inspector. You can then eliminate a house and move on to one with fewer defects.

You have nothing to lose. If my checklist doesn't work for you, I'll give you your money back. Oh, one more thing, it's an Instant Download! You can have the checklist in your hands just minutes from now!


One of the reasons real-estate inspections became a huge industry was a subtle change in the laws in many states. For many years, the law put the burden of defects that might exist on the buyer of real estate. The Latin phrase 'Caveat Emptor' - Let the Buyer Beware - was the standard. Sellers of real estate or other chattel were held exempt if they sold goods that were defective.

But slowly the law started to change as more buyers won lawsuits about serious undisclosed defects. At the same time, real estate brokers were sucked into this costly legal vortex by being named as defendants in the lawsuits. The homeowners felt they should be held to a higher standard as they saw the houses each day and should be able to spot problems.

It didn't take long for the Realtors to figure out that it was in their best interest to help promote using builders, or any professional engineer, to look at a house once it was under contract. Suffice it to say, the real-estate inspection industry can trace its roots to the legal profession.

The inspection of real estate can be an involved process. My inspection took about three hours. Some inspections can take even longer. If you want a thorough inspection, you often have to bring in more than one inspector. In my case, I also brought in a septic tank specialist who looked inside the tank, tested the cleanliness of the leach field and tested the pump. Unfortunately, my septic system is below the leach field, so the secondary waste water in the tank has to be pumped uphill about 25 feet in elevation.

It's easy to locate real-estate inspection services. I think the Internet is the best place to start. Beware of using inspectors recommended by the Realtor. For many years, real-estate inspectors were known as deal killers. Many Realtors don't want the deals to blow up, so some unethical salespeople and brokers would recommend an easy inspector. You want a real-estate inspector that used to be a drill sergeant in the Marine Corps.

Furthermore, you want a certified inspector that has to meet tough qualifications and is required to take continuing education. Not all inspection certification programs are equal, not by a long shot. At the time this column was written, I feel the toughest real-estate inspection association is the American Society of Home Inspectors (ASHI). Take a look at their requirements and see if you don't agree.

To save money on inspections, it's really a good idea to take with you on all showings your own real-estate inspection checklist. Your form will not be as detailed as that of an ASHI inspector, but if you can see major problems that would eliminate the house before you go to all the trouble of placing an offer, why not do that? These checklists exist out on the Internet, and they prompt you to look at foundation problems, water leaks that have been disguised, roof condition, exterior drainage, etc. You have to be really careful when you look at homes as it's easy to overlook the true condition of a home. Often your mind glosses over defects as you try to place yourself in the house.

If you do hire a professional, you'll get a real-estate inspection report at the conclusion of the inspection. Sometimes the inspector will give it to you immediately, and other times you may get it sent to you within hours as the inspector transfers photos from the inspection onto the report. Photos in the report are invaluable. You want to ask for these as they can win arguments down the road if the deal goes south.

Be sure to get a good real-estate termite inspection if you live in the lower 48 contiguous states of the USA. Termites are everywhere, and are more active in some areas than others. I've been told that there are two types of houses: those that have had termites and those that will. Termites have a motto: Take no prisoners. Given the opportunity, they will invade your home. The worker termites forage for new food sources constantly. It's a survival skill so they are constantly introducing new food to the colony.

When you finally decide to order your residential real-estate inspection, try to be present during the inspection. You'll be able to see the things the inspector discovers, and he'll be able to explain to you in person the severity of any issues. I don't know if the perfect house exists that's problem free, so don't expect a report that says there are no problems. Use common sense when evaluating the report, and be sure to get accurate estimates as to what it might cost to fix major problems.

EXTRA NEWS from Tim Carter:
Purchase my Easy-to-Use Home Inspection Checklist Now. This Simple-To-Use Tool allows you to spot many defects before you have to hire a real inspector. You can then eliminate a house and move on to one with fewer defects.

You have nothing to lose. If my checklist doesn't work for you, I'll give you your money back. Oh, one more thing, it's an Instant Download! You can have the checklist in your hands just minutes from now!

Column Q&A

Natural Stone

Natural stone is the handiwork of Mother Nature. My college degree is in geology, so I'm very partial to rock and what it takes to create it. I've seen my share of natural stones, and my walk into and out of the Grand Canyon in the summer of 1972 was one place to see an enormous variety of stone including, but not limited to, limestone, sandstone, shale, schist, quartzite and some granite. Many of these rocks look drab and uninteresting in the field, but when you slice them and polish them, their hidden beauty jumps at you faster than a frog into a pond.

Natural stone tile is popular because it allows the average person to install a stone product that normally was done by a select group of professionals. Prior to the explosion of stone tiles, master craftsman stone setters would install larger slabs of stone. This requires great skill and tools. But the natural stone tile handles just like ceramic tile, only requiring a diamond wet saw or an angle grinder to make cuts.

If you're considering natural stone flooring, then be sure to look at all of your options. One of the most amazing finishes I've seen is flamed granite. Instead of the normal high-polished look, flamed granite has a rougher texture that appears burnished. It produces a slip-resistant surface that looks strikingly beautiful.

Natural-stone products can be found at specialty stores as well as home centers. If you want the best selection, and often the best prices, avoid the home centers. The selection there is extremely limited. Many larger cities have multiple businesses that sell nothing but stone products. You can also discover many natural-stone products using the Internet. Many online businesses will sell natural stone direct to you.

Natural stone marble as well as natural stone granite are possibly the most popular stones used by homeowners. Marble has a timeless beauty with its rich veining and intertwined colors. Granite is appealing for it's vibrant colors, crystals and extreme durability. I have both granite and marble in my existing home. My lake house in New Hampshire has soapstone countertops. I'm partial to granite because it's beauty takes my breath away.

If you decide to incorporate stone into your home, you'll need some natural stone supplies. Some stone products need to be set with epoxy, rather than thinset. You'll need special high-quality sealers. Special sanded grouts or seam epoxies might also be required. Don't let the home-center employee play Jedi mind tricks on you getting you to believe you don't need these things. Always speak to a merchant that specializes in natural stone. They know what works, and more importantly what doesn't work when it comes to setting stone permanently.

If you live in an area where stone is littered all over the land, you might be able to gather enough to build a natural stone wall. I spent the majority of my life in Cincinnati, and there was limestone to be had at road cuts and stream beds. This rock made fantastic retaining walls. Well over 150 years ago, there were quarries on top of the highlands that overlooked the Mill Creek Valley in downtown Cincinnati. These quarries produced vast amounts of natural stone that was used in thousands of foundations in the older buildings of Cincinnati.

The land I own in New Hampshire has natural stone walls that are perhaps 200 years old. The granite stone is just dry stacked, but the walls along many of the boundary lines are still in great shape. My goal is to rebuild as many of these walls as possible where they have been breached by logging skidders, and people who just pushed them over. If you choose a natural stone that resists erosion, the wall can last for hundreds of years. Some stone walls in Europe are over one thousand years old.

Fireplace natural stone is where you'll typically see stone in a home. The building code requires that fireplaces be surrounded by a non-combustible material, and stone surely meets that requirement. Another advantage of many stone products is their affordability. The stone usually costs nothing, the distributor just has to pay the quarrying cost and transportation. Stone is often dressed and sized in the field by the stone mason who's building your fireplace surround.

If you want a floor that wears like iron, then install a natural stone floor. I have five of them at my current house, and will have at least that many in my new home. Slate is an excellent flooring material as is granite. If you install these materials on a stiff floor that has no bounce to it, the stone will remain crack-free for generations.

Column Q&A

Screen Porches

screen in porch design
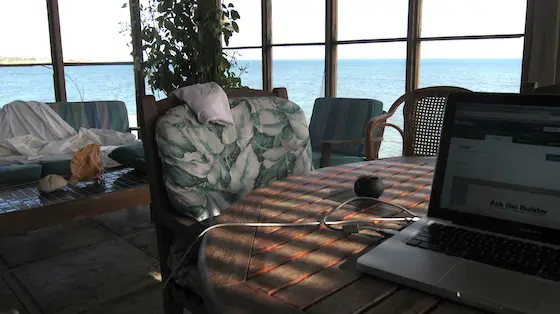
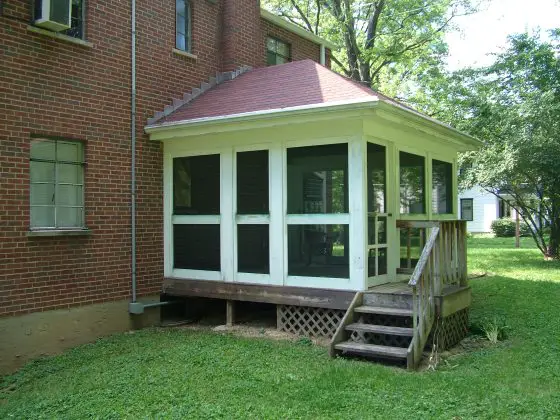
Screen porches are everywhere here in New Hampshire. I'm about to discover why as Spring is just around the corner and the black flies and noseeums will descend upon us like confetti at a parade. Porch screens are popular in just about any area that has moderate to high humidity and a generous population of insects. Unfortunately, the house I purchased doesn't have a screen porch, but it has a huge room that has windows and doors on three walls. All of these can be opened to create nearly the same effect as a true screen porch that has screens down to the floor.

When you decide to screen a porch, there is much to consider. For starters, the type of screening material is important. Some newer screens allow for much greater visibility than older, thicker screening materials. Be sure to ask about resistance to ultraviolet (UV) light degradation. UV light can make some screens that are made from synthetic materials fall apart or get weak over time. Years ago, most screen were made from thin galvanized wire or even brass, so this was not an issue with them. But modern screens are rarely made from these two metals.

If your curiosity has you wondering just how to screen a porch, you're not alone. It's a popular topic as each spring and summer tens of thousands of people react to their frustration of sitting out on patios hoping that the bug repellent and special machines will protect them from pesky bugs of all sorts. When you're relaxing on a screen porch, you just sit back and forget about bugs. The best part of these structures is that you can be outdoors in great weather or a rain shower. The roofs on screened porches keeps people dry while Mother Nature waters trees, plants and lawns.

screened in porch irregular shape

This patio will be extremely difficult to enclose. The irregular shape of the house and different roof heights create significant challenges. Photo Credit: Barry Hoosing

You may be interested in screened-porch plans. If so, that's a great thing to focus on as poor planning will result in a porch that's too small, and will not allow you to enjoy the space with all your friends. Some of the best screened porches I've been on and built have these things in common:

  • They have vaulted ceilings
  • They are at least 14 feet wide and 17 feet long
  • They have generous overhangs that minimize rain from entering
  • They have indirect lighting that washes the ceiling with a soft glow of light at night
  • There are ample electric outlets for floor lamps, computers and possibly a television

Be sure your screen-porch plans have lots of details with respect to how the screened panels are trimmed. It's important that you plan for these panels to be removed easily. This can be accomplished by making an interior stop molding that's screwed to the frame with stainless-steel screws that won't rust. Screws allow you to remove the stop molding easily. If you nail the large panels into the frame, you will likely damage them at some later date if you need to remove them.

Some of the best screened-porch designs are ones that really take into account the placement of the porch in its surroundings. I'll never forget the screen porch I built that was an octagon in the middle of a garden. This outdoor room was cozy and could only sit four people in soft chairs. The homeowner considered this porch a hideaway in the middle of the garden. There was a view from each of the eight sides of the porch. My only regret is that I never took screen-porch pictures of this project and many others I did. Idiot.....

hodges bay antigua

You're looking at Hodges Bay through the screened porch where I spent lots of time working and sleeping! It was so glorious to be right next to the water. Photo credit: sleepy Tim Carter

Try to incorporate into your screen-porch design a flooring product that's easy to clean keeping in mind that the floor will get wet. Rain is going to enter your porch no matter how hard you try to keep it out. Be sure you plan to maximize your view. Don't allow the planner to place a post or vertical screen-panel rail right where you have a view from a prime seating location. This is easier said than done, but talk about this with your architect or draftsperson. You want to know going in what is the maximum expanse of screening you can have before an additional vertical rail is required.

A patio screen porch is a great project to consider. If you go this direction make sure the patio slab is crowned slightly. This means that the center of the porch slab is higher than the edges. This allows any rain water to flow to the edges and out instead of puddling in the porch. You also want to make sure the concrete slab has steel reinforcing rods in the middle of the slab. These need to be placed on 2-foot centers, and the steel should be at least one-half-inch thick. This steel will keep the slab in one piece in case you get common shrinkage cracks in the concrete.

Reference: March 15, 2009 AsktheBuilder News

Column Q&A

Cabinets Storage

If you typed cabinets storage into a search engine, no doubt you were looking to discover how to unravel the rat's nest of possessions that's transformed your garage, closets or other spaces in your home into a giant mess. Kitchen storage cabinets can make your life less complicated by allowing you to see easily all of your foodstuffs. Buy a media storage cabinet, and your music and video collection can be gotten up off the floor or off the top of your DVD player where it's blocking the air flow to your DVD player. The bottom line is that storage cabinets of every type, for every purpose, can save you time as organized placement of your possessions allows you to find things when you need them.

I have office storage cabinets that I've both bought and built. These have worked so well, I'm copying the same system and layout in my new home office. These cabinets are a mix of horizontal file cabinets and open shelving that's hung so the bottom of the first shelf is easily reached while I'm sitting at my desk. You can't ask for more convenience. What's more, some of the wall cabinets store my fax machine and other things that might take up valuable desk real estate.

My favorite home-storage cabinets are the ones I have in my garage and laundry room. I recently remodeled my laundry room and installed 42-inch high cabinets that reach to the ceiling. All sorts of things can be stored out of sight in these extra-tall cabinets. Prior to this, we would just throw some things like small picnic coolers on top of the regular-height cabinets. Not only would this look cluttered, but they were dust magnets up there.

My garage storage cabinets are a mixture of old cabinets I salvaged over the years from remodeling jobs. If you create a relationship with one of the remodeling companies in your area, they almost always have old cabinets that are in great shape. They get these from kitchens they're remodeling. Soap and water and a fresh coat of paint can transform used kitchen cabinets into amazing garage storage cabinets. The best part is you can often get them for free.

Cabinets and storage go hand in hand as that's the primary purpose of a cabinet. A cabinet is really just shelving on steroids. Open shelving gets things off floors and within easy reach, but cabinets do this while at the same time protecting the items from dust and curious cats. If you don't believe me, just ask Barry Bonds or Alex Rodriguez. Both of these athletes undoubtedly store their ill-gotten achievement trophies, game balls and milestone uniforms in cabinets at their homes.

You may wonder if you really need a CD storage cabinet with the explosion of iPods and other hand-held devices that store vast amounts of music in a small space. My thinking is that CD storage cabinets days are numbered. I'm told there are distinct advantages to having the actual CD for music clarity, but most people will want the convenience of having thousands of songs stored in a device that's much smaller than a single plastic CD case. The same will probably be said of your DVD storage cabinet, although this cabinet will be around longer as technology advancements need to happen to deal with the massive data that needs to be stored as you'd find on hundreds or thousands of DVDs.

Two years ago, I installed a recessed bathroom storage cabinet. This cabinet is similar to a pantry storage cabinet you'd purchase from a cabinet manufacturer. Mine has a large door that's about 4-feet tall and then three stacked drawers under the door. It's perfect for all of the hair-care tools, personal hygiene products, towels, and anything else you'd want to store in a bathroom.

If you don't have room for one of these cabinets, then install a wall cabinet over your toilet. Many people waste this valuable space. Often there is space for a 42-inch-tall cabinet that reaches to the ceiling. You can put the toilet seat down using it as a step stool to get to the top shelf.

Technically, each cabinet in a kitchen qualifies as a kitchen storage cabinet. My newest kitchen has about fifteen different cabinets in it. Kathy designed several unique cabinets that took advantage of every cubic inch of space that is under the countertops. You can do the same as many cabinet manufacturers will modify cabinet layouts for you, as well as make special cabinets to fit your needs.

If a pantry storage cabinet is part of your plan, be sure to explore all of the shelf and drawer options out there. We have a fantastic pantry cabinet that has five sturdy pullout drawers that make getting to things very easy. Traditional pantry storage cabinets just had shelves. It was easy for things to get hidden behind other things on shelves. With a pullout drawer, you get to see everything when the drawer slides out magically. This simple hardware can save you hours of time and lots of frustration.

Column Q&A

Lake Winnisquam Ice Golf Championship Video

p>Tim Carter at the world headquarters of AsktheBuilder.com in Meredith, New Hampshire. It is an exciting day as we are getting ready to play a little golf.

Today is the first annual Lake Winnisquam Ice Golfing Tournament. Since AsktheBuilder.com sponsored the first hole, Tim gets to tee off the first shot in the championship. Weather conditions are perfect - a balmy 30-degrees, winds are light and variable, and the course is rock hard.

Hole 1 is 800-yards, par 3. Tim’s drive should be about 250 yards off the tee with his driver. It should then roll and bounce an additional 500 yards towards the green(?). A short chip towards the pin and one putt for par.

Special thanks to Joel Suggs, certified PGA Master Teaching Professional and Tim’s golf coach. He should love this swing.

Tim adjusts his grip and addresses the winter-orange golf ball. He swings, it is a straight drive bouncing several hundred yards down the fairway or iceway.

Craftsman Snowblower Video

We are going to blow some snow today and have some fun. We will be working with a Craftsman snowblower. Snow blowers are not a too much different from a lawn mower. A mower has a big blade under the deck that spins around and shoots the grass out the side of the lawnmower. A snowblower does the same thing. It has auger blades in the front that spin and cuts into the snow. It then feeds it back to another high-speed impeller that shoots the snow up and out the chute. As a safety precaution when using a snowblower, wear ice cleats on the bottom of your boots. They simply attach to the bottom of your shoes or boots and make sure you don’t slip on the snow.

Before you use the snow blower, get the owner’s manual out and read it, including all the safety precautions. These are dangerous machines and you, or someone nearby, could get hurt. Respect the snow blower as you would any other power tool.

This blower has a powerful gasoline engine with an electric starter. Plug in an electrical cord to the unit and push the start button. It also has a rope-pull start in case the power is out.

This model has a lever that controls the discharge chute. You just tilt the lever to the left to discharge the snow to the left. Or to the right for the opposite direction discharge. The same lever will adjust the height of the discharge out of the chute.

Snow blowers have a transmission similar to an automotive. This one has six forward speeds and two reverse speeds. Adjust the speed according to the depth and how wet the snow is. Go too fast and you will choke the front of the snow blower. You will have to experiment with the proper speed.

Snow blowers are a bunch of fun if you have to shovel snow. They will save your back. And this one matches my shirt and pants! Cool. One last thing if you want to make sure your snow blower works for you in the winter, be sure to do maintenance in the fall before the snow falls. Also, make sure that your driveway does not have any rocks or sticks on it, that could get into the augers and break the shear pins.

Installing Windows

Installing windows can be two totally different tasks in this day and age, but not too long ago it only meant one thing. You're reading this because you may want to know how to install Windows software that's used on personal computers, but then again you may want to pick my brain about installing a window or two in your home. Believe it or not, I can clearly remember back when there were no personal computers and no Windows software of any type. Before Windows software was even a glimmer in his eye, Bill Gates and I were riding bicycles, throwing water balloons and throwing mud balls as we're close to the same age.

You can have problems installing new windows if you're a rookie. For starters, glass is heavy. It's shockingly heavy. Large windows can easily weigh hundreds of pounds. If you don't have enough help on hand, you can drop a window causing severe damage to the unit and/or yourself. Don't underestimate the physical effort you have to invest just to lift a window, position it and hold it in place as you try to get it into the rough wall opening. Don't forget about the wind. A gust of wind can blow the window out of the opening sending it crashing to the ground in an instant.

After installing windows in your home, you can have serious water and air-infiltration issues if you don't follow some critical steps as you're putting in the window. Fortunately, the major window manufacturers have created fantastic written instructions showing you and your builder how to avoid the most common problems installing windows. If you have a little patience and some moderate construction skills, you can do a great job of installing new windows or replacement windows.

Perhaps the three biggest mistakes I've seen people make while installing windows are:

  • Missing or inadequate flashings
  • Too few fasteners and shims
  • Out of square and level

Water infiltration is a major issue with homeowners. I get complaints each week about water that leaks in and around windows. Flashings are transition materials that capture water and redirect it safely back outdoors. Newer flashings are modified asphalts and other rubberized materials that come in rolls that resemble adhesive tape. When applied in a certain fashion, water simply can't get indoors.

When you're installing glass windows, you must pay attention to the instructions about the type and length of fasteners, and where along the window frame they should be placed. Don't be surprised to see a nailing schedule that calls for a nail every 12-inches. You must use shims to ensure the window frame remains straight so the window is always in firm contact with the jamb. This prevents air infiltration.

Installing replacement windows is harder than installing windows in a new house. When you're working on an existing home, you have to remove the old window and deal with an opening that could be out of square. You also have to deal with the existing interior and exterior finishes. Sometimes this can be very challenging.

Be careful if the house was built prior to 1967. The paint used on and around the existing windows you're removing could contain lead paint. You have to be really careful about the lead dust and lead-paint chips.

If you're wondering about how to install replacement windows, start by talking with the new-window manufacturer or a distributor. Be sure the windows you're buying are really meant to be replacement windows. Some windows come with integral nailing fins that surround the frame. These don't work well in a replacement window situation as the edge of the frame needs to be in close contact with the existing exterior surfaces.

You'll discover that installing house windows can be rewarding and enormously frustrating at the same time. The best way to achieve success is to start with just one small window. A small window is easy to handle. The most important thing you can do is read the written instructions until you completely understand them. Don't skip any steps.

Take your time when installing the flashings. Be sure to look at the gaps between the window and the frame at all stages to ensure the window is square in the frame. Before you drive the fasteners completely into the frame, check to make sure the window operates smoothly and it locks easily.

Column Q&A

Building Inspection

A building inspection is typically a service provided by a government agency. The reasoning is twofold. First and foremost, the government uses this power to help protect the health and welfare of the citizens. Building inspections point out defects in the construction that could cause collapse, fires or conditions that might cause rapid deterioration of the structure.

Building inspections create more tax revenue. Although often denied by elected and appointed officials, monitoring building inspections allows the government to keep track of real estate improvements. Most towns and cities get tax revenue based upon the value of improvements on the property. When you apply for a building permit, which is the first step in getting a building inspection, the tax auditor's office is notified that something is happening on a parcel of land in the community. Typically, the real estate is worth more money after the project which means the government can collect more taxes.

The actual building inspection service is almost always performed by a government employee, or a subcontractor working for the government. Hopefully, this inspector has been properly trained. Often building inspectors are former building contractors who have decided they still want to be involved in building, but in a capacity with much less liability.

A series of hurricanes over the past twenty years has put Florida building inspection in the harsh spotlight. But it was Hurricane Andrew in 1992 that blasted ashore and proceeded to expose concrete slabs as well as poor construction practices, and sub-standard building inspection standards. The building codes since Andrew have been strengthened considerably to the credit of the building inspection profession in south Florida.

Commercial building inspection is not much different than residential inspection. There is a separate commercial building code that must be followed, and in many ways it's far more stringent and complicated. Commercial buildings almost always have more people in them and fire hazards and evacuations from these structures are more problematic. Tough commercial building inspections are a good thing as they also are concerned with the welfare of the general public as well as people that work in the buildings.

When I was still building everyday, I would order my county building inspection over the phone. It's now possible in many areas to do this online. The same is true for a city building inspection. Each government is different and some are more progressive than others. No matter what, you'll have to set different appointments at different stages of construction for the building inspector to come to your job site.

Keep in mind that there are many things to inspect, but the inspector can't view all things. They typically inspect the soil conditions as you never want to build a building on bad soil that won't support the weight of the structure. A seasoned inspector can often tell just looking at the soil that all is well.

The framing of the structure, all mechanical systems, the insulation as well as many of the safety items like stairs, handrails and alarm systems are checked during the different inspections. It's common to have different inspectors look at the different systems.

A home building inspection doesn't normally take long to complete. The inspector may be on site for five to fifteen minutes. It depends on his workload and what needs to be inspected. The building inspection department can almost always be found in your local town or county offices. Just contact your local town office to see who is the building inspector. I lived for twenty years in a small village in Ohio. The village didn't need a full-time inspector so they contracted all inspections to the county. It was convenient and the county appreciated the business.

You don't need a building inspection checklist, but it would be a good idea to see if the building inspector would share a copy with you. This way you know what things he'll be looking at when he arrives at the job site. Some of these checklists can be very complex, so don't expect to understand some of the terminology on the forms if you can get copies.

New-building inspection is perhaps the cleanest form of inspecting as you're not working inside an old building that was erected using an ancient code. Be sure you keep in mind that some laws require you to upgrade old buildings to the current code if you do a large renovation. It's mission critical that you investigate this before you buy an old building. You want to make sure that you budget enough money for the project. Many a homeowner has been shocked when they learn thousand of extra dollars have to be spent to finish a job they thought was going to be within budget and on time.

Screened In Porch

The first screened-in porch I owned was built as an addition onto a grand older home in the Pleasant Ridge neighborhood of Cincinnati, Ohio. This house was on the border between Kennedy Heights and Pleasant Ridge, and was only several hundred feet from the historic McFarland's Station, constructed in 1795. This station was an historic fortified pioneer outpost settled just a year or so after the first settler's landed at Yeatman's Cove on the Ohio River bank. No doubt these early settlers needed screened in porches as much as my wife Kathy and I did. The summers in Cincinnati, Ohio, are fraught with mosquitoes, flies and other annoying insects.

A screened in porch offers fantastic relief from the insects on a warm summer night. You get all the benefits of being outdoors, but none of the hassles. Perhaps some of the best times on a spacious screened porch can be had when a gentle summer rain shower is tickling the leaves in the trees next to the porch and splashing on the ground. The sounds can put you to sleep in minutes.

This screened-in porch needs a paint job, but its design is perfect. The owner still compliments me 20 years after I built it. PHOTO CREDIT: Tim Carter

This screened-in porch needs a paint job, but its design is perfect. The owner still compliments me 20 years after I built it. PHOTO CREDIT: Tim Carter

I used to build a screened in porch or two for past clients. This experience gave me a unique perspective as to what works and what doesn't when it comes to screened in porch designs. For a screened in porch to really work well, it must be the right size. All too often I see smaller, cramped porches where people struggle to move about. The screened in porch on my Pleasant Ridge home was nearly perfect. It measured 14 feet by 17 feet.

If you're looking at different screened in porch plans, try to find one that measures 15 feet by 20 feet. You'll discover that size will accommodate lots of chairs, small tables and couches, or a 4-foot circular table with no problems.

Building a screened in porch is not as easy at it seems. You're really building a standard room addition, but without solid walls. You need a foundation, posts, beams and a roof for starters. To end up with a gorgeous porch, you better have some sweet carpentry skills as you'll discover quite quickly that installing the screened panels, the doors and trimming all these elements is not as easy as it appears.

A good place to discover how to build a screened porch would be a conversation with a lead carpenter that works for a remodeling company. This person will be able to talk to you about many of the challenges that present themselves each day as you move forward. Keep in mind that these porches are just another room on a house, but with one special consideration. When it rains, water almost always gets into the room unless you have developed some magical system where covers drop down blocking the blowing rain from entering the space. This water creates special challenges with respect to furnishings and the flooring.

Good screened in porch designs take this water issue and other things into consideration. Generous roof overhangs can stop much of the water infiltration in all but the most vicious rainstorms. Simply put, you need to think about how you'll deal with water that gets in making sure the materials used to build the screened in porch floor are waterproof. I would always recommend building a screened in porch deck using treated lumber so if the porch floor gets wet repeatedly, it will not rot the subflooring nor the floor joists.

If your screened in porch is built on a concrete slab, you don't have to be worried about rot, but you need to be concerned about the slope of the concrete. You want any water to flow outwards to the edges of the screened porch.

In my new house, the screened in porch ideas we're considering come from our past experience as well as many of my past jobs. For starters, the porch will absolutely have a vaulted ceiling. Not only do these ceilings create a more spacious feeling, they help make your porch more comfortable if you live in a humid location. You want to be sure you have one or more high-quality paddle fans on the ceiling, in case you sit on the porch on days with calm winds. The fans will create silent breezes that will cool you.

Plan for gentle indirect lighting. It's best to bounce light off the ceiling that washes the porch with just a touch of light when you're relaxing at night. Indirect light allows you to preserve your night vision in case you want to gaze out to what you see beyond the screened in porch panels. You can have sleek pinpoint reading lamps if you want to sit on the porch and read at night.

Be sure to chose your screened in porch furniture early in your planning process. If you know exactly what furniture you're going to use, you can ensure your porch will be the right size. Simply use regular graph paper, and make scale cutouts of your furniture. Arrange them on the paper as you imagine your floor plan will be. Make sure you have enough space between the furniture to walk around it. Use the dimensions in an existing room of your house to help confirm what is the minimum space needed around things. Doing this simple exercise will guarantee your screened in porch will be perfectly sized!

Column QA

Sandstone

Sandstone is a very fascinating rock that I first met when I was 18. Being born and raised in Cincinnati, Ohio, I was only familiar with the coarse limestone and shale that made up the bedrock around town. My family didn't travel much, so I was fairly sheltered. But all that changed in the summer of 1971 when I went on a planned three-week driving tour of the Southwest. Sandstone rock out there is as plentiful and exposed as biceps and buttocks on a sunny Florida beach during spring break. My favorite Arizona sandstone was the Coconino sandstone. You can see its gleaming vertical faces in the Grand Canyon.

When it comes to naming something, sandstone really describes what it is. My college degree is in geology, so I can vouch that there are rock names that simply don't make sense. Sandstone is not one of those. Imagine taking billions of pieces of sand and packing them tightly together. That's what sandstone is in its most basic configuration.

The hardness, density and durability of sandstone are directly related to the type of sand that makes up the matrix of material in the rock. Realize that sand is simply small rock particles, and that there are many different types of rock!

If you want to be amazed one day, take a quarter teaspoon of sand and hold it in your hand. There's a great chance you'll see tiny red, white, black, gray, and maybe green grains of sand. They may be different sizes as well. It's best to do this with sand from a gravel pit or on a beach near a sizable river. If you do this on some ocean beaches, the sand there may be just ground up shells.

Sandstone comes in different colors. At Zion and Grand Canyon National Parks, you can see a wide variety of colors from red sandstone to buff and even white sandstone. Black sandstone, as well as brown sandstone, is common. Some of the colors come from chemical interactions as the sand is transformed into rock. This happens over millions of years, and can be influenced by high pressures, temperatures and mineralized waters that saturate the sand as it's cooking under thousands of feet of sediments.

Limestone sandstone is a misleading description. It's sometimes common to see limestone and sandstone as nearby rock formations. In fact, a geologic rock formation of limestone can transition into a sandstone formation! To see that happening in real time, all you have to do is visit a clear ocean environment where a coral reef is adjacent to a clear-water river that's depositing sand as it flows into the ocean. You've got limestone being created by the reef, while a mile or so away the mouth of the river is creating sandstone. Geology is so cool when you stop and think about it.

Sandstone rocks can be very hard and durable. Imagine sandstone where the sand grains are nearly all quartz. Quartz is a very hard rock and is a primary component of granite. You surely know that granite is a hard rock, so imagine a rock made up of nearly 100 percent quartz! There are sandstones out there like this. A sandstone building in your city or town may be made from this material.

As with many other rocks, sandstone can be cut into large blocks in a quarry. After a single sandstone block is raised from the quarry, it can then be cut into many sandstone materials ranging from small sandstone coasters all the way to large sandstone tiles. Building stone sizes can range from brick size to massive blocks that measure feet wide and tall and many inches thick. It all depends upon the scale of the building and what the architect is trying to accomplish with his design.

The next time you have some building project that involves natural stone, stop by a stone center that has all types of rock. Take a look at the different sandstones. They make great retaining wall blocks, stepping stones in a garden path and a formal fireplace for that matter. You'll be amazed at all the different types of natural sandstone that you'll see. Try to purchase one that has high quartz content if you want the stone to last nearly forever!

Column QA