25 Things You Must Know If You're Remodeling
Remodeling is as different from building a new home as night from day. When you visit your new home construction site, you can look around and then go home. You don't have to deal with the workers and the mess.
Remodeling is the exact opposite. Your normal routine is rocked to its core. Strangers, whom you have never seen, invade your home. The excitement of the job starting soon wears off and becomes a dull headache.
If the remodeling job is a major one, such as kitchen remodeling, or bathroom remodeling or even a room addition, the impact on your life will be significant. Many people are not prepared for the disruption, dust, and missed deadlines.
To make a remodel job go smoothly, it require enormous amounts of planning. Be sure to convey your bathroom remodeling ideas or basement remodeling concerns or what ever room you are doing to your contractor at the beginning of the remodeling projects. The remodeling contractor is responsible for this, but you must make sure he or she has covered all of the bases. In my opinion, you can only do this if you have a clear understanding of all of the things that can go wrong during the remodeling process. With this knowledge, you can already have a strategy in place to eliminate problems before they happen.
Asbestos and Lead
Harmful basic chemical elements lurk like hidden time bombs in many existing homes. Two of the most prominent are asbestos and lead. Asbestos was commonly used in insulation pads that sat on top of furnaces and was used in wrapping materials around forced-air heating and cooling ducts.
Asbestos was also used in floor tiles, roofing, piping, adhesives, etc. In other words, it can be found just about everywhere. You need to make sure you identify potential trouble areas in your home and make sure your contractor deals with the danger in an approved manner during the asbestos removal.
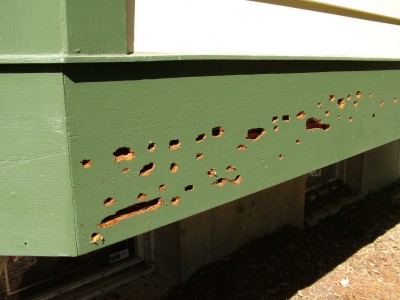
Lead is a very serious hazard that can be found in many homes built prior to 1978. If your remodeling job involves scraping, sanding or removing anything that might contain lead paint, you better make sure all precautions are taken so your home does not become listed as a Superfund site. Lead poisoning is a possibility if not handled properly.
Bid Breakdowns
When you are soliciting bids from different contractors for your upcoming remodeling project, it is imperative that they submit detailed itemized bids. You need to know how much money is allocated for the labor and material for each part of the job.
This information will be used by you to why the low bidder is low and why the high bidder is high. If there is an enormous amount of disparity between contractors when you compare the cost of the same task, this is an area that needs further discussion. For example, if you are getting a new roof put on and painting done and you have specified the exact shingle you want, then the actual itemized number for the shingles should be within $50 or so of one another as both contractors should have calculated the same number of shingles.
The breakdown will also be an invaluable tool when you need to make payments. When a payment is requested, it becomes your job to view the work that is complete and ensure it is satisfactory. Refer to the initial bid breakdown and make sure to only pay for that amount of work along with a pro rata portion of contractor overhead and profit.
Customizing Touches
One of the most fulfilling things, I experienced as a remodeling contractor, was doing extra special things for customers. Creating special nooks or crannies, delightful custom window seats, maybe it was a special set of steps leading from a deck to a patio.
If you start to gather photographs from magazines and even the Internet that depict things you especially like, an experienced carpenter, painter or other trades person might be able to create it for you with very little extra work.
But you need to communicate these wants and desires in the planning stages. Photographs are an ideal tool for communicating what you want. My wife did this exact thing with me as she saw a gorgeous wood picket fence in a magazine. Without any plans and just working from the photo, I created a nearly exact copy. It doesn't cost one dime to ask for a price or express an idea.
Debris Removal
It is surprising to many people how much debris and garbage are created during a moderate to large remodeling job. The problem on a remodeling job is that you don't want it scattered or piled in the yard or left inside if at all possible. Any trash that is combustible represents a serious fire hazard as it is commonly stacked so there is lots of air around it. A spark from a plumber's torch, a carelessly discard cigarette, etc. can create an inferno that can cause serious damage.
To make matters worse, when debris is being created, often the structure is being altered. Some structures can lose much of it's fire stop characteristics, especially if drywall and plaster have been removed. Open walls and ceilings provide a pathway for rapid fire spread.
Include in your contract that all debris will be cleaned up each day and placed in a metal container that is placed safely away from your home. Request that the work area be broom clean each day and vacuumed at the end of each work week.
Duration of Job
The last thing you want is your house torn up for an extended period of time. If you have seen your friends', relatives', co-workers' and neighbors' homes go through a remodeling job of any size, you know it can take a while. Anything that delays the job causes the pain threshold to rise exponentially.
Using your past experience and observations of other people's projects, you might be able to get a feel for the length of time a job should take. If a contractor says they can do a small room addition from start to finish in 10 days, ask him what magician will show up. You may be surprised as he may have the addition pre-built at a modular home factory!
It is possible to compress time schedules, but your job during the bidding process, is to request a detailed time line of what tasks are going to happen each day or each week. Compare the schedules that each contractor provides to see if each one has accounted for each task. If a contractor refuses to produce a schedule, it might be a sign of disorganization.
Dust Control
Even small remodeling jobs create dust. Large-scale demolition can create dust storms within homes. When you are interviewing contractors, during the bidding process, have detailed discussions about dust.
Take notes during these discussions. If the contractor says something that doesn't sound right, ask for clarification. When you talk with past customers of each contractor, ask specific questions about how well dust was controlled.
Some dust is inevitable, unless the contractor sets up a negative pressurization environment where the work is taking place. This setup costs extra money and is widely used by the mold abatement companies if you or someone in your family is sensitive to dust.
Keep in mind that homes equipped with recirculating forced air systems must be turned off during periods of dust creation. The return air aspect of the system can inadvertently pull dust into the system and broadcast it throughout the home.
Extra Telephone
It seems as if everyone has a cellular telephone today. But it is entirely possible for a battery to die or a cell phone to be forgotten at home or become damaged at the jobsite.
The last thing you want is a contractor or one of his subcontractors using your phone. One or two phone calls is not bad, but day-after-day use of your home phone can become very annoying.
It gets worse, some contractors give out your telephone number because they might expect a return call. You then become an unpaid secretary or a receptionist for the branch office of your contractor.
The solution is simple. Place language that your contractor must install a temporary land telephone line or at the very least buy a temporary cell phone that is kept at the jobsite for all subcontractors and employees to use. We have more options now than ever with respect to communication.
Fumes
Many parts of the remodeling process can and do create fumes. The assembly of PVC plumbing pipes creates very noticeable fumes. Soldering copper tubing creates fumes as well, Drying paint liberates vapors into the air that contain a brew of different chemicals.
Urethanes, adhesives, etc. all create fumes that can invade your home during time periods where windows must be closed. These accumulated fumes can cause discomfort and actually sickness to people who might be acutely sensitive to some of these very peculiar chemical vapors.
Temporary space heaters used for all sorts of heating and drying purposes can create deadly carbon monoxide. Fumes can enter your home quite by accident and cause a problem. A heater placed innocently next to an air intake might cause massive amounts of carbon monoxide to be inject into your interior air. It is extremely important to discuss fumes with the bidding contractors and what they plan to do to minimize them in your home as they work.
HVAC Sizing
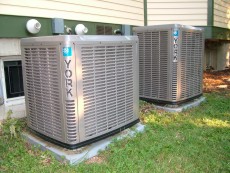
If your remodeling project involves adding additional space, there is a strong possibility you will have to upgrade or modify your existing heating and cooling system. Your existing furnace and air conditioner might be at the limit now with respect to the amount of heating and cooling BTUs they can handle.
It is extremely important that you discuss this possibility with the remodeling contractors during the bidding process. Talk with them about heat gain and heat loss calculations. If the contractor or sales person squints or tilts their head when you mention those words, you might be talking with the wrong person.
Once you have awarded the job to a contractor, it is imperative that the heating and cooling contractor come out and gather the necessary data to perform the needed calculations. These tell them whether or not your existing heating and cooling equipment will work.
Insurance Certificates
Unfortunately, we live in a society that seems to be over-populated with attorneys. These people need to feed their families and some of them seem to love to work on accident claim cases. You need to make sure you are never named as a party to one of these lawsuits.
You can do this by taking about insurance certificates with the bidding contractors. It is not always enough for a remodeling contractor to show you he has coverage for his employees. What is important is that each and every person who shows up to work at your home is indeed covered.
Although it is a lot of work, you must insist upon doing it. You must make it very clear to the bidding contractors that they must supply you with current workman's compensation and general liability insurance certificates for all subcontractors who plan to work on your job. These documents need to be produced the day the contract is signed.
Matching Materials
Clothing, automotive, etc. styles change on a constant basis. The same is true for products used to build your home. Your existing home may have very unusual interior and exterior woodwork or plaster. If your remodeling contractor is a professional, he or she will know how to get exact matches on many of the materials used in your job.
There are many woodworking mills that can easily create identical profiles for door and window casing as well as crown molding and baseboards. It will cost more than buying stock trim, but the long-term value you add to your home by doing this will be well worth it.
With lots of extra effort, it is sometimes possible to get very close matches on brick and even ceramic tile. If you are trying to match brick, always go for the color match first and then the texture match. From the street, you rarely can detect texture but readily notice differences in color.
Pavement Problems
Do you have a gorgeous driveways, sidewalks and patios right now? If so, it would behoove you to take very good photographs to prove it. Remodeling activity almost always causes damage to existing paving materials around a house.
Dumpster deliveries, concrete trucks, lumber trucks, etc. can not only crack and break apart paving, but they can spill seas of motor or hydraulic oil on pristine concrete or blacktop.
It is imperative that you and the bidding contractors talk about how your paved surfaces will be impacted by the remodel job. Document what each contractor says and decide who has the best plan to protect your current investment. The last thing you need is an argument that a crack or an oil stain was already there. This is the reason for the photos you took prior to the remodeling project.
Be aware that large loaded delivery trucks can weigh as much as 20 times what your car weighs. It is no wonder thin concrete slabs crack and blacktop driveways crumble when a truck backs up onto it. Read the delivery tickets that are signed by the workers and most have damage waivers that relieve the truck companies of responsibility if a person allows them to drive onto your paved surfaces.
Payment Schedules
This is one of the most important parts of your remodeling job. The money you possess is the only leverage you have to ensure your job gets completed and done to a level of quality you have agreed upon in your contract.
All too often, people advance large sums of money to the contractor when the contract is signed. The only time this is necessary is when your job requires special order materials to be ordered before the job starts. Examples of this might be semi-custom or custom cabinets, a custom front door, custom garage doors, etc. Any materials that are commodity items that can be purchased at supply house do not qualify.
Keep in mind that your contractor should have open accounts at all suppliers. If he does, why would he need advance money? He doesn't pay workers in advance, nor does he pay for supplies in advance.
You must always retain a sufficient amount of money to complete the project no matter what stage it is in. When you do pay for completed work, the contractor must supply you with notarized affidavits from all who have work on the job as well as all companies that have supplied material. Never issue a payment without having these documents. Get your payment calculator out and be sure the total amount you pay each time needs to match the amounts on all of the affidavits.
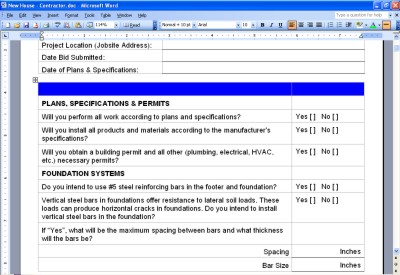
Plans - Triple Check Accuracy
As with new construction, the plans, blueprints, and written specifications are the primary tool that communicates to the remodeling contractor, suppliers and all subcontractors what is going to happen at your home. The ideal set of house plans would be ones that are so complete and so detailed that no one ever has to ask you a question. It is possible to do this as I have been blessed to work on such a job.
But this goal is very hard to reach. It requires you to think through the simplest things, such as the exact place where a toilet paper holder might go. You need to make all product selections, even paint and stain, before the job is even bid.
Is there a value to all of this? Absolutely, yes. If your plans are this complete, the bids you receive should be highly competitive. Dishonest contractors can't play the famous bait and switch game with absurdly low allowances for things when plans and specifications are complete and accurate.
Plumbing Disruptions
Many remodeling jobs involve plumbing. What may seem to be a very simple task of just turning off your main water valve and turning it back on can wreak havoc in an older home. When water lines refill from the rapidly incoming water, it can dislodge pieces of sediment from the sides of the older pipes. This sediment can clog faucet aerators, toilet fill valves and faucet valve cartridges.
It is very important that you discuss all plumbing jobs with your contractor before work begins. If water needs to be shut off to solder pipes, what happens if a small fire starts? If drain lines need to be cut into to install a new branch drain line, how long will the toilets in the house be inoperative? These simple questions need solid answers.
Avoid major plumbing changes on Fridays. If leaks develop after workers go home, will you be able to get instant repair service over the weekend? If you must have work done on a Friday, have a contingency plan in place. Make arrangements such that you can easily contact the plumber or the remodeling contractor in the event of plumbing problems.
Porta-Potty
Bathrooms are private places. The last thing you need is a bunch of strangers with dirty clothes and muddy boots walking onto the clean throw rugs in your bathrooms or powder rooms.
Major remodeling jobs that will see many people at your home for weeks on end need a temporary toilet facility. Many of these are quite discreet and they allow you to maintain control of a very important part of your home. This is an important issue and you should not budge on it.
Make it very clear to the bidding contractors that a temporary toilet must be on the jobsite and that it must be serviced once or twice a week.
Pre-Order Materials
Any type of delay on a remodeling job creates havoc and stress. You can minimize delays by making sure the exact materials you need are at the jobsite long before they are needed.
This concept may seem simplistic, but it is often overlooked. If you have a safe and secure place to store products that are not readily available, why not buy them in advance and have them on hand?
Examples of this would be specialty faucets, hardware, light fixtures, ceramic tile, special-order windows and doors, and any other material that is not ordinarily in stock. It is also very important to inspect these items to make sure there are no defects and that they are exactly what you ordered. It is not uncommon for the wrong product to be shipped.
Protecting Finishes
Imagine how many trips up and down your stairs a remodeling contractor and his subcontractors might make as they remodel a second-floor bathroom. Without protection, the stairs, carpeting, handrails, walls, etc. can easily be damage or scuffed.
I suggest having a very frank and open discussion with your contractor about what steps will be taken to protect all existing surfaces both inside and outside of your home. Take very good notes and write down in the contract any promises the contractor makes with respect to what he or she intends to do.
The marketplace is crammed with many surface-protection products that help contractors keep dirt and dust away from things that are important to you.
But keep in mind it doesn't stop with existing materials. Many a new tub has been scratched by a drywall or ceramic tile subcontractor. Finish carpenters can scratch new hardwood floors with tools when they come back to install toe stripping. Discuss all of these issues with your contractor so things that are in excellent shape stay that way.
Scheduling
One of the top complaints of homeowners who have gone through a major remodeling job are delays caused by scheduling snafues. Large construction projects employ special people who are experts at coordinating the arrival of both materials and workers so that the job continues from start to finish with no disruption.
Small remodeling contractors can create simple charts that do the same thing. The trick is to correctly identify the realistic amount of time it takes to do a particular task and then place it in the right position on the schedule.
The next task is to determine which jobs can occur on the job at the same time. It is often possible for a plumber to be working inside a room addition while a bricklayer or siding contractor is applying the outer skin to the job.
Request a written schedule from your contractor in the bidding phase. See if any of the contractors you are talking with can produce one they are currently using on an existing job. If they can't, you better talk with past customers to see if the jobs they did progressed with little or no interruptions.
Selecting the Real Professional
I often think this is the Holy Grail of both new home building and remodeling. Every homeowner wants the best contractor, who is both professional and honest. These people do exist. They can often be found in just about every city and county in the nation.
If you hope you have the right contractor for the job, you may already be in trouble. You can't ever base decisions on hope. You start the process of finding the professional by conducting a thorough and in-depth interview. This may seem unusual, but it is a common practice in the business world.
You can ask very interesting questions and get some fascinating information. For example, ask a contractor the names of the last three books he has read. Ask if he attends remodeling conventions. If not, ask why. Ask them if they volunteer time. If so, where? Do they coach children's teams? When asked to produce an ID, does the contractor show you a driver's license or some other card? Never forget that it is your home and it represents an enormous investment. You must be sure you and your contractor are a close, if not perfect, fit.
Temporary Kitchens and Baths
If you have never kneeled down to wash dishes in a bathtub, you are not missing a thing. It is miserable and it is humiliating. It is also unnecessary.
If your kitchen is going to be torn up for several weeks, ask the bidding contractors how they intend to provide you and your family with temporary sinks, cooking appliances and refrigeration. Creative and professional remodeling contractors can often throw together a temporary kitchen that can roll into and out of the kitchen in progress each day.
Bathrooms are even more critical. It is not uncommon for a professional remodeling contractor to build a temporary shower in some location while the primary bathroom is being remodeled. Sinks and toilets are a must. There must always be functioning sanitary plumbing fixtures for you at all times. Excuses are reasons for failure. Do not tolerate them.
Trees and Landscaping
The landscaping around your home may be priceless. How many years has it taken a particular tree to reach its current height? You may have tens of thousands of dollars invested in expensive flower, bushes, shade plants, etc. The last thing you need is permanent and irreversible damage to your trees and vegetation caused by an unknowledgeable contractor, subcontractor, excavator or delivery truck driver.
The best way to ensure you preserve all of your plants is to arrange a consult with a certified arborist long before your project begins. Get written instructions from this person as to what needs to be done to make sure all trees and plants will survive the remodeling ordeal.
Make these written instructions part of the bidding documents and part of your contract. Be sure the contractor you choose has sufficient general liability insurance to cover damages and that the policy specifically covers damage to trees and landscaping.
Valuables
This is an uncomfortable subject, but one that must be discussed. There is no doubt in my mind that your home contains valuables. They may be cash, jewelry, guns, art or stamp collections or even musical instruments.
Remember that your remodeling job will bring with it people you have never met, and employees who work for those people who may have never been properly screened. Never tempt these people by leaving valuable objects in plain view.
If you have things of great monetary or sentimental value in your home, it may behoove you to move them to another safe location during the remodeling process. Accidents can happen. Fires can start. Worse yet, loose talk at a drinking establishment might tip off criminals who learn about all of the wonderful and tantalizing things within the confines of your four walls. Eliminate this problem from the start by eliminating the source of temptation.
Weather Protection
Many remodeling jobs involve opening up your house to the weather. Extreme jobs could actually involve tearing off your entire roof or a part of it to add a second story or a large dormer. The job might be as small as adding a skylight. But Mother Nature might spoil the fun with a pop up thunderstorm or five days of non-stop rain. A snowstorm may even be thrown in for good luck.
The point is simple. You must know how your remodeling contractor is going to protect your home against all forms of weather while your home's outer defenses have been compromised by work-in-progress. You need to understand that giant tarps can blow away in moderate winds. Wind pressure can be enormous over large expanses of plastic or fiberglass.
Not only can rain and wind-driven rain be a problem, but extremes of heat and cold can create enormous amounts of discomfort. Discuss with your contractor, before the job starts, how air leaks will be stopped until such time as enough work is in place to minimize any loss of conditioned air from your home.
Work Days
Within a week or two, you will grow tired of the flow of people who come to your home to perform the remodeling work. It is important for your sanity and peace of mind for the workers to maintain a strict work schedule. When you get home from work, the last thing you need is noise, dust and activity at your home. Yes, that may be part of your families ordinary activities, but you don't need additional input for the remodeling contractor.
When you are bidding the job, ask each contractor to state the normal times workers will arrive and leave each day. Ask about weekend work. If you do not want workers to be around on weekends, make it clear for the beginning.