Lead Paint Problems

lead paint

Lead Paint Can Make you Sick or Kill You

DEAR TIM: I'm thinking of having extensive rehabilitation work performed on my home built in 1959. It will include both interior and exterior alterations. I have heard that lead poisoning can happen during remodeling work. Is there a possibility that my family and myself will be exposed to lead as the contractor works on my home? How can we determine if lead exists in our home? Cindy M., Hillsboro, OH

Lead-Based Paint Year

DEAR CINDY: Watch Out! Any house built before 1978 may have interior and exterior paint that contains lead. The farther back in time you go, all the way back to the 1800s, there's a very good chance that you'll discover lead paint inside and outside your home.

Where Can I Test for Lead Paint?

Walls, woodwork, and exterior trim could easily have original layers of paint or clear varnish from when the house was built. If so, there's a very high probability that your house is one of the estimated 29 million homes that are thought to contain lead danger zones.

Children, adults and pets are poisoned by lead each and every day somewhere in the USA. Lead is a sinister poison and can cause permanent physiological defects if it's allowed to accumulate in a person's body.

Lead Paint Poisoning 2000 Years Old

Humanity has known that lead is a poison for over 2,000 years. In 370 BC Hippocrates documented a sickness he labeled as lead colic. For many years, people ignored the wisdom of Hippocrates. The Romans used lead in their cookware and as a component in their spectacular waterworks system that supplied drinking water to Rome. One of the symptoms of lead poisoning is a gradual loss of taste. Perhaps this is one reason why certain Italian foods are spicy.

Lead Paint Inspection Locations

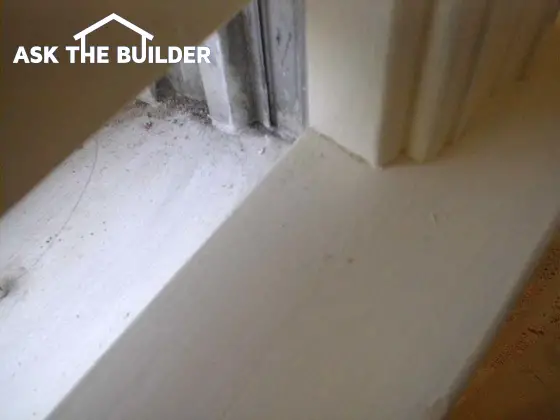
The lead that is found in most older homes is hidden in the paint and old varnish. Lead is an excellent pigment and helps paint hide what it is covering. It was used as a dryer in clear varnishes. Windows, doors and other places where you touch painted surfaces can be high hazard locations.

How Do I Get Poisoned by Lead Paint?

The lead is spread via dust that is created when the painted surfaces are scuffed, scraped, or sanded. Old fashioned double-hung windows that slide up and down can create fine dust on window sills. The opening and closing of doors can also create lead dust. Old painted furniture used for babies is especially dangerous as the lead actually has a slightly sweet taste to it. The lead contaminated dust usually passes into one's body from the fingers into the mouth.

How Much Lead is Dangerous?

It takes very little lead to cause severe physical problems. Lead seeks out and attacks the central nervous system.

When health officials measure lead in a person's body, they deal in increments of micrograms (one microgram equals one millionth of a gram). To put this in perspective consider a packet of artificial sweetener found on the average restaurant table. A single packet usually contains about one gram or 1,000,000 micrograms of artificial sweetener. Open a packet and pour the sweetener onto a colored piece of paper. Look at how small 1,000,000 micrograms actually is!

How Much Lead Intake is Fatal?

Imagine if you created a similar pile of pure lead dust. Since lead weighs far more than artificial sweetener, the pile would actually be smaller. If an adult male receives an acute intake of just 5,000 micrograms of lead - just 1/200th of this small pile of dust, he will most likely die in a very short period of time. It takes far less lead in a child or an adult to cause irreversible physical defects such as coordination problems, learning disabilities, seizures, kidney, heart and reproductive problems.

Are Contractors Required to Warn Homeowners of Lead Danger?

On June 1, 1999, a new Federal Law - Rule 406 (Part of the amended Toxic Substances Control Act) - went into effect. This law mandates that remodeling contractors who disturb more than 2 square feet of painted surfaces in houses built before 1978 must distribute a pamphlet developed by the Environmental Protection Agency (EPA) titled Protect Your Family From Lead in Your Home. (This was featured in the August 7, 2008 Newsletter.)

Go here to get up to speed about lead paint dangers in your home.

The contractor must also obtain a signed acknowledgment from all who receive the pamphlet. This acknowledgment must be kept on file by the contractor for a period of three years from the date it was signed. Houses that contain no bedrooms, housing for the elderly or disabled (providing a child under the age of 6 does not live in the building), emergency repairs and minor repairs involving less than 2 square feet of surface area are exempt from this Federal ruling.

How Do I Deal With Lead Paint Dust?

It is critical that you keep dust to a minimum during your project. Any demolition of old painted surfaces must be accompanied by a wet mister or spray to stop dust from spreading. Plastic enclosures need to be built to stop the transfer of dust to other parts of the house. Special wet / dry vacuums with high performance particulate air (HEPA) filters must be used for clean-up purposes. The remodeled areas need to be thoroughly cleaned each day.

How Do I Test for Lead Paint?

Lead can be detected by submitting samples of your paint to local laboratories that do analysis testing. Check with your local health department for these labs. The testing is usually very affordable. The lab will instruct you how to collect test samples. If testing shows that you have a significant amount of painted surfaces that contain lead, you may want to simply seal them with several coats of clear urethane or with a fresh coat of paint.

Lead poisoning can often be avoided if you keep surfaces clean of the lead contaminated dust. Use wet cleaning methods with detergents and disposable paper towels for final wiping and drying. Dispose of the towels so that the dust is removed from your home.

IMPORTANT NOTE: Many facts contained in this column were contributed by Jack L. Whitaker, Sr., Lead Risk Assessor - Ohio License #001644.

Companion Articles:  Beware of Lead Paint, Lead Poisoning Danger - Lead Paint, Free Lead Poisoning Hazard Information, Hepa Filter & Hepa Vacuum Manufacturers

Column 278

Vapor Retarders Will Stop Odors and Moisture

crawl space dirt

The dirt in this crawl space is covered with traditional clear poly. It can have thousands of pinholes and allow vast amounts of water vapor to escape up into your home.

Vapor Barrier in the Crawl Space

DEAR TIM: Our home is a hodgepodge of construction. We have a medium sized basement, a crawl space, and a part of the home built on a slab. The house always has a musty odor and damp feeling. I am constantly battling mildew on just about every surface. There is no water leaking into my home. Is this mustiness damaging my home? What is causing this to happen? Is there a way to eliminate and/or minimize it? Paula B., Culpeper, VA

DEAR PAULA: Have I got good news for you! Your mildew fighting days are going to be over very soon. Not only that, the air within your home will soon be dry and fresh smelling. Fortunately, much, if not all, of the work required to stop the musty odor can be done by yourself if you are willing to use a pump sprayer and wiggle around in the crawl space for a half a day.

The musty odor is caused by water vapor that is entering your home through the concrete walls, slab, and the dirt beneath your crawl space. The invisible vapor can elevate interior humidity levels that will easily support the growth of mildew and other microorganisms. If you stop the water vapor from entering your home, you can cause these tiny creatures to die of thirst.

It is important to stop water vapor movement in homes. If the water vapor comes into contact with wood surfaces that are cool or cold, the vapor turns into liquid water. This liquid water can accumulate inside of exterior walls and up in roof and attic spaces. If enough water is present, wood rot and decay can cause significant damage.

To stop the water vapor from entering the crawl space, I suggest that you install a high quality vapor barrier. Before you run out and purchase the standard 4 or 6 mil clear as shown in this photo or black polyethylene at the home centers or hardware stores, be aware that some of these products are often a single layer of plastic, are made from recycled plastic resins, and can contain fillers, pin holes and imperfections. Certain alkaline soils can actually degrade these plastic films.

A better choice might be high density cross laminated virgin polyethylene. These vapor barriers are made with two sheets of high strength puncture resistant virgin polyethylene that cross each other at right angles. The sheets are bonded to one another and stop virtually all water vapor movement. Special tape is available that allows you to effectively seal any seams where the plastic needs to overlap or be cut to fit around pipes, posts or other items that project from the soil of the crawl space.

If you want to install the vapor barrier in the crawl space professionally, you simply need to lap the material up the sides of the foundation walls. Apply strips of treated(ACQ) lumber at the top edge of the plastic. Use regular masonry nails to attach the strips to the foundation walls. Trim any excess plastic that projects beyond the wood strips. Apply a bead of standard caulk at the top of the wood strips to complete the job.

The concrete walls and floor in your basement and the remaining floor slabs in the house and garage can be sprayed with some unique water based chemicals. These products are basically a liquid water vapor that penetrate into concrete surfaces and block water vapor movement. Because they are water based, they can be safely sprayed indoors near furnaces or water heaters. Avoid the use of solvent based products indoors. These products produce vapors as they dry that represent a severe explosion hazard around any open flames or spark ignition appliances.

These liquid vapor barriers are often colorless. Once they dry, there is usually little trace of their presence. If you have rooms that are going to be re-carpeted soon, you can tear up the old carpeting, clean the floor and apply these chemicals before the new carpeting is laid. These high quality liquids and sheet vapor barriers can be found at specialty concrete and building supply businesses that sell products to contractors.


Author's Notes:

I received this email from Michael P, Cincinnati, OH. Here's how he helped with his crawl space problem.

"I live in Turpin Hills and wanted to thank you for your advice for sealing a crawl space. This is our third winter in our home and the basement is always much colder than previous basements from other homes. I did as you suggested and put heavy duty, thick plastic on the gravel and put doors on the opening of the crawl space. It's been a few weeks and I can see water droplets forming under the plastic. I may put a second layer of plastic for good measure. The basement is warmer and so is the room above the crawl space. I don't smell the mustiness either. Thanks again for the tip."

Here's another one from Marilyn W. in Troy, MI with a similar issue.

"I read your answer concerning musty smells coming from crawlspace and slab foundations. The musty smell is in our cottage. Part is a slab and part is a modified crawlspace that we can not get under. The space is too small and there is no entry. If we remove the carpet and spray the the floor with the liquid water vapor barrier, would this take care of the smell? It is closed a good part of the year, and when we do open and use it, the smell permeates everything including our clothes, hair etc. Please help us make our cottage usable. Thanks!"


Column 279

Build a Loft Bed

build a loft bed

This is a traditional bunk bed in my son's room. But we removed the lower bed to create a cubby for his desk. You can do the same thing with regular lumber and make a simplistic bed for a dorm room or even a starter apartment. Unless you have special woodworking equipment, your bed will not have the fancy end boards you see in this photo. PHOTO BY: Tim Carter

Loft Beds

DEAR TIM: I have a daughter going off to college and she wants a loft bed constructed in her dorm room. Her room dimensions are 10 feet by 16 feet with windows on the 16 foot wall side. The loft cannot be in front of the windows and there must be a minimum of 3 feet of space from the mattress to the ceiling. Help! There are only 4 weeks until classes begin. Nancy B., Uniontown, OH

DEAR NANCY: Let's see, from the time you wrote your note until the time this column was written we have lost 10 days. You now have just two and one half weeks to plan and build this loft. Relax, it's a piece of cake! If you take your time, your daughter just might have the coolest loft bed in the dorm. Not only that, her room should be spacious because her desk is going to tuck under the loft for a cozy study area. You need to pre-cut and assemble the loft now so that when you take it to the dorm, it will assemble in about 10 minutes.

The loft bed, that I have in mind, requires a floor space of only 48 inches in width, 78 inches of length and a minimum ceiling height of 8 feet. If the dorm room has a ceiling height greater than 8 feet, the headroom above the mattress, will be very generous. Based upon the room size you have provided, I have to believe that one corner of the dorm room will be able to easily accommodate the loft bed.

The plan I use is based upon a person sleeping on a standard twin sized mattress. These generally measure 38 inches wide by 76 inches long and are about 8 inches thick. Many colleges provide mattresses for dorm rooms. Make sure you determine the dimensions before you start this project.

The materials required to construct the loft consist of: 1 piece of 4 by 8 by 3/4 inch thick A/C plywood, four 4x4 by 8 feet long construction heart redwood or regular pine posts, three regular lumber 2x6x8's, three 1-inch thick by 3.5-inch wide by 8-foot long finished lumber boards and some assorted lag bolts and screws. The bolts and screws allow for easy assembly and disassembly. Nails should not be used to connect any of the pieces of lumber. Avoid using treated lumber for this project, as it is a good idea to minimize contact with the chemicals used in the treating process.

The loft portion of the bed is going to consist of a simple rectangle box made from the 2x6 lumber. This box is then covered with the custom cut piece of plywood. I prefer to make the loft platform so that there is just one inch of extra space around each side of the mattress. The mattress lays on top of the plywood-covered box you are about to make. Check to make sure the mattress you are going to use measures 38 x 76 inches. If so, then you should cut two of the 2x6's to a length of 78 inches.

Cut the remaining 2x6 into two pieces that measure 37 inches long. The long pieces overlap the short pieces at each corner so that you end up with a box that measures 40 inches by 78 inches and is five and one half inches tall. Use three 3 inch long drywall screws to connect the 2x6's to one another at each corner. Cut the piece of plywood to fit the box and use 1 and 5/8 inch drywall screws spaced at 2 foot intervals to connect the plywood to the 2 x 6 rectangular box.

Check to make sure that all of the 4x4 posts are the same length. Lay them on the ground side by side and measure down from one end 44 inches. Use a square across the group of posts and draw a line. This line on each post represents the point where the top of the loft platform must stop so that you maintain the 3 foot ceiling clearance.

Position two posts so that the outer edges are parallel and spaced 78 inches apart. Have your daughter help you tilt the platform up onto the posts so that the top surface of the plywood is just touching the line on each post. Drill two one quarter inch diameter holes through each 2x6 and half way into the center of the 4x4 posts. Attach the platform to the posts using 4 inch long 3/8 inch diameter lag bolts. Do the exact same thing with the other two posts and your loft bed is now complete.

To get up and down from the loft area, you will need to construct a ladder. Use the one inch thick lumber to make a ladder similar to those found on a ship or a fire escape. These have level treads spaced at 10 to 12 inch intervals and are often set at a fairly steep 60 degree angle. Once the ladder is built, attach it to the loft platform with screws so that it will not fall away as your daughter moves up and down from the loft. Be sure to take all of your tools with you in case minor adjustments have to be made at the dorm.


Author's Notes:

Received these pictures and the following emails. The first one is from Dona Lopez, TX. The second is from Tom Koenig, PA.

loft bed

A surprise Christmas present built from these instructions by a mom for her daughter. Doubles as a computer desk. PHOTO CREDIT: Dona Lopez

"Well it's not really a question, I used your instructions for the loft bed for a "While you were out" style Christmas surprise for my daughter, and I wanted to share the results with you.

I customized it a bit with a desk and a different type of ladder system due to extremely limited floor space, her room is about 10 x 10.

I'm a mom with basic woodworking skills, did it all in three days with only my 20 month old son to help (he's a whiz with the cordless drill lol)!

Thanks so much for the instructions, my daughter was completely floored! By the way the green was her idea!

Thanks again,"

Dona Lopez


loft bed

Photo Credit: Tom Koenig

"Just thought I would share a photo of the loft I just built. Your help was great. I used lots of molding to dress up the 2x lumber. Everything from Lowes, nothing fancy.

I also used rope lighting with remote control to light up the platform around the bed. I recessed the mattress as you suggested but used 1"x 4' angle iron." - Tom K.

Tom also posted this comment regarding his loft bed.

"When I made a loft for my 12 year old daughter this past Christmas I dressed up the 2x lumber with molding.  I topped the 2x6 bed frame with a bullnose and cove molding and then put a small dental molding beneath that. I also used a small stop molding on the lower part of the 2x6 to give weight to the lower part of the beam.  For the legs I used the same base molding on the bottom of the 4x4s as I have in the entire house. Then I put a small crown at the top of each post.  It doesn't make it furniture grade, but it really steps it up from painted lumber."

Read in my May 12, 2009 Newsletter about Liz's need for a special loft bed.

Column 280

Sandpaper Selection

sandpaper

Sandpaper Selection | This column was SO GOOD that I shared with the 31,000 subscribers who read my August 26, 2014 and my April 12, 2020 AsktheBuilder Newsletter. Photo Credit: Tim Carter

Sandpaper Selection

DEAR TIM: I could use a little help sanding some wood prior to staining it. I am sandpaper challenged. When I visit the hardware stores there are different colors, types, grits, etc. When do you use what? Is one paper better than another? I even saw some sandpaper on thin foam pads. It said on the package that you could rinse them with water after each use. Is that possible? Martin H., Sheperdsville, KY

DEAR MARTIN: You sure have some rough questions to answer. My answers may seem a little coarse, but I think they will be just fine. Okay, okay, so I won't quit my day job! The first thing you need to know is that they don't use sand on sandpaper. Today's manufacturers use high quality refined abrasive particles and fantastic resins and glues to bond the abrasives to a wide variety of different backing papers, foam and cloth.

Sandpaper got its start nearly 800 years ago. Chinese craftsmen used natural gum to bond crushed seashells to parchment paper. The abrasive paper industry continued to make progress but saw lots of innovation during the 1800's and early 1900's.

Most of the sandpaper products you see at the hardware stores are made using four types of abrasive particles, each available in different particle sizes or grits. The typical abrasive materials you will find are aluminum oxide, silicon carbide, red garnet, and ceramic grit.

Aluminum oxide sandpapers are probably the most common. They are excellent products to use on wood. One of the unique features of aluminum oxide is that it is a self-sharpening particle. As you use this type of sandpaper, small pieces of the grit fracture off. The remaining particle exposes a new sharp cutting face so that you see little loss of cutting power.

aluminum oxide sandpaper

This is great aluminum oxide sandpaper. It's my favorite brand. CLICK or TAP HERE or the photo to have it delivered to you.

Silicon carbide is sharp as well, but it doesn't crack as easily as aluminum oxide. This property makes it an excellent abrasive for use on plastics and metal. Red garnet is an abrasive mineral that actually gets dull as you sand with it. At first blush this may seem like a disadvantage. Many wood workers like this quality because it allows them to highly polish and buff wood surfaces prior to the application of stains and clear finishes.

The ceramic grits are not as sharp as the others. These abrasive particles are usually found on sandpaper that is used with mechanical sanders such as large drum sanders, belt sanders and rotating disk sanders.

Just about every sandpaper you see on the shelf at the hardware store does a great job if you match it to the job you are doing. Keep in mind that to make a rough piece of lumber satin smooth before you stain it, you need to use possibly 4 different types of sandpaper. A coarse paper will often be a number 50 or 60 grit. Use this paper to begin the sanding process and sand across the grain of the wood or at a 45 degree angle to the grain. Switch next to 100 grit paper and sand in the same direction of the wood grain. The final sanding should be done with 150 or 180 grit paper just before you get ready to stain. Be sure to sand in the same direction of the grain with fine and ultra fine grits. After the wood has been stained you may want to lightly dress it with 220 grit paper before and in between coats of clear urethane. If you desire professional results, the wood needs to be as smooth as glass before you stain.

The sandpaper coated foam pads are really innovative. Most are made to be used wet or dry. This means you can use them for wood, metal or plastic. The foam actually helps the sanding process as it allows the grit to float over the object being sanded. This usually produces a more gentle and more even cut. Because the foam is flexible, the pads allow you to easily sand rounded or irregular shaped objects. I have used them with great success and love the fact that you can clean and rinse them after each use. Once dry, the foam sanding pads look and perform like new.

Companion Articles: Sandpaper Comparison, Foam Pads for Sanding, Abrasives & Specialty Sandpaper, Sandpaper Facts

This popular article was the Tip of the Week in the June 4, 2013 AsktheBuilder Newsletter.

Column 281

Y2K – A Real or Perceived Threat?

Y2K

If you have a negative outlook on life, start gathering supplies such as these. Me, well I am not going to do anything to get ready. I have a feeling everything is going be just fine. I figure Superman will save the day if need be.

DEAR TIM: To tell you the truth, I am a little concerned about all this Y2K stuff. What if many computers malfunction on New Years Day? How can I protect the investment in my house and that of my mother who lives in Florida? What should we do to prepare for possible interruptions in utilities? Just what are you doing to get ready? Hollis B., Columbus, OH

DEAR HOLLIS: To be perfectly honest with you, I am just now starting to make some Y2K preparations. I actually planned for periodic disruptions in electric service when I built my home some years ago. At that time, I installed a wood burning fireplace that has a special firebox that allows heat from the fire to flow back into the rooms of the house. About 10 years ago, we lost power for 3 days during an early winter storm and the fire I built kept the family warm enough to survive. I also recently installed a set of gas logs in another fireplace that require no electricity to operate. If the utility company is still piping natural gas during a Y2K crisis, I will be in great shape.

There are several things you should think about doing in the event there are Y2K problems. Since you live in a climate where it drops below freezing, you need to protect your water piping systems from the danger of freezing. The water supply lines represent the largest danger. You need to make sure that your main water shutoff valve operates with ease and that you have the ability to drain the water supply lines in the entire house.

To effectively drain water lines, you need a valve in a low spot of the water supply line system. A simple boiler drain valve that has hose threads on it will work just fine. This allows you to install a garden hose on the valve to allow water to drain to a floor drain or some other low spot. To drain down a water system without the aid of compressed air, get as many people to help as possible. Station a person at each plumbing fixture or group of fixtures. Turn off the main water supply valve. When a signal is given that all can hear, turn on all plumbing fixtures, flush all toilets and open the boiler drain valve. Gravity will pull virtually all of the water out of the water supply lines.

If the heat does go out in your home, and it begins to really get cold or you decide to abandon the home, you need to pour some potable or recreational vehicle antifreeze into the drain traps of all sinks, tubs, and showers. Avoid using automotive antifreeze as it is highly poisonous and can cause problems in public sewer and private septic systems. You need to pour the antifreeze into toilet bowls as well. This solution keeps the standing water in those fixtures from freezing and rupturing the drain lines. Your mother in Florida shouldn't have to worry one bit about freezing weather. She needs to stockpile sun screen lotion!

Air leaks around windows, doors and other exterior cracks will rob your house of the marginal heat that a fireplace will produce. It is a good idea to make sure that all weatherstripping and gaps around doors and windows are sealed tightly. If your attic has minimal insulation, now would be a great time to upgrade so that your house stays warmer for a longer period of time.

If you plan to burn wood or some other fuel, make sure your chimney is cleaned. If there is a chimney fire during a crisis and there is no water supply, you house will most likely burn to the ground. For this reason do not use candles for lighting purposes. Purchase high quality flashlights and lots of batteries.

Start to save plastic one gallon milk jugs. Rinse them out well and begin to stockpile water. Fill the bottles with 16 ounces of rinse water and shake vigorously. Do this at least 5 times before filling with water. You can also use 2 liter soda pop bottles to store water. Put 4 or 5 drops of chlorine bleach in each container to stifle bacteria growth. You can also fill them in the last few weeks of December if you desire to have the freshest water. If you need to drink the water, open the containers and pour it into a large bowl. Let it sit for 12 - 24 hours and the chlorine taste and odor will dissipate.

Those people who live in a moderate climate should make preparations to capture rainwater for sanitation purposes and possible drinking water. If it snows during the crisis, you can always melt snow to make liquid water.

Your mother needs to think about a potential interruption of air conditioning. Window shades or outdoor awnings might help minimize heat gain if this happens. She should also stockpile water. If the Y2K crisis turns out to be a dud, the water bottles will come in handy during a water main break. If you don't believe me, just ask my Mom!

Column 282

Outdoor Lighting

outdoor lighting

This house is only several miles from mine. The outdoor lighting is just splendid at twilight.

DEAR TIM: Some of my neighbors' houses and gardens have some unique and interesting outdoor lighting. I asked them about it, and they said it is low-voltage outdoor lighting. Is this possible? Are there limitations to what you can do with exterior lighting? What should I be concerned about? Is it difficult to install? Lisa N., West Warwick, RI

DEAR LISA: High-powered low-voltage outdoor lighting is nothing new at all. The next time you are out driving at night and some idiot turns on his bright headlights in your face temporarily ruining your night vision, keep in mind those headlight bulbs are powered with just 12 volts of electricity.

The outdoor lighting industry has been making hundreds of exquisite low-voltage outdoor light fixtures in a multitude of finishes for all sorts of uses for over 40 years. Its popularity has exploded during the past 10 years.

There are many, many advantages to using low voltage lighting in outdoor applications. Lower voltage means smaller, more compact, light bulbs and light fixtures. This allows you to hide fixtures within landscaping so that they are not visible during daylight hours. Installation costs are much less than if you were to use traditional high-voltage fixtures. High-voltage wiring often requires conduit, and lots of labor to install all wiring and fixtures to meet or exceed the National Electrical Code.

Outdoor lights can be used to do all sorts of things. You can use them to create small, soft puddles of light to illuminate a garden path. Outdoor waterscapes can contain underwater lights that let you enjoy small ponds and waterfalls on those dark evenings when you are relaxing on your patio or deck. More powerful beams of light can shoot straight up or down to draw attention to specimen trees, bushes, or magnificent features of your home. Lights can be activated by timers, motion detectors, photo-electric cells, or traditional switches if you prefer.

The central core of a low-voltage outdoor lighting system is the power center. This is a high-performance transformer that steps down regular 120 volt household current to the low voltage needed to power your lights. These centers are often installed outdoors. Because low voltage means less energy, the power centers should be centrally located within the lighting arrangement. This keeps voltage loss to any one fixture at a minimum.

You need to be concerned about over-lighting. Many homeowners make mistakes by installing far too many exterior lights. To further complicate things, good intentioned homeowners often select the wrong lights. The first thing you need to do before you purchase any products is to decide exactly what you are trying to accomplish. Do you want security lighting, landscape lighting for trees only, architectural lights to highlight features on your home, or a combination of these? Each of these applications requires specific light fixtures equipped with specialized high performance lamp bulbs.

Also, keep in mind a growing interest in the dark skies movement. Some parts of the nation limit the amount of outdoor lighting, as it interferes with star gazing. Be sure you check with your local government code officials or in private subdivision regulations or covenants for dark skies policies.

Once you have a general idea of how many lights you think you might use, draw up a simple plan. Compare the number of lights you think you need to the actual number of lights you see at many of your neighbors' houses and gardens. Stop by and visit them and do an actual fixture count. You might be surprised to find out that you have too many lights in your plan.

Keep in mind that you can always add more lights at a later date. The power centers that feed the safe low voltage electricity to each light come in different sizes so you should plan ahead. If your initial lighting plan causes you to reach the capacity of a certain power center, it might be wise to upgrade to the next size. You will not regret this in the event you need to add several more lights as you begin to fall in love with what outdoor lighting can do for you.

Low-voltage outdoor lighting can be a challenge to install if you have no electrical experience. Voltage-drop calculations often need to be considered, cables and fixtures need to be sized, total light wattage needs to be calculated, power centers need to be sized, etc.

Some manufacturers have excellent step-by-step guidelines and booklets, but even after reading these, you may feel overwhelmed. Don't hesitate to obtain quotes from several outdoor-lighting experts in your area. Be sure to visit projects they have completed, and view them at night. Ask the homeowners if they would hire the company again to do additional work.

Companion Articles:  Landscape LightingLow Voltage Landscape Lighting ResourcesLow Voltage Landscape Lighting ProblemsLow Voltage Outdoor Lighting Manufacturers

Column 285

Change Drill Bits in a Snap!

drill bits

Changing Drill Bits

DEAR TIM: I am really frustrated with the chore of exchanging different drill bits while doing projects. Using a drill chuck key can be a real pain. I have two drills that I can use, but this seems like a waste as well. What do you do to make switching drill bits and other accessories go smoothly? Surely there must be a better way! Steve D., Crown Point, IN

DEAR STEVE: I not only have experienced frustration, but also bloody knuckles on more than one occasion! Traditional drill chucks that require the use of a key are fine if you intend to use one bit for several hours or all day. But many jobs require switching of different bits or accessory tips within a matter of minutes. Enormous amounts of time and energy are wasted every time you have to use a drill chuck key.

Drill manufacturers thought they had solved this problem several years ago when they introduced the keyless drill chuck. I have several drills that use this very nice feature. Keyless drill chucks grasp drill bits tightly and are easy to use. However, they only solve part of the problem. If you need to change bits frequently, you still have to turn the chuck mechanism to release the bit and then adjust and re-tighten once you have the new bit or accessory tip in place.

The problem with drill chucks was solved not too long ago. Interestingly enough, the traditional drill chuck has been left unchanged. Someone had an ingenious idea to marry the simple, yet dependable, quick connect fittings commonly found on pneumatic tools, gas hoses, automotive tools, etc. to regular drill bits and other accessories.

The end result is so nifty you can't believe it. You can buy different tool kits that include a variety of different sized drill bits, drill extension rods, screwdriver bits, screwdriver guides, etc. that have a unique hexagonal shaft at one end rather than the traditional rounded end. Included with each kit is a special holder that you install into your drill chuck. After you tighten the drill chuck , you load and unload different bits into this holder with a simple quick motion. The holder grabs onto the bits or accessories and the hexagonal shaped shaft prevents slippage as the drill turns.

Some of the holders work differently than others. Certain ones have a sliding ring that clicks to an open position that allows you to load or unload a bit. When you have the bit in place, you then slide the outer ring backwards to lock the bit in place. Other designs have a spring loaded ring mechanism. You slide the outer holder collar down to load or unload a bit. Once you let go of the ring, it locks the bit into place. Another design allows you to simply push bits into the holder and they lock in place. To release the bit, you simply slide the outer ring and the bit falls into your hand.

These very handy tool kits come in different sizes. You can purchase smaller kits that have approximately 20 - 30 pieces including the bit holder, assorted wood and steel drill bits, flathead and Phillips head screwdriver tips, nut drivers, spade drill bits that cut larger diameter holes, and special screw countersink bits that have a small pilot bit included. As you might expect, you can also buy kits that have up to 85 pieces! All of the kits come with wonderful plastic or tough fabric cases that store the bits and accessory tips.

Many of the kits come with a very nice tool that has a sliding guide that surrounds a screw. When you slide the guide into place, it surrounds the entire screw. This makes it impossible for the screw to jump out of the bit that you have installed into the tool. As the screw is driven into the wood or metal, the guide retracts on its own allowing you to drive the screw without fear of making a mistake.

These new drill bit kits with the accessories are one of the best power tool ideas I have seen in a long time. It is now a joy to use a drill instead of a hassle. I can assure you that once you use this system, your old drill bits will soon be a garage sale item.

Companion Articles:  Where to Buy Quick Release ToolsQuick Release Drill Bit ManufacturersDrill Bits - Quick Release

Column 286

Settlement Cracks – Causes and Prevention

settlement crack

Settlement Cracks

DEAR TIM: I am beginning to notice cracks in the foundation, concrete slabs, and some of the interior walls and ceilings of my home. I am concerned that the house may be settling. Do all houses settle? What can cause this to happen? What can one do to minimize cracking in a home? Who is the best person to call for advice? Mandy S., Sulphur Springs, TX

DEAR MANDY: The word settlement, in my opinion, is one of the most misused words in the residential construction industry. There is no doubt that your house may be experiencing settlement. In addition, it may be suffering from upheaval, frost heave, slippage, lumber and concrete shrinkage, and compression stress caused by insect damage! Wow, I sure know how to ruin someone's day, don't I?

Settlement happens when parts of a house drop below the elevation or height where they were placed during the original construction. There are numerous reasons why this may happen. The soil beneath the foundation or beneath column supports may shrink due to moisture loss. The soil may not have been compacted properly before the foundation was installed. Large pieces of organic material may have been included in the soil under the house. When it decays, the soil above it collapses to fill the void. The list of possibilities is nearly endless. Not all houses settle, but many suffer cracking of one type or another.

My own home has hairline cracks in the foundation as well as numerous cracks in the basement floor. The cracks are normal concrete shrinkage cracks. Concrete shrinks as it dries and cures. It is not uncommon to see 1/16th inch of shrinkage for every 10 feet of concrete length. This shrinkage tends to pull or tear the concrete apart. Sharp 90 degree corners at windows, doors, and offsets in slabs and foundations are excellent locations for the cracks to begin.

If you get up on my roof and look at my chimney flashings, you would think my house has settled nearly an inch and a half. This relative movement could have been a combination of upheaval of the chimney and settlement of the house, but I am inclined to think it is due entirely to lumber shrinkage. Even kiln dried lumber will shrink as it acclimates with the atmosphere and dry conditions inside a home. A multi-story home, like mine, can easily see 3/4 inch or more shrinkage depending upon the moisture content of the wood when the house was built and the species of lumber that was used.

Some soils are very sensitive to moisture gain or loss. Certain clay soils can expand nearly 20 times their volume if they get saturated with water. If this happens because an under-slab plumbing pipe fails, a large hump can develop in an interior slab. Other expansive clay soils can shrink and take a structure with them as they dry out. If you build in areas that have these types of soils, you need to keep soil moisture as constant as possible. One way to accomplish this is to install perforated drain pipe around the foundation. As part of the piping layout , install a tee fitting and a riser pipe up to the surface. If a drought sets in, use a garden hose to inject water into the piping system. This will trick the soil around the foundation into thinking it is raining at the surface.

Structural cracking in houses can be minimized if you take precautions. If you are building on fill dirt, make sure it is properly compacted. Geotechnical and soils engineers can perform soil tests to make sure the soil can support the building. If you live in a cold climate, make sure that all footings are installed below the depth that frost normally penetrates the soil. Foundation walls need horizontal steel bars near the bottom and at the top of the wall to offset stress forces. A residential structural engineer can design steel reinforcing rod placements to help hold footings, foundations and slabs together.

To minimize lumber shrinkage, try to get your house under roof as soon as possible. If the lumber does get saturated by rain during the construction process, try to get it to dry out by keeping windows and doors open as construction continues. Consider installing fans to accelerate evaporation. If you can get the framing lumber to shrink before the drywall, finished flooring, cabinets and trim are installed, you will see minimal cracks.

Column 288

Lots and Drainage

! ! ! See Author's Notes at Bottom of Column ! ! !

topographic map

Learning to understand a topographic map that shows elevations will be worth the investment of time.

Drainage Problems

DEAR TIM: My husband and I are getting ready to purchase a lot for a new home. We are concerned about drainage and flooding issues. Our current home has a soggy lot and we would like to avoid that. What should you look for when selecting a lot for both a new and an existing home? Can you do anything to improve the drainage on a lot or to prevent house flooding? Can you look at a plan of the subdivision and tell a difference between lots? Jeeney A., Owensboro, KY

DEAR JEENEY: Drainage problems in and around homes can be a huge source of misery for a homeowner. Periodic flooding from storms, overland storm drainage and even subsurface water can cause damage to a home and its contents. If you choose wisely, you can sleep soundly every night a rain storm pops up. If you choose poorly, you may have many a sleepless night after your first flood.

Lot selection is just as important for people who live in flat coastal areas as it is for people who live in the plains and hilly areas. Each area has its own unique characteristics. The first thing you should be concerned with is the big picture. Take a look at the land around your lot. How much land is directly uphill from the lot? How much surface water is funneled onto or around your lot? You want to avoid lots that are in or adjacent to the bottom of natural drainage swales or shallow valleys. These are Mother Nature's gutters in a very heavy rainfall.

Pay attention to the regional location of your new lot. Is there a tremendous amount of land yet to be developed that may cause the streams around your home to carry more water in a future storm? Storm water retention basins are required in many new developments, however they end up discharging more water into streams and creeks than before the development was undertaken. Prior to development, undisturbed soil actually captures and soaks up a certain amount of rain water. After development, parking lots, driveways, streets, rooftops collect and disgorge this rainwater into the retention basins.

Build Your House Elevated

Consider picking a lot where the actual house location rises up above the surrounding land slightly. If your lot does not have this feature you can often create it artificially. The trick is to hold the top of the foundation or slab up out of the ground 18 to 24 inches and then use excavated foundation dirt to create a gentle grade away from the house in all directions. This slight rise in elevation in low lying areas may keep the inside of your house dry in a torrential rain storm while your neighbors are wading around in one or two inches of water in their slippers.

Try to look for a lot that has perhaps 3 or 4 feet of elevation difference over the entire lot. Lots that have this valuable asset allow you to install subsurface drainage pipes that can drain soggy lots or capture overland storm water that is aiming for your house. You can install a linear french drain or an inter-connect series of these simple drainage trenches to collect subsurface and overland water and then direct it to the low point on your lot.

How can a trench drain help?

These simple trench drains are often only 6 inches wide, 18 to 24 inches deep. You install a 4 inch perforated drainpipe at the bottom of the trench and then fill the trench with 1 inch diameter rounded washed gravel. Grass will eventually cover the top of the gravel to hide the trench. If you want to capture overland water, widen the trench as it nears the surface and create a walking path with flat stones that are surrounded by the washed gravel.

Many land developers sell lots using plans. These plans often contain lines that tell you what the lot topography will look like when all grading is complete. These lines connect points on the lot of equal elevation and are usually drawn in two foot increments. If the lot you are looking at has lots of lines on it that are closely spaced to one another, it means it is a hilly lot. Lines that are V shaped indicate a large or small valley that is present on the lot. If you don't understand the lines, take the plan to the actual lot and see how the actual land relates to the lines. It isn't really that hard to figure out once you see the land!


Author's Notes:

You may wonder if my advice is worth anything. Well, read what Jim Sanders wrote to me when he was at the end of his rope:

"Hi, I just wanted to write to give you the results of my "Trench Drain". I have had a wet crawlspace for 15 years. Water would fill the crawlspace at times, so we actually had to drill weep holes at the base so that it would enter the basement and eventually, the sump pump.

I have tried everything. Several contractors said that the only thing we could do was to bring the water into the house via drainage tile and let it enter the sump pump. That would work, but because I live on a 6' elevation, there is no reason that I should have water problems. It became like clockwork...when it rained, we would rush home from the lake or wherever we were vacationing so that we could be prepared to start the backup generator, in case the power failed. We even had our alarm company put a sump alarm on our system, so they could notify us if we had a power failure. Battery backup was not an option, because sometimes we lose power for days and during any rain, our sump would run every 7 minutes...just like clockwork.

I found your site and read the article on the trench or French drain. At first, it sounded a bit like "holistic healing" to me. I failed to understand why a 2 ft. deep trench, 4 ft. away from the house would do any good. How could this simple thing correct an extreme water problem that has plagued me for years, cracked my foundation, settled my garage floor and ruined almost every vacation?

The Linear French Drain trench running from the house. PHOTO CREDIT: Jim Sanders

The Linear French Drain trench running from the house. PHOTO CREDIT: Jim Sanders

I decided "what the heck". I had to dig by hand using a trenching spade and a pick-ax, because the builder back-filled our property with brick and blacktop. It took quite a bit of time. Because the ground level varies so much on that side of the house, I was not able to achieve exactly 2 ft. deep. It varied from 18" to 30" in spots, but the slope was downhill. The trench is about 80 ft. long. At times, I thought about filling it all in, because I just didn’t believe that it would work.

I stoned it, put tile in, and filled it with #1 round stone. I socked the pipe just for safety measure and I also used geotextile fabric on top, so I could cover with dirt and grass. I also ordered some clay and pitched from the house to the drain.

After a short rain, water is running away from the house. PHOTO CREDIT: Jim Sanders

After a short rain, water is running away from the house. PHOTO CREDIT: Jim Sanders

Result? For the last month, we have had 7 or 8 torrential rains, the worst of which was last night. It rained so hard, that our lawn washed out in spots because of the high clay content. Our sump pump, that normally ran every 7 minutes during and after rain, has not turned on for 4 weeks. The silt at the bottom of the sump well is now dry and cracking. Our crawlspace has not shown a trace of water or even moisture.

Since I couldn’t see correcting the foundation cracks or the garage floor settling and tilting until I corrected the problem's source, I waited to see if the trench drain worked first.

This week, I had a company come in and perform sort of a "mud-jacking" technique on the garage floor, which worked perfectly. Also, during the past few weeks, I parged the cracks in the foundation.

A dry sump pump. PHOTO CREDIT: Jim Sanders

A dry sump pump. PHOTO CREDIT: Jim Sanders

I just wanted you to know how this worked. I stressed for many years over this issue and the solution was nowhere near as difficult as I thought it would be.

As a side note, I went to the end of the drain tile during a hard rain to see what was happening. Water was running out of the drain tile in about the same exact volume that it previously ran out of the weep holes in my crawlspace. This winter will be interesting, because last year, the ground next to the house was so saturated that during a thaw, my sump would run constantly. I'm guessing that the ground between the trench and the house will probably be drier now going into this winter."

- Jim Sanders, Upstate area - New York

CLICK HERE to get FREE & FAST BIDS from local drainage expert contractors.

Column 289


Dust Free Central Vacuums

central vac system

Dust Free Central Vacuums

DEAR TIM: I am thinking of having a central vacuum system installed. Is it possible to install these in an existing house or just new homes only? Are there different systems and sizes? How do you know where to install the inlets? What about accessory tools? George W., Norwich, CT

DEAR GEORGE: Central vacuum systems are superb! I have one in my home and would never think of going back to a traditional upright system. I love the whisper quiet operation and the fact that all dust and dirt is directed to the collection canister and/or outdoors through the vacuum exhaust port. What really appeals to me is their cost. Often you can get a high quality system installed in an existing home for the same money you might spend for a top of the line upright vacuum cleaner.

You absolutely can install a central vacuum system in an existing home. The tubes that transport the dust and debris can be installed in attics, basements and crawl spaces. Even two story houses can be retrofitted. A professional worker can often install a system within one day with minimal mess and hassle. Installing a central vacuum system in a new house is extremely simple. The tubing can often be finished in just several hours.

Not all central vacuum systems are created equal. There are two basic types of systems - one type incorporates filters or filter bags and one system doesn't. Central vacuum systems that use filter bags operate at peak efficiency when the filter bags are brand new. As you vacuum, dust particles clog the filter paper and dirt fills the bag. These characteristics cause the system to suffer a reduction in suction power as dust and dirt build up within the filter bag.

The other type of central vacuum does not use a filter. Using advanced design, the dirt and dust enter the central vacuum canister and swirl around. Centrifugal force created by the cyclonic spinning of the air transports the dirt and dust to the sides of the canister. Here a series of cones and stand pipes stop all but the finest dust. This fine dust is transported to the exterior of your home where it belongs.

Sizing a central vacuum system is important. The smaller your house is the smaller your central vacuum system needs to be. The power of a vacuum system is often measured by how high a column of water it can support or pull. Most manufactures make models that can pull anywhere from a 90 inch to as high as 136 inch water column. An average home that contains 2,400 square feet of finished floor space might easily be serviced with a vacuum system that is rated at 95 inches of water column. Large homes above 6,500 square feet usually require motors that can create a column of water 120 inches or more. Extremely large homes often require two or more separate central vacuum systems.

The positioning of the inlets ports requires some planning. These ports are the locations where you plug in your vacuum hose. Vacuum hoses come in different lengths and some people like long ones and other people prefer to use short ones. Long hoses have greater reach from room to room. If you use one of these, you may only need two inlets per floor that are located in hallways. Short hoses obviously require more inlets per floor. Be sure that you place the inlets on walls where they will not be blocked by furniture. Often the best place is near a doorway.

Central vacuum system manufacturers offer a complete line of accessory cleaning tools. These are often matched to the system and can't always be interchanged between manufacturers. Consider purchasing ones that are electric powered instead of air powered. Air powered accessories might not work at peak efficiency if there is a loss of suction power.

Make sure that you can get at least one of the nifty dustpan inlet accessories. These special inlets are cut into baseboards at the floor level. They are ideal for mud rooms, kitchens, and bathrooms. You simply use a broom to quickly sweep large messes over to the sleek baseboard mounted door. As soon as you open the door with your toe, the motor starts up and your dirt offering is gladly accepted by the vacuum cleaner spirit!

Column 290