Gladiator Foldaway Work Station

gladiator foldaway work station

Gladiator Foldaway Work Station | There are countless things you can store on these heavy-duty metal shelves not the least of which are indoor orchid gardening supplies! The workstation is 42 inches wide, 30.5 inches tall, and the shelves are 10 inches deep. Look far below for photos of what happens when you mix all of the above ingredients with loving care.

Gladiator Foldaway Work Station - Beefy & Easy to Assemble

My wife Kathy needed some heavy-duty shelving to help her store supplies for her orchid-growing hobby.

I felt the Gladiator Foldaway Work Station would be just the thing and both of us are now happy.

While you may not grow orchids, you surely will find this work station beneficial for storing all sorts of tools and supplies.

How Long Did it Take to Assemble?

It only took less than an hour to assemble the work station. All of the bolts and nuts, as well as a handy Allen wrench were included. It was easy to follow the instructions and all in all it was not hard to do.

Did You Have Any Difficulty?

Yes, there were four bolts on the middle shelf that were next to impossible to install using the included Allen wrench. A total of eight bolts hold up the shelf and the first four were easy to install. Gladiator should include a cheap screwdriver tool that has the same Allen-wrench shaft to allow you to install the four bolts. It's impossible to get the Allen wrench into the tight spot to tighten the four bolts.

How Long Did It Take To Hang on the Wall?

It took me less than 30 minutes to hang the work station on the wall. You'll need a helper to lift it up with you to connect it to the Geartrack®. 

The drop-down shelf that acts as a door is quite handy for small projects requiring a solid flat surface.

gladiator foldaway work station

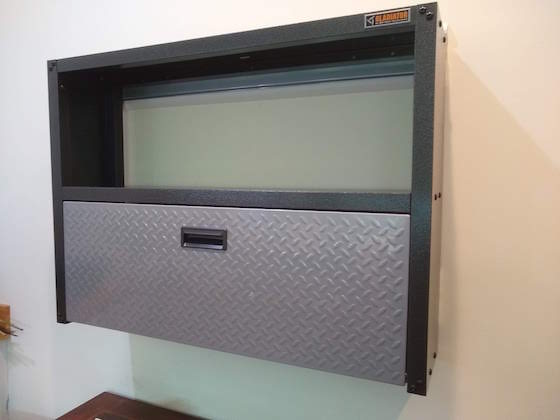
This is what the work station looks like before you load it up. It's designed to hold lots of weight. You can put 50 pounds on each of the three shelves and 50 pounds on the drop-down door you see with the handle.

gladiator foldaway work station

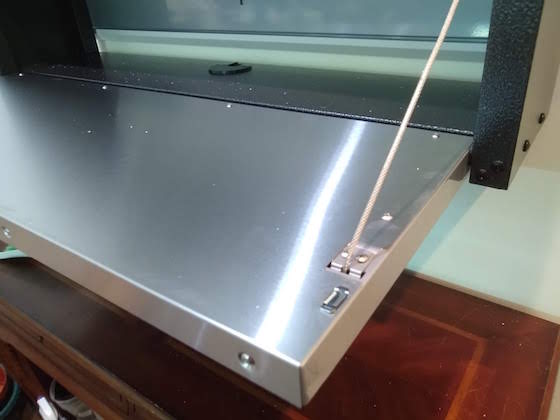
This is the beefy stainless-steel door that transforms into a sturdy work platform. You can place up to 50 pounds on this shelf!

gladiator foldaway work station

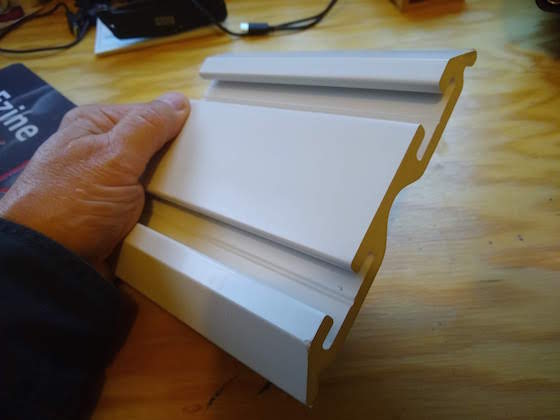
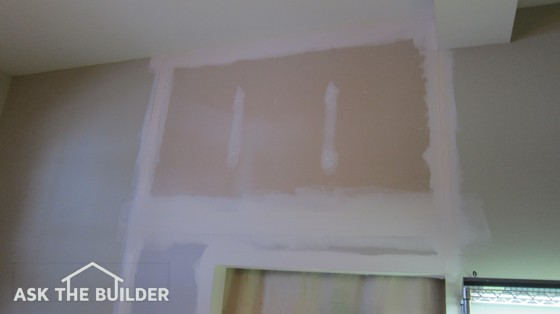
This is a scrap piece of the Gladiator Geartrack® Channel used to hang the work station. It's made from vinyl and is easy to cut and attach to the wall. Unfortunately, these are NOT INCLUDED with the work station. I feel that's a mistake. You have to order a pack of two of these channels separately and then you have to cut them. I feel Gladiator should make it easy and precut them to the required 42 inches and put two of them in the box for goodness sakes. I guarantee you there are going to be people complaining about this in online reviews. Be sure the screws you use penetrate no less than 1.5 inches into a solid wood stud. If mounting to concrete, use stud anchors no less than 2 inches long.

gladiator foldaway work station

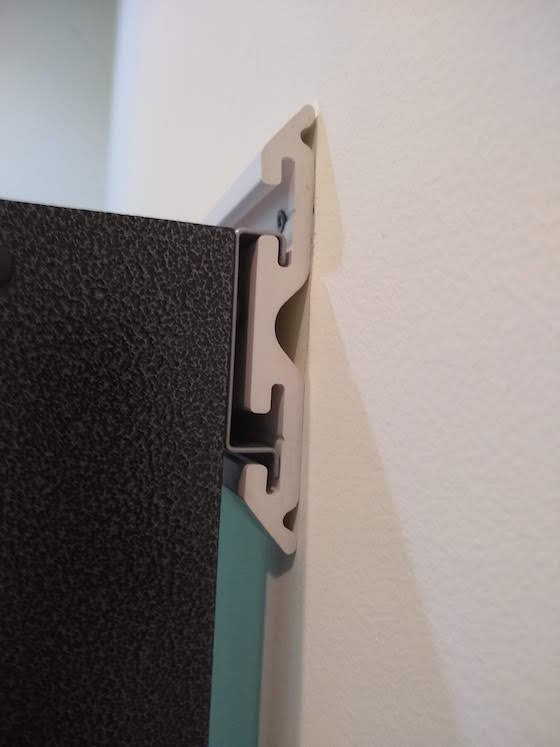
This is how the work station attached to the Geartrack® channels.

gladiator foldaway work station

You get this handsome logo at the top right corner to remind you who made this strong workstation that will last for generations.

red orchid

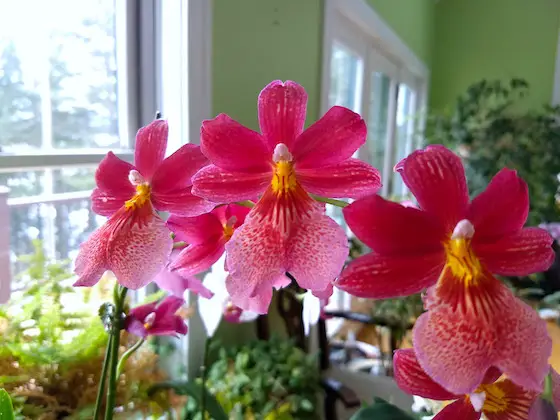
Kathy has no less than 100 orchids in the house and she gets them to bloom and bloom and bloom with what appears to be minimal effort.

yellow orchid

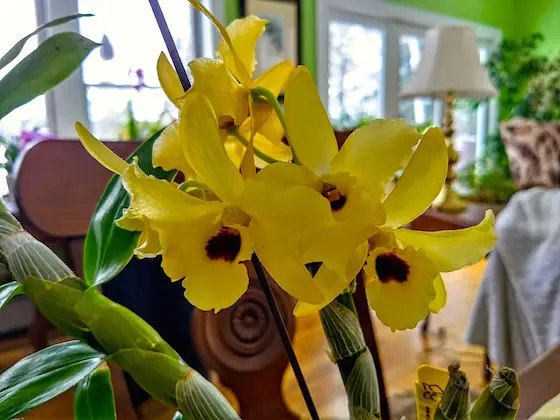
There are orchids of all sizes and shapes and colors in the house. They sure are eye candy to me!

purple orchid

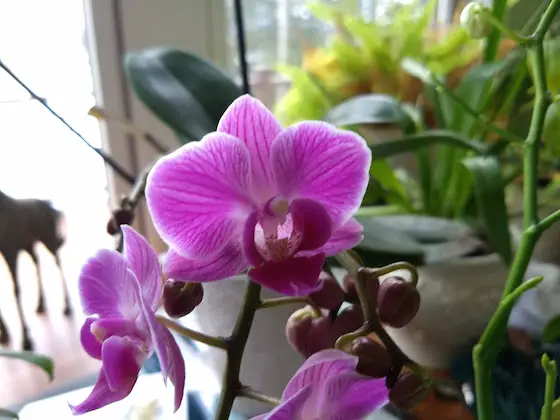
This is a very common orchid you might see in stores. The trick is getting them to bloom and bloom and bloom. Much of the magic is all about temperature variation every 12 hours and a breezy environment believe it or not.


Natural Discoloration Stains in Granite Countertops & Drywall Joint Banding

stain in a granite countertop

Natural Discoloration Stains in Granite Countertops | You’re looking at an iron-oxide (rust) stain in a granite countertop that could be millions of years old. In my opinion, it’s not a defect. (C) Copyright 2019 Tim Carter

Natural Discoloration Stains in Granite Countertops

QUESTION #1: Tim, we just moved into an existing home that’s got granite countertops. When we looked at the house there were cleverly placed trivets in certain places. I’ve come to discover they were hiding what appears to be rust stains deep in the granite but I really can’t say for certain. Is this natural? Can anything be done to remove or lessen their appearance? Would you accept granite that looks like this? Constance P., Fresno, CA

While I’m not a full-time hard-rock geologist, my house happens to rest upon the Meredith Porphyritic Granite, thought by many to be the most gorgeous rock in all of New England. I did major in geology in college and am attracted to granite for a host of reasons. It’s not only a gorgeous rock, but it’s also one of the most durable natural stones you can buy.

Random discoloration in some granite is normal. There are many reasons why it happens. Many people think the discoloration adds character and makes their countertops one-of-a-kind.

It’s important to realize that giant formations of granite can have cracks throughout the rock. If the granite is working it’s way to the surface over a million years or so, hot mineral-rich groundwater can be forced at high pressure into the tiniest cracks in the rock. This may explain how the discoloration occurred.

Another key point is the rust stains may be just a surface imperfection created by a happy accident attributed to the previous homeowner. Something made from iron may have gotten wet and the legs or bottom of the object as it sat on the granite left behind the rust.

You can do a small test to see if you can remove the rust stain. I’d start with oxalic acid. This product comes in crystals and is readily available online. Mix it according to the package instructions and pay close attention to all the warnings on the label. Apply just one drop with a cotton swab to the stain. Allow the acid to work for ten or fifteen minutes. If the droplet soaks in, add another drop on top until you have a tiny standing pool of solution on the granite no bigger than the eraser on a pencil.

At the end of the waiting period, take a clean cotton swab and try to suck up the droplet of acid you put on the counter. If the tip of the new cotton swab goes from white to brown then you know you’re removing the rust and it might have been a surface deposit.

Rinse the spot with clear water at least two times. Use a clean rag and dry the granite. It’s now time to check for surface damage.

granite countertop with stain

You want to use a flashlight or smartphone light and check to see if the acid harmed the gloss finish of the granite. The odds are there will be no damage, but check to make certain. I’d then wait for a week to see if there’s any change in color to the spot where you placed the drop of acid.

If there’s no change in color, then you can begin to do the same process to try to remove the surface rust stain. Take your time and don’t go crazy with the acid solution. Use no less than one gallon of common sense when working with it.

Drywall Joint Banding

QUESTION #2: Hey Tim, I’m having a robust debate with my painter. I have a room with all new drywall and it’s not been skimmed coated so the white joint compound stands out next to the paper face of the drywall. In my old house, you could see at night time where each taped seam was as well as the joint compound covering the fasteners. What’s odd is the wall was perfectly smooth. My painter says this is not going to happen this time. Should I trust him? Brian M., Richmond, VA

Ah, the mystery of drywall joint banding! Look closely at the paper facing of drywall and the sanded joint compound and you should be able to understand exactly why your wall in the old house was not one texture when the low-angle light hits it from indoor light fixtures.

drywall finishing

This small section of wall has just about every drywall finish challenge in it: flat and tapered seams, inside and outside corners and an archway! Photo credit: Tim Carter

Your painter may be trustworthy if he intends to apply a primer and/or paint-primer mixture that has two mission-critical ingredients. The paint or primer must have a sealer that takes care of the porosity issue between the joint compound and the drywall paper. Another key point is the primer or paint/primer must have some heavy-body pigments to even out the texture between the smooth joint compound and the coarser paper facing.

There are special drywall primers made that have these ingredients. I’ve also seen at the Altar of Saving Time a finish paint product that claims it can do everything you want to be done with just one coat not requiring a primer. I’ve not yet tested this product on new drywall, but it’s entirely possible a paint manufacturer has developed a product that eliminates the need for the special drywall primer. You can get one quart of this and paint one wall as a test.

Column 1325

September 29, 2019 AsktheBuilder Newsletter

You may be a new subscriber this week. I was on vacation and hope you settled in okay. This is NOT a normal newsletter. You'll see why in a moment. Hang in there until next week for a home-improvement injection.

If you're a hardened subscriber who's a road warrior like me, then you know what it's like to travel and try to avoid barker spiders!

Little-Man Self-Discovery Trip

Kathy, my wife, is not a big fan of traveling. I'm the opposite. I could be ready to leave in about 45 minutes if an opportunity arises.

We have a great relationship and she encourages me to travel because then she gets a vacation from me! It's important for you to realize I've worked out of the house for the past twenty-five years.

Need I say more?

About 15 years ago, I started traveling to very neat places here in the USA and Canada. Many trips were wrapped around going to secret Internet mastermind conferences.

I majored in geology in college, so I'm attracted to the Southwest where bedrock and structural geology is delicious eye candy.

I'm sitting here right now creating this newsletter for you at Gate C 31 in the Denver airport on my way back to New Hampshire. I've got about an hour to get this into your inbox.

I spent the past week in northern New Mexico. What a delight!

Here are some photos that tell just a part of story of the trip:
Boston Logan
I shot the above photo at Boston Logan airport last Monday morning. I had to wake up at 1:30 AM to catch a 3:15 AM bus to the airport. UGH!

But I was rewarded with this sunrise just before boarding the direct flight to Denver, CO.
giant pot at the shuttle bus stop
After a grueling 21-hour travel day on Monday, I woke up in Taos, NM. My buddy Dan and I went to Bandelier National Monument.

Here I'm standing in front of a giant pot at the shuttle bus stop. I wear the spandex hoo rag as a sunscreen and it makes me look mysterious as well.

Bandelier has some remarkable cave dwellings that were carved out of volcanic tuff deposits up to 1,000 feet thick. Massive super volcanoes in this part of NM blew their stacks over a period of 1,000,000 years plus creating all the rock.

I highly recommend you going to Bandelier.
Cave Swelling - Bandelier
These are just a few of the cave dwellings at Bandelier. The loop trail is easy to do and there are not too many elevation changes. You can do this trail.
Santa Fe, NM Sanitary Sewer Lid
My buddy Dan thinks I take the strangest photos. Here's a great sewer lid in Santa Fe. Personalized sewer lids are the sign of pride and creativity.

Think about it. The foundry just charges a one-time fee to make the mold and BOOM you have super-unique sewer lids that tourists photograph!
Fresco in Taos, NM
The above fresco was in a very old town meeting building in Taos, NM. The artist back nearly 100 years ago understood how too many laws are not a great thing. Too many regulations and laws crush us and hold back our ability to create things.

Think about it for a moment. When was the last time you saw a news story of any type where your local town or state government repealed laws? I know I can't remember. Each law that's passed takes away some of your, and mine, freedom and liberty. It's really something to ponder in my opinion.
watermelon juice
I love love love watermelon. Kathy thinks the aroma of it is disgusting, much less the actual melon. I've often thought, "Why don't they sell watermelon juice at the grocery?"

BOOM! I was walking through the plaza in Santa Fe this past Thursday mid morning and look at what I saw!
Blamb watermelon juice vendor
Blamb was the food vendor selling the juice along with his multitude of fresh and wholesome burritos. I ordered a lamb one with tasty fried onions sans wretched green peppers and cilantro.

I'm one of the ten percent that thinks cilantro tastes like soap. I promised Blamb that he'd be featured in my newsletter. The burrito and juice was simply fantastic.
William The Poet, Santa Fe, NM
Here's William the poet. He sets up at one corner of the Santa Fe plaza. This was our first night here. I had him compose a special poem for Kathy. He's holding it in his hand. He uses a real typewriter with a black and red ribbon to type your poem on card stock. It's very unique.

He asked me a few questions about what I wanted, I gave him some ideas about what message I wanted to convey and William said, "Come back in 10 minutes and I'll have it ready."

I came back and it was unbelievable. You can hire William long distance to send a special poem to that special person in your life.

What's cool is YOU decide what to pay. Very clever, William!

CLICK or TAP HERE to order your personalized poem from William.

I get NOTHING from William and am just happy to tell you about this very one-of-a-kind service. Let him know you heard about him from me.
Slot Canyon
Thursday afternoon found us at a non-planned stop. It turns out this may have been the most scenic of all the places we saw!

Kasha-Katuwe Tent Rocks National Monument

WOW!

That's a slot canyon cut into more volcanic tuff. I can't say enough great things about this amazing national treasure. It's not too far off the beaten path and if you can get here, DO IT!

Sandia Peak above Albuquerque, NM
This was me yesterday on top of Sandia Peak above Albuquerque, NM. I was doing a Summits on the Air amateur radio activation. We rode the ginormous Sandia Tram up the mountain. It whisks you up 3,600+ feet of elevation in just 15 minutes.

Moments before this photo was taken, I threw a water bottle up into a pine tree about 55 feet.

Everyone that walked by me while I was contacting other radio operators marveled at just one thing:

"How in the heck did you get that string up so far in the tree?!"

I'm glad you asked. I had Dan record a video showing exactly how I do it when we were at the Randall Davey Audubon Center in Santa Fe on Wednesday.

CLICK or TAP HERE to see exactly how you can get a string 50+ feet up into a tree by just using a water bottle.

I took hundreds of other photos, but didn't want to overload you.

I'll have a regular newsletter for you next week, so hang in there!

Tim Carter
Founder - www.AsktheBuilder.com
Certified Organic CLEAN MAN - www.StainSolver.com
Outdoor Radio Mountain Man - www.W3ATB.com

Do It Right, Not Over!

P.S. Late September is absolutely a magical time to be in northern New Mexico. The daytime average high temp is in the upper 70s F or so. I hope you get to travel here.

Stone Foundation Repair Rebuild

stone foundation repair rebuild

Stone Foundation Repair Rebuild | This stone foundation very likely was built in the 1840s in central New Hampshire. It will support a new apartment building with the help of the concrete block for at least another 200 years! (C) Copyright 2019 Tim Carter

Stone Foundation Repair

DEAR TIM: I’m thinking of buying a dilapidated old frame house out in the country. It’s got a stone foundation that seems to me to be too close to the ground. Are stone foundations adequate and strong? Is it possible to add more stone or concrete to get the foundation higher? How would you recommend connecting the new concrete to the old stone? If you have a solution, I’m going to make an offer tomorrow! Shannon P., Cavendish, VT

I was born and raised in the Midwest, Cincinnati, Ohio to be exact. I was blessed to be surrounded by tens of thousands of homes built with stone foundations. The greater Cincinnati area is blessed to rest upon the world type section of the upper Ordovician Period rock strata. This means it’s got countless tons of thick limestone rocks that can be used to make magnificent foundations and retaining walls.

Did You Own a Stone Foundation?

I owned a house built in the late 1800s in Cincinnati that had a stone foundation. The stone foundation was in perfect condition when I purchased the house in 1976. It still is today as I know the current owners. Most stone or rock is naturally durable and if you install it correctly in a foundation it can be as strong or stronger than a new cast concrete foundation! I know that’s hard to believe, but it’s true.

Can You Add More on Top of a Foundation?

Yes, you can add more material on top of an existing foundation. I’ve got great news for Shannon or you if you’re thinking of purchasing a house with a stone foundation that’s in good shape and not tumbling into the basement or crawlspace. You can add more stone, concrete block, or poured concrete to the top of it to give you a perfectly flat and square new foundation.

What is a Good Stone Foundation Repair Method?

There are a number of ways to repair a stone foundation or add to it, but I prefer to use concrete blocks for the task. Concrete blocks typically have two hollow cores that can really come in handy when you need to connect the new block to the old stone.

bond beam block

Can you Cut Concrete Block?

The concrete block can be chiseled and cut with ease if a stone or two is a little too high. There are gas-powered saws you can use or you can do it the old fashioned way with a hammer and cold chisel.

How Do You Connect the Concrete Block to the Stone?

Once the first course of concrete block is laid upon the stone, you can use a hammer drill to create 1/2-inch holes into the stones. Place a 16-inch-long drill bit into the drill and put the bit into the center of one of the hollow cores of the concrete block and drill down into the stone about 4 or 5 inches.

How Long Should the Rebar Pins Be?

If you’re just adding one row of concrete block to the stone foundation, cut pieces of 1/2-inch steel rebar about 11 inches long. Use a four-pound hammer to tap the rods into the drilled hole. They typically go in with moderate effort. You want the top of the rod just below the top of the concrete block.

How Far Apart Should the Rebar Pins Be?

I’d space the rods every 24 inches on center if possible. This puts a steel rod in every other concrete block. Once all the rods are in place, you then mix up concrete to fill the cores of the concrete block. I prefer to use pea gravel as the aggregate when filling the concrete block. The smaller stones in the mix work very well if, by chance, your concrete block are multiple courses high.

Should the Last Row of Block Be Special?

In the event that you’re adding multiple courses of concrete block on top of the stone, I’d give serious consideration to using a special bond-beam concrete block as the top course. These blocks are very unusual because they have a hollow center that looks like the letter U when you look down the end of the block.

What is Put Inside the Bond Beam Block?

If you can visualize a long row of these placed end-to-end, I believe you can see how you can fill that long U-shaped void with concrete along with long 3/8-inch steel rods. Doing this is the closest thing you can get to a poured concrete foundation that has steel rods near the top to help hold the foundation together.

Who Should Install the Rebar?

An expert mason will be very familiar with these bond beam block and will most likely recommend them too. They’re not too difficult to install for a pro. The concrete and steel rods really will make for a superior foundation for the structure you intend to place on top of the lower stone foundation.

stone foundation

Why are Concrete Blocks Better?

One of the advantages of using concrete blocks on the stone foundation is you can do the job faster than trying to monkey around with traditional forms used for cast or poured concrete. Cast concrete foundation forms prefer to rest on top of a new level footing. Stone foundations are rarely that smooth.

How High Should the Concrete Blocks Be?

Another key point is you generally only need to add 8 or 16 inches to the top of the stone foundation to get it to the preferred height above grade. A great block mason can have this done before the poured concrete contractor can set his forms and bring in the ready-mix trucks.

If your foundation is in really bad shape, you can replace a foundation. House-moving companies can lift your house up in the air so the old foundation can be removed and a new one installed. Be SURE the foundation height is correct!

This column was featured in Tim's October 13, 2019 AsktheBuilder Newsletter.

Column 1324

September 22, 2019 AsktheBuilder Newsletter

You could be a new subscriber. If so, greetings and solutions as my late father-in-law would say. He was a great man. I learned so much from him!

Should you be a subscriber in good standing for the past twenty-four years, oh the tales you could tell!

What I Did Last Saturday

Remember those "What I Did on my Summer Vacation" assignments from grade school?

w3atb telegrapherNo, Halloween didn't come early to New Hampshire! But that was a good guess!

CLICK or TAP HERE to see what I was up to a week ago.

If you leave a comment on the page, realize I have to approve them before they appear. I do this to prevent SPAM comments from littering my blog. Don't freak out if you don't see what you typed as soon as you click SUBMIT. I'll approve your comment, you just have to be patient. The same is true for comments on my AsktheBuilder.com website, BTW.

Cleaning Sink Stains

Frank sent me the following photo. He wanted to know if my Stain Solver, the magical certified organic oxygen bleach, would restore this kitchen sink in his daughter's home.

If not, Emily was facing a replacement bill of no less than $1,000.00.

stained double sink

What do you think the sink looked like after Emily followed my directions?

Before you answer, you need to know there was NO SCRUBBING involved. That's not a typo. I just told her to fill the sink with HOT water, pour in some Stain Solver, and go to bed.

CLICK or TAP HERE to see the results. There was NO photoshopping or other tricks done to the photos. They are exactly as were sent to me by Frank.

Are you still a non-believer in Stain Solver? You could be one who's resisted my Jedi mind tricks to get you to try Stain Solver. Your inner strength is remarkable. But you may also suffer from chrometophobia. Seriously, you can't see parting with $11.95 to see if you're wrong? Give me a break.

But you have to admit, after seeing all three photos, that Stain Solver is indeed a magical cleaner. Go ahead, order some now.

If you have ANY PROBLEMS at all using it, I'll call you on the phone. Seriously, I'll call you. CLICK or TAP HERE now to order even just one of the small sample sizes.

Remember, Stain Solver works on ANYTHING water washable. Stains in your clothes, carpets, upholstery, car mats, blah blah blah.

An Outdoor Sink Restoration

Check out this photo:

restore outside sink

What's going on in this photo? What was the sink used for?

CLICK or TAP HERE to see what JoAnne had going on.

Deck Pier Foundations

Look at Jeff's concrete deck pier. Do you see anything wrong?

concrete deck foundation

Do you think this pier was installed correctly?

CLICK or TAP HERE to see if you're hunch is right. Be SURE to leave a comment at the bottom of the page about anything you'd do differently. I'm intensely interested in how you do your deck piers and foundation details.

Meghan & Brent's Attic Trusses

Do you want to see what the attic of Meghan and Brent's house looks like?

Can you imagine how you might get a huge room in your house for next to nothing? It's easier than you thought.

attic trusses meghan and brett

CLICK or TAP HERE now to watch a very short video. I guarantee you'll discover something you didn't know.

Remember, ASK ANY QUESTION(S) you have about attic trusses in the comments BELOW the video. That way everyone can see the answer and become better informed. Sending me a private email with a question is not the way to go.

That's plenty for a Sunday.

I leave tomorrow for a little-man self-discovery trip to an undisclosed region of the Southwest USA tomorrow. I'll be with my buddy Dan again. We invited Chuck, Steve, and Russ, but they were unable to make it.

Stay out of trouble while I'm gone. I'll be in your Inbox for sure next Sunday with some photos of the adventure.

Tim Carter
Founder - www.AsktheBuilder.com
Order Certified Organic Stain Solver NOW - www.StainSolver.com
Mr. Green Visor Man - www.W3ATB.com

Do It Right, Not Over!

P.S. Did you see my review of a super handy personal work light? WOW! CLICK or TAP HERE. I pretty much guarantee you'll LOVE this light.


Attic Trusses Design

Attic Trusses Design

This video shows you just about all you need to know about attic trusses.

In case you do have questions, PLEASE click the two links just below and read my past columns about attic trusses. That saves me from typing the answer twice.

Attic Trusses Column #1

Attic Trusses Column #2

The #2 column has a photo of my man cave where I work and ponder the state of humanity.

More of the backstory on this attic construction appeared in the February 24, 2019 AsktheBuilder Newsletter.

This video was featured in the January 5, 2020 AsktheBuilder Newsletter. Click to read Mike's story.

Concrete Deck Foundation Details

concrete deck pier

Concrete Deck Foundation Details | This round concrete deck foundation pier may look shabby but it’s quite possible it’s installed correctly so the deck post will not fail. (C) Copyright 2019 Tim Carter

Deck Foundation

DEAR TIM: I’m concerned about the concrete deck base that’s fully above ground at my new home. The other decks in our development have the concrete piers below ground. Shouldn’t the concrete be completely buried to protect against freezing and cracking in the winter months? What do you feel are the best concrete deck foundation details? Jeff K., Falling Waters, WV

I don’t know about you, but I love questions like Jeff’s. I can absolutely understand his concern based on the data that he’s considering. When you think about it, it’s not far-fetched to think that his deck foundation piers are wrong when his are the only ones that look like it in the neighborhood! But you and Jeff need to cast a wider net to gather more data points that will give you the comfort that your job was done right. Trust me, the truth is out there.

But think about this: Is it possible the carpenter that built Jeff’s deck was the only good one in the development and the other ones are ill-informed and lack critical thinking skills? You bet it’s possible. I see it every day in the photos and emails I get on my website.

The two photos Jeff sent me show me that the builder or carpenter got everything right as far as what’s supposed to happen above ground. It would take less than an hour with a round point shovel to determine if the deck pier extends below the frost level and has a wider concrete footing that the circular deck pier rests on.

round concrete deck pier

(C) Copyright 2019 Tim Carter

Let’s discuss Jeff’s deterioration concerns first. Concrete is an artificial man-made rock. If it’s mixed and installed properly for the local weather conditions, it can last for hundreds of years. All you have to do to prove this is visit a few railroad bridges in your area that have poured concrete abutments that support the bridge structure. I’ve seen concrete bridgework that was put in in the early 1900s that looks in excellent shape.

You can also look around to see above-ground poured concrete house foundations in your area that might be eighty, or more, years old. It’s all about adding enough Portland cement to the mix and making sure you don’t add too much water to the mix or use water to finish the concrete. Curing the concrete to slow the release of the mix water is also very important.

Jeff is probably worried about frost heave and/or he should be. Soils that contain water in freezing climates can expand and they go up in almost all cases. Here where I live in central New Hampshire, the soil around my house goes up at least 3 inches each winter. It can go up even more if there’s an active spring under the soil. Ice lenses grow and grow pushing the soil above them higher as the bitter weather drives the frost deeper in the soil.

Builders, engineers, architects, and building inspectors are all aware of the frost depth in a local area. I’ve got a drawing on my AsktheBuilder.com website showing the frost depth across many areas of the USA. If you live in the farthest northern reaches of Minnesota or Maine, you might have to dig down at least 6, or more, feet to get a foundation footing below the depth that frost penetrates!

You want your deck piers to be below the frost level so the deck doesn’t lift up. This kind of unwanted force can cause severe structural damage to the deck.

I’ve worked with many architects and engineers in my building career. Most of their plans all agree. It’s important to realize you need to spread out the concentrated load of the deck posts across as much soil as you can. Usually, a 6 or 8-inch-thick 2-foot-diameter poured concrete pad below the frost depth is sufficient to distribute the weight of the deck.

There are all sorts of ways to install a deck foundation base or pier. I can think of no less than ten off the top of my head. The most ingenious method I’ve seen to date, and I used this on my own deck and for shed foundation piers I built four years ago, is a plastic deck pier form you snap together on the job site. It even comes with all the required pre-bent and pre-cut reinforcing steel rods! I’ve got several videos of this marvelous deck pier system on my website.

This deck pier form is designed so its base is flared out at the bottom so it spreads out the concentrated load. You just dig the hole to the correct depth, make sure the soil is compacted, set the form in place and then immediately backfill around the form with the soil you just dug out of the hole. Add this soil slowly so you make sure the form doesn’t move.

You then fill the form with the concrete, place the anchor bolt for the post base and wait one day to start building the deck.

I prefer to have the top of my concrete deck piers at least 4 inches above the final grade around the piers. I don’t want my treated lumber posts buried in the soil as I’ve seen them rot and be a food source for termites. I always use a galvanized steel post base that keeps the bottom of the wood post up and off the poured concrete. This allows water to drain away from the wood.

Column 1323

Outdoor Sink Restoration & Handrail on Brick Wall

natural stone outdoor sink

Outdoor Sink Restoration | This is a stunning outdoor sink (featured in the September 22, 2019 AsktheBuilder Newsletter) made from natural stone. It was originally installed to clean fish. Special sealers should be used to preserve it. (C) Copyright 2019 Tim Carter

Outdoor Sink Restoration

QUESTION #1: I’m in the process of restoring a grand natural stone outdoor sink. It’s made from some type of natural stone. Locals tell me it’s soapstone. Once restored, it’s going to be used as a beverage serving station for outdoor parties. Someone painted it years ago and after stripping the paint, the stone is a matte finish and rather dull. I’d like to enhance the color and protect it from the elements. What would you recommend? JoAnne G., Earleville, MD

My college degree is in geology and I can tell you that just about every natural stone has a natural resistance to weathering. This is but one reason why mountains exist. That said, it can be a good idea to seal certain polished stones to minimize deterioration from freezing weather and oils that might stain the stone.

JoAnne sent me several photos of this grand sink and they’re all visible on my AsktheBuilder.com website. The stone does resemble soapstone in appearance. There’s an easy way to determine it as soapstone. True soapstone is a metamorphic rock that’s got a high content of talc. Talc is extremely soft and soapstone can be scratched with relative ease.

outdoor stone sink

Soapstone also feels smooth and slick when dry just like wet soap. Stone fabricators often tell homeowners who use soapstone for countertops to coat the stone with linseed oil. My experience has been dreadful doing this as everything you set on it picks up the oil. Do this outdoors and your soapstone will be black in weeks as mold and mildew will feast on the natural oil.

My suggestion is to purchase a cordless electric orbital buffing tool that car body shop techs use. I’d invest in some marble polishing compounds to bring back the luster of the natural stone. Start on the rear of the tall panel until you determine the correct method to get a fine polish.

There are quite a few great videos online showing how to polish marble. Watch those as soapstone reacts to polishing just as marble does.

Once you get the stone looking as good as possible, I’d then test out on the sink back the clear penetrating sealers recommended for use on granite countertops. These sealers can penetrate into the microscopic cracks in granite and will do the same in the soapstone. The sealers work well on just about every natural stone. Simply read the label to see if there are restrictions.

Don’t expect a sealer alone to product magical results if the stone is dull and scratched. The stone needs to be polished before sealing. Beware of sealers that are like urethane or varnish. These form a film on top of the stone and will eventually peel leaving a huge mess.

outdoor stone sink

Handrail on Brick Wall

QUESTION #2: Help Tim! I need to install a wrought iron handrail down an exterior stairwell. One of the mounting brackets will be on the poured concrete foundation wall but the other one must be on the exterior brick. I don’t want to ruin the brick and realize I must get this right the first time. What would you do to prevent the handrail from pulling away from the wall? Ken B., Homewood, IL

Ken’s facing an interesting conundrum. You do usually only get one chance to get this installation right. Ideally, it would have been best to put in through bolts in the masonry walls, but this is also extremely problematic.

I’ve tested all sorts of masonry anchors over the years and some are far better than others. Lately, I’ve had the best success coupling wedge anchors with high-strength epoxy.

A wedge anchor looks just like a normal threaded bolt at one end. However, the business end of the anchor is cone-shaped end and a secondary steel sleeve fits over the cone. As you tighten a nut at the end of the anchor it pulls the cone-shaped end into the sleeve causing the sleeve to grow in diameter and wedge itself into the masonry.

This friction helps offset the pulling force exerted by the weight of the handrail and anyone pulling on it. However, I’ve had failures with just using the anchors alone even though I made sure the drilled hole was not oversized and the hole was free of grit and dust.

I decided to start testing a new method where I angle the hole as I drill into the masonry. I move the drill left and right about 15 degrees off-center to create a hole that is much wider deep in the masonry than the small-diameter hole that you can see on the face of the brick or concrete.

I blow out all the grit and use a bottle brush to make sure every bit of dust is removed from the cavity. I then squirt in a special concrete epoxy so the hole is just about filled. I coat the wedge anchor and then push it into the hole so that some of the epoxy squirts out. I clean off the epoxy and allow it to cure for 48 hours before applying tension.

IMPORTANT NOTE:

I created a special column about Ken's project with photos and a list of all products I suggested he use. CLICK HERE to read the column on how to install handrail into brick.

Column 1322

PEX or Copper – Which One Should I Use?

PEX cold water lines

PEX or Copper | These are PEX cold water lines in my daughter’s new home. Each blue tube supplies cold water to a single fixture. (C) Copyright 2019 Tim Carter

Which one - PEX or Copper?

DEAR TIM: I have to install some new water supply lines in my home. My current home has copper water supply lines. I’m intrigued by the plastic PEX material and it seems too good to be true. Using PEX I’d only have a joint in my basement and then up at the shutoff valve at the fixture. Hard copper requires many more fittings and lots of soldering. What’s been your experience with both materials and what would you use in your own home? Victoria C., Grand Rapids, MI

I’ve been a master plumber since age 29. You may have the same interest in water supply lines in your own home just like Victoria. The good news is I’ve got deep experience with both copper and PEX water supply lines.

It’s important to realize that I could write an entire book on the topic of copper vs PEX water lines. There’s simply so much information to know about both products and the pros and cons to each. Another key point is there are different types of plastic PEX piping and different systems. With that in mind, I’m going to give you the Cliffs Notes version. You’ll be able to make a sound decision for sure.

I cut my teeth as a young plumber using copper. PEX hadn’t even been invented at the time. Plastic PEX tubing first was introduced into the USA market as a radiant floor heating product in the 1980s. Just over twenty years ago, in the 1990s, PEX started to appear as piping material for use in domestic potable drinking water supply.

Copper is a time-tested water supply line material, but it’s not immune from trouble. There are places in the USA where the water chemistry is aggressive. The water can actually dissolve the copper and cause pinhole leaks and other catastrophic failures. Copper is also subject to splitting if the water in tubing freezes and expands.

Copper is easy to work with. Believe it or not, a homeowner with just a little practice and inexpensive tools can cut and solder copper creating leak-proof joints. It may seem intimidating, but I recorded a video years ago showing how to solder copper in just minutes. You can watch the video by clicking here.

The issue with copper is that it takes quite a bit of time to install a water line from one part of a home to another. You might have five, or more, fittings to get from point A to point B. Each fitting requires you to cut and clean the pipe, clean the fitting, apply flux, and solder. Working with a hot propane torch around wood can be dangerous. Countless house fires have been started by plumbers and DIYers who underestimate how fast a torch can ignite nearby combustible materials.

There’s a newer system to attach fittings to copper tubing without solder. The fittings have a rubber o-ring inside them and an expensive tool crimps the fitting onto the end of the tubing to make a leakproof connection. I doubt you can afford to purchase the required tool. The fittings are also expensive compared to those you solder.

PEX tubing is a magical material. For the most part, you install it like you’d run an electric cable from a circuit-breaker panel to a wall outlet. You snake the PEX tubing through floors and walls from a manifold or adapter in your basement or crawlspace and then end the tubing at the fixture. There are no joints at all that can leak between the two points.

I prefer the Uponor PEX system. You create a leakproof connection using a small PEX collar that slides over the end of the tubing. A tool is used to expand the PEX so it can slide onto the end of a fitting. It’s far easier to create a joint using PEX than copper and I created a Connect PEX video at my website to show you just how easy it is to do.

The PEX tubing has a memory and wants to go back to its original shape so it starts to squeeze very hard onto the ridges on the fitting. After a short time, it’s impossible for me to try to pull the tubing off a fitting. I’ve never ever had a leak with PEX tubing.

Another benefit to PEX is its resistance to splitting when water freezes inside the tubing. In my current home which I did not build, a second-floor water line to a sink always freezes in bitterly cold weather because the builder and plumber goofed up installing the PEX. The tubing has never split and leaked.

You can purchase electric tools that expand the PEX or you can use hand-powered versions. Watch this video of mine to see how easy it is to make up a PEX joint. You couldn't even clean the copper in the short amount of time I can COMPLETE a joint!

Cutting the PEX accurately is important and a simple hand tool cuts the tubing square and perfectly each time. Watch this video to see how easy it is to cut PEX tubing:

You can install PEX as you would a traditional copper system where a larger-diameter pipe supplies water to all the fixtures as the large line snakes through the house. Or, you can install a separate water line from a manifold to each fixture. The manifold method ensures you have no hidden joints or fittings hidden in walls or ceilings, but you end up using much more tubing material.

I’m a big believer in PEX and because it’s so easy to install, I’d use it in any new home I’d build. I just installed over 6,000 feet of hePEX in my daughter’s home for radiant heating and I installed about 1,500 feet of PEX for her hot and cold water lines. We went with the manifold system because I didn’t want any hidden fittings anywhere.

Column 1321

Foam Insulation Above Windows & Painting Bath Tile

foam insulation above window

Foam Insulation Above Windows | This is a beam across the top of a window. It should have had twice as much closed-cell foam insulation. (C) Copyright 2019 Tim Carter

Foam Insulation Above Windows

QUESTION #1: Tim, I need your expert opinion. I’m building a new home with 2x6 exterior walls. Beams have to be installed over the top of all windows and doors. What’s a great way to insulate these as the solid wood creating the beam doesn’t have a very high R-value. What did you used to do and did you ever have any failures? Beth S., Table Rock, WY

You may be building a new home or contemplating a room addition like Beth. If so, you’ve got a once-in-a-lifetime opportunity to make your home as energy-efficient as possible. It’s important to realize that once the wall framing is covered with exterior siding, brick or stone and the inside is covered with drywall, paneling, or plaster, it’s impractical to tear everything apart to add more insulation over a window or door.

The issue of beams, or headers, over windows and doors is somewhat complex. The size and number of the framing members used to create the beam depends on the load that’s pressing down on top of the window or door. This load can be small or it can be enormous.

The last home I built for my family had a header over an opening that had a concentrated load on it that was the sum of 1/4 the load of the entire second floor, plus 1/4th of the attic floor, plus a large part of the roof. One end of a large beam carrying all that load was resting on the header, or beam, that spanned over the opening.

You want the smallest beam height as you can get by with that will handle the load as calculated by a residential structural engineer. These professionals almost always include an additional safety factor. If you oversize the beam to a great degree, you simply have too much solid wood where there could be a full-thickness fiberglass batt or spray foam depending on what you’ll use for your wall insulation.

For example, a small narrow window in a wall that has no concentrated loads above it may have a header beam that’s just made with one or two 2x6s and the rest of the space can be filled with closed-cell foam insulation.

The wider the window or door opening the taller the wood beam must be to handle the load above the space. Engineers will tell you if the beam needs to be made from something as large as multiple 2x12s.

I’ve installed countless header beams across windows and doors and never had any failures. I never used more than a double 2x12 in the largest openings. In rare cases, the engineer or architect called for a metal flitch plate that was bolted to the inside of the wood header. The steel added an extreme amount of strength to the beam.

Closed-cell foam is a great material because it also acts as a very good vapor retarder. The foam comes in various thicknesses so you can fill the space in the header completely with foam depending on how much wood the engineer or architect specifies.

Painting Bath Tile

QUESTION #2: Dad, what can I do to make the tile in my apartment bath and shower look better? I just want to paint the dingy tan tile all white. Should I coat the paint with a clear coating for durability? What problems might I have? Your loving daughter, Kelly

Yes, my daughter texted me that question last night. She lives in Puerto Rico and at least had the good sense to ask me what to do before creating a nightmare.

Painting tile can be very problematic. It’s important to realize that paint is just colored glue. Most consumer paints prefer to stick to rougher surfaces like drywall and wood, not glass. The surface of almost all ceramic tile has an ultra-thin top layer of glaze or glass. That’s why most ceramic tile has a gloss to it.

The internet is littered with stories from homeowners who paid companies to come out and *re-glaze* their porcelain or cast-iron bathtubs. These tubs have the same ceramic glaze on them as tile. If you truly want to re-glaze a tub, you need to rip it out and send it back into a kiln.

The companies don’t re-glaze the tub. They paint the tub with special epoxy paint. Go read the stories about how some of these installations fail and the paint peels. It’s all about adhesion, never forget that.

The paint, and even a clear coating you might use to protect the paint, generally are not as hard as the glaze on tile. This means that they can be scratched with ease and cleaning with any abrasive cleanser will absolutely dull the painted finish.

Water is the biggest culprit and painted tile in a shower stall will almost always fail in short order. I’ve successfully painted wall tile that doesn’t get wet. You can paint floor tile in a room and coat it with three coats of water-based clear urethane. The urethane protecting the paint is the same product used to protect hardwood floors. Once again, this will work well as long as you don’t subject the painted floor tile to lots of water.

Column 1320