The Dream Garage – It Has Lots of Room

Dream Garage

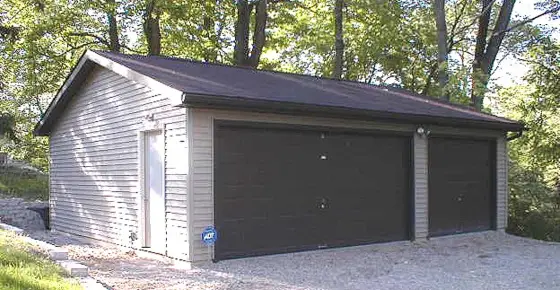
This is a nice detached garage. It could be bigger and it would really be nice if it had a garage floor drain. Photo Credit: Tim Carter

A Garage with Room

DEAR TIM: My existing garage is simply too small. I have the opportunity to build a new detached garage and want to do it right. Can you share some design tips that will allow me to construct a garage that will provide ample space for my two vehicles, riding lawn mower, bikes, a workbench, and miscellaneous other items? What other options can I incorporate that will make this the garage of my dreams? Sally M., West Point NE

DEAR SALLY: What a common problem! I thought I was doing the right thing when I made my own garage 24 feet deep by 30 feet wide. Was I ever wrong! Not only that, I made a couple of other silly errors that have become pet peeves of mine with respect to any garage space.

two car garage with custom doors

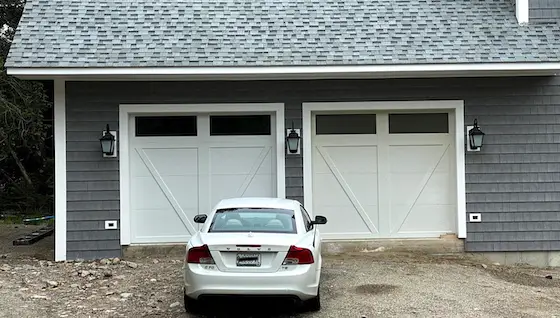
This is my daughter's garage. It would have been perfect had the garage been just 4 or 5 feet wider but the lot could not accommodate the extra width. The wall next to the left door should have been 5 feet instead of 3 feet. The same is true of the right door. The center wall between the two doors should have been 3 feet wide. Copyright Tim Carter 2024

When garages are empty, they appear to be huge. The vast open space is often the largest space in a person's home. Looks can be deceiving. The best way for you to solve your space problem is to do a quick analysis of what you need to store in your garage. Clean out your garage first. Discard accumulated trash and sell things you no longer need.

Arrange the remaining items in the manner you feel most comfortable. Undoubtedly you will see that things are still cramped. Calculate the necessary width and depth of the garage that will give you adequate walking room around and between all of your possessions. With these calculations in hand, you now have the new floor plan footprint of your garage in hand.


Is a garage addition in your future? Save time and money by using my Garage Addition Checklist. I offer a 100% Money Back Guarantee.


My guess is that you will come up with an interior size of 32 feet wide by 26 feet deep with 12 foot high walls. This garage will provide you with room to easily house all of the things you have plus give you the opportunity to construct a useful loft in one or more corners of the garage.

A common problem in most garages is not enough side clearance when you open a car door. Car doors seem to attract bicycles, garbage cans, shelving, and any other items you have placed along a side wall. Make sure that a garage door opening begins no closer than four feet from a corner. Most garage door openings (including mine!) start two feet from a side wall.

Garage doors can also be a problem. If you want a large double door, make sure it is 18 feet wide by 8 feet high. This door will give you the extra space you need in the event you have oversized vehicles. If you desire single doors and have a large sports utility vehicle (SUV), make sure at least one of the doors is at least 10 feet wide to accommodate the vehicle's mirrors. Large SUV's appreciate 8 foot high openings as well.

If your budget will permit it, consider using attic storage trusses. These roof framing members allow you to install all sorts of goodies up in space that typically goes to waste. They are made so that you can't fully stand up in the space, but can easily move about as there are no irritating truss cross members to get in your way.

Be sure to plan for your electric needs. Install two or three separate 20 amp circuits so that you have plenty of power for large tools. Do not forget to install both indoor and outdoor outlets adjacent to the garage door(s). This will eliminate the need for extension cords for many projects. Place outlets three feet off the ground for easy access. Be sure you have several outlets at your proposed workbench site. Most model and national codes require that all readily accessible outlets and circuits must have Ground Fault Circuit Interrupter protection.

Skylights are wonderful in a garage. They allow you to work inside on many days without the need for artificial lighting. Consider a through-the-wall fan to provide ventilation on hot days or while you work with finishes or chemicals that require vast amounts of fresh air. Mount this fan in such a way that it will pull air across the garage from a slightly cracked door or a fresh air intake port.

Insulate and drywall the interior surfaces of the garage when you build it, not later. If you wait until a later date, it may never get done and you will have to move everything out of the garage to accomplish the task.

If you want a book to help you design and build a really unique outdoor storage building, then The Backroad Home is a good place to start. This large format 96 page paperback book is a collection of cottage, cabin, barn, stable, garage, and garden shed plans. The thing I like about this book is that it may stimulate an idea for a unique styled outbuilding. If you like the design but the structure is too big, simply downsize the plan to fit your needs.

Companion Articles:   Garage Plans & Construction CostsIdeal Garage Plans - TipsDream Garage Illustrations

Column 271

Stop Termites and Wood Rot with Borate Wood Treatments

borate products with sprayer

Borate Treated Wood | A simple hand-held sprayer and this tub of water soluble chemical is all you need to help make sure the wood in your home doesn't end up in the bellies of a bunch of termites.

Borate Treated Wood - Effective DIY Termite & Rot Treatment

DEAR TIM: My husband is afraid that termites are going to eat the new home we are getting ready to build. I find them boring. Is there some way we can treat the lumber so that the termites find it distasteful? I don't want to use a chemical that might smell or is harmful to my children, pets or myself. If such a product exists, can it be applied by a homeowner? Lynne H., Hilton Head Island, SC

DEAR LYNNE: Your ho-hum attitude may cost you big ti.......wait a minute, I get it - boring! Well, if you don't want those little devils to bore into the lumber in your new home, then you need to apply some of the handy chemicals out there that contain boron. Not only can you protect your house's lumber from wood boring insects like termites, beetles and carpenter ants, the borate chemicals also protect against fungi (brown, white, and wet rot) that cause wood decay.

When Did Borate Wood Preservative Start?

The application of borate solutions directly to lumber is not really new. These chemicals have been widely used in Europe, Australia, and New Zealand since the 1960s. The use of borate chemicals in the United States is beginning to grow for several reasons. The termite treatment industry in nearly a 2 billion dollar per year industry. This money is most often spent once the termites and other insects have already shown up for dinner at most homes. Applying borate solutions to lumber allows you to protect the wood before the unwanted guests arrive!

Are Borate Wood Preservative Products Powder or Liquid?

The borate chemicals can be either a powder or a liquid. Borate in powder form readily dissolves in water. The borate chemical is derived from naturally occurring minerals that are easily mined. Once the solution is applied to bare lumber, it can soak deeply into the wood. The depth and extent of penetration depends on several things: temperature of the lumber, lumber species and texture, the internal moisture content of the lumber, and the number of applications. Dry, rough lumber absorb borate chemicals readily.

What are the Advantages to Using Borate Wood Treatment?

There are numerous advantages to using borate chemicals on lumber. Although they are highly toxic to wood boring insects and fungi, they exhibit low toxicity to humans and other mammals. Once the wood has been treated and kept dry, the borate protection is extremely long lasting. What's more, the borates do not affect the appearance or workability of the lumber. The borates are non-corrosive to metal fasteners used in lumber, they are odorless, and they are extremely cost effective.

borate wood treatment

This is borate wood treatment. It's a powder you mix with water. You can have it delivered to your home in two days by going here.

Can Borate Treatment Leach Out of Wood?

The borate chemical treatment does have an Achilles' heel. As previously mentioned, you mix the powder with water in order to apply it to wood. This same water in the form of a plumbing, roof, or siding leak can, over time, re-dissolve and remove the borates from the lumber. If this occurs, the wood is susceptible to attack.

Should Borate Treated Wood be Used Outdoors?

The only place I'd used borate treated wood outdoors is the Atacama Dessert. It's not rained in this place for decades. Borate chemically treated lumber isn't readily used as an exterior wood preservative against insect and rot attack because rain will soak into wood, re-dissolve the chemical, and then remove it from the wood as more rain washes onto the surface.

Rain water and contact with moist soil will simply render the chemicals ineffective over time. To protect exterior lumber that has been treated with borates, you need to apply a penetrating water repellent on a regular basis. Since most lumber used in homes stays dry for the life of the home, water leaching shouldn't concern you too much.

Is Borate Wood Preservative a DIY Project?

You can apply borate chemicals to the wood in your new home yourself. It's best to apply it to lumber when the house is under roof and the framing lumber will receive minimal or no direct rainfall. You want to spray or brush on the borate solution before the lumber is covered over with insulation, drywall, or plastic. Consult with your builder as to how you can be worked into the construction schedule. With a couple of helpers and some hand pump sprayers, you can complete this job in no time. If possible, consider two applications on separate days.

Can I Apply Borate Chemicals to Existing Homes?

Borate solutions can be applied to existing homes. The problem, however, is that many wood surfaces have been covered by other building materials. Wood boring insects may be able to still inflict damage by finding their way into untreated wood.

When you go to buy borate chemicals, look for ones that are labeled and registered as wood preservatives. These are the ones that are classified by the Environmental Protection Agency as safe for use by the general public. Some borate chemicals are registered as insecticides and can only be applied by licensed and trained technicians.

Companion Articles:  Borate Chemicals for Wood Preservation About Borate Chemicals, Using Borate Chemicals

Author's Note: We've received other emails with similar problems or questions. Here's one from Aaron S. of Los Angeles, CA, regarding termite fumigation.

"My house was fumigated for termites covered with a tent etc. After removing the tent two days later, we entered our house but there was no odor of gas at all.  A while later, we saw insects, spiders, roaches etc. moving around. The fumigation company claims that they mix a substance with the gas so that it will not have an odor. My question: Shouldn't there be a gas odor and dead insects? We can't see the termites inside the wall, but we feel that if all the insects are still alive, probably the termites are not dead either. Please, let us hear you opinion. Thank you very much!"

Doing a little online checking, the chemical used during termite fumigation is targeting only termites. It will not kill spiders, ants, bed bugs or cockroaches. So Aaron, you may still see other insects moving around.

This column was the Tip Of The Week in the June 18, 2014 Newsletter.

Column 272

Electrostatic Air Filters

Electrostatic Air Filters

My electrostatic filter is on the left. It has a built-in carbon monoxide alarm. The black-plastic mesh is perhaps 10 or 15 layers and does a great job of stopping very fine dust particles. It is easy to rinse it with a garden hose. The filter on the right is a different high-performance rinseable filter.

Electrostatic Air Filters

DEAR TIM: I am tired of using those flimsy disposable fiberglass filters for my furnace. I feel it is bad for the environment. Unfortunately I can't afford an electronic air cleaner. Are there reusable air filters that do a great job of capturing dust? Has technology improved to a point where filters are able to capture and trap carbon monoxide? What should I look for when purchasing a reusable air filter? John R., Shelbyville, IN

DEAR JOHN: I share your feelings about those inexpensive fiberglass filters. My dislike grew even more once I found out that those filters are designed only to protect the furnace and air conditioning components. They are virtually useless in capturing visible and invisible dust and pollen particles.

Residential air filters are not made equal - not by a long shot. Different styles and types trap different sized particles. For example, the expensive built-in air filters that are connected to 120 volt household current do a swell job of grabbing very small particles like smoke. However, because of their internal design, larger sized particles can sometimes pass through these filters and become heavily charge with electricity. Once the particle leaves the duct work, it is immediately attracted to any object that has an opposite electrical charge. You can often see evidence of this when you see dust and dirt trails around supply duct registers.

Air Filters Video Transcript

CLICK or TAP HERE to get a full transcript of the above video.

Did you know you actually may be able to afford an electrostatic air filter? You can purchase very slick tribo-electrostatic reusable filters that slide right into the same slot that you place your existing disposable filter. They cost just a fraction of what you would pay for a built-in electronic filter setup. The photo to the right shows two different filters. The one on the left has a built-in carbon monoxide detector.

These washable filters are made from a variety of plastic and paper filter media that have their own built-in electricity. When air passes through the filters, the electrical charges increase dramatically and allow the filters to grab very small invisible particles that are floating in the air. Some of the pleated paper electrostatic filters are not washable. Once dirty, you are expected to throw them away.

You need to pay attention when you purchase one of these reusable filters. Furnaces and air conditioners are designed to handle a certain amount of resistance within the duct work system. Many furnace manufacturers do not want the overall resistance within the system to exceed .5 inch water column resistance. In many houses the duct work and the supply and return register grilles create approximately .2 inch resistance without any filter in place. Since the filter creates more resistance to air flow as it picks up and retains dirt and dust, you want to purchase a filter that has the least amount of initial resistance. Initial resistance is the resistance to air flow the filter creates when it is perfectly clean. You can purchase some electrostatic filters that have a low initial resistance of just .08 inch!

If you suffer from certain allergies, it is also possible to purchase these reusable filters with anti- bacterial protection. The anti-bacterial compounds are actually part of the plastics that are used to build the filter media. When you wash the filters on a regular basis, you do little to diminish the anti-bacterial protection. Tests have shown that the filters retain their ability to inhibit the growth of the bacteria, mildew and mold for up to ten years.

Technology has advanced a great deal with respect to electrostatic filters, but not as far as you would like. Although no electrostatic filter can trap carbon monoxide, you can buy certain filters that have a built-in carbon monoxide detector. Most furnace and air conditioning systems are designed so that all of the air in your house is transported through the filter every 15 minutes. This means a filter with a built-in detector can act as a fantastic early warning system in the event a furnace, hot water heater, or other appliance begins to emit poisonous carbon monoxide. The detectors in these filters have special sensors that minimize false alarms. In the event of real danger, these detectors sound an alarm that passes right through the duct work and alerts inhabitants in each room of the house.

The filters that have the carbon monoxide detectors are also equipped with a very handy feature that will save you money. They have a built-in electronic cleaning reminder tone that issues a friendly signal telling you it is time to clean the filter. If you choose to ignore the tone, the filter becomes more persistent and chirps at more frequent intervals. It works to your advantage to clean the filter as soon as possible. Clean filters allow your heating and cooling equipment to operate at peak efficiencies which lowers your utility bills!

Companion Articles:   Electrostatic Air Filters & Cleaning Tips, Carbon Monoxide FilterElectrostatic Filter Resistance Comparison

Column 273

Steam Showers and Baths – Simply Soothing

DEAR TIM: I belong to a health club and really enjoy relaxing in the steam room. Is it possible to create one of those in my house? Is it as simple as installing the steam generation unit? What is the best way to construct a steam enclosure? What do you know about the different steam generating units? Lana M., Cookeville, TN

DEAR LANA: Whooaa! You are going to be the most relaxed person in your town if you have one of these wonderful steam baths in your house. What's more, I'll bet you will have the cleanest skin in town. There simply is nothing quite like a steam bath to soothe a stressed soul.

The actual installation of a steam generation unit is not that hard. It requires moderate plumbing and electrical skills and the ability to follow directions. Many units now have electronic controls that allow you to set the desired temperature and the duration of your steam experience. Certain models have controls both inside and outside the steam area. They are easy to operate and tell you exactly what the temperature is and how many minutes of pleasure are left of your steam experience.

The key to a completely successful installation lies in the actual construction of steam bath or shower area. Steam is visible water vapor and it can penetrate into walls, ceilings, and floors and create rot problems. The trick is to block the movement of this water vapor, collect the water as it condenses, and then return the water into the shower or tub drain.

I feel the best way to build a residential steam room is to model it after the one at your health club, but downsize it for your needs. A 4 foot wide by 6 foot long shower area is ideal. You need to build in a seat at one end, so you can relax while the steam surrounds you. The walls, floor and ceiling should be tiled covered. You can't have any exposed plaster or drywall. If you do, it will soon deteriorate as it is attacked by the high temperature steam.

The tile floor should be installed using a cement base that sits on top of a chlorinated polyethylene (CPE) water barrier. This water and vapor proof material will act as the collection pan for any water that tries to escape from the steam room. The walls and ceiling must be covered with a single piece of high performance cross laminated polyethylene vapor barrier that is at least 6 mills thick. This vapor barrier material is nailed to the wall and ceiling framing members and drapes over the turned up edges of the shower floor CPE liner.

The next item that is installed is one half inch cement tile backer board. I like to leave a one eighth inch crack between pieces and then caulk this crack with 100 percent silicone caulk. The ceramic tile should be installed using thinset mortar, not the pre-mixed organic adhesives. Thinset is simply a cement based adhesive that will withstand many years of steam exposure. The organic adhesives might succumb to the constant high temperature steam assault.

You can't use a standard shower door for a steam room. The doors must be custom fit to your opening so that when closed, no steam can escape the shower area. The major shower door manufacturers make decorative doors for this very purpose.

Steam Showers

Sizing a steam generation unit requires a little thought. Each manufacturer has several different sized units that are matched to the cubic feet of area in your steam enclosure, the type of wall surface and its construction, type of tub or floor, distance from the steam unit to the steam bath area, and whether the steam enclosure is adjacent to an exterior wall. It seems difficult, but the manufacturers have easy tables that guide you through the sizing process.

When selecting a steam unit, ask about the length of time it takes the steam to build within the room. Because of their internal design, some units make steam much faster than other units. Ask about the buildup of minerals on the internal components of the steam units. Some manufacturers have built their units so that they flush these minerals away at the end of each steam cycle. Read and reread the installation instructions. It is vitally important that you follow them to the letter to make sure the steam units work as designed.

Companion Articles: Steam Room Construction Tips, Steam Bath Unit Companies, Steam Bath Check Up

Column 275

Cooling With Mother Nature and Whole House Fans

attic fan whole house fan

The low-velocity attic fan has wonderful insulated hinged covers that help keep winter drafts from invading your home.

Whole House Fans

DEAR TIM: The house I am moving to does not have a whole house fan. I remember as a child that they provided lots of relief on many a summer's night. How do you make sure that the fan is sized correctly for the house? What do you need to do to maximize their ability to cool? Do you use them in conjunction with a central air conditioner? Is it tough to install a whole house fan? Sally M., Scotts Bluff, NE

DEAR SALLY: Whole house fans are really wonderful features if you want to take advantage of the air conditioning that Mother Nature provides for free. They cool your body just as a slight breeze does when you pop out of a swimming pool. The air moving across damp skin causes evaporation. As the water leaves the surface your skin it takes body heat with it and dumps it in the atmosphere. The net effect is that you feel cooler.

A whole house fan can create a breeze in just about every room of your house at the same time. After the sun goes down and the air temperature begins to drop, they can rapidly cool you and the objects inside your home by replacing hot, stale air with refreshing, cool air. A large sized whole house fan can replace all of the air in your house every two minutes. Smaller capacity fans will also deliver cool air into your home, but at a reduced rate.

Many of these fans move lots of air very quickly. The air movement is measured in cubic feet per minute (CFM). Whole house fans can be purchased that move anywhere from 1,000 to 8,500 CFM depending upon the fan type and the fan blade speed. Fans that move lots of air tend to use greater amounts of electricity and they make more noise.

There are two schools of thought when it comes to sizing these appliances. The high velocity method recommends that you attempt to achieve a total air exchange within the house every two minutes. That requires large fans sucking vast quantities of air through your windows and into and through your attic. The low velocity supporters feel that a lower CFM fan capacity will produce acceptable cooling. These low speed fans use less electricity than their big brothers and sisters. Some of them come with swell built in covers that save energy when not in use. They are also whisper quiet.

If you want a whole house fan to really cool you and your house, you need to control where the cool air enters your house. I suggest that you open windows in and around the rooms you are occupying at different times of the day and night. If you have windows open in only one room, the fan will create a virtual windstorm as air travels through the room and towards the fan. The trick is to open just enough windows so you get a breeze that comforts you.

It is mandatory that you install a timer switch with these fans. If you let the fan run through the night they can actually make you cold as they deliver very cool night air as you sleep. All manufacturers offer timers as standard features or as handy options.

Whole house fans and air conditioners should never be used at the same time. Air conditioning is usually turned on when heat and humidity become unbearable. Air conditioners are designed to lower the humidity in household air. This less humid air allows air to evaporate from your skin at a faster rate. If you air condition your house during the day and then turn on the whole house fan at night, you remove this dry air from your house. Use your air conditioner only when the whole house fan can't provide you with comfort.

Installing a whole house fan can be challenging. New installations require a separate electrical circuit and the possible installation of multiple roof vents to exhaust the vast amount of air that is being pumped into your attic. The instructions that come with whole house fans are very specific about the amount of attic ventilation space that is required in order to allow the fans to operate at peak efficiency. If you don't feel comfortable installing electrical lines, roof vents, and cutting holes into your ceilings, I suggest you hire a professional. If your house is constructed with prefabricated roof trusses be sure that no one cuts into a truss. Purchase whole house fans that are meant to be used with trusses.

Companion Articles:  Whole House Fan Installation Tips, Whole House Fan Sizes and ManufacturersCooling Comfort With Whole House Fans

Column 276

A Walk Through Checklist Will Wake Up the Builder

DEAR TIM: My husband and I are building a new home. It is nearly finished but the builder seems to be ignoring many small details that are not finished to our satisfaction. We are concerned that there may be significant defects that we are unable to identify. How can we protect ourselves? What is the best way to list all imperfections and nudge the builder to fix them? Becky D., Dallas, TX

DEAR BECKY: What a common scenario! It seems that many builders lose interest in projects as they near completion. The challenge of the job has long faded. They want to move on to a new, refreshing project. In many instances the builder fails to return phone calls and ignores repeated requests to complete all of the punch list items. There are several ways to protect yourself and insure that one way or another the job will get done to your satisfaction.

Let's talk first about money. It is your only true leverage when dealing with a builder. If you pay the builder for work that is unsatisfactory or not complete, you have become a lender. You hope that he will repay the loan by completing the work. All too often the builder defaults on this loan and leaves you high and dry. If your builder vanishes and you have withheld enough money to cover the cost of all repairing all defects, you can hire another builder to finish the job.

The bank or savings and loan that holds the construction loan or mortgage is not necessarily going to look out for you when it comes to this matter. You need to ask them early in the loan process if there is a way that money can be withheld at the closing to cover the cost of work that is unfinished or of poor quality. This sum of money that is held back is often referred to as an escrow account. After the closing takes place and the builder completes the work to your satisfaction, the bank or savings and loan releases the last bit of money to the builder. Not all lending institutions offer this service so it is vital that you check into this when you apply for a construction loan.

Approximately one week before the closing, you should schedule a walk-through inspection. This task should take you about 3 to 4 hours to complete. You need to inspect every square foot of the interior and exterior to locate defects, imperfections and things that don't work. You will need a flashlight, a small mirror, a detailed checklist, notepad and lots of patience. Proceed with a room-by-room inspection and note all imperfections. Operate every mechanical device, door, window, lock, appliance, faucet, etc.

It is very important to note the lack of cracks or defects in foundation walls, concrete surfaces, flooring, walls, ceilings, ceramic tile grout, caulking, etc. If a defect occurs in these areas after you have moved in, your inspection report will validate that the defect was not present at the time of the inspection. If there are indeed structural problems and the defect gets consistently worse, your written inspection report will be worth its weight in gold.


Don't try to do your own walk through inspection unless you are armed to the teeth with my 100% Satisfaction Guaranteed Walk Through Inspection Checklist!


Little things can cause big problems at a later date. For example, the tops and bottoms of all doors need to be painted or sealed to prevent warping and twisting. Your handy mirror will allow you to check these areas with ease. Listen as you perform the inspection. Do the floors squeak? Does the plumbing rattle when faucets are turned on or off?

Consider purchasing a copy of the building code that was in force at the time the house was built. Many items in the code are written so a lay person can understand them. The building inspector may not have the time to do as thorough an inspection as you may like. Check to make sure that the exterior grading, handrail heights, window glazing and mirrors all meet or exceed the building code. Do not close on your property unless all inspections are complete and a certificate of occupancy has been issued by the building department.

If you feel uncomfortable about overlooking defects during this inspection, it might be a great idea to hire a professional inspector. Many home inspectors belong to associations that require intensive training, written testing, and continuing education. These pros know exactly what to look for when inspecting a new home. Be sure the builder or his agent signs any walk through inspection checklist acknowledging the condition of the home at the time of the inspection walk through.

Column 277

Lead Paint Problems

lead paint

Lead Paint Can Make you Sick or Kill You

DEAR TIM: I'm thinking of having extensive rehabilitation work performed on my home built in 1959. It will include both interior and exterior alterations. I have heard that lead poisoning can happen during remodeling work. Is there a possibility that my family and myself will be exposed to lead as the contractor works on my home? How can we determine if lead exists in our home? Cindy M., Hillsboro, OH

Lead-Based Paint Year

DEAR CINDY: Watch Out! Any house built before 1978 may have interior and exterior paint that contains lead. The farther back in time you go, all the way back to the 1800s, there's a very good chance that you'll discover lead paint inside and outside your home.

Where Can I Test for Lead Paint?

Walls, woodwork, and exterior trim could easily have original layers of paint or clear varnish from when the house was built. If so, there's a very high probability that your house is one of the estimated 29 million homes that are thought to contain lead danger zones.

Children, adults and pets are poisoned by lead each and every day somewhere in the USA. Lead is a sinister poison and can cause permanent physiological defects if it's allowed to accumulate in a person's body.

Lead Paint Poisoning 2000 Years Old

Humanity has known that lead is a poison for over 2,000 years. In 370 BC Hippocrates documented a sickness he labeled as lead colic. For many years, people ignored the wisdom of Hippocrates. The Romans used lead in their cookware and as a component in their spectacular waterworks system that supplied drinking water to Rome. One of the symptoms of lead poisoning is a gradual loss of taste. Perhaps this is one reason why certain Italian foods are spicy.

Lead Paint Inspection Locations

The lead that is found in most older homes is hidden in the paint and old varnish. Lead is an excellent pigment and helps paint hide what it is covering. It was used as a dryer in clear varnishes. Windows, doors and other places where you touch painted surfaces can be high hazard locations.

How Do I Get Poisoned by Lead Paint?

The lead is spread via dust that is created when the painted surfaces are scuffed, scraped, or sanded. Old fashioned double-hung windows that slide up and down can create fine dust on window sills. The opening and closing of doors can also create lead dust. Old painted furniture used for babies is especially dangerous as the lead actually has a slightly sweet taste to it. The lead contaminated dust usually passes into one's body from the fingers into the mouth.

How Much Lead is Dangerous?

It takes very little lead to cause severe physical problems. Lead seeks out and attacks the central nervous system.

When health officials measure lead in a person's body, they deal in increments of micrograms (one microgram equals one millionth of a gram). To put this in perspective consider a packet of artificial sweetener found on the average restaurant table. A single packet usually contains about one gram or 1,000,000 micrograms of artificial sweetener. Open a packet and pour the sweetener onto a colored piece of paper. Look at how small 1,000,000 micrograms actually is!

How Much Lead Intake is Fatal?

Imagine if you created a similar pile of pure lead dust. Since lead weighs far more than artificial sweetener, the pile would actually be smaller. If an adult male receives an acute intake of just 5,000 micrograms of lead - just 1/200th of this small pile of dust, he will most likely die in a very short period of time. It takes far less lead in a child or an adult to cause irreversible physical defects such as coordination problems, learning disabilities, seizures, kidney, heart and reproductive problems.

Are Contractors Required to Warn Homeowners of Lead Danger?

On June 1, 1999, a new Federal Law - Rule 406 (Part of the amended Toxic Substances Control Act) - went into effect. This law mandates that remodeling contractors who disturb more than 2 square feet of painted surfaces in houses built before 1978 must distribute a pamphlet developed by the Environmental Protection Agency (EPA) titled Protect Your Family From Lead in Your Home. (This was featured in the August 7, 2008 Newsletter.)

Go here to get up to speed about lead paint dangers in your home.

The contractor must also obtain a signed acknowledgment from all who receive the pamphlet. This acknowledgment must be kept on file by the contractor for a period of three years from the date it was signed. Houses that contain no bedrooms, housing for the elderly or disabled (providing a child under the age of 6 does not live in the building), emergency repairs and minor repairs involving less than 2 square feet of surface area are exempt from this Federal ruling.

How Do I Deal With Lead Paint Dust?

It is critical that you keep dust to a minimum during your project. Any demolition of old painted surfaces must be accompanied by a wet mister or spray to stop dust from spreading. Plastic enclosures need to be built to stop the transfer of dust to other parts of the house. Special wet / dry vacuums with high performance particulate air (HEPA) filters must be used for clean-up purposes. The remodeled areas need to be thoroughly cleaned each day.

How Do I Test for Lead Paint?

Lead can be detected by submitting samples of your paint to local laboratories that do analysis testing. Check with your local health department for these labs. The testing is usually very affordable. The lab will instruct you how to collect test samples. If testing shows that you have a significant amount of painted surfaces that contain lead, you may want to simply seal them with several coats of clear urethane or with a fresh coat of paint.

Lead poisoning can often be avoided if you keep surfaces clean of the lead contaminated dust. Use wet cleaning methods with detergents and disposable paper towels for final wiping and drying. Dispose of the towels so that the dust is removed from your home.

IMPORTANT NOTE: Many facts contained in this column were contributed by Jack L. Whitaker, Sr., Lead Risk Assessor - Ohio License #001644.

Companion Articles:  Beware of Lead Paint, Lead Poisoning Danger - Lead Paint, Free Lead Poisoning Hazard Information, Hepa Filter & Hepa Vacuum Manufacturers

Column 278

Vapor Retarders Will Stop Odors and Moisture

crawl space dirt

The dirt in this crawl space is covered with traditional clear poly. It can have thousands of pinholes and allow vast amounts of water vapor to escape up into your home.

Vapor Barrier in the Crawl Space

DEAR TIM: Our home is a hodgepodge of construction. We have a medium sized basement, a crawl space, and a part of the home built on a slab. The house always has a musty odor and damp feeling. I am constantly battling mildew on just about every surface. There is no water leaking into my home. Is this mustiness damaging my home? What is causing this to happen? Is there a way to eliminate and/or minimize it? Paula B., Culpeper, VA

DEAR PAULA: Have I got good news for you! Your mildew fighting days are going to be over very soon. Not only that, the air within your home will soon be dry and fresh smelling. Fortunately, much, if not all, of the work required to stop the musty odor can be done by yourself if you are willing to use a pump sprayer and wiggle around in the crawl space for a half a day.

The musty odor is caused by water vapor that is entering your home through the concrete walls, slab, and the dirt beneath your crawl space. The invisible vapor can elevate interior humidity levels that will easily support the growth of mildew and other microorganisms. If you stop the water vapor from entering your home, you can cause these tiny creatures to die of thirst.

It is important to stop water vapor movement in homes. If the water vapor comes into contact with wood surfaces that are cool or cold, the vapor turns into liquid water. This liquid water can accumulate inside of exterior walls and up in roof and attic spaces. If enough water is present, wood rot and decay can cause significant damage.

To stop the water vapor from entering the crawl space, I suggest that you install a high quality vapor barrier. Before you run out and purchase the standard 4 or 6 mil clear as shown in this photo or black polyethylene at the home centers or hardware stores, be aware that some of these products are often a single layer of plastic, are made from recycled plastic resins, and can contain fillers, pin holes and imperfections. Certain alkaline soils can actually degrade these plastic films.

A better choice might be high density cross laminated virgin polyethylene. These vapor barriers are made with two sheets of high strength puncture resistant virgin polyethylene that cross each other at right angles. The sheets are bonded to one another and stop virtually all water vapor movement. Special tape is available that allows you to effectively seal any seams where the plastic needs to overlap or be cut to fit around pipes, posts or other items that project from the soil of the crawl space.

If you want to install the vapor barrier in the crawl space professionally, you simply need to lap the material up the sides of the foundation walls. Apply strips of treated(ACQ) lumber at the top edge of the plastic. Use regular masonry nails to attach the strips to the foundation walls. Trim any excess plastic that projects beyond the wood strips. Apply a bead of standard caulk at the top of the wood strips to complete the job.

The concrete walls and floor in your basement and the remaining floor slabs in the house and garage can be sprayed with some unique water based chemicals. These products are basically a liquid water vapor that penetrate into concrete surfaces and block water vapor movement. Because they are water based, they can be safely sprayed indoors near furnaces or water heaters. Avoid the use of solvent based products indoors. These products produce vapors as they dry that represent a severe explosion hazard around any open flames or spark ignition appliances.

These liquid vapor barriers are often colorless. Once they dry, there is usually little trace of their presence. If you have rooms that are going to be re-carpeted soon, you can tear up the old carpeting, clean the floor and apply these chemicals before the new carpeting is laid. These high quality liquids and sheet vapor barriers can be found at specialty concrete and building supply businesses that sell products to contractors.


Author's Notes:

I received this email from Michael P, Cincinnati, OH. Here's how he helped with his crawl space problem.

"I live in Turpin Hills and wanted to thank you for your advice for sealing a crawl space. This is our third winter in our home and the basement is always much colder than previous basements from other homes. I did as you suggested and put heavy duty, thick plastic on the gravel and put doors on the opening of the crawl space. It's been a few weeks and I can see water droplets forming under the plastic. I may put a second layer of plastic for good measure. The basement is warmer and so is the room above the crawl space. I don't smell the mustiness either. Thanks again for the tip."

Here's another one from Marilyn W. in Troy, MI with a similar issue.

"I read your answer concerning musty smells coming from crawlspace and slab foundations. The musty smell is in our cottage. Part is a slab and part is a modified crawlspace that we can not get under. The space is too small and there is no entry. If we remove the carpet and spray the the floor with the liquid water vapor barrier, would this take care of the smell? It is closed a good part of the year, and when we do open and use it, the smell permeates everything including our clothes, hair etc. Please help us make our cottage usable. Thanks!"


Column 279

Build a Loft Bed

build a loft bed

This is a traditional bunk bed in my son's room. But we removed the lower bed to create a cubby for his desk. You can do the same thing with regular lumber and make a simplistic bed for a dorm room or even a starter apartment. Unless you have special woodworking equipment, your bed will not have the fancy end boards you see in this photo. PHOTO BY: Tim Carter

Loft Beds

DEAR TIM: I have a daughter going off to college and she wants a loft bed constructed in her dorm room. Her room dimensions are 10 feet by 16 feet with windows on the 16 foot wall side. The loft cannot be in front of the windows and there must be a minimum of 3 feet of space from the mattress to the ceiling. Help! There are only 4 weeks until classes begin. Nancy B., Uniontown, OH

DEAR NANCY: Let's see, from the time you wrote your note until the time this column was written we have lost 10 days. You now have just two and one half weeks to plan and build this loft. Relax, it's a piece of cake! If you take your time, your daughter just might have the coolest loft bed in the dorm. Not only that, her room should be spacious because her desk is going to tuck under the loft for a cozy study area. You need to pre-cut and assemble the loft now so that when you take it to the dorm, it will assemble in about 10 minutes.

The loft bed, that I have in mind, requires a floor space of only 48 inches in width, 78 inches of length and a minimum ceiling height of 8 feet. If the dorm room has a ceiling height greater than 8 feet, the headroom above the mattress, will be very generous. Based upon the room size you have provided, I have to believe that one corner of the dorm room will be able to easily accommodate the loft bed.

The plan I use is based upon a person sleeping on a standard twin sized mattress. These generally measure 38 inches wide by 76 inches long and are about 8 inches thick. Many colleges provide mattresses for dorm rooms. Make sure you determine the dimensions before you start this project.

The materials required to construct the loft consist of: 1 piece of 4 by 8 by 3/4 inch thick A/C plywood, four 4x4 by 8 feet long construction heart redwood or regular pine posts, three regular lumber 2x6x8's, three 1-inch thick by 3.5-inch wide by 8-foot long finished lumber boards and some assorted lag bolts and screws. The bolts and screws allow for easy assembly and disassembly. Nails should not be used to connect any of the pieces of lumber. Avoid using treated lumber for this project, as it is a good idea to minimize contact with the chemicals used in the treating process.

The loft portion of the bed is going to consist of a simple rectangle box made from the 2x6 lumber. This box is then covered with the custom cut piece of plywood. I prefer to make the loft platform so that there is just one inch of extra space around each side of the mattress. The mattress lays on top of the plywood-covered box you are about to make. Check to make sure the mattress you are going to use measures 38 x 76 inches. If so, then you should cut two of the 2x6's to a length of 78 inches.

Cut the remaining 2x6 into two pieces that measure 37 inches long. The long pieces overlap the short pieces at each corner so that you end up with a box that measures 40 inches by 78 inches and is five and one half inches tall. Use three 3 inch long drywall screws to connect the 2x6's to one another at each corner. Cut the piece of plywood to fit the box and use 1 and 5/8 inch drywall screws spaced at 2 foot intervals to connect the plywood to the 2 x 6 rectangular box.

Check to make sure that all of the 4x4 posts are the same length. Lay them on the ground side by side and measure down from one end 44 inches. Use a square across the group of posts and draw a line. This line on each post represents the point where the top of the loft platform must stop so that you maintain the 3 foot ceiling clearance.

Position two posts so that the outer edges are parallel and spaced 78 inches apart. Have your daughter help you tilt the platform up onto the posts so that the top surface of the plywood is just touching the line on each post. Drill two one quarter inch diameter holes through each 2x6 and half way into the center of the 4x4 posts. Attach the platform to the posts using 4 inch long 3/8 inch diameter lag bolts. Do the exact same thing with the other two posts and your loft bed is now complete.

To get up and down from the loft area, you will need to construct a ladder. Use the one inch thick lumber to make a ladder similar to those found on a ship or a fire escape. These have level treads spaced at 10 to 12 inch intervals and are often set at a fairly steep 60 degree angle. Once the ladder is built, attach it to the loft platform with screws so that it will not fall away as your daughter moves up and down from the loft. Be sure to take all of your tools with you in case minor adjustments have to be made at the dorm.


Author's Notes:

Received these pictures and the following emails. The first one is from Dona Lopez, TX. The second is from Tom Koenig, PA.

loft bed

A surprise Christmas present built from these instructions by a mom for her daughter. Doubles as a computer desk. PHOTO CREDIT: Dona Lopez

"Well it's not really a question, I used your instructions for the loft bed for a "While you were out" style Christmas surprise for my daughter, and I wanted to share the results with you.

I customized it a bit with a desk and a different type of ladder system due to extremely limited floor space, her room is about 10 x 10.

I'm a mom with basic woodworking skills, did it all in three days with only my 20 month old son to help (he's a whiz with the cordless drill lol)!

Thanks so much for the instructions, my daughter was completely floored! By the way the green was her idea!

Thanks again,"

Dona Lopez


loft bed

Photo Credit: Tom Koenig

"Just thought I would share a photo of the loft I just built. Your help was great. I used lots of molding to dress up the 2x lumber. Everything from Lowes, nothing fancy.

I also used rope lighting with remote control to light up the platform around the bed. I recessed the mattress as you suggested but used 1"x 4' angle iron." - Tom K.

Tom also posted this comment regarding his loft bed.

"When I made a loft for my 12 year old daughter this past Christmas I dressed up the 2x lumber with molding.  I topped the 2x6 bed frame with a bullnose and cove molding and then put a small dental molding beneath that. I also used a small stop molding on the lower part of the 2x6 to give weight to the lower part of the beam.  For the legs I used the same base molding on the bottom of the 4x4s as I have in the entire house. Then I put a small crown at the top of each post.  It doesn't make it furniture grade, but it really steps it up from painted lumber."

Read in my May 12, 2009 Newsletter about Liz's need for a special loft bed.

Column 280

Sandpaper Selection

sandpaper

Sandpaper Selection | This column was SO GOOD that I shared with the 31,000 subscribers who read my August 26, 2014 and my April 12, 2020 AsktheBuilder Newsletter. Photo Credit: Tim Carter

Sandpaper Selection

DEAR TIM: I could use a little help sanding some wood prior to staining it. I am sandpaper challenged. When I visit the hardware stores there are different colors, types, grits, etc. When do you use what? Is one paper better than another? I even saw some sandpaper on thin foam pads. It said on the package that you could rinse them with water after each use. Is that possible? Martin H., Sheperdsville, KY

DEAR MARTIN: You sure have some rough questions to answer. My answers may seem a little coarse, but I think they will be just fine. Okay, okay, so I won't quit my day job! The first thing you need to know is that they don't use sand on sandpaper. Today's manufacturers use high quality refined abrasive particles and fantastic resins and glues to bond the abrasives to a wide variety of different backing papers, foam and cloth.

Sandpaper got its start nearly 800 years ago. Chinese craftsmen used natural gum to bond crushed seashells to parchment paper. The abrasive paper industry continued to make progress but saw lots of innovation during the 1800's and early 1900's.

Most of the sandpaper products you see at the hardware stores are made using four types of abrasive particles, each available in different particle sizes or grits. The typical abrasive materials you will find are aluminum oxide, silicon carbide, red garnet, and ceramic grit.

Aluminum oxide sandpapers are probably the most common. They are excellent products to use on wood. One of the unique features of aluminum oxide is that it is a self-sharpening particle. As you use this type of sandpaper, small pieces of the grit fracture off. The remaining particle exposes a new sharp cutting face so that you see little loss of cutting power.

aluminum oxide sandpaper

This is great aluminum oxide sandpaper. It's my favorite brand. CLICK or TAP HERE or the photo to have it delivered to you.

Silicon carbide is sharp as well, but it doesn't crack as easily as aluminum oxide. This property makes it an excellent abrasive for use on plastics and metal. Red garnet is an abrasive mineral that actually gets dull as you sand with it. At first blush this may seem like a disadvantage. Many wood workers like this quality because it allows them to highly polish and buff wood surfaces prior to the application of stains and clear finishes.

The ceramic grits are not as sharp as the others. These abrasive particles are usually found on sandpaper that is used with mechanical sanders such as large drum sanders, belt sanders and rotating disk sanders.

Just about every sandpaper you see on the shelf at the hardware store does a great job if you match it to the job you are doing. Keep in mind that to make a rough piece of lumber satin smooth before you stain it, you need to use possibly 4 different types of sandpaper. A coarse paper will often be a number 50 or 60 grit. Use this paper to begin the sanding process and sand across the grain of the wood or at a 45 degree angle to the grain. Switch next to 100 grit paper and sand in the same direction of the wood grain. The final sanding should be done with 150 or 180 grit paper just before you get ready to stain. Be sure to sand in the same direction of the grain with fine and ultra fine grits. After the wood has been stained you may want to lightly dress it with 220 grit paper before and in between coats of clear urethane. If you desire professional results, the wood needs to be as smooth as glass before you stain.

The sandpaper coated foam pads are really innovative. Most are made to be used wet or dry. This means you can use them for wood, metal or plastic. The foam actually helps the sanding process as it allows the grit to float over the object being sanded. This usually produces a more gentle and more even cut. Because the foam is flexible, the pads allow you to easily sand rounded or irregular shaped objects. I have used them with great success and love the fact that you can clean and rinse them after each use. Once dry, the foam sanding pads look and perform like new.

Companion Articles: Sandpaper Comparison, Foam Pads for Sanding, Abrasives & Specialty Sandpaper, Sandpaper Facts

This popular article was the Tip of the Week in the June 4, 2013 AsktheBuilder Newsletter.

Column 281